

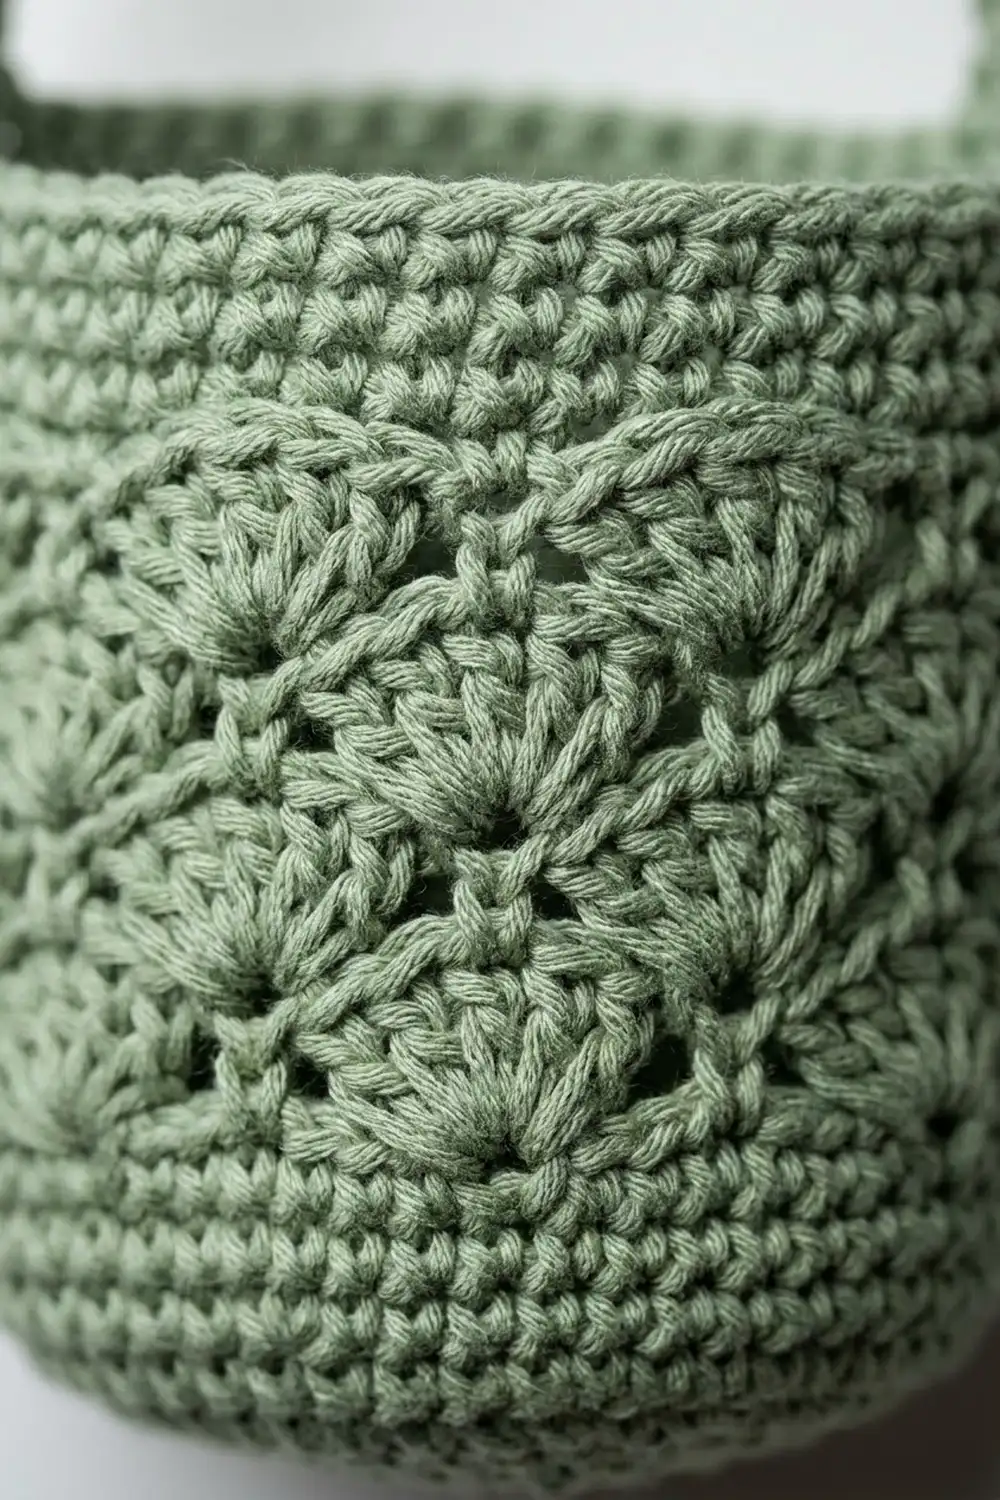
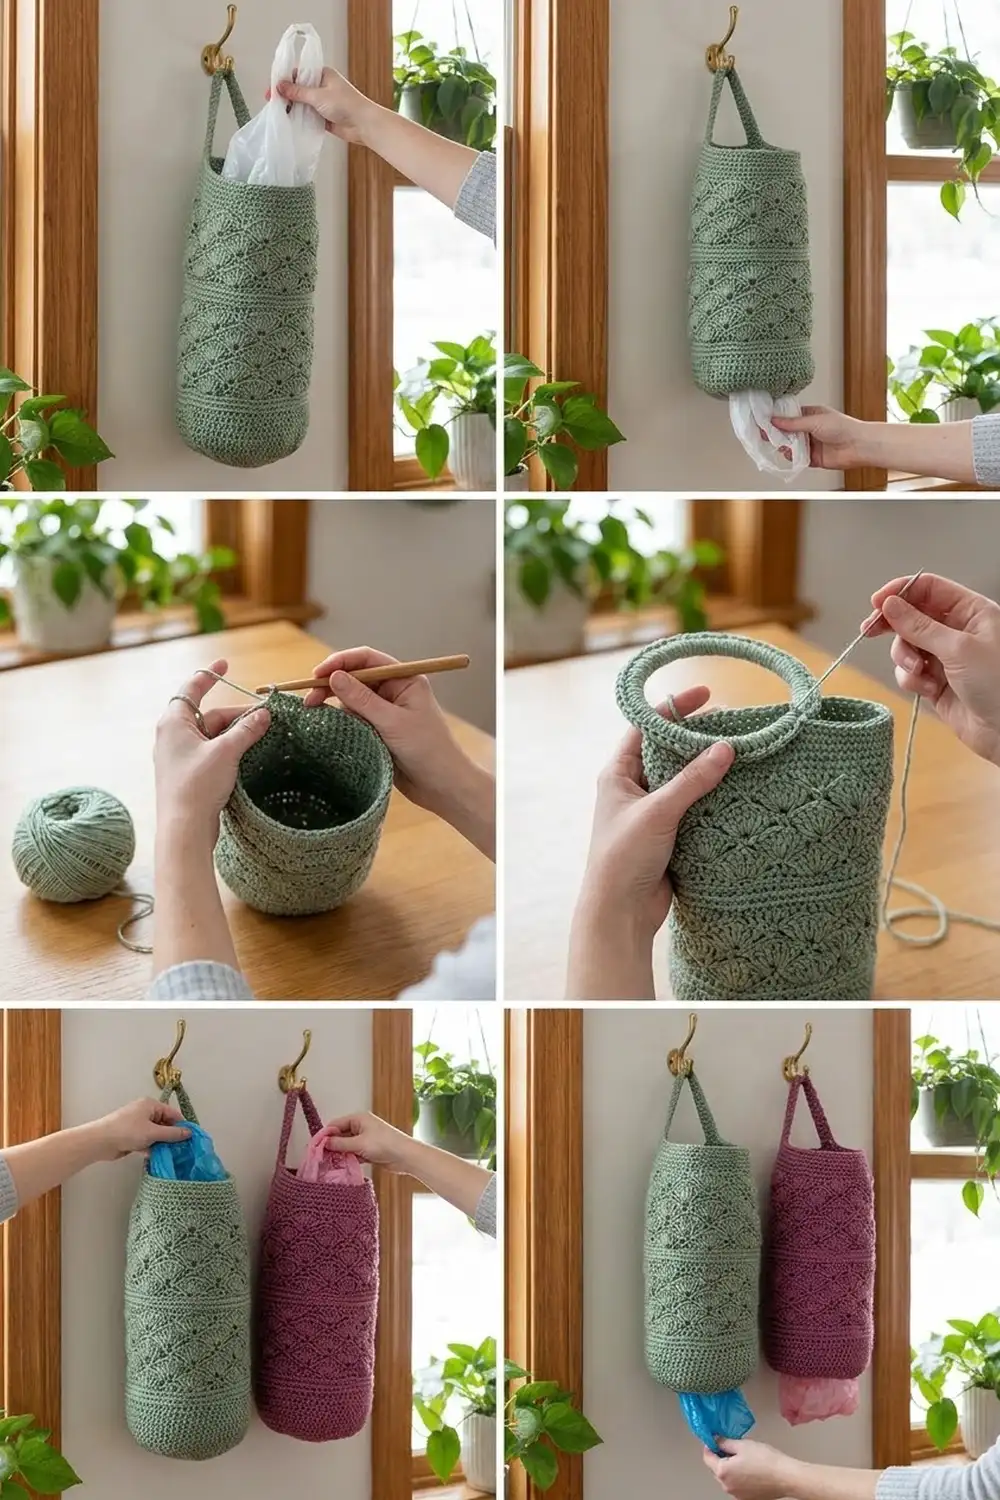
The Seaglass Shell Grocery Bag Holder is a long, slim tube that keeps plastic bags tidy on a wall hook. You push bags in at the top and pull them out one at a time at the bottom. The body is covered in rows of solid shell fans, and each row is offset from the one below, so small triangular windows open between the fans when the holder is full.
The sample uses a soft sage green, a calm color that suits most kitchens and laundry rooms. The same pattern works well in plum or berry, and two holders in different colors make it easy to sort bags by type. Each holder uses one color only, so you have no color changes and very few ends to weave in.
This pattern uses US crochet terms. The finished tube is 14.4 in (36.6 cm) around, 7.2 in (18.3 cm) wide when flat, and 17 in (43.2 cm) long. The covered ring adds about 2.5 in (6.4 cm) of height, for an overall hanging length of about 19.5 in (49.5 cm).
You work the tube from the bottom up in joined rounds: a foundation chain, one round of single crochet, then 24 rounds of alternating shells. After that you add single-crochet borders at the top and bottom. Last, you cover a ring with single crochet and stitch it to the inside back of the top band.
Finished Size and Construction
- Finished size: 14.4 in (36.6 cm) circumference × 17 in (43.2 cm) long
- Flat width: 7.2 in (18.3 cm)
- Overall hanging length: about 19.5 in (49.5 cm) including the ring
- Skill level: Easy / advanced beginner
- Terminology: US
- Yarn weight: #4 worsted, 100% cotton
- Hook: 4.0 mm (US G-6)
- Number of pieces: 1 tube plus 1 covered ring that you attach to the tube
- Layout: One vertical tube with the ring centered at the back of the top edge
- Tube size before borders: 15.2 in (38.6 cm) long
- Border depth: top 1 in (2.5 cm); bottom 0.8 in (2.0 cm), which reads as 1 in (2.5 cm) together with body Round 1
- Stitches per round: 72, from the foundation to the last border round
Materials
Yarn: Use a smooth worsted-weight cotton or cotton blend. Cotton holds its shape when the tube is stuffed with bags, and it doesn’t stretch out over time the way acrylic can. Avoid fuzzy or splitty yarns, because they blur the shell texture.
- Sage green (main sample): 170 g / about 290 m
- Alternative colorway, plum: 170 g / about 290 m for a second holder
These quantities include a margin of about 10 percent for your gauge swatch and for differences in tension.
Tools:
- 4.0 mm (US G-6) crochet hook
- One metal or plastic ring, 2.75 in (7.0 cm) outer diameter
- Stitch marker
- Tapestry needle
- Scissors
- Measuring tape
- Rustproof pins and a rolled towel or a 2-liter bottle for blocking
Abbreviations (US Terms)
- ch: chain
- sl st: slip stitch
- sc: single crochet
- hdc: half double crochet
- dc: double crochet
- st(s): stitch(es)
- sk: skip
- rnd(s): round(s)
- beg: beginning
Special stitches:
- Shell: 5 dc in the same stitch. The 3rd dc is the center dc.
- Split shell: At the start of a round, ch 3 (counts as dc) and work 2 dc in the stitch. At the end of the round, work 2 dc in that same stitch. Together these make one 5-stitch shell, and the beg ch-3 is its center.
Gauge and Checkpoints
Single-crochet gauge: 20 sc × 20 rnds = 4 in (10.2 cm), which is 5 sts and 5 rnds per inch.
Shell gauge: 2 shell repeats (12 sts) = 2.4 in (6.1 cm) wide, and 8 shell rnds = 5 in (12.7 cm) tall. Each shell round is about 0.625 in (1.6 cm) tall.
Work a sc swatch first. Then make the foundation and the first four shell rounds, and treat that as your test piece. This is the only piece in the project, so checking it early saves you from ripping out a full tube later.
Checkpoints:
- After Rnd 1: circumference 14.4 in (36.6 cm). Lay the tube flat. It should measure 7.2 in (18.3 cm) wide.
- After Rnd 9 (8 shell rnds): length 5.2 in (13.2 cm).
- After Rnd 17 (16 shell rnds): length 10.2 in (25.9 cm).
- After Rnd 25 (all 24 shell rnds): length 15.2 in (38.6 cm). This is the size before borders.
- After the top border: length 16.2 in (41.1 cm).
- After the bottom border: length 17 in (43.2 cm).
If your piece is too big (the flat width is more than 7.5 in (19.1 cm)), go down half a hook size. If it is too small (the flat width is under 6.9 in (17.5 cm)), go up half a hook size. Keep the stitch count at 72 so the shell repeats come out even. If your width is right but your rows are taller or shorter, adjust the length by adding or removing shell rounds in pairs. Each pair changes the length by about 1.25 in (3.2 cm).
Main Pattern: The Tube
Foundation: Ch 72. Join with a sl st to the first ch to form a ring, taking care not to twist the chain.
Rnd 1: Ch 1, sc in each ch around. Join with a sl st to the first sc. (72 sc)
Rnd 2 (Shell Rnd A): Ch 1, sc in the first st. Sk 2 sts, shell in next st, sk 2 sts, sc in next st. Repeat from * 10 more times. Then sk 2 sts, shell in next st, sk 2 sts, and join with a sl st to the first sc.
(12 shells + 12 sc = 72 sts)
Each repeat uses 6 stitches from the round below, and 12 repeats × 6 = 72.
Rnd 3 (Shell Rnd B): Ch 3 (counts as dc), 2 dc in the same st as the join. This is the first half of the split shell. Sk 2 dc, sc in the center dc of the next shell, sk 2 dc, shell in the next sc. Repeat from * 10 more times. Then sk 2 dc, sc in the center dc of the last shell, sk 2 dc, 2 dc in the same st as the beg ch-3, and join with a sl st to the top of the beg ch-3.
(3 + 11 × 6 + 1 + 2 = 72 sts: 12 shells + 12 sc)
This round sets each new shell into the sc between two shells of the round below. That offset creates the triangular openings.
Rnd 4 (Shell Rnd A): Ch 1, sc in the top of the beg ch-3, which is the center of the split shell. Sk 2 dc, shell in the next sc, sk 2 dc, sc in the center dc of the next shell. Repeat from * 10 more times. Then sk 2 dc, shell in the next sc, sk 2 dc, and join with a sl st to the first sc.
(12 shells + 12 sc = 72 sts)
Rnds 5–25: Alternate the rounds. Work Rnd 3 on every odd round (5, 7, 9 … 25) and Rnd 4 on every even round (6, 8 … 24).
(72 sts in every round)
At the end you have 24 shell rounds (Rnds 2–25), and Rnd 25 is a B round. Place a marker at the join and check that it stays in a straight vertical line. Measure at checkpoint 4: 15.2 in (38.6 cm). Don’t fasten off.
Border
Border gauge: 20 sc × 20 rnds = 4 in (10.2 cm), the same as the sc gauge. Each sc round adds 0.2 in (0.5 cm).
Top Border
Rnd 26 (conversion round): Ch 1. Sc in the top of the beg ch-3 and in each dc around, and work 1 hdc in each of the 12 sc. Join with a sl st to the first sc.
(72 worked 1 per existing stitch + 0 added = 72 sts: 60 sc + 12 hdc)
The hdc stitches fill the low dips over each sc, so this round levels the scalloped top into a straight edge.
Rnds 27–30: Ch 1, sc in each st around, join. (72 sc)
This gives 5 rounds × 0.2 in = 1 in (2.5 cm). Fasten off and leave a 12 in (30.5 cm) tail.
Bottom Border
Turn the tube upside down. Join yarn with a sl st in the free loop of the foundation chain at the marker.
Rnd 1: Ch 1, sc in each free loop of the foundation chain around, join. (72 worked 1 per existing chain + 0 added = 72 sc)
Rnds 2–4: Ch 1, sc in each st around, join. (72 sc)
This adds 4 rounds × 0.2 in = 0.8 in (2.0 cm). Together with body Rnd 1 it reads as a 1 in (2.5 cm) band, which matches the top. Fasten off.
Why the math works: The foundation, every shell round, and every border round all have 72 sts. At 5 sts per inch, 72 sts = 14.4 in (36.6 cm). Because the borders don’t add or remove any stitches, the tube stays a straight cylinder with no flare and no pull-in. In length, 0.2 in + 15 in + 1 in + 0.8 in = 17 in (43.2 cm).
Covered Hanging Ring
Rnd 1: Make a slip knot on your hook. Holding the yarn behind the 2.75 in (7.0 cm) ring, work 52 sc around the ring. Push the stitches together as you go so none of the ring shows. Join with a sl st to the first sc. (52 sc)
If the ring still shows through, add 2–4 more sc. Fasten off and leave a 16 in (40.6 cm) tail. Rotate the stitches so the joining seam sits on the inside edge of the ring.
The covered ring measures about 3.25 in (8.3 cm) across.
Attaching the ring: Find the center back of the tube, which is directly opposite the marker. Put the bottom of the ring inside the top band so it overlaps 0.75 in (1.9 cm). Using the ring tail, whipstitch 8 ring sts to the inner face of the top border through Rnds 28–30. Go around twice for strength. About 2.5 in (6.4 cm) of ring stays above the rim. Weave in the ends.
Final Blocking
- Weave in all remaining tails along the inside of the sc bands.
- Soak the holder in cool water for 10 minutes, then press out the water. Don’t wring it.
- Roll it in a towel to remove the extra moisture.
- Slide a rolled towel or a 2-liter bottle into the tube so it fills to 14.4 in (36.6 cm) around.
- Line up the shell columns so they run straight. Pat the shells open so the triangular windows show.
- Pin the top and bottom bands flat. Check that the tube is 17 in (43.2 cm) long.
- Let it dry completely. Cotton can take 24–48 hours.
Final Quality-Control Checklist
- Each round has 72 stitches, with 12 shells per shell round.
- The shell columns alternate cleanly and the openings are even.
- The join line runs straight up the back.
- Flat width is 7.2 in (18.3 cm), give or take 0.25 in (0.6 cm).
- Length is 17 in (43.2 cm) and both bands are about 1 in (2.5 cm) deep.
- The ring is fully covered and centered at the back.
- The ring holds the full weight of a stuffed tube without tilting.
- All ends are woven in on the inside.
Troubleshooting
The tube twisted after the foundation. If you notice this before Rnd 3, rip back and rejoin. Later in the work, a twist can’t be fixed.
The shell count is off. Count the sc stitches. You need 12 per round. A missed “sk 2” usually adds or loses 2 stitches.
The shells are drifting into a spiral. Make sure each round begins exactly at the join, and move the marker up every round.
The top edge is wavy. Check that you worked hdc, not sc, into each sc dip on Rnd 26.
Bags fall out of the bottom. Work the bottom border with a 3.5 mm (US E-4) hook to snug the opening a little.
The ring tilts forward. Stitch it lower, through Rnds 27–30 instead of Rnds 28–30.
Care
Machine wash cold on the gentle cycle, or hand wash. Reshape the holder while it’s damp and lay it flat to dry. Don’t tumble dry, because heat can shrink cotton unevenly.
Final Notes
The whole pattern rests on one number: 72 stitches. At 5 stitches per inch, that gives a 14.4 in (36.6 cm) circumference. The 24 shell rounds of 0.625 in (1.6 cm) each add 15 in (38.1 cm) of body above the 0.2 in (0.5 cm) base round. The top border adds 1 in (2.5 cm) and the bottom border adds 0.8 in (2.0 cm), for a 17 in (43.2 cm) tube. The covered ring brings the hanging length to about 19.5 in (49.5 cm). Check your gauge early, measure at each checkpoint, and the finished holder will come out right.
Happy crocheting!