

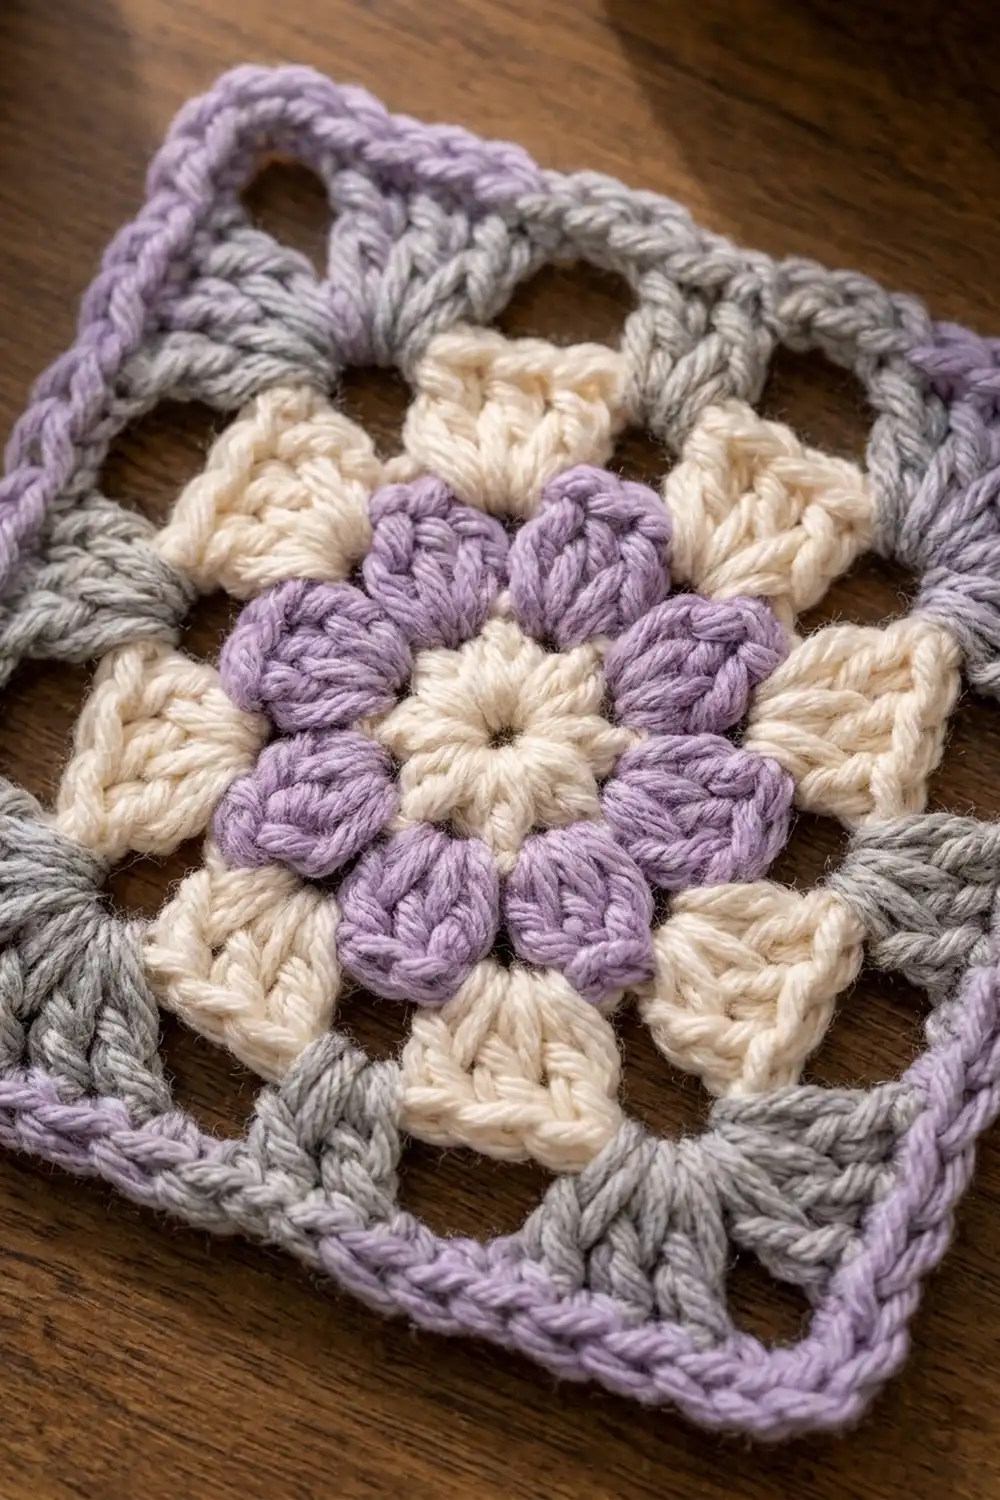
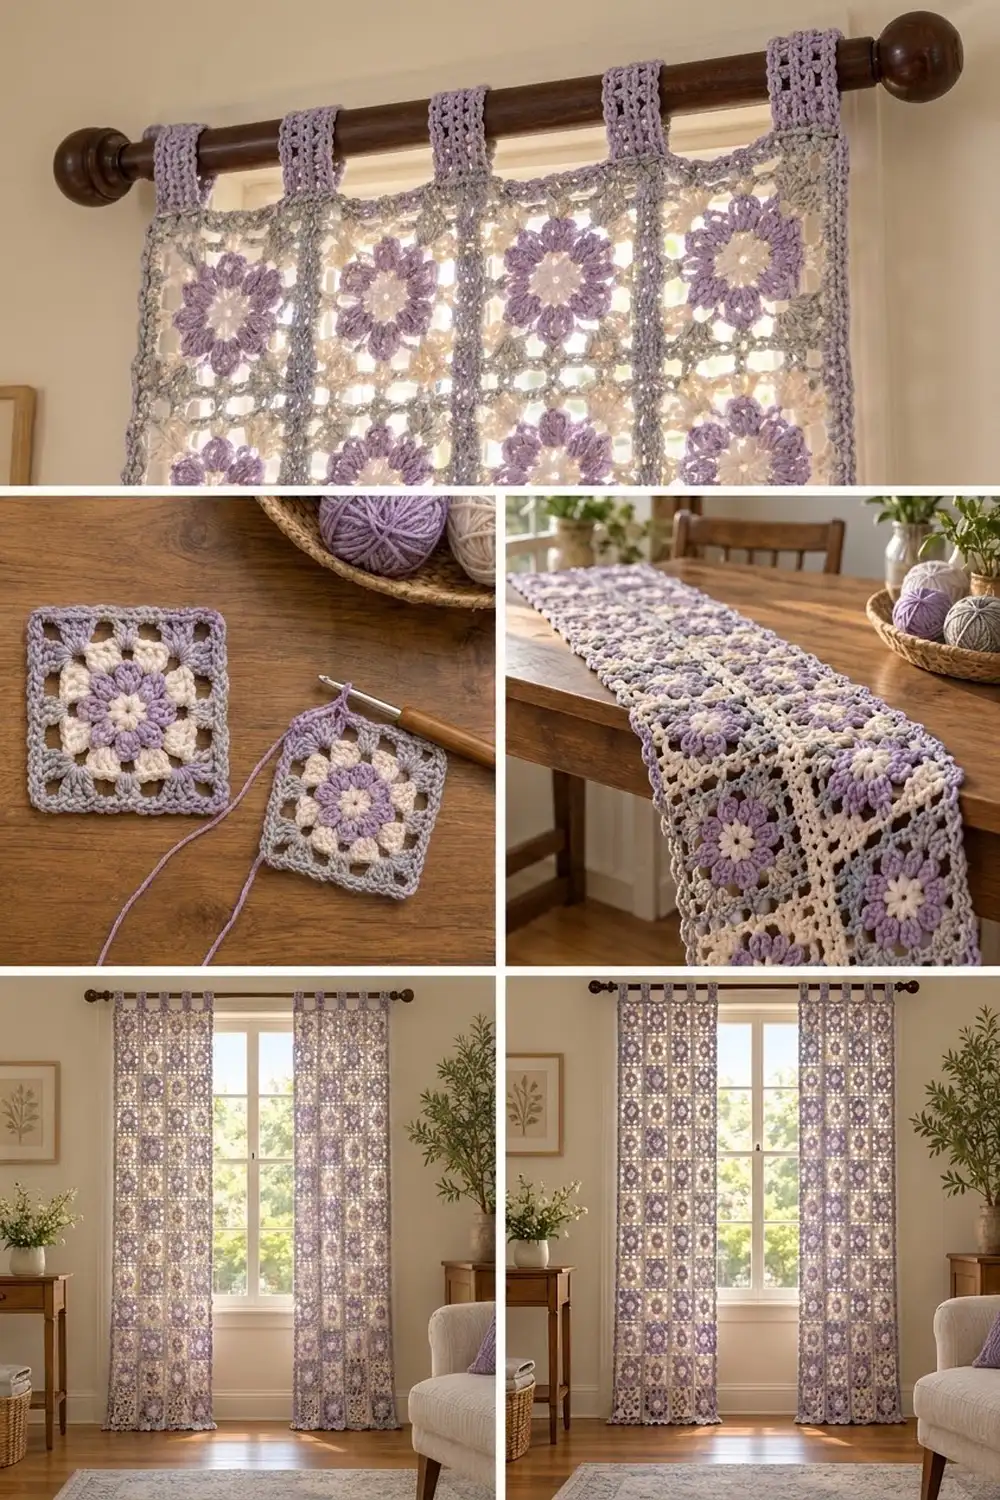
The Lavender Bloom Curtain Panel is a light, airy tab-top curtain built from classic flower granny squares. Each square has a cream center, a ring of puffy lavender petals and a second ring of cream petals. Soft gray rounds turn the flower into a square, and a crisp lavender edge finishes it. When the panel hangs in a sunny window, light shines through the open corner fans and the raised lavender seams frame every flower.
The palette is three calm colors: lavender, cream and heather gray. The style is cottage-modern: vintage granny-square charm with a clean grid. The pattern uses US crochet terms throughout.
One finished panel measures 25 x 61 in (63.5 x 154.9 cm), not counting the tabs. With the tab loops, the hanging height is about 63.5 in (161.3 cm). Make two panels for a pair like the one shown.
Construction is simple. You crochet 40 squares in the round and join them with single crochet into a grid 4 squares wide and 10 squares tall. Then you add a two-round lavender border and work five tabs straight off the top edge.
Finished Size and Construction
- Finished panel size: 25 x 61 in (63.5 x 154.9 cm), without tabs
- Hanging height with tabs: about 63.5 in (161.3 cm)
- Skill level: Easy-intermediate
- Terminology: US crochet terms
- Yarn weight: Worsted (#4)
- Hook: 5.5 mm (I-9)
- Number of pieces: 40 squares plus 5 tabs per panel
- Layout: 4 squares wide x 10 squares tall
- Square size: 6 x 6 in (15.2 x 15.2 cm)
- Size before border: 24 x 60 in (61.0 x 152.4 cm)
- Border depth: 0.5 in (1.3 cm) on every side
Materials
Use a smooth worsted-weight yarn with good stitch definition. A cotton or cotton-acrylic blend drapes nicely and stands up to sunlight better than fuzzy acrylic. Avoid very hairy yarns, because the clusters lose their puffy shape.
Quantities for one panel (100 g = about 200 m / 219 yd):
- Color A, Lavender: 400 g, about 800 m (875 yd), for petals, square edges, joining, border and tabs
- Color B, Cream: 200 g, about 400 m (437 yd), for the centers and outer petals
- Color C, Heather Gray: 350 g, about 700 m (766 yd), for the squaring rounds
Double all amounts for a pair. These quantities include a margin of about 15% for gauge differences and swatching.
Tools:
– 5.5 mm (I-9) crochet hook
– Tapestry needle
– 4 locking stitch markers
– Rust-proof pins and blocking mats
– Spray bottle
– Measuring tape
– Scissors
Abbreviations (US Terms)
- ch – chain
- sl st – slip stitch
- sc – single crochet
- dc – double crochet
- sp – space
- st(s) – stitch(es)
- sk – skip
- RS / WS – right side / wrong side
- rep – repeat
Special stitches:
- 3-dc cluster (3-dc cl): (Yarn over, insert hook in the stitch or space, pull up a loop, yarn over, pull through 2 loops) 3 times in the same place. Yarn over and pull through all 4 loops on the hook.
- 4-dc cluster (4-dc cl): Same as the 3-dc cl, but work 4 partial dc and finish by pulling through all 5 loops.
- Beginning cluster (beg cl): Ch 2, then work a cluster with one fewer partial dc (2 for a 3-dc cl, 3 for a 4-dc cl) in the same place.
Gauge and Checkpoints
Make one complete square before anything else and block it lightly. Gauge matters here: the panel width is 4 squares, so a small error on one square becomes four times larger across the panel.
Checkpoints for one square:
– After Rnd 1: about 1.25 in (3.2 cm) across
– After Rnd 3: about 3.5 in (8.9 cm) across, measured petal tip to petal tip
– After Rnd 5: about 5.5 in (14.0 cm) side to side
– After Rnd 6: 6 in (15.2 cm) side to side
Edge gauge: 19 sc along one side of Rnd 6 (counting both corner sts) = 6 in (15.2 cm).
If your square comes out larger than 6 in, go down to a 5 mm (H-8) hook. If it is smaller, go up to a 6 mm (J-10) hook. Even 0.25 in (0.6 cm) per square adds up to 1 in (2.5 cm) across the width and 2.5 in (6.4 cm) down the length.
Square (Make 40)
Rnd 1 (Color B, Cream): Make a magic ring. Ch 3 (counts as dc), work 15 dc in the ring, then join with a sl st to the top of the ch-3. Pull the ring closed. Fasten off. (16 dc)
Rnd 2 (Color A, Lavender): Join the yarn in any dc. Work a beg cl (3-dc cl version) in the same st, then ch 3, sk next dc. [3-dc cl in next dc, ch 3, sk next dc] 7 times. Join to the top of the beg cl. Fasten off. (8 clusters, 8 ch-3 sps)*
These are the 8 puffy lavender petals.
Rnd 3 (Color B, Cream): Join the yarn in any ch-3 sp. Work a beg cl (4-dc cl version) in the same sp, then ch 3. [4-dc cl in next ch-3 sp, ch 3] 7 times. Join to the top of the beg cl. Fasten off. (8 clusters, 8 ch-3 sps)*
The larger cream petals now sit between the lavender petals.
Rnd 4 (Color C, Gray): Join the yarn in any ch-3 sp. Ch 3 (counts as dc), then work (2 dc, ch 2, 3 dc) in the same sp for the first corner. Ch 1, work 3 dc in the next sp, ch 1. [(3 dc, ch 2, 3 dc) in next sp, ch 1, 3 dc in next sp, ch 1] 3 times. Join to the top of the ch-3. (36 dc, 4 corner ch-2 sps, 8 ch-1 sps)*
Each side now has 11 sts between the corner spaces: 9 dc plus 2 ch-1 sps. The corner groups form the gray triangular fans.
Rnd 5 (Color C, Gray): Sl st across to the first corner ch-2 sp. Ch 3 (counts as dc), then work (dc, ch 2, 2 dc) in the same sp. Work 1 dc in each dc and each ch-1 sp across the side (11 dc), then (2 dc, ch 2, 2 dc) in the next corner sp. Rep from * twice more, then work 1 dc in each st across the last side. Join and fasten off. (60 dc: 15 per side between corner sps)
Rnd 6 (Color A, Lavender): This is a trim round. Join the yarn in any corner ch-2 sp. Ch 1, 3 sc in the same sp, then sc in each of the next 15 dc. [3 sc in next corner sp, sc in each of next 15 dc] 3 times. Join to the first sc. (60 sc worked 1 per existing st + 12 sc added in the corners = 72 sc)*
Place a marker in the center sc of each corner group; these are the corner sts. Each side now has 19 sts, counting both corner sts: 1 corner st + 17 + 1 corner st. Check: 4 sides x 19 = 76, minus 4 shared corners = 72. ✓
Fasten off and weave in all ends on the WS, tucking each color into its own round.
Make All Pieces
Per panel, make 40 identical squares. For each square:
– Color B (Cream): Rnds 1 and 3
– Color A (Lavender): Rnds 2 and 6
– Color C (Gray): Rnds 4 and 5
Block all squares to 6 x 6 in (15.2 x 15.2 cm) before you join them.
Layout grid (4 wide x 10 tall), with S = one square:
Row 1:  S S S S   <- top (tabs here)
Row 2:  S S S S
Row 3:  S S S S
Row 4:  S S S S
Row 5:  S S S S
Row 6:  S S S S
Row 7:  S S S S
Row 8:  S S S S
Row 9:  S S S S
Row 10: S S S S   <- bottom
Joining
Method: Use a single-crochet seam in Color A, with the WS of the squares held together and the RS facing you. This gives the raised lavender ridge that outlines each flower on the front.
Horizontal seams first: Hold Row 1 and Row 2 together. Starting in a corner st, sc through both loops of both squares, matching st to st. That is 19 sc per square side, from corner st to corner st. Move straight on to the next pair of squares without adding chains. Each long seam is 4 x 19 = 76 sc. Work all 9 horizontal seams.
Vertical seams: Join the columns in the same way, matching st to st along the whole length. Each vertical seam is 10 x 19 = 190 sc. Where you cross a horizontal seam, keep working into the square stitches only. Do not work into the existing seam ridge, and do not add stitches. Work all 3 vertical seams.
Tension: Keep the seams loose enough to match the square edges. If a seam puckers, go up one hook size for joining only. Tight seams pull the panel narrower and make the grid ripple.
Size checkpoint: The joined panel should measure 24 x 60 in (61.0 x 152.4 cm).
Border
Border gauge: Same as the square edge: 19 sc = 6 in (15.2 cm). Two rounds of sc = 0.5 in (1.3 cm).
Starting counts: The short edges have 4 squares x 19 sts = 76 sts each. The long edges have 10 squares x 19 sts = 190 sts each. Both counts include the corner sts, and no stitches are added at the seams. The 4 outer panel corner sts are each shared by two edges, so the edge total is 76 + 76 + 190 + 190 − 4 = 528 sts.
Rnd 1 (Color A): Join the yarn in the top-right panel corner st. Ch 1, 3 sc in the same st, then sc in each st along the edge. Work 3 sc in each outer corner st. Join.
– Short sides: 76 sts + 1 extra at each corner = 78 sts each
– Long sides: 190 sts + 1 extra at each corner = 192 sts each
– Total: 528 + 8 = 536 sts
Move the markers up to the new corner center sts.
Rnd 2 (Color A): Ch 1, sc in each st and 3 sc in each corner center st. Join and fasten off.
– Short sides: 80 sts each
– Long sides: 194 sts each
– Total: 536 + 8 = 544 sts
Why the math works: Every square edge has exactly 19 sts per 6 in, and you work into each stitch once. The border therefore lies the same length as the joined edge, with no ruffling or cupping. The 3-sc groups add just enough at each corner for it to turn flat. The finished panel is 24 + 1 = 25 in (63.5 cm) wide and 60 + 1 = 61 in (154.9 cm) long.
Tabs (Make 5, Worked Onto the Top Edge)
The top edge has 80 sts. Count from the right corner center st: 2 sts, then tab (8), gap (9), tab (8), gap (9), tab (8), gap (9), tab (8), gap (9), tab (8), then 2 sts to finish. Check: 2 + 40 + 36 + 2 = 80. ✓
Row 1: With the RS facing, join Color A in the first st of the tab. Ch 3 (counts as dc), then dc in the next 7 sts. (8 dc)
Rows 2–11: Ch 3, turn, then dc in each st across. (8 dc)
Each tab is 2.5 in (6.4 cm) wide and about 6 in (15.2 cm) long. Fasten off and leave a 12 in (30.5 cm) tail. Fold the tab to the WS and whipstitch Row 11 to the base of the tab, just below border Rnd 1. The loop fits a rod up to 1.75 in (4.4 cm) in diameter and rises about 2.5 in (6.4 cm) above the panel.
Final Blocking
- Weave in all remaining ends along the seams on the WS.
- Lay the panel flat on blocking mats, RS up.
- Pin the four corners to 25 x 61 in (63.5 x 154.9 cm).
- Pin along every seam line so the grid runs straight, checking that each square is 6 in (15.2 cm).
- Spray until damp, not soaked, and gently pat the petals into rounded shapes.
- Let it dry completely, which takes 24 hours.
- Unpin and hang. Let the panel settle on the rod for a day.
Final Quality-Control Checklist
- [ ] All 40 squares measure 6 in (15.2 cm) square
- [ ] Each square has 72 sts in Rnd 6, with 19 per side including corners
- [ ] Horizontal seams have 76 sc and vertical seams have 190 sc
- [ ] The joined panel measures 24 x 60 in (61.0 x 152.4 cm)
- [ ] Border Rnd 2 has 80 / 194 / 80 / 194 sts
- [ ] The finished panel measures 25 x 61 in (63.5 x 154.9 cm)
- [ ] There are 5 evenly spaced tabs of 8 dc x 11 rows
- [ ] No loose ends show on the RS
Troubleshooting
Squares are cupping: Rnd 6 is too tight. Go up a hook size for that round.
Squares are ruffling: The clusters in Rnd 3 are too loose. Pull each cluster snug before you chain.
Square sides are uneven: Recount Rnd 5. Each side needs 15 dc between the corner spaces.
Seams pucker: Rework the seam with a larger hook and keep the loops relaxed.
Border waves: You have added stitches. Recount each side against 78/192 for Rnd 1.
Tabs are twisted: Fold each tab straight to the back before you sew, and pin it first.
Care
Hand wash in cool water with a mild detergent, or machine wash on a delicate cycle inside a large laundry bag. Lay flat to dry and re-pin it to 25 x 61 in (63.5 x 154.9 cm) if needed.
Final Notes
Everything in this panel follows one measurement chain. A 6 in (15.2 cm) square with 19 sts per side, joined 4 x 10 stitch-to-stitch, gives 24 x 60 in (61.0 x 152.4 cm). Two rounds of border add 0.5 in (1.3 cm) per side, for 25 x 61 in (63.5 x 154.9 cm), and five folded tabs lift it onto the rod. If your first square hits gauge, every step after that falls into place.
Happy crocheting!