

The Marigold Tulip String Curtain is a pair of light, airy panels made from many small solid tulips, each set on a vertical chain strand. The strands hang from a solid header band with tab loops that slide over a curtain rod. Light passes between the strands, so the window stays bright and the tulips stand out.
The whole curtain uses one warm color: a saturated pumpkin orange. Every tulip has a rounded cup and three pointed petals. Neighboring strands are offset by half a repeat, which gives the panel its staggered, checkerboard rhythm.
This pattern uses US crochet terms. Each panel measures 26 in (66.0 cm) wide and 84.5 in (214.6 cm) long from the top of the header band to the bottom of the longest strand. The tab loops sit above that.
Construction is simple and modular. First you work the tulips flat in rows from the base up. Then you build each strand as one long chain, slip-stitching the tulips on as you go. Last, you work the header band, attach the strands to marked stitches, and add the tabs.
Finished Size and Construction
- Finished size (one panel): 26 in (66.0 cm) wide x 84.5 in (214.6 cm) long, not counting tabs
- Skill level: Easy / advanced beginner
- Terminology: US crochet terms
- Yarn weight: Worsted (#4) cotton
- Hook: 4.5 mm (US 7)
- Number of pieces: 2 panels. Each panel has 128 tulips, 8 chain strands, and 1 header band with 5 tabs
- Layout: 8 strands per panel, each carrying 16 tulips, alternating Strand A and Strand B
- Piece size (one tulip): 2.75 in (7.0 cm) wide x 2.5 in (6.4 cm) tall
- Size before border (strands only): 82.5 in (209.6 cm) long
- Border depth (header band): 2 in (5.1 cm), plus tab loops of about 5.25 in (13.3 cm) worked length
Materials
Pick a smooth mercerized or combed cotton in worsted weight. Cotton holds the petal points well, doesn’t stretch much while hanging, and stands up to sunlight better than most acrylics. Avoid fuzzy or very splitty yarns; they blur the petal points.
- Pumpkin orange: 600 g / about 1,140 m (1,247 yd) for the pair, which is 300 g / about 570 m (623 yd) per panel. This assumes a yarn with about 190 m per 100 g.
Quantities include a margin of about 15-20% above the calculated use. Buy all balls from a single dye lot.
Tools:
- 4.5 mm (US 7) crochet hook
- Tapestry needle
- Locking stitch markers (at least 13)
- Scissors
- Measuring tape
- Blocking mats and rustproof pins
- Spray bottle
Abbreviations (US Terms)
- ch – chain
- sl st – slip stitch
- sc – single crochet
- hdc – half double crochet
- dc – double crochet
- tr – treble crochet
- st(s) – stitch(es)
- RS / WS – right side / wrong side
Special stitch – Point picot: ch 3, sl st in the 3rd ch from the hook. This forms the sharp tip of each petal.
Gauge and Checkpoints
Base gauge: 16 sc and 18 rows = 4 in (10.2 cm) in sc worked in rows. In other words, 4 sc and 4.5 rows per 1 in (2.5 cm).
Chain gauge: 10 ch = 2.5 in (6.4 cm), measured gently relaxed, not stretched.
Make one test tulip before anything else and check it at three points:
- After Row 5: 11 sts, 2.75 in (7.0 cm) wide.
- After Row 7: the cup is about 1.5 in (3.8 cm) tall from the base.
- After Row 8: 2.5 in (6.4 cm) from the base to the tip of the center petal.
A tulip more than 0.25 in (0.6 cm) too wide means you need a smaller hook; try 4 mm (US G-6). If it’s more than 0.25 in (0.6 cm) too narrow, go up to 5 mm (US H-8). Check your chain gauge separately. Many people chain tighter than they sc, so you might need a hook one size larger just for the strand chains.
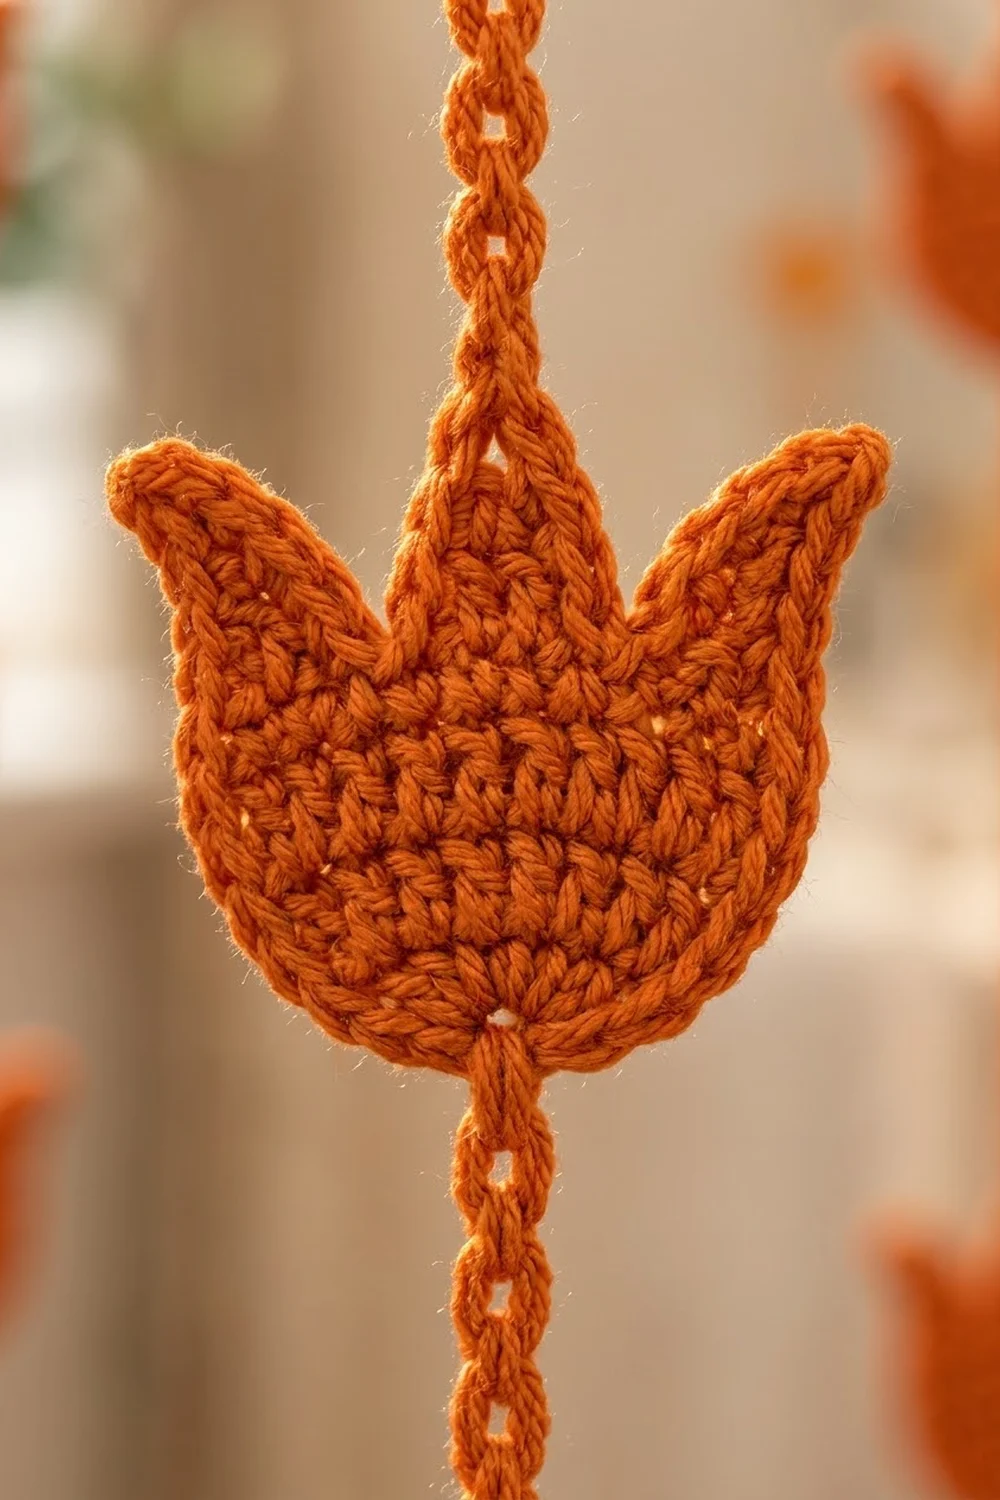
Tulip Motif (make 128 per panel)
The tulip is worked flat in rows from the base up. The turning ch 1 does not count as a stitch.
Row 1 (RS): Ch 2, 3 sc in the 2nd ch from the hook. (3 sts)
Row 2: Ch 1, turn. 2 sc in the first st, sc in the next st, 2 sc in the last st. (5 sts)
Row 3: Ch 1, turn. 2 sc in the first st, sc in the next 3 sts, 2 sc in the last st. (7 sts)
Row 4: Ch 1, turn. 2 sc in the first st, sc in the next 5 sts, 2 sc in the last st. (9 sts)
Row 5: Ch 1, turn. 2 sc in the first st, sc in the next 7 sts, 2 sc in the last st. (11 sts)
Checkpoint: 2.75 in (7.0 cm) wide.
Rows 6–7: Ch 1, turn. Sc in each st across. (11 sts)
The cup is now finished: a rounded base widening into straight sides.
Row 8 (petal row): Ch 1, turn. The 11 sts are split into a left petal (sts 1–4), a center petal (sts 5–7), and a right petal (sts 8–11).
- Left petal: sc in st 1; (hdc, dc) in st 2; (tr, point picot, dc) in st 3; sl st in st 4.
- Center petal: hdc in st 5; (dc, tr, point picot, tr, dc) in st 6; hdc in st 7.
- Right petal: sl st in st 8; (dc, point picot, tr) in st 9; (dc, hdc) in st 10; sc in st 11.
Row 8 count: 18 sts plus 3 picots (6 sts and 1 picot per petal).
The sl sts in sts 4 and 8 make the deep V-notches between petals. The tr-and-picot groups make the three sharp points, and the center petal stands slightly taller because it has two tr.
Fasten off and weave in both tails. Checkpoint: 2.5 in (6.4 cm) tall at the center tip.
Make All Pieces
For each panel, make:
- 128 tulips (8 strands x 16 tulips)
- 4 Strand A and 4 Strand B (instructions in the Joining section)
- 1 header band with 5 tabs (Border section)
For the pair, double everything: 256 tulips, 16 strands, and 2 header bands.
Lightly steam-block the tulips in batches of 16 before joining them (see Final Blocking). Flat tulips are much easier to join evenly.
Layout grid (one panel, viewed from the front; T = tulip, | = chain):
Header band: sts 7, 20, 33, 46, 59, 72, 85, 98
Strand:  1   2   3   4   5   6   7   8
         A   B   A   B   A   B   A   B
         |   |   |   |   |   |   |   |
         T   |   T   |   T   |   T   |
         |   T   |   T   |   T   |   T
         T   |   T   |   T   |   T   |
         |   T   |   T   |   T   |   T
        ...  (16 tulips per strand) ...
         T   |   T   |   T   |   T   |
         |   T   |   T   |   T   |   T
         |       |       |       |
Joining: Building the Strands
Tulips are joined to the strands as you go. Each strand is worked from the bottom up. Use the 2.5 in (6.4 cm) chain gauge for every chain section.
How a tulip joins (stitch-to-stitch logic): Sl st into the base of the tulip, through the center of Row 1 (the 3-sc cluster). Ch 10 across the WS of the tulip so the chain runs up its center. Sl st into the ch-3 space of the center petal’s picot. The strand now enters at the base point and leaves from the top center tip, the same way it does on the finished curtain. The chain on the back stays hidden.
Strand A (bottom chain tail):
- Make a slip knot, ch 10 for the bottom tail.
- Join a tulip: sl st in base, ch 10 behind, sl st in center picot.
- Ch 10 to the next tulip.
- Repeat Steps 2–3 until 16 tulips are joined. Leave out Step 3 after the 16th tulip.
- Ch 10 for the top chain. Leave a 12 in (30.5 cm) tail.
Strand A total: 330 ch (10 + 16 x 10 + 15 x 10 + 10) and 32 sl sts.
Strand B (tulip at the bottom):
- Make a slip knot on the hook. Sl st into the base of the first tulip, ch 10 behind, sl st in center picot.
- Ch 10, join the next tulip.
- Repeat Step 2 until 16 tulips are joined.
- Ch 20 for the top chain. Leave a 12 in (30.5 cm) tail.
Strand B total: 330 ch (16 x 10 + 15 x 10 + 20) and 32 sl sts.
Length check: Both strands measure 82.5 in (209.6 cm). Strand A: 2.5 + (16 x 2.5) + (15 x 2.5) + 2.5 = 82.5 in. Strand B: (16 x 2.5) + (15 x 2.5) + 5 = 82.5 in. The extra 2.5 in (6.4 cm) of top chain on Strand B drops its tulips by exactly half of the 5 in (12.7 cm) repeat, and that offset creates the stagger.
Tension: Keep the behind-tulip chain the same length as the tulip. If it’s too short, the tulip curls forward; if it’s too long, the tulip droops. Hang each strand for a few minutes and measure it before you attach it. A strand within 1 in (2.5 cm) of 82.5 in (209.6 cm) is fine.
Border: Header Band and Tabs
The header band is the curtain’s border. It is worked in sc rows at the base gauge of 4 sts per 1 in (2.5 cm) and 4.5 rows per 1 in (2.5 cm).
Foundation: Ch 105.
Row 1 (RS): Sc in the 2nd ch from the hook and in each ch across. (104 sts)
Rows 2–9: Ch 1, turn. Sc in each st across. (104 sts)
Header band: 104 sts along each long edge and 9 rows along each short edge, which gives 26 in (66.0 cm) x 2 in (5.1 cm). Don’t fasten off yet.
Why the math works: Each strand gets its own 13-st section of header, so 8 strands x 13 sts = 104 sts. No stitches are added at seams or corners. Each strand attaches to the 7th (center) st of its section, so the strand points fall on sts 7, 20, 33, 46, 59, 72, 85, and 98. That leaves 6 sts of margin on each end, and the strands are spaced 13 sts = 3.25 in (8.3 cm) apart. A tulip is 2.75 in (7.0 cm) wide, so neighbors get a 0.5 in (1.3 cm) gap.
Tabs: The tabs are worked from the top of Row 9. Five tabs of 8 sts each with four 16-st gaps between them: 5 x 8 + 4 x 16 = 104.
- Tab 1 (sts 1–8): Ch 1, turn. Sc in the first 8 sts only. Work 23 more rows of 8 sc. (24 rows, about 5.25 in / 13.3 cm.) Fasten off.
- Tabs 2–5: Join yarn in st 25, 49, 73, then 97. Work each tab over 8 sts the same way.
Fold each tab to the WS and whipstitch its last row to the matching 8 sts on the back of Row 9. Each loop fits a rod up to 1.5 in (3.8 cm) in diameter. For a thicker rod, add 2 rows to each tab for every extra 0.5 in (1.3 cm) of diameter.
Attaching the strands: On the foundation edge, mark sts 7, 20, 33, 46, 59, 72, 85, and 98. Work from left to right: Strand A at st 7, Strand B at st 20, and so on. Pull each strand’s top tail through its marked st from front to back, sl st once to lock it, and weave the tail into the header.
Checkpoint: The finished panel is 26 in (66.0 cm) wide and 84.5 in (214.6 cm) long (2 in + 82.5 in).
Final Blocking
- Lay the header band WS up on mats and mist it until it’s damp.
- Pin it to 26 in x 2 in (66.0 cm x 5.1 cm) with straight edges.
- Pin tulips that curl face up. Set a pin in each petal tip and angle the side petals slightly outward.
- Mist and let dry fully, at least 4 hours.
- Hang the panel on the rod for 24 hours so the strands settle under their own weight.
- Measure the length again. If a strand is more than 1 in (2.5 cm) off, mist it and ease it gently longer or shorter.
Final Quality-Control Checklist
- Each tulip is 2.75 in (7.0 cm) wide and 2.5 in (6.4 cm) tall.
- All three petal tips are sharp and the notches are clear.
- No behind-tulip chains show from the front.
- Every strand has 16 tulips and is 82.5 in (209.6 cm) long.
- Strand tulips alternate in an even half-repeat stagger.
- The header is 104 sts, 26 in (66.0 cm) wide, with strands on sts 7, 20, 33, 46, 59, 72, 85, and 98.
- All 5 tabs are sewn securely and slide freely on the rod.
- All tails are woven in and trimmed.
Troubleshooting
Tulips curl forward: The chain behind them is too tight. Redo it with 11 ch or a larger hook.
Petals look rounded, not pointed: Pull each picot sl st snug and pin the tips firmly while blocking.
Strands come out different lengths: Chain tension drifted. Count chains carefully and measure every strand before attaching.
Header ripples: Your foundation chain was too tight. Rework it with a hook one size larger.
Header narrower than 26 in (66.0 cm): Check your sc gauge. Don’t add stitches, or the strand positions shift.
Strands twist: Before attaching, lay each strand flat with all tulips facing up.
Care
Hand wash cold or machine wash on a gentle cycle inside a mesh bag, then lay flat or rehang damp to dry. Don’t tumble dry; the heat can shrink the strands unevenly.
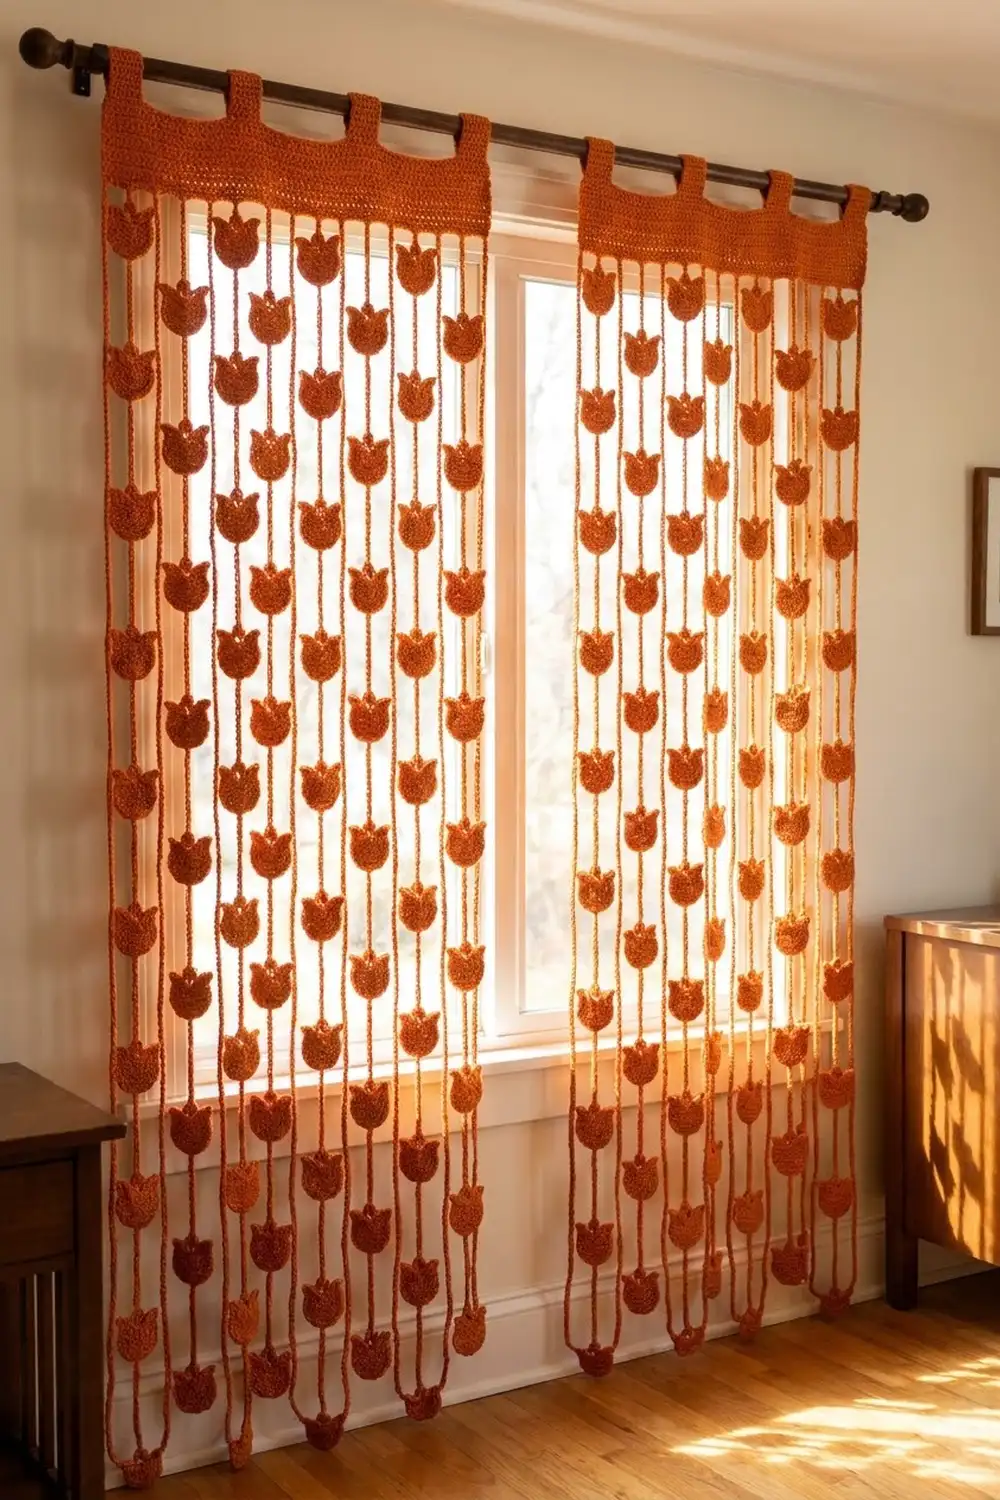
Final Notes
The measurement chain is short and easy to follow. A gauge of 4 sc per 1 in (2.5 cm) gives 2.75 in (7.0 cm) tulips. Chains of 10 at 2.5 in (6.4 cm) give a 5 in (12.7 cm) repeat and 82.5 in (209.6 cm) strands. Eight 13-st sections give a 104-st, 26 in (66.0 cm) header band, so each panel ends up 84.5 in (214.6 cm) long. If each stage matches its checkpoint, the next stage fits without adjustment.
Happy crocheting!