

The Linen Lattice Curtain Panel is an airy, natural-cream window panel. Its center is an open diamond net of long loops held together by small round knots. Each loop is made of several strands, so the lattice looks a little like macramé, but it is all made with a hook.
A firm, ridged single crochet frame runs around all four sides. It keeps the lace square and gives the panel a clean edge. Seven solid tabs at the top slide straight onto a curtain rod, so you don’t need rings or clips.
This pattern uses US crochet terms. The finished panel measures 26.25 in x 70.5 in (66.7 cm x 179.1 cm), not counting the tabs. With the tabs, it hangs about 73.5 in (186.7 cm) below the rod.
The panel is one single piece. You work the lattice in rows using Solomon’s knots, then work a single crochet border in rounds around it, then add the tabs. For a pair, make a second identical panel.
Finished Size and Construction
- Finished size: 26.25 in x 70.5 in (66.7 cm x 179.1 cm)
- Skill level: Intermediate
- Terminology: US crochet terms
- Yarn weight: Worsted (#4) cotton
- Hook: 5.0 mm (H-8)
- Number of pieces: 1
- Layout: One rectangular lace panel with a border and top tabs
- Lace center (size before border): 22.25 in x 66.5 in (56.5 cm x 168.9 cm)
- Border depth: 2 in (5.1 cm) on every side
- Tabs: 7 tabs, each 2.25 in (5.7 cm) wide
Materials
Yarn: Use a smooth worsted-weight cotton or cotton blend with a soft twist. Cotton holds the knots crisply and blocks well. Avoid very splitty yarn, because a Solomon’s knot needs a clean back strand.
- Natural/cream: 260 g, approx. 440 m (481 yd), for one panel
This quantity includes a margin of about 15%. Double it for a pair.
Tools:
– 5.0 mm (H-8) crochet hook
– Tapestry needle
– Scissors
– Stitch markers (at least 4)
– Measuring tape
– Blocking mats or a clean carpet, rust-proof pins, and a spray bottle
Abbreviations (US Terms)
- ch – chain
- sc – single crochet
- tr – treble crochet
- sl st – slip stitch
- BLO – back loop only
- st(s) – stitch(es)
- sk – skip
- RS / WS – right side / wrong side
- SK – Solomon’s knot (see below)
Special stitch – Solomon’s knot (SK): Draw up the loop on your hook to 1.25 in (3.2 cm). Yarn over and pull through, keeping the long loop open. You now have a long loop with a single back strand behind it. Insert the hook under that back strand, yarn over and pull through, then yarn over and pull through both loops on the hook. This makes one tight knot at the top of the long loop.
Center knot: When you make 2 SK in a row, the knot between them is the center knot. You will work into these in the next row.
Edge knot: In rows that begin with 3 SK, the knot between the 1st and 2nd SK is the edge knot.
Gauge and Checkpoints
Border gauge: 16 sc and 16 rows/rounds = 4 in (10.2 cm). Each sc is 0.25 in (0.6 cm) wide and each row is 0.25 in (0.6 cm) tall.
Lace gauge (after blocking): Nodes are spaced 8 sts = 2 in (5.1 cm) apart. Each mesh row is 1.5 in (3.8 cm) tall.
Make a test piece first. Chain 26 and work Row 1 (25 sc). Then work Rows 2–7 as written below (3 repeats instead of 11), followed by the closing row. Pin it out lightly.
- Width: 6.25 in (15.9 cm)
- Height: 9.5 in (24.1 cm), which is 6 mesh rows at 9 in (22.9 cm) plus the two sc rows
Checkpoints on the panel:
– After Row 1: 22.25 in (56.5 cm) wide
– After Row 21 (20 mesh rows): 30 in (76.2 cm) of mesh, measured gently stretched
– After Row 45: 66 in (167.6 cm) of mesh
– Lace complete: 22.25 in x 66.5 in (56.5 cm x 168.9 cm)
– After border Round 4: 24.25 in x 68.5 in (61.6 cm x 174.0 cm)
– After border Round 8: 26.25 in x 70.5 in (66.7 cm x 179.1 cm)
Too big? Go down half a hook size, or for the lace only, pull SK loops to 1 in (2.5 cm). Too small? Go up half a hook size, or pull SK loops to 1.5 in (3.8 cm). Always keep every SK loop the same length. A strip of card cut to 1.25 in (3.2 cm) makes a handy loop gauge.
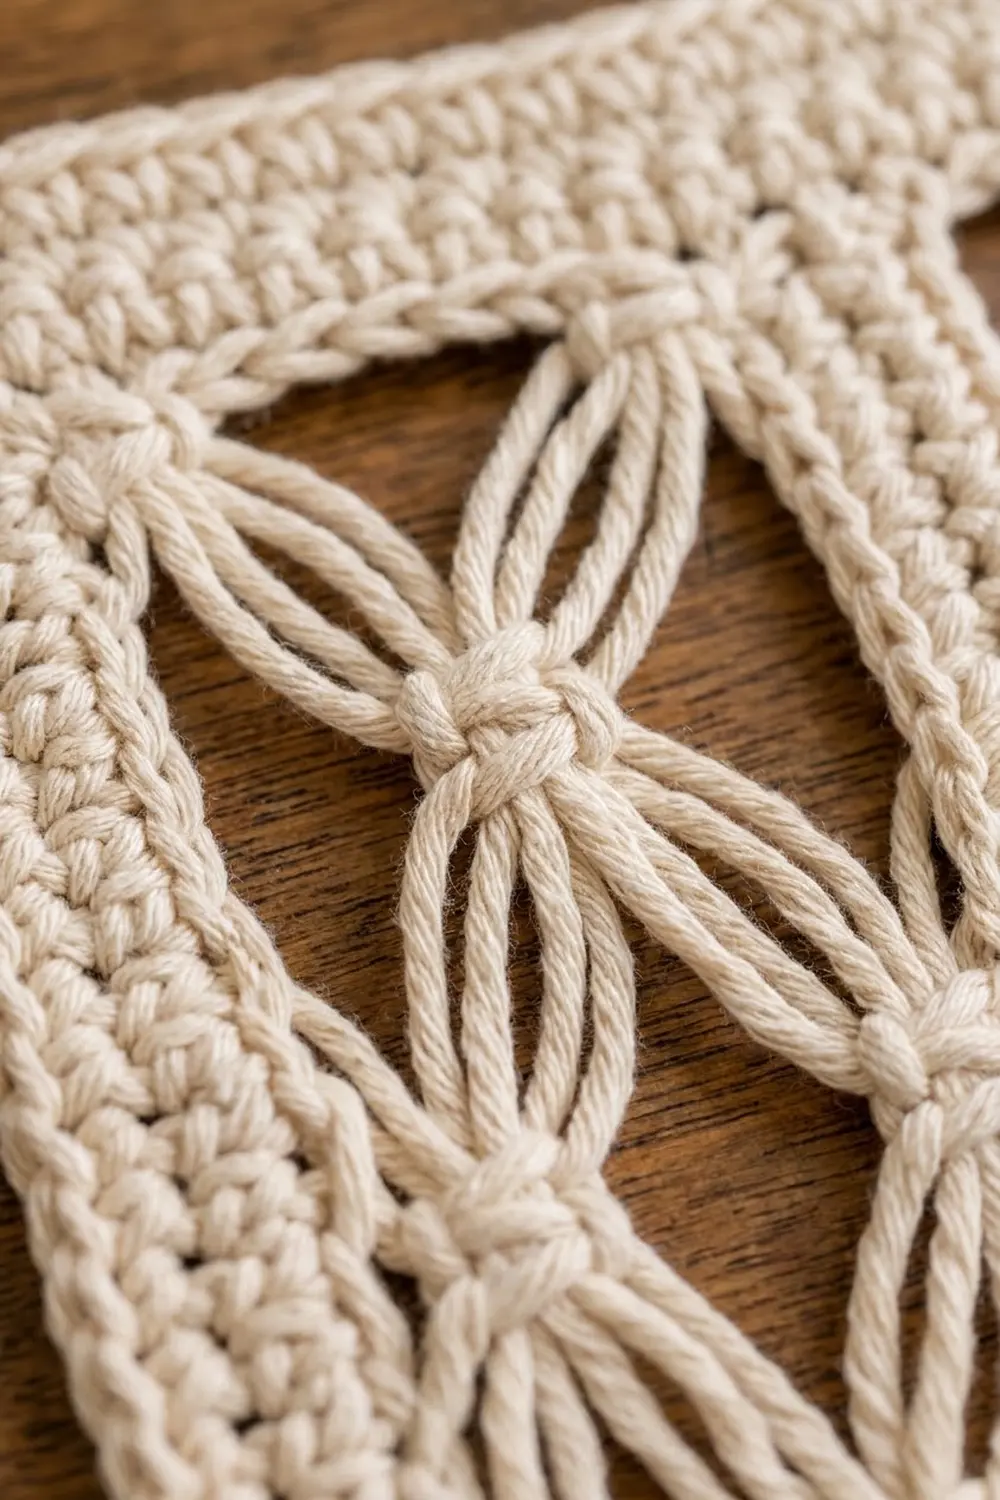
Lace Panel
The lattice alternates two row types:
- Row B starts at an sc node and makes 11 spans.
- Row A starts with a 3-SK riser and makes the offset spans, so the half-diamonds at both side edges stay straight.
Row 1 (RS, base row): Ch 90. Sc in 2nd ch from hook and in each ch across. Turn. (89 sc)
The nodes for Row 2 are sts 1, 9, 17, 25, 33, 41, 49, 57, 65, 73, 81, and 89, which is 12 nodes with 11 spaces of 8 sts each.
Row 2 (Row B): Ch 1, sc in first sc. Make 2 SK, sk next 7 sc, sc in next sc. Repeat from * 10 more times. Turn. (11 spans, 22 SK, 12 sc nodes, 11 center knots)
Row 3 (Row A): Make 3 SK. Sc in the next center knot of Row 2. Make 2 SK, sc in the next center knot. Repeat from * 9 more times. You have now worked into all 11 center knots. Make 2 SK, tr in the last sc of Row 2. Turn. (25 SK, 11 sc, 1 tr; 10 new center knots plus 1 edge knot)
Row 4 (Row B): Ch 1, sc in the top of the tr. Make 2 SK, sc in the next center knot. Repeat from * 9 more times. Make 2 SK, sc in the edge knot. Turn. (11 spans, 22 SK, 12 sc, 11 center knots)
Row 5 (Row A): Work as Row 3, working into the center knots of Row 4.
Rows 6–45: Repeat Rows 4–5 twenty more times. Even rows are Row B and odd rows are Row A. Row 45 is a Row A. (44 mesh rows total; mesh measures 66 in / 167.6 cm)
Row 46 (closing row): Ch 1, sc in the top of the tr. Ch 7, sc in the next center knot. Repeat from * 9 more times. Ch 7, sc in the edge knot. Do not turn and do not fasten off. (12 sc + 77 ch = 89 sts)
The closing row sits right above the Row 1 nodes, so the top edge mirrors the bottom edge stitch for stitch: 89 sts at both ends.
Border
Border gauge: 16 sc = 4 in (10.2 cm). Each round adds 0.25 in (0.6 cm) to every edge. Each corner is worked as 3 sc in one stitch, and the middle one of those 3 is the corner center.
Counts below are the sts between corner centers on each side. To get a round’s total, add the four sides and the 4 corner centers.
Round 1 (RS): Ch 1. Work 3 sc in the first st of Row 46 (corner), sc in the next 87 sts, 3 sc in the last st (corner). Rotate to work down the side. Work 6 sc evenly over each of the 44 mesh row ends, going around the tr posts, riser SKs, and edge sc. That makes 264 sc.
Across the opposite side of the foundation ch, work 3 sc in the first ch (corner), sc in the next 87 ch, 3 sc in the last ch (corner). Then work 264 sc up the second side. Join with sl st to the first sc. Place a marker in each corner center.
(Top and bottom: 89 each. Sides: 266 each. Total 714.)
Rounds 2–8: Ch 1. Sc BLO in each st to the next corner center, then 3 sc BLO in the corner center. Continue around and join. Move the markers up each round. Each round adds 2 sts per side and 8 sts in total.
| Round | Top/Bottom | Sides | Total |
|---|---|---|---|
| 2 | 91 | 268 | 722 |
| 3 | 93 | 270 | 730 |
| 4 | 95 | 272 | 738 |
| 5 | 97 | 274 | 746 |
| 6 | 99 | 276 | 754 |
| 7 | 101 | 278 | 762 |
| 8 | 103 | 280 | 770 |
Fasten off and weave in the ends. Working in back loops only builds the horizontal ridges on the front.
Why the math works: Each round moves the edge outward by 0.25 in (0.6 cm) at both ends of every side. That is one stitch width at each end, so each side needs 2 extra sts per round, which is exactly what a 3-sc corner adds.
Across the top after Round 8, there are 103 sts plus 2 corner centers = 105 sts. At 4 sts per inch, 105 sts = 26.25 in (66.7 cm), which equals 22.25 in + 2 in + 2 in.
Down each side, there are 280 sts plus 2 corner centers = 282 sts, or 70.5 in (179.1 cm), which equals 66.5 in + 2 in + 2 in.
Top Tabs
The top edge of Round 8 has 105 sts, counted from one corner center to the other with both corners included. That edge holds 7 tabs of 9 sts and 6 gaps of 7 sts: 63 + 42 = 105.
Tab 1: With RS facing, join yarn in the top-right corner center. Ch 1, sc in the same st and in the next 8 sts. (9 sc)
Rows 2–28: Ch 1, turn, sc in each sc. (9 sc) The tab is 7 in (17.8 cm) long. Fasten off, leaving a 12 in (30.5 cm) tail.
Tabs 2–7: Sk the next 7 sts of Round 8. Join in the next st and work as Tab 1. Tab 7 ends exactly on the top-left corner center.
Fold each tab to the WS. Whipstitch its last row across the back of the border along Round 4, keeping the stitches invisible from the front. The loops fit rods up to 1.5 in (3.8 cm) across.
Final Blocking
- Soak the panel in cool water with a little wool wash for 15 minutes.
- Press the water out gently. Do not wring. Roll the panel in towels to remove more water.
- Lay it flat on mats or a sheeted carpet.
- Pin the border straight to 26.25 in x 70.5 in (66.7 cm x 179.1 cm), with a pin every 4 in (10.2 cm).
- Inside the border, pin each knot row so the diamonds open evenly. Nodes should sit 2 in (5.1 cm) apart across, and each mesh row should be 1.5 in (3.8 cm) tall.
- Spray lightly and let it dry completely, usually 24–48 hours.
- Unpin. Hang the panel for a day before trimming any ends, so the cotton can settle under its own weight.
Final Quality-Control Checklist
- [ ] Row 1 and Row 46 each have 89 sts
- [ ] Every mesh row has 11 spans, and all SK loops are the same length
- [ ] Odd mesh rows end with a tr and even rows end in an edge knot
- [ ] The side edges run straight, with no scallops
- [ ] Round 8 has 770 sts: 103 on the top and bottom, 280 on each side, plus 4 corners
- [ ] The panel measures 26.25 in x 70.5 in (66.7 cm x 179.1 cm)
- [ ] There are 7 tabs, all 28 rows long and evenly spaced
- [ ] All ends are woven into the solid border, not the lace
Troubleshooting
Diamonds look uneven: The SK loops vary in length. Use a card gauge and pull each loop to it before locking the knot.
Knots slip or open: You worked the sc into the long loop. Go under the single back strand only.
Side edges pull inward: Make the riser SKs at full length, and check that the tr really reaches the height of the row.
Border ruffles: Your border tension is looser than your lace. Go down half a hook size for the border only.
Border cups or pulls the lace in: Recount Round 1. It should have exactly 6 sc per mesh row end, and 264 per side.
Panel grows longer when hung: That is normal for cotton lace. Block firmly, and measure again after it has hung for a day.
Care
Hand wash in cool water, or machine wash on a gentle cycle inside a mesh bag. Then reshape and dry flat; never hang the panel to dry while it is wet.
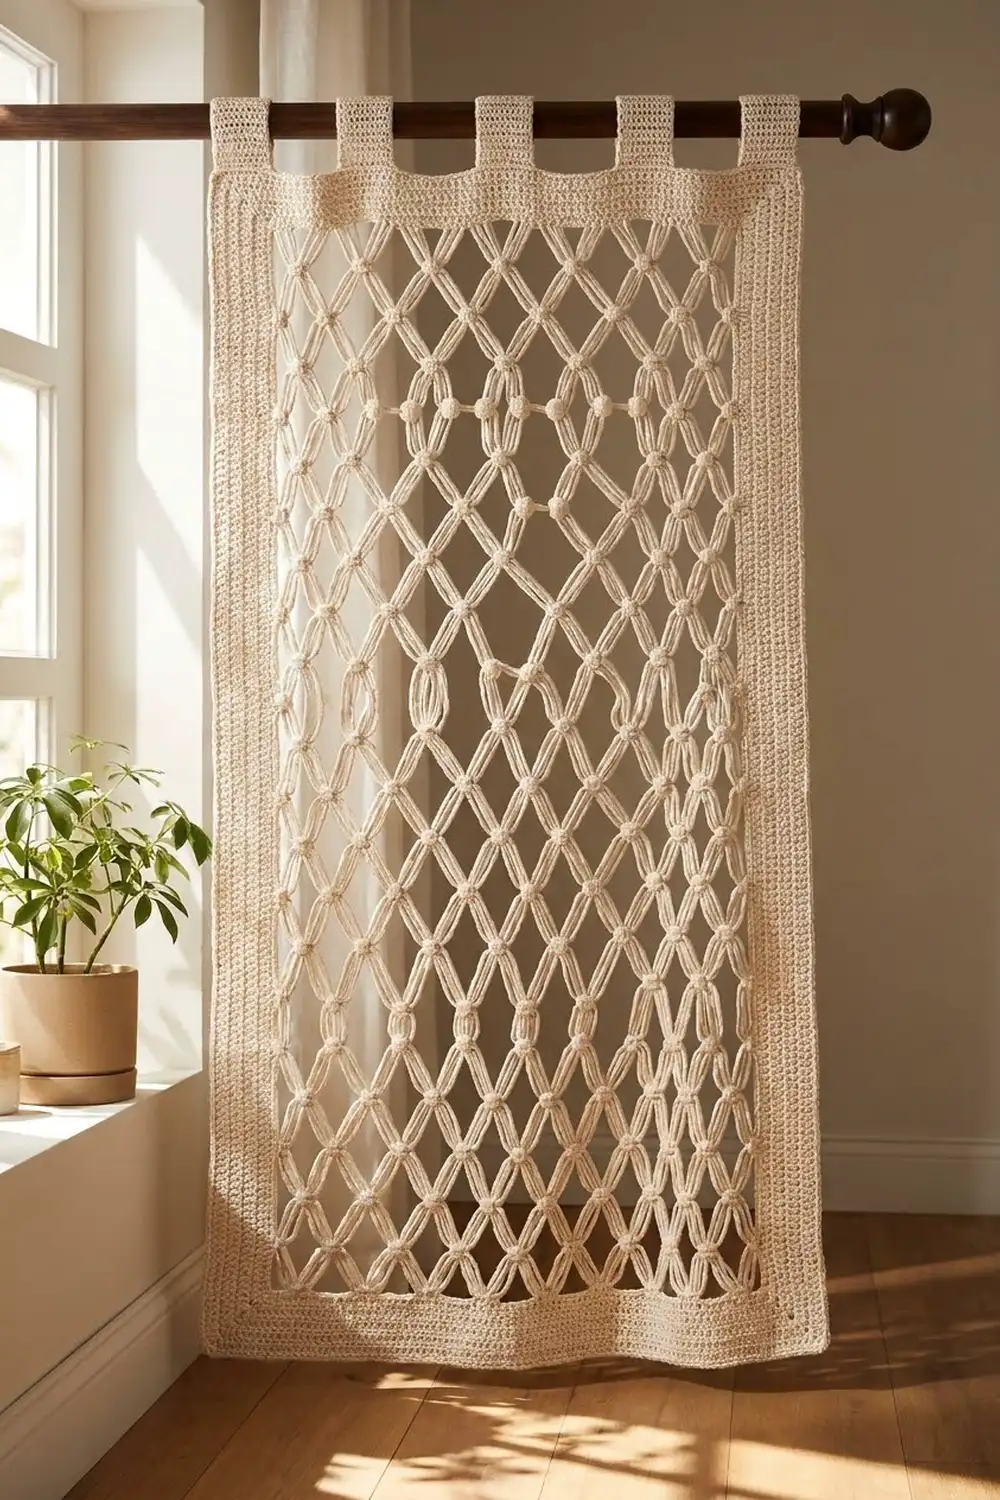
Final Notes
The measurements build on each other in order:
- The 89-st base row sets the lace width at 22.25 in (56.5 cm).
- 44 mesh rows at 1.5 in (3.8 cm) each, plus the two sc rows, set the lace height at 66.5 in (168.9 cm).
- Eight border rounds add 2 in (5.1 cm) on every side, for 26.25 in x 70.5 in (66.7 cm x 179.1 cm).
- Seven tabs fill the 105-st top edge exactly.
If your test piece matches, the full panel will too.
Happy crocheting!