

This curtain panel is made from long hairpin lace strips in two soft colors, sage green and warm cream, set side by side in vertical stripes. Each strip has a center spine with open loops on both sides. A chain edging gathers the loops into small fans. When light comes through a window, the open loops glow and the stripes look almost woven.
The style is relaxed farmhouse with a touch of boho. Six sage strips and five cream strips alternate, so both outer edges are sage. A narrow cream single-crochet border frames the panel, and six cream tabs along the top slide straight onto a curtain rod.
This pattern uses US crochet terms. One finished panel measures 34 in (86.4 cm) wide by 81 in (205.7 cm) long without the tabs. It hangs about 84 in (213.4 cm) from the top of the rod. The photo shows a matching pair, so make two panels for a full window.
Construction is simple. You make 11 hairpin lace strips on a loom and edge each one. Strips 2–11 are joined to their neighbor while you edge them (join-as-you-go). Then you work a two-round border and crochet the tabs straight off the top edge.
Finished Size and Construction
- Finished panel size: 34 in x 81 in (86.4 cm x 205.7 cm), tabs not included
- Hanging length with tabs: about 84 in (213.4 cm)
- Skill level: Intermediate (basic hairpin lace experience helps)
- Terminology: US crochet terms
- Yarn weight: Worsted (#4)
- Hook: 5.0 mm (US H-8)
- Loom width: 2.5 in (6.4 cm) between prongs
- Number of pieces: 11 strips per panel, joined into one panel
- Layout: 11 strips side by side, 1 row high
- Single strip size: 3 in x 80 in (7.6 cm x 203.2 cm) after edging
- Panel size before border: 33 in x 80 in (83.8 cm x 203.2 cm)
- Border depth: 2 rounds, 0.5 in (1.3 cm)
Materials
Choose a smooth worsted cotton or cotton-acrylic blend with about 200 m per 100 g (219 yd per 100 g). Cotton gives crisp, open loops and hangs straight. Avoid fuzzy or very stretchy yarn, because long strips can stretch under their own weight.
Per panel:
- Color A, Sage Green: 240 g, about 480 m (525 yd) – 6 strips
- Color B, Cream: 250 g, about 500 m (547 yd) – 5 strips, border and tabs
Double these amounts for a pair. The quantities include a margin of about 15–20% for swatching and differences in tension.
Tools:
- 5.0 mm (US H-8) crochet hook
- Adjustable hairpin lace loom set to 2.5 in (6.4 cm)
- Locking stitch markers (at least 12)
- Tapestry needle
- Scissors and measuring tape
- Blocking pins and a large flat surface
Abbreviations (US Terms)
- ch – chain
- sc – single crochet
- sl st – slip stitch
- sp – space
- st(s) – stitch(es)
- rnd – round
- Group sc – insert the hook through the next 4 loops of the strip at once (untwisted and in order), yarn over, pull up a loop, yarn over and pull through both loops on the hook. This gathers 4 loops into one small fan.
Gauge and Checkpoints
Test one strip first. Make a short test strip of 24 loops per side and edge it with 6 groups per side.
- Loop gauge: 12 loops per side = 4 in (10.2 cm), measured along the relaxed spine.
- Edging gauge: 3 groups (group sc + ch 4 each) = 4 in (10.2 cm), so 1 group = 1 1/3 in (3.4 cm).
- Strip width after edging: 3 in (7.6 cm).
- Border gauge: 11 sc = 3 in (7.6 cm); 4 sc rows = 1 in (2.5 cm).
Checkpoints:
- Test strip: 8 in (20.3 cm) long.
- First full strip after edging: 80 in (203.2 cm) long, 3 in (7.6 cm) wide.
- After joining all strips: 33 in x 80 in (83.8 cm x 203.2 cm).
- After the border: 34 in x 81 in (86.4 cm x 205.7 cm).
If your strip is too long, tighten the spine sc slightly or go down to a 4.5 mm hook. If it is too short, relax your spine tension or go up to a 5.5 mm hook. The loom sets the width, so only adjust length, using tension and hook size. Don’t change the number of loops or groups, because the border math depends on them.
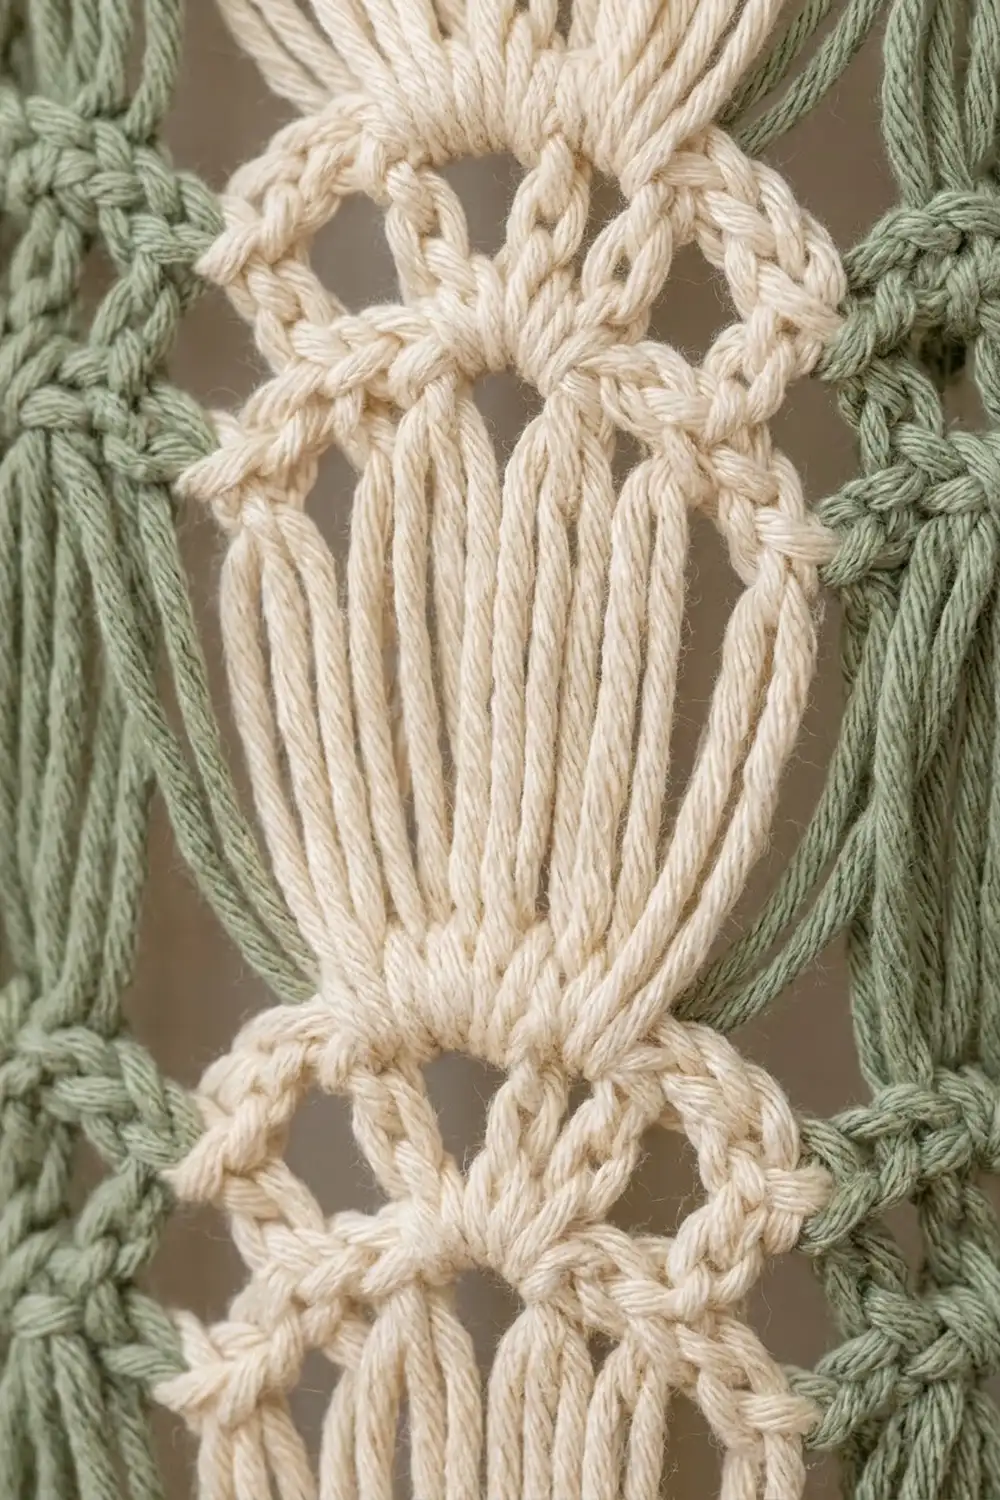
Hairpin Lace Strip (Make 11)
Make 6 strips in Color A and 5 strips in Color B. Every strip has exactly 240 loops on each side.
Foundation:
- Set the loom to 2.5 in (6.4 cm). Make a slip knot and place it on the left prong, with the knot centered between the prongs.
- Bring the yarn to the front around the right prong, then to the back. Insert the hook into the slip-knot loop, yarn over and pull up a loop, yarn over and pull through (ch 1 made). This starts the spine.
Working the strip:
- Raise the hook upright and turn the loom clockwise. The yarn wraps around the new right prong and makes a new loop.
- Insert the hook into the front of the left-prong loop, yarn over, pull up a loop, yarn over and pull through both loops (1 spine sc made).
- Repeat steps 1–2.
Each turn adds 1 loop to one side and 1 sc to the spine. Keep the spine centered.
When the loom fills, remove the bottom bar, slide off all but the last 4–5 loops on each side, and replace the bar. Place a marker every 40 loops on one side to keep count.
Continue until there are 240 loops on each side (480 loops total). Fasten off, leaving a 6 in (15.2 cm) tail, and weave it into the spine. The strip measures about 80 in (203.2 cm) along the relaxed spine.
Strip count check: 240 loops per side = 60 groups of 4 per side.
Edging and Join-As-You-Go
Edge each strip in its own color. Lay each strip with the starting end at the bottom so all the fans point the same way. Side A is the right side and Side B is the left side as you look at the strip.
Strip 1 Edging (no joining)
Rnd 1: Join yarn with a group sc through the first 4 loops at the bottom of Side A. Ch 4, group sc through next 4 loops. Repeat from * 58 more times. (60 group sc and 59 ch-4 sps on Side A.)
Ch 4, sc into the end of the spine, ch 4. Rotate the strip.
Group sc through the first 4 loops of Side B, ch 4, group sc through next 4 loops 59 times. (60 group sc and 59 ch-4 sps on Side B.)
Ch 4, sc into the starting end of the spine, ch 4, sl st to the first group sc. Fasten off.
Strip edging count: 120 group sc + 2 spine sc = 122 sc; 118 side ch-4 sps + 4 end ch-4 sps = 122 ch-4 sps.
Each fan of 4 loops sits under one sc. Each ch 4 covers the same 1 1/3 in (3.4 cm) as one group of loops, so the edge lies flat.
Strips 2–11 (join as you go)
Follow the color order A, B, A, B, A, B, A, B, A, B, A. Work Side A exactly as for Strip 1, then the end ch 4, spine sc, ch 4.
Joining Side B: Hold the new strip to the left of the previous strip, with the bottoms aligned. Group sc through the first 4 loops of Side B. Ch 2, sl st in the matching ch-4 sp on Side A of the previous strip, ch 2, group sc through next 4 loops. Repeat from * 58 more times. (60 group sc, 59 joins.)
Finish with ch 4, sc in spine end, ch 4, sl st to first group sc. Fasten off.
The ch 2 + sl st + ch 2 takes the place of the ch 4, so each seam is the same length as a free edge. Keep the sl st relaxed. Every 10 joins, lay the work flat and check that the fans line up across the seam.
Size checkpoint: after Strip 11, the panel measures 33 in x 80 in (83.8 cm x 203.2 cm).
Make All Pieces
Per panel: 6 strips in Color A (Sage), 5 strips in Color B (Cream).
Strip:  1  2  3  4  5  6  7  8  9  10 11
Color:  A  B  A  B  A  B  A  B  A  B  A
Each strip is 3 in (7.6 cm) wide and 80 in (203.2 cm) long.
Border
Work the border in Color B. Border gauge: 11 sc = 3 in (7.6 cm).
Corner note: In Rnd 1 the corners are ch-2 spaces only, and the Rnd 1 side counts do not include them. In Rnd 2, each side count includes the 2 sc worked into the corner spaces.
Rnd 1 (conversion round)
Start at the top right corner, on the top edge.
Short edges (top and bottom): On each strip end, work 1 sc in the end group sc, 4 sc in the ch-4 sp, 1 sc in the spine sc, 4 sc in the next ch-4 sp, and 1 sc in the end group sc on the other side.
- Per strip: 3 sc worked 1-per-existing-st + 8 sc in 2 ch-4 sps = 11 sc
- Per short edge: 11 strips x 11 sc = 121 sc
Corner: ch 2.
Long edges (outer sides of Strips 1 and 11): Skip the end group sc already used by the short edges. Work 1 sc in each remaining group sc and 4 sc in each ch-4 sp.
- 58 sc worked 1-per-existing-st + (59 ch-4 sps x 4 sc = 236) = 294 sc
Corner: ch 2.
Repeat for the remaining two sides. Sl st to the first sc.
Rnd 1 total: (2 x 121) + (2 x 294) = 830 sc, plus 4 ch-2 corner sps.
Rnd 2
Ch 1, sc in each sc around, working (sc, ch 2, sc) in each corner ch-2 sp. Sl st to first sc.
- Short edge: 121 sc worked 1-per-existing-st + 2 corner sc = 123 sc
- Long edge: 294 sc worked 1-per-existing-st + 2 corner sc = 296 sc
- Rnd 2 total: (2 x 123) + (2 x 296) = 838 sc, plus 4 ch-2 corner sps.
Fasten off on the bottom edge, leaving the top edge free for the tabs.
Why the Math Works
At 11 sc = 3 in (7.6 cm), 121 sc fill the 33 in (83.8 cm) top edge exactly: 11 sc for each 3 in strip. On the long edges, each group (1 group sc + ch 4) covers 1 1/3 in (3.4 cm), and Rnd 1 turns each group into 5 sc. So 294 sc ÷ 11 x 3 = 80.2 in (203.7 cm), within one stitch of 80 in (203.2 cm). The border lies flat without ruffling or pulling in.
Tabs (Make 6, worked off the top edge)
Join Color B in the first sc of the top edge of Rnd 2 (the corner sc).
Row 1: Ch 1, sc in the first 8 sts, turn. (8 sc)
Rows 2–24: Ch 1, sc in each sc across, turn. (8 sc)
Fasten off, leaving a 12 in (30.5 cm) tail. Skip the next 15 sts of the top edge and join yarn for the next tab.
Top edge layout: 6 tabs x 8 sts = 48 sts, plus 5 gaps x 15 sts = 75 sts, total 123 sts.
Each tab is about 2.2 in (5.6 cm) wide and 6 in (15.2 cm) long. Fold each tab to the back and sew the last row to the back of border Rnd 1. This leaves a loop about 3 in (7.6 cm) tall that fits a rod up to 1.5 in (3.8 cm) in diameter.
Final Blocking
- Weave in all ends along the spines or inside the border sc, never through the open loops.
- Soak the panel in cool water with a little gentle wash for 15 minutes.
- Press out the water. Roll the panel in towels; do not wring it.
- Lay the panel flat on towels or blocking mats.
- Pin the four corners to 34 in x 81 in (86.4 cm x 205.7 cm).
- Pin along each seam, spreading the fans so each group of 4 loops opens evenly.
- Check that the strips run straight with a long ruler or a string line.
- Let the panel dry completely before hanging, usually 24–48 hours.
Final Quality-Control Checklist
- 11 strips in order A-B-A-B-A-B-A-B-A-B-A, both outer strips sage
- 240 loops and 60 group sc per side on every strip
- 59 joins on each of the 10 seams
- Fans aligned across all seams
- Border Rnd 1: 121 / 294 / 121 / 294 sc
- Border Rnd 2: 123 / 296 / 123 / 296 sc
- 6 tabs, each 8 sc x 24 rows, with 15 sts between tabs
- Panel 34 in x 81 in (86.4 cm x 205.7 cm)
- All ends secure and hidden
Troubleshooting
The spine drifts to one side. You aren’t turning the loom the same way each time. Always turn clockwise and keep the knot centered.
Loops look uneven in the fans. Gather the loops in order before each group sc, and handle any twists the same way on every strip.
Strip lengths differ. Recount loops and groups. A strip with 59 groups is 1 1/3 in (3.4 cm) short and throws off every seam.
A seam puckers. Your join chains are too tight. Loosen the ch 2 on each side of the sl st.
The border ruffles or pulls in. Check your sc gauge on the border. Change the hook by half a size rather than changing the stitch counts.
The panel stretches when hung. Cotton blends settle a little. Block it flat again and let it dry fully before rehanging.
Care
Hand wash in cool water and dry flat to protect the loops and the strip length. Don’t tumble dry, and don’t hang the panel while it is wet.
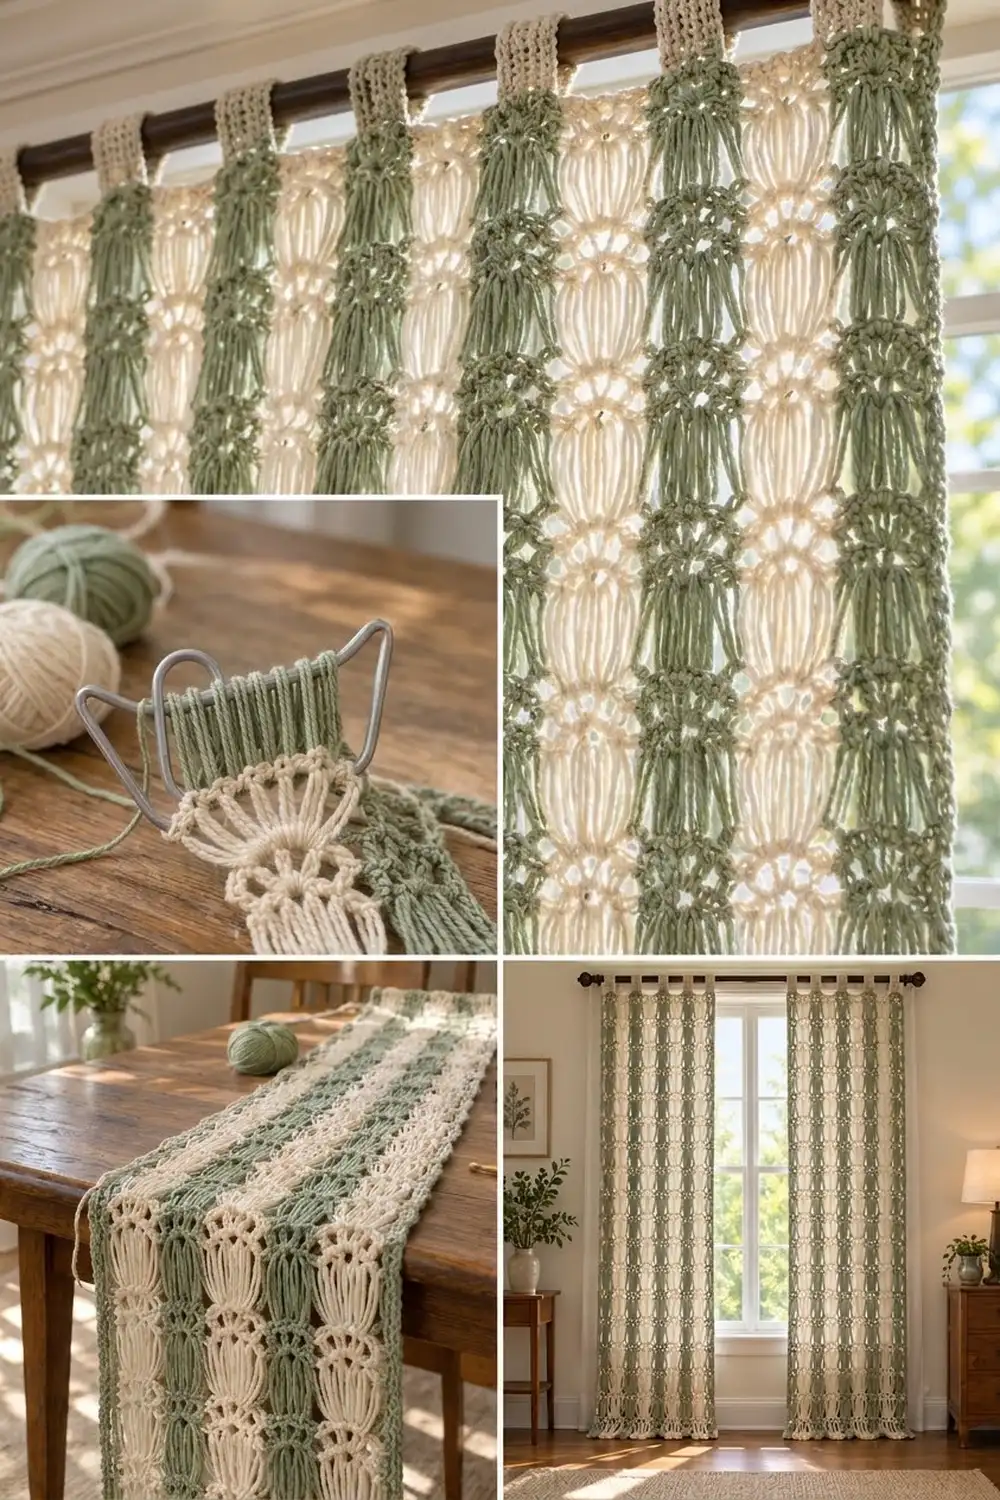
Final Notes
The whole panel rests on one chain of measurements. Twelve loops per side make 4 in (10.2 cm). Four loops make one group of 1 1/3 in (3.4 cm). Sixty groups make an 80 in (203.2 cm) strip. Eleven strips at 3 in (7.6 cm) make a 33 in (83.8 cm) panel. Two border rounds bring it to 34 in x 81 in (86.4 cm x 205.7 cm), and the six tabs make it hang about 84 in (213.4 cm) from the rod.
Check your gauge on the test strip and count your loops, and the rest falls into place. Make a second panel for a matching pair, and enjoy the light coming through the sage and cream stripes.
Happy crocheting!