

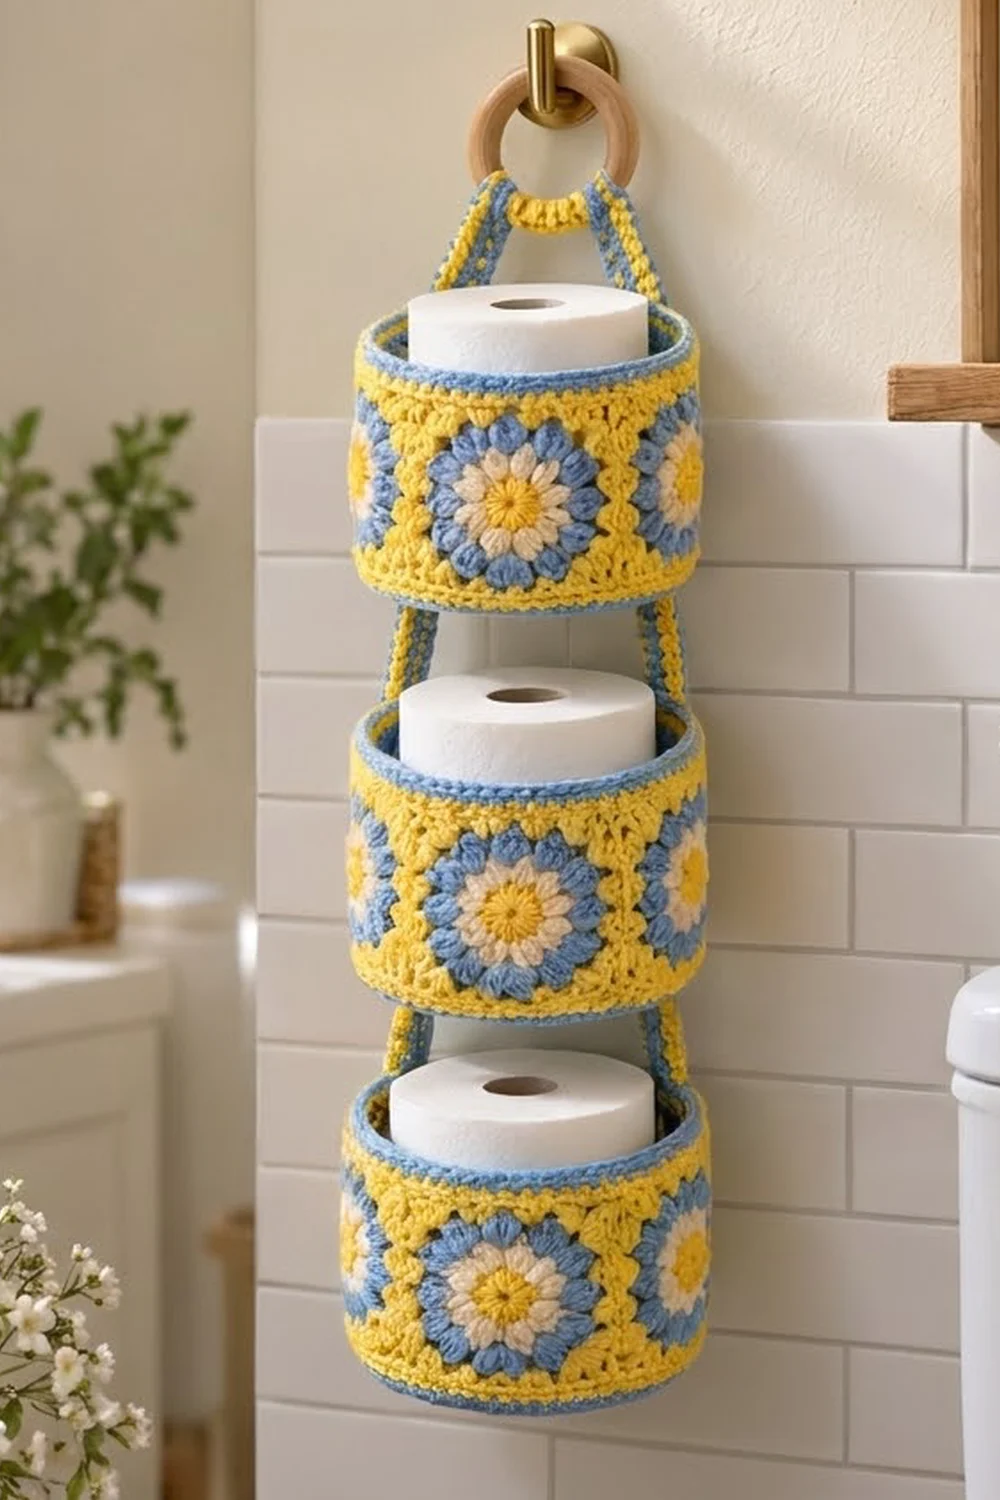
The Sunny Meadow holder is a three-tier hanging organizer that keeps three spare rolls tidy and close at hand. Each tier is a short, open-topped cylinder of flower granny squares with a blue rim and a round base. The tiers hang one above the other from a wooden ring.
The palette is bright and cheerful. Each flower has a yellow center, a ring of cream puff petals, and a ring of cornflower-blue puff petals, all set into a sunshine-yellow square. Blue edging frames the top and bottom of every tier, and the yellow straps have blue edges to match.
This pattern uses US crochet terms. Each tier measures about 5.2 in (13.2 cm) across and 3.85 in (9.8 cm) tall. The holder is about 21 in (53.3 cm) long overall, including the 3 in (7.6 cm) ring.
The construction is modular. You make 15 squares, 3 round bases and 6 straps. Five squares join into a tube for each tier, a rim goes around the top, the base is crocheted onto the bottom, and the straps link the tiers to each other and to the ring.
Finished Size and Construction
- Finished size: each tier 5.2 in (13.2 cm) diameter x 3.85 in (9.8 cm) tall; overall about 21 in (53.3 cm) long
- Skill level: Intermediate
- Terminology: US
- Yarn weight: DK / light worsted (#3) cotton
- Hook: 3.5 mm (E-4)
- Number of pieces: 24 (15 squares, 3 bases, 6 straps), plus 1 wooden ring
- Layout: 3 tiers; each tier is a ring of 5 squares (1 x 5, closed into a tube)
- Piece size: square 3.25 in (8.3 cm); base 4.9 in (12.4 cm) before joining
- Size before border: band 16.25 in (41.3 cm) around x 3.25 in (8.3 cm) tall
- Border depth: top rim 0.4 in (1.0 cm); bottom joining round 0.2 in (0.5 cm)
Materials
Use a smooth mercerized or combed cotton in DK weight. Cotton holds its shape and won’t stretch much under the weight of the rolls, and it keeps the puff petals crisp. The amounts below assume 50 g balls of about 120 m.
- Yellow: 110 g, about 264 m
- Blue: 60 g, about 144 m
- Cream: 25 g, about 60 m
These amounts include about 20 percent extra for gauge differences and swatching.
Tools:
- 3.5 mm (E-4) crochet hook
- Wooden ring, 3 in (7.6 cm) diameter
- Tapestry needle
- Stitch markers (at least 4)
- Scissors and a flexible tape measure
- Blocking mat and rust-proof pins
Abbreviations (US Terms)
- ch – chain
- sl st – slip stitch
- sc – single crochet
- dc – double crochet
- sp(s) – space(s)
- st(s) – stitch(es)
- rep – repeat
- RS / WS – right side / wrong side
- puff – puff stitch (see below)
Puff stitch: (yarn over, insert hook in stitch or space, yarn over, pull up a loop to the height of a dc) 3 times; yarn over and pull through all 7 loops on hook.
Gauge and Checkpoints
Gauge: 20 sc and 20 rows = 4 in (10.2 cm) on a 3.5 mm hook. That works out to 5 sc per inch, and the square edges and rims depend on it.
Make one complete square first and check it at each stage:
- After Round 1: 1.25 in (3.2 cm) across
- After Round 3: 2.6 in (6.6 cm) across
- After Round 4: 3 in (7.6 cm) square
- After Round 5: 3.25 in (8.3 cm) square
If your square is larger than 3.4 in (8.6 cm), go down half a millimeter in hook size. If it’s smaller than 3.1 in (7.9 cm), go up half a millimeter. Any error is multiplied by five around each tier. A square that is 0.25 in (0.6 cm) too big makes the band 1.25 in (3.2 cm) too big around.
Check the base after Round 4 (3 in / 7.6 cm) and Round 7 (4.9 in / 12.4 cm). It should lie flat, with no cupping or ruffling.
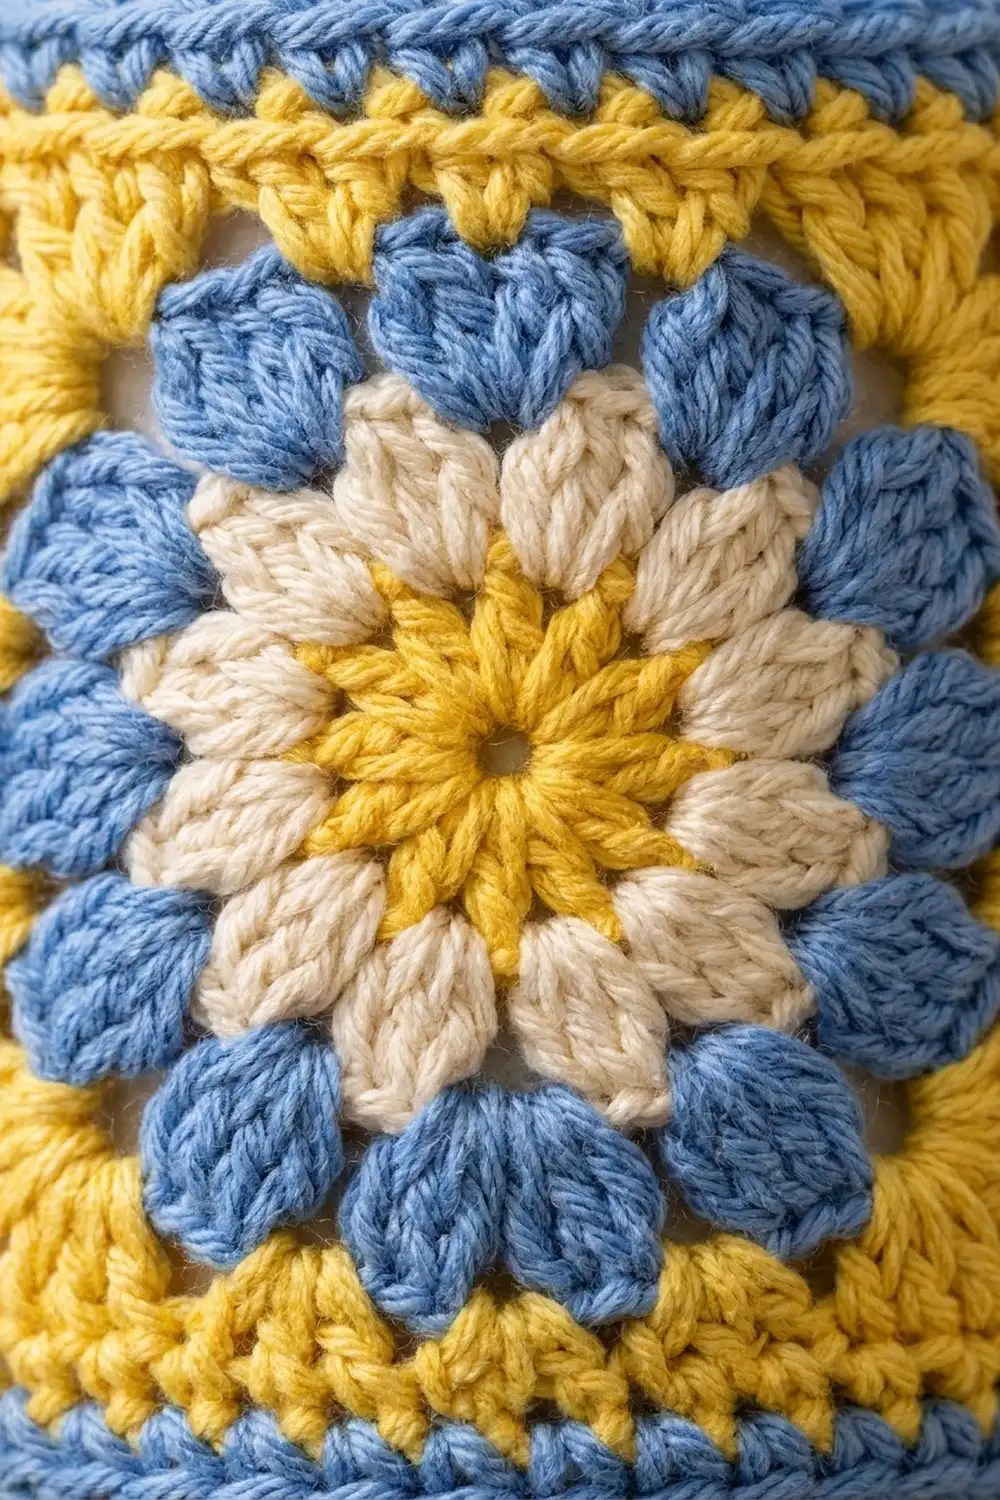
Flower Square (make 15)
Round 1 (yellow): Make a magic ring. Ch 3 (counts as dc), 11 dc in ring. Sl st to top of ch-3. Pull the ring closed. Fasten off. (12 dc)
Round 2 (cream): Join cream in any dc. Ch 2 (does not count), puff in same st, ch 1. *Puff in next dc, ch 1; rep from * 10 more times. Sl st to top of first puff. Fasten off. (12 puffs, 12 ch-1 sps)
Round 3 (blue): Join blue in any ch-1 sp. Ch 2 (does not count), puff in same sp, ch 2. *Puff in next ch-1 sp, ch 2; rep from * 10 more times. Sl st to top of first puff. Fasten off. (12 puffs, 12 ch-2 sps)
Round 4 (yellow, squaring round): Join yellow in any ch-2 sp. Ch 3 (counts as dc), (2 dc, ch 2, 3 dc) in same sp for the first corner. 3 dc in each of next 2 sps. *(3 dc, ch 2, 3 dc) in next sp, 3 dc in each of next 2 sps; rep from * 2 more times. Sl st to top of ch-3. (48 dc: 12 dc per side between corners, plus 4 corner ch-2 sps)
Round 5 (yellow, trim round): Ch 1, sc in same st and in each dc to the first corner sp, 3 sc in corner sp. *Sc in each dc to next corner sp, 3 sc in corner sp; rep from * 2 more times, sc in each remaining dc. Sl st to first sc. Fasten off, leaving a 12 in (30.5 cm) tail for joining. (48 sc worked one per existing dc + 12 sc added in corners = 60 sc)
The middle sc of each 3-sc group is the corner stitch. Each side has 16 sts including both corner stitches (corner, 14 sc, corner). Neighboring sides share a corner, so 4 x 15 = 60 confirms the total.
Round Base (make 3)
The base repeats the flower center, so the bottom of each tier looks finished too.
Rounds 1–3: Work as Square Rounds 1–3. (12 puffs, 12 ch-2 sps)
Round 4 (yellow): Join yellow in any ch-2 sp. Ch 3 (counts as dc), 3 dc in same sp, 4 dc in each remaining ch-2 sp. Sl st to top of ch-3. (48 dc)
Round 5 (yellow, growth round): Ch 3 (counts as dc), dc in next 2 sts, 2 dc in next st; *dc in next 3 sts, 2 dc in next st; rep from * 10 more times. Sl st to top of ch-3. (60 dc)
Round 6 (yellow, growth round): Ch 3 (counts as dc), dc in next 3 sts, 2 dc in next st; *dc in next 4 sts, 2 dc in next st; rep from * 10 more times. Sl st to top of ch-3. Fasten off. (72 dc)
Round 7 (blue, conversion round): Join blue in any st. Ch 1, sc in same st and next 7 sts, 2 sc in next st; *sc in next 8 sts, 2 sc in next st; rep from * 6 more times. Sl st to first sc. Don’t fasten off; put the live loop on a marker. (72 sc worked one per existing st + 8 sc added = 80 sc)
The base should measure 4.9 in (12.4 cm) across and lie flat.
Strap (make 6: 2 long, 4 short)
Foundation (yellow): Ch 5.
Row 1: Sc in 2nd ch from hook and in each ch across. (4 sc)
Rows 2–35 for long straps / Rows 2–15 for short straps: Ch 1, turn, sc in each st across. (4 sc) Fasten off.
Edging (blue): With RS facing, join blue at one corner of a long edge. Ch 1, work 1 sc in each row end along that edge. Fasten off. Repeat on the other long edge. (35 sc per edge on long straps, 15 sc per edge on short straps)
Long straps measure 7 in (17.8 cm) and short straps 3 in (7.6 cm). All straps are 1.2 in (3.0 cm) wide.
Make All Pieces
| Piece | Qty | Yellow | Cream | Blue |
|---|---|---|---|---|
| Flower square | 15 | Rnds 1, 4, 5 | Rnd 2 | Rnd 3 |
| Round base | 3 | Rnds 1, 4–6 | Rnd 2 | Rnds 3, 7 |
| Long strap | 2 | Body | – | Edging |
| Short strap | 4 | Body | – | Edging |
Layout of each tier, seen from the outside (the arrow closes the tube):
Tier 1:  [A][B][C][D][E] -> back to [A]
Tier 2:  [A][B][C][D][E] -> back to [A]
Tier 3:  [A][B][C][D][E] -> back to [A]
Weave in all ends before joining, except the long yellow tails on the squares.
Joining the Squares
Join each tier into a tube with a yellow slip-stitch seam through the back loops.
- Hold squares A and B with RS together and the edges aligned.
- Insert the hook through the back loop of the corner sc on the front square and the back loop of the matching corner sc behind it. Sl st.
- Continue matching stitch to stitch, for 16 sl sts from corner to corner. The 14 side stitches pair one-to-one, and the corners pair corner to corner.
- Join B to C, C to D, D to E, then E to A to close the tube.
Keep the slip stitches as loose as the rest of the fabric. A tight seam pulls the tube into a pentagon. If the seams pucker, go up one hook size for the seams only. Before you close each tube, make sure all five flowers face the same way and all seams sit on the inside.
Size checkpoint: each joined tube measures 16.25 in (41.3 cm) around and 3.25 in (8.3 cm) tall.
Border
Border gauge: the rims are worked at the same 5 sc per inch as the square edges. The top of each tube has 5 squares x 16 sts = 80 sts. Spread over 16.25 in (41.3 cm), that’s about 4.9 sts per inch, so one sc in each existing stitch lies flat without flaring or pulling in. Don’t add stitches at the seams. Both corner stitches are already counted in each square’s 16.
Top Rim
Rnd 1 (blue): Join blue in the top-edge corner stitch of square A, next to the A/E seam. Ch 1, sc in same st and in each st around, 16 sc across each of the 5 squares. Sl st to first sc. (80 sc)
Rnd 2 (blue): Ch 1, sc in each st around. Sl st to first sc. Fasten off. (80 sc)
Place a marker in st 1 and st 41 of Rnd 2. These sit exactly opposite each other, 40 sts apart, and mark where the straps go.
Bottom Joining Round
Turn the tube upside down. Slide a base into the bottom edge with the base’s RS facing out, so its Round 7 lines up with the bottom edge of the squares.
Joining Rnd (blue): Use the live blue loop from the base. Insert the hook through the bottom-edge corner stitch of square A and the next base stitch together, and sc through both layers. Work one sc through each pair all the way around: the tube’s 80 sts (16 per square x 5 squares) match the base’s 80 sts. Sl st to first sc. Fasten off. (80 sc)
Both edges have exactly 80 sts, so the base closes the tube flat with no gathering.
Repeat for all three tiers. Each tier should now measure 3.85 in (9.8 cm) tall and 5.2 in (13.2 cm) across.
Attach the Hanging Straps
- Top tier: Lay a long strap over each marker on the outside of Tier 1 so it overlaps the band by 0.75 in (1.9 cm) below the rim. Whipstitch all around the overlap with yellow.
- Ring: Bring both long straps up and wrap each top end around the wooden ring from front to back. Fold back 1.25 in (3.2 cm) and whipstitch the end to the strap. The straps should hang about 3.5 in (8.9 cm) below the ring in a gentle V.
- Connectors: Directly below each long strap, sew the top 0.75 in (1.9 cm) of a short strap to the outside bottom of Tier 1. Then sew the bottom 0.75 in (1.9 cm) of each short strap to the outside top of Tier 2 at its markers. This leaves a 1.5 in (3.8 cm) gap between the tiers.
- Repeat step 3 to link Tier 2 to Tier 3.
Final Blocking
- Lightly mist each assembled tier with water.
- Slide a toilet roll into each tier to hold the tube round.
- Stand each tier upright on its base so the base dries flat.
- Pat the rims into clean circles and straighten the strap edges.
- Let everything dry completely, at least 12 hours, before hanging.
Final Quality-Control Checklist
- Every square measures 3.25 in (8.3 cm), with 16 sts per side including corners.
- All 15 flowers face the same direction.
- Every top rim and bottom joining round has exactly 80 sts.
- Each tier is 5.2 in (13.2 cm) across and 3.85 in (9.8 cm) tall.
- The straps sit exactly opposite each other, and the tiers hang level.
- The gaps between tiers are 1.5 in (3.8 cm).
- All ends are woven in securely on the inside.
Troubleshooting
- Puffs lean or look flat: pull each loop up to dc height and close the puff firmly.
- Square looks round: check that each corner has (3 dc, ch 2, 3 dc), with exactly 12 dc per side.
- Base cups: go up a hook size for Rounds 5–7. Base ruffles: go down a hook size.
- Rim flares: recount; you need exactly 80 sc, with no extras at the seams.
- Tier tilts: reposition the straps so the markers are exactly 40 sts apart.
- Roll won’t fit: your squares are too small; make a test square with a larger hook.
Care
Remove the wooden ring, then hand wash in cool water with mild soap. Dry flat, reshaping each tier around a roll.
Final Notes
The whole holder follows from a short chain of measurements. A 3.25 in (8.3 cm) square with 16 sts per side gives a band of 5 x 16 = 80 sts that measures 16.25 in (41.3 cm) around. The top rim and the 80-st base match that count exactly, which gives a tier 5.2 in (13.2 cm) across and 3.85 in (9.8 cm) tall. Three tiers, two 1.5 in (3.8 cm) gaps, the 3.5 in (8.9 cm) strap drop and the 3 in (7.6 cm) ring add up to about 21 in (53.3 cm). Get the first square right, and the rest falls into place.
Happy crocheting!