

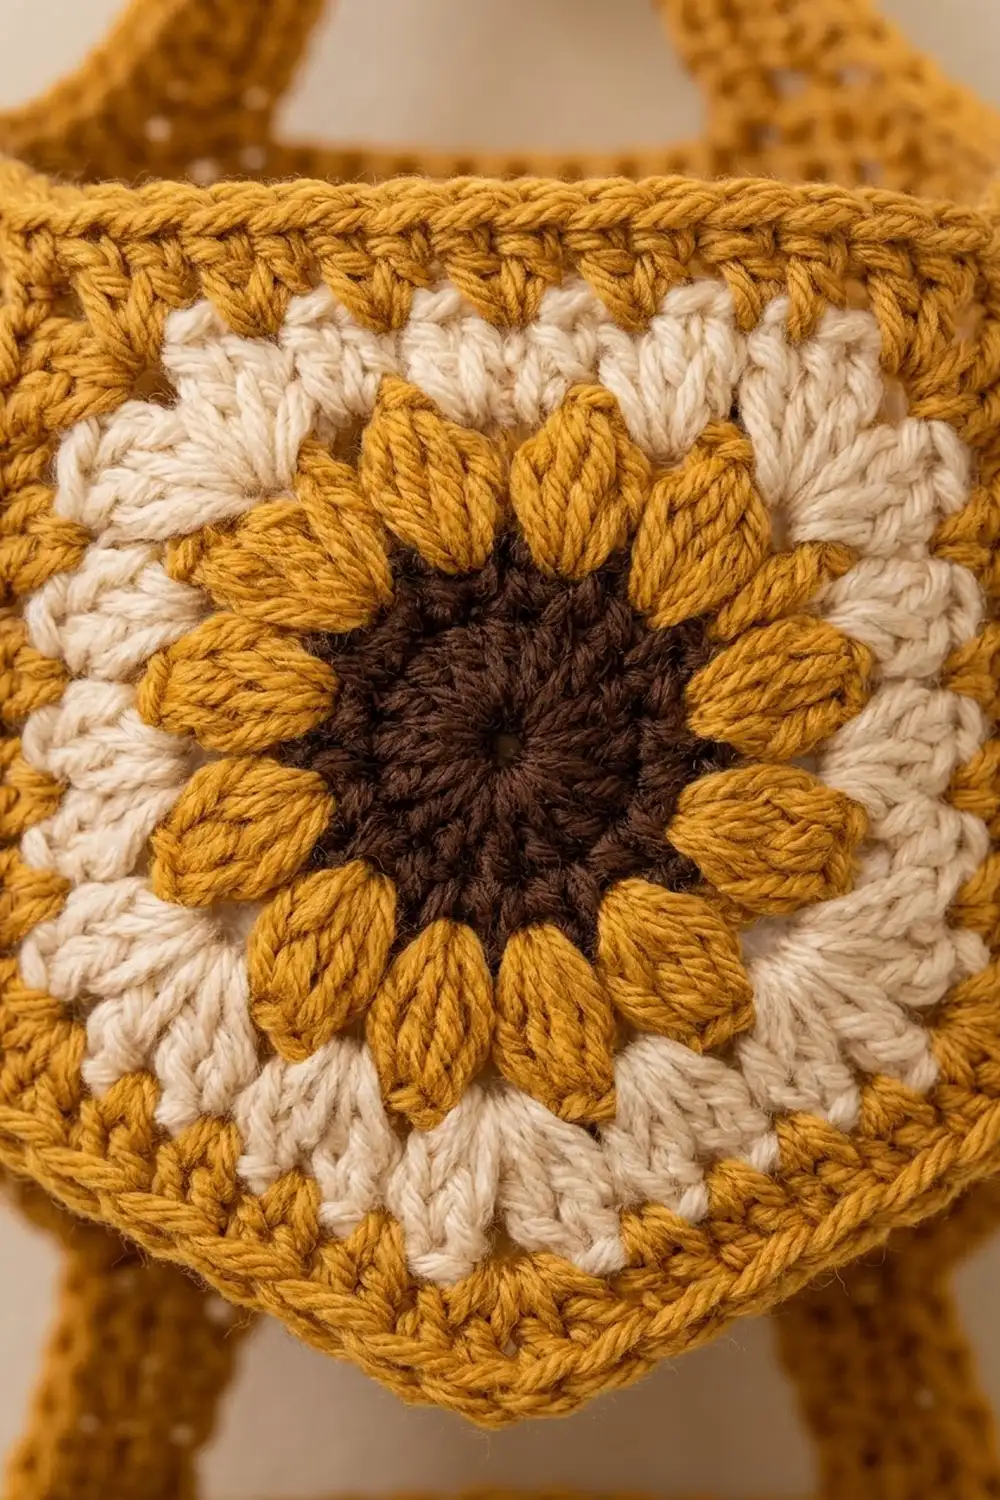
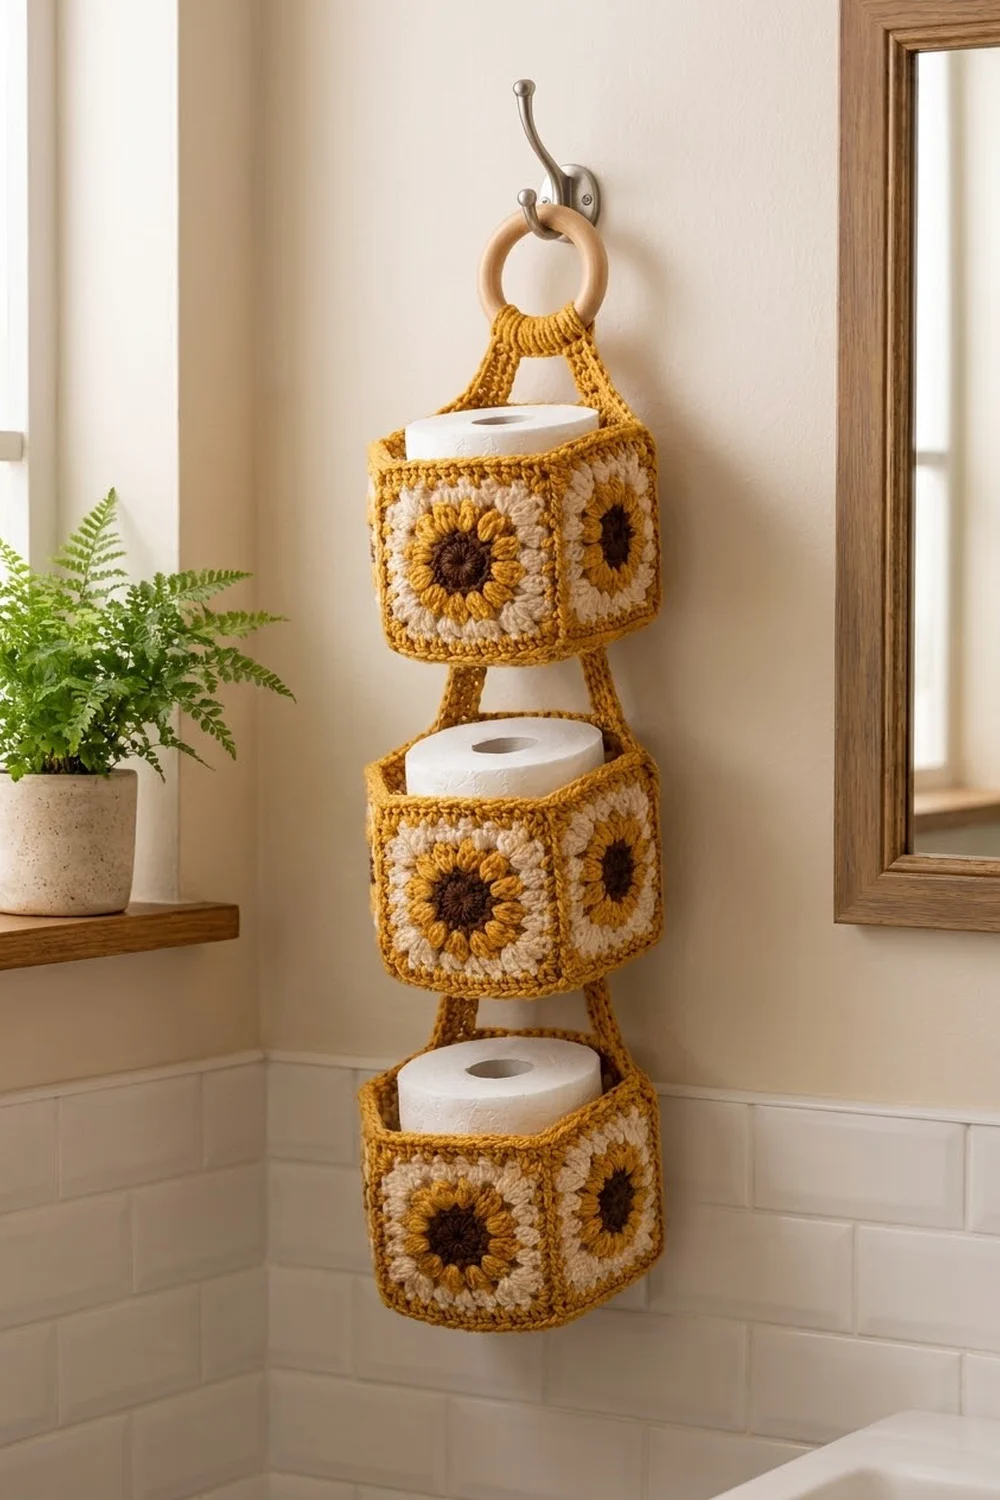
This hanging holder stores three standard toilet rolls in a column of hexagonal baskets. Each basket wall shows six sunflower squares with a brown center, puffy mustard petals and a soft cream ground. All of it is framed in warm mustard.
The style is cottage-farmhouse: firm, tidy and practical. A natural wooden ring at the top lets you hang it from a robe hook, a towel ring or a door hook. The pattern uses US crochet terms throughout.
The finished holder is about 6 in (15.2 cm) wide from corner to corner, 5.2 in (13.2 cm) from flat side to flat side, and about 22 in (55.9 cm) long including the ring. Each tier is about 3.6 in (9.1 cm) tall, so the top of each roll sits just above the rim and is easy to grab.
Here is the construction in order. You make 18 identical squares and join each set of six into a ring. You crochet a hexagon base for each ring and join it with a raised seam. Next you work the rim, then link the tiers with short straps, and finally attach the hanger to the ring.
Finished Size and Construction
- Finished size: 6 in (15.2 cm) corner to corner; 22 in (55.9 cm) long overall
- Skill level: Intermediate
- Terminology: US crochet terms
- Yarn weight: Worsted (#4), cotton or cotton blend
- Hook: 3.75 mm (F-5)
- Number of pieces: 18 squares, 3 bases, 4 connector straps, 2 hanger straps
- Layout: 3 tiers, each made of 6 squares in a ring
- Square size: 3 in x 3 in (7.6 cm x 7.6 cm)
- Square before its mustard frame: 2.6 in (6.6 cm)
- Rim (border) depth: 3 rounds, about 0.6 in (1.5 cm)
Materials
Use a smooth cotton or cotton-blend worsted yarn. Cotton holds the hexagon shape well and copes with bathroom humidity. Avoid fuzzy or very soft acrylics, because the baskets will slump.
- Mustard (A): 180 g, about 360 m
- Cream (B): 70 g, about 140 m
- Chocolate brown (C): 35 g, about 70 m
These amounts assume yarn of roughly 200 m per 100 g. All quantities include a margin of about 15–20% for gauge swatches and joining.
Tools:
- 3.75 mm (F-5) crochet hook
- Tapestry needle
- Wooden ring, 3 in (7.6 cm) outer diameter
- 6 stitch markers
- Measuring tape
- Blocking mat and rust-proof pins
- Spray bottle
Abbreviations (US Terms)
- ch – chain
- sl st – slip stitch
- sc – single crochet
- hdc – half double crochet
- dc – double crochet
- sp – space
- st(s) – stitch(es)
- MR – magic ring
- BL – back loop
- RS / WS – right side / wrong side
Puff stitch (puff): (Yarn over, insert hook in the stitch, pull up a loop to about 1/2 in [1.3 cm]) 3 times, giving 7 loops on the hook. Yarn over and pull through all 7 loops, then ch 1 tightly to close. The closing ch is part of the puff and is never counted as a stitch or a space.
Gauge and Checkpoints
Gauge: 14 sc = 3 in (7.6 cm) with a 3.75 mm hook. The fabric should be firm, with no light showing between stitches.
Make one complete square before anything else. Use these checkpoints:
- After Round 1: about 1.1 in (2.8 cm) across
- After Round 2: about 1.9 in (4.8 cm) across
- After Round 3: 2.6 in (6.6 cm) square, measured side to side
- After Round 4: 3 in (7.6 cm) square
If your square is too big (over 3.1 in / 7.9 cm), go down half a hook size. If it is too small (under 2.9 in / 7.4 cm), go up half a size. Every later piece depends on a 3 in (7.6 cm) square with 14 sc per side.
Sunflower Square (make 18)
Round 1 (C): MR, ch 3 (counts as dc), 11 dc in ring, sl st to the top of ch-3. Pull the ring closed. (12 dc) Fasten off.
Round 2 (A): Join A in any dc. Ch 2 (does not count), puff in the same st, ch 1. Puff in the next dc, ch 1; repeat from * around. Sl st to the top of the first puff. (12 puffs, 12 ch-1 sps)* Fasten off.
Round 3 (B): Join B in any ch-1 sp. Ch 3 (counts as dc), then work (2 dc, ch 2, 3 dc) in the same sp for the first corner. Work 3 dc in each of the next 2 ch-1 sps. *(3 dc, ch 2, 3 dc) in the next ch-1 sp, then 3 dc in each of the next 2 ch-1 sps; repeat from * 2 more times. Sl st to the top of ch-3.
This round turns the circle into a square. Count it as 4 corners x 6 dc (24) plus 8 side sps x 3 dc (24). (48 dc total: 12 dc per side between the ch-2 corner sps) Fasten off.
Round 4 (A): Join A in any ch-2 corner sp. Ch 1, then work (sc, ch 2, sc) in the same sp. Sc in each of the next 12 dc. *(Sc, ch 2, sc) in the next corner sp, then sc in each of the next 12 dc; repeat from * 2 more times. Sl st to the first sc.
This trim round is 48 sc worked 1 per existing dc, plus 8 corner sc. (56 sc total: 14 sc per side, including the corner sc at each end, plus 4 ch-2 corner sps) Fasten off and leave a 16 in (40.6 cm) tail on 6 of the squares for seaming.
Weave in all the other ends. Block the squares flat to 3 in x 3 in (7.6 cm x 7.6 cm) before joining.
Make All Pieces
- Squares: 18 in total. Each square uses about 1.5 g of C, 2 g of A for the petals, 3 g of B and 2 g of A for the frame.
- Bases: 3, in A
- Connector straps: 4, in A
- Hanger straps: 2, in A
Layout of one tier, shown as the ring unrolled flat (repeat for all 3 tiers):
| S1 | S2 | S3 | S4 | S5 | S6 | → S6 joins back to S1
  ^ strap seam (S6/S1)  ^ strap seam (S3/S4)
The straps sit on two opposite seams: the seam between S6 and S1, and the seam between S3 and S4.
Joining
Wall ring: Place two squares RS together. Using A, whipstitch through the BL of matching stitches. Join ch-2 sp to ch-2 sp at the start, then work all 14 sc to 14 sc, then ch-2 sp to ch-2 sp at the end. That is one stitch to one stitch, with nothing added and nothing skipped.
Join S1 to S2, then S2 to S3, and continue to S6. Finally join S6 back to S1 to close the ring.
Keep your tension snug but not puckered. The seam should lie flat when the squares are opened out. Mark the S6/S1 and S3/S4 seams for the straps.
Checkpoint: The ring measures 18 in (45.7 cm) around and 3 in (7.6 cm) tall.
Hexagon Base (make 3, in A)
Work in joined rounds. At the end of every round, sl st to the first sc and ch 1. The ch 1 does not count as a stitch.
- Round 1: 6 sc in MR. (6)
- Round 2: 2 sc in each st. (12)
- Round 3: (Sc in the next st, 2 sc in the next st) 6 times. (18)
- Round 4: (Sc in the next 2 sts, 2 sc in the next st) 6 times. (24)
- Rounds 5–14: For each round number n, work (sc in the next n–2 sts, 2 sc in the next st) 6 times. Each round totals 6 x n. For example, Round 5 = 30, Round 7 = 42, Round 10 = 60 and Round 14 = 84.
Every increase falls on the second stitch of the previous increase pair, so the six corners stack into straight lines and the piece keeps its hexagon shape.
After Round 14: 84 sc, which is 14 sc per side, 3 in (7.6 cm) per side and 5.2 in (13.2 cm) flat to flat. Do not fasten off.
Attaching the base: Hold the base inside the bottom of the ring with WS together and the base RS facing down. Line up each base corner with a vertical seam.
Working from the outside with the base hook still in place, sc through both the base stitch and the square’s bottom-edge stitch. Join 14 base sts to 14 square sts on each side, and skip the joined ch-2 sps at each seam. (84 sc) Sl st to the first sc and fasten off. This seam makes the raised mustard ridge around the bottom.
Border (Top Rim)
Border gauge: This is the same as the main gauge, 14 sc = 3 in (7.6 cm). The rim does not grow because it is a straight tube.
With RS facing, join A in the first sc of S1’s top edge, just after the S6/S1 seam.
- Round 1: Ch 1, then sc in each of the 14 sc along the top of each square. Skip the joined ch-2 sps at each seam. Sl st to the first sc. (84 sc: 14 per square side)
- Round 2: Ch 2 (does not count), then hdc in each st around. Sl st to the first hdc. (84 hdc: 14 per side)
- Round 3: Ch 1, then sc in each st around. Sl st to the first sc. (84 sc: 14 per side) Fasten off.
Why the math works: The rim starts at 6 sides x 14 sts = 84, which matches the 84 sts of the base. Rounds 2 and 3 keep exactly 84 because the rim is a vertical wall, not flat fabric. Adding stitches would make the rim ruffle, and removing them would pull it inward.
Repeat the joining, base and rim for all 3 tiers.
Checkpoint: Each tier is about 3.6 in (9.1 cm) tall from the bottom ridge to the rim.
Straps
Connector straps (4): Lay out the tiers in order: Tier 1 at the top, then Tier 2, then Tier 3.
On Tier 2, with RS facing, join A in Round 3 of the rim 2 sts to the right of the S6/S1 seam. Work across 5 sts, centered on the seam.
- Row 1: Ch 1, sc in each of the 5 sts. (5)
- Rows 2–10: Ch 1, turn, sc in each st. (5)
The finished strap is about 2 in (5.1 cm) long. Leave a 10 in (25.4 cm) tail.
Whipstitch the last row to the bottom ridge of Tier 1 at the matching S6/S1 seam. Repeat at the S3/S4 seam. Then repeat both straps between Tier 3 and Tier 2.
Hanger straps (2): On Tier 1, work Row 1 in the same way at each strap seam. Then repeat Rows 2–25 for a strap about 5 in (12.7 cm) long.
Bring the two strap ends together and stack them. Fold the stacked ends over the wooden ring by 1.25 in (3.2 cm). Whipstitch through all layers.
Checkpoint: The holder hangs about 22 in (55.9 cm) long, ring included.
Final Blocking
- Weave in all remaining ends along the seams.
- Mist each tier lightly until it is damp but not wet.
- Stuff each tier with a toilet roll wrapped in a plastic bag, or with a 4.5 in (11.4 cm) wide container.
- Pinch the six corners into crisp vertical lines.
- Press the base flat. It should measure 5.2 in (13.2 cm) flat to flat.
- Let it dry completely, ideally for 24 hours.
- Hang it from the ring and let the straps settle overnight.
Final Quality-Control Checklist
- Every square measures 3 in (7.6 cm), with 14 sc per side.
- The twelve puff petals are evenly spaced, and the brown center ring is closed tight.
- Each tier ring measures 18 in (45.7 cm) around.
- Each base has 84 sc, and its corners line up with the vertical seams.
- Every rim round has 84 sts.
- All straps sit on opposite seams, so the tiers hang level.
- The tiers are evenly spaced about 2 in (5.1 cm) apart.
- The ends are secure and invisible.
Troubleshooting
- The square cups: Your puffs are too tight. Pull up longer loops, or work Round 2 with a hook half a size larger.
- The square ruffles: Your Round 3 dc are too loose. Tighten your tension or go down half a hook size for that round.
- The base is rounder than a hexagon: Your increases have drifted. Check that each “2 sc” goes into the second stitch of the previous pair.
- The base doesn’t match the ring: Count both pieces. Each needs 84 sts. Add or remove one round on the base only after checking your gauge.
- The tier tilts: The straps are uneven. Count the rows on each strap and redo any strap that doesn’t have the stated number.
- The rim flares: Recount Round 2. You may have worked extra hdc at the seams.
Care
Hand wash in cool water with mild soap, reshape, and dry flat with a roll inside each tier. Avoid the dryer, which can soften the structure.
Final Notes
Everything in this holder follows one measurement chain. A 3 in (7.6 cm) square has 14 sc per side. Six squares make an 18 in (45.7 cm) ring of 84 stitches. A base of 14 rounds also ends at 84 stitches, and the three rim rounds hold 84 stitches. Check the first square and the first base carefully, and the rest of the holder should come out to the stated sizes.
Happy crocheting!