

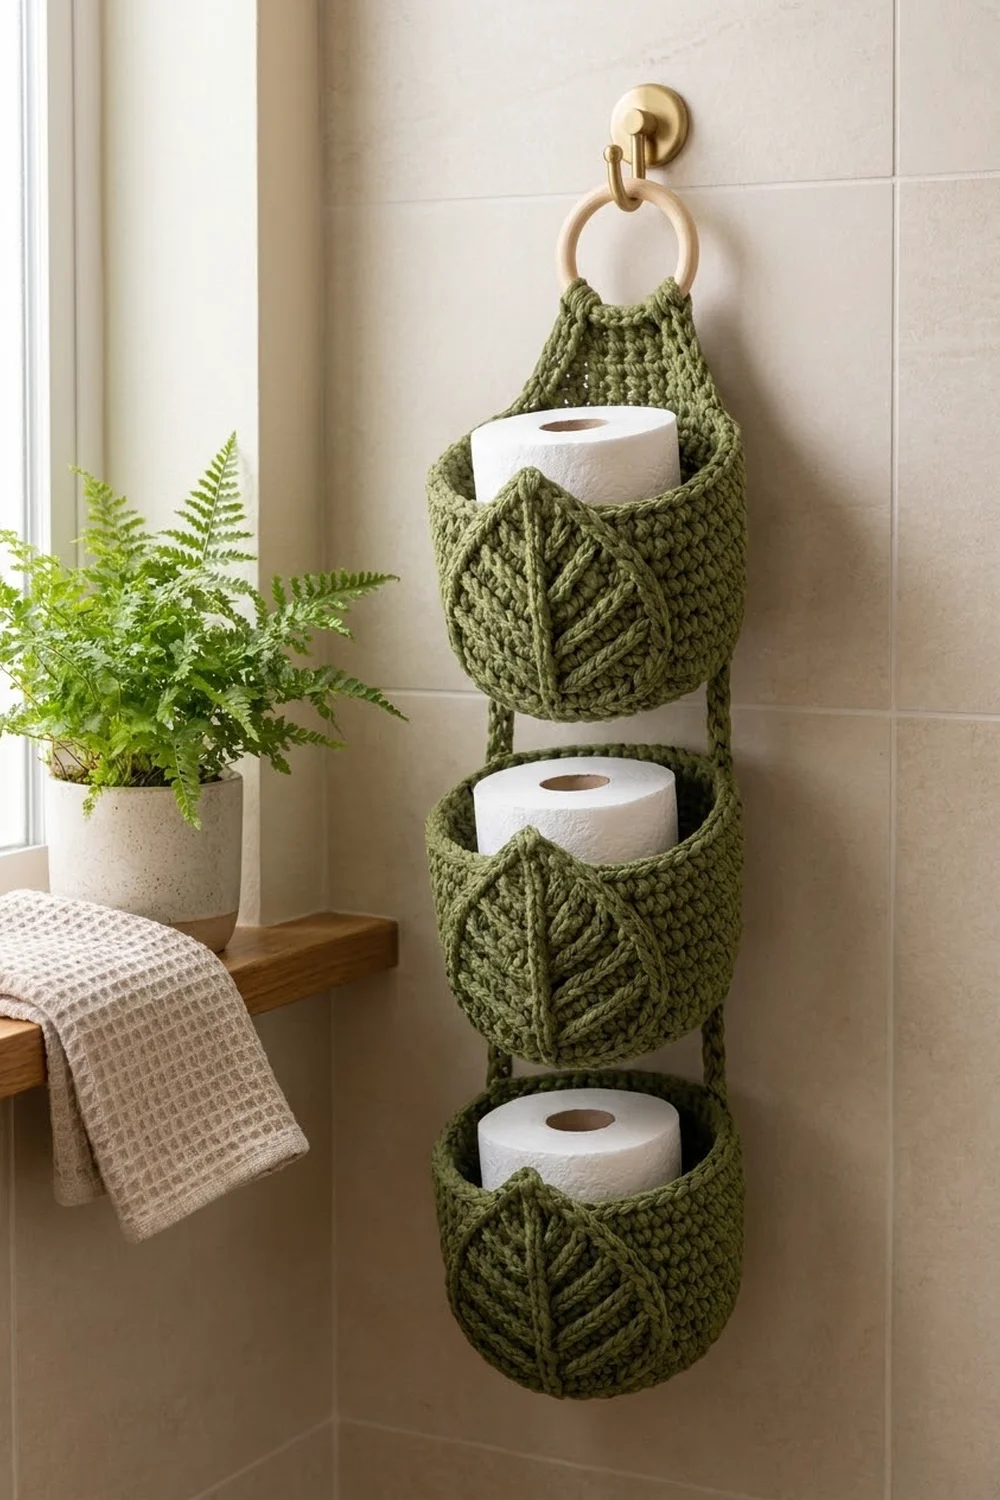
This hanging holder keeps three spare rolls tidy and within reach. Three round baskets hang in a column from a wooden ring, and each basket has a raised leaf appliqué on the front. The look is calm and botanical, and it suits a bathroom with plants, wood and cream walls.
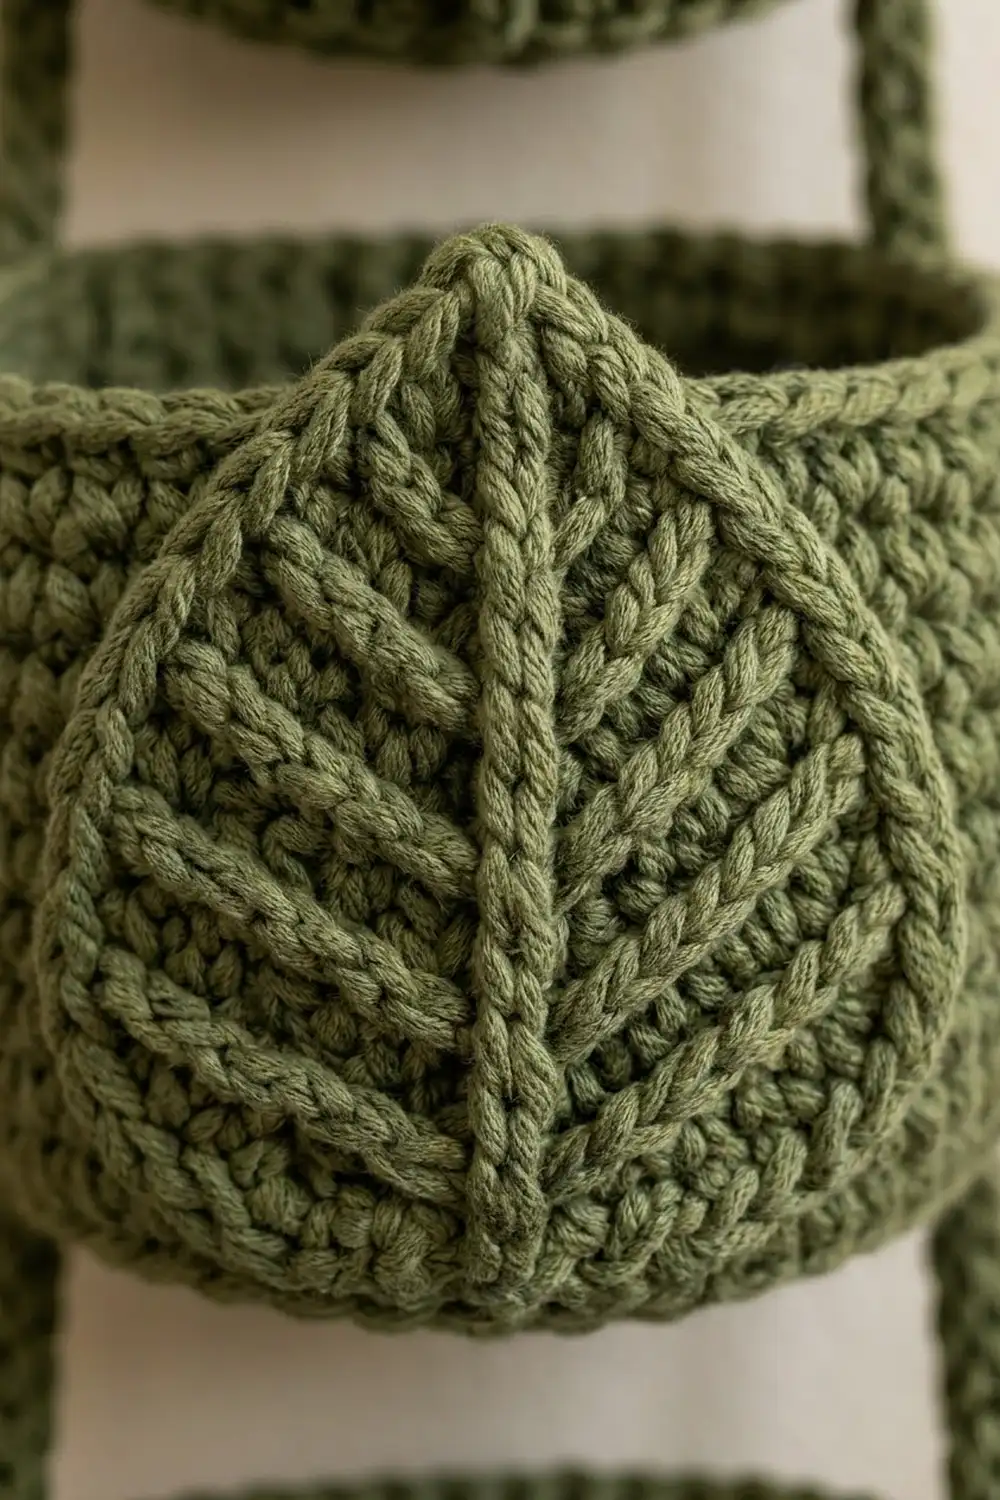
The sample uses one color, a soft olive green, in bulky yarn. Dense single crochet makes firm walls that hold their shape when the baskets are empty. The leaf veins are surface slip stitches, so they stand out without needing a second color.
This pattern uses US crochet terms. The finished holder is about 18.1 in (46.0 cm) long from the top of the folded tab to the bottom of the lowest basket, and 5.1 in (13.0 cm) wide.
You make 11 separate pieces: three baskets worked in joined rounds, three leaves worked around a foundation chain, four connecting cords and one hanging tab. You then sew everything together and add a 2 in (5.1 cm) wooden ring.
Finished Size and Construction
- Finished size: 18.1 in (46.0 cm) long x 5.1 in (13.0 cm) wide
- Skill level: Easy–Intermediate
- Terminology: US crochet terms
- Yarn weight: Bulky (#5)
- Hook: 6.0 mm (J-10)
- Number of pieces: 11 (3 baskets, 3 leaves, 4 cords, 1 tab)
- Layout: 1 column of 3 baskets, linked by 2 in (5.1 cm) cord gaps
- Basket size: 5.1 in (13.0 cm) across x 3.7 in (9.4 cm) tall
- Basket wall before border: 3.1 in (7.9 cm)
- Border (rim) depth: 0.6 in (1.5 cm)
- Leaf size: 4.5 in (11.4 cm) long x 3 in (7.6 cm) wide
Materials
Yarn: Use a bulky cotton or a cotton-acrylic blend. Cotton holds structure well and copes with bathroom humidity. Avoid very fuzzy yarn, because it blurs the leaf veins.
- Olive Green: 220 g / 260 m (284 yd)
The quantity includes a margin of about 15% for your gauge swatch and for sewing tails.
Tools:
– 6.0 mm (J-10) crochet hook
– 2 in (5.1 cm) wooden ring
– Tapestry needle
– 8 locking stitch markers
– Rust-proof pins
– Measuring tape
– Wall hook to hang the holder
Abbreviations (US Terms)
- ch – chain
- sl st – slip stitch
- sc – single crochet
- hdc – half double crochet
- dc – double crochet
- inc – 2 sc in the same stitch
- sc2tog – single crochet 2 together
- MR – magic ring
- st(s) – stitch(es)
- sp – space
- rev sc – reverse single crochet (crab stitch)
Reverse sc (rev sc): Work from left to right (right to left if you crochet left-handed). Insert the hook into the next stitch to the right, yarn over, pull up a loop, yarn over and draw through both loops. This makes a twisted, corded edge.
Surface slip stitch: Hold the working yarn behind the fabric. Insert the hook from front to back through the fabric, pull up a loop, and draw it through the loop on your hook. This makes a raised chain line on the front.
Gauge and Checkpoints
Gauge: 12 sc x 13 rounds = 4 in (10.2 cm) in sc worked in the round.
Make one complete basket before you start the others. It works as a full-size gauge swatch and shows you right away whether a roll fits.
Checkpoints:
– After Rnd 4 (24 sts), the base measures about 2.5 in (6.4 cm) across.
– After Rnd 8 (48 sts), the base measures 5.1 in (13.0 cm) across.
– After Rnd 18, the wall measures 3.1 in (7.9 cm) tall.
– After the border, the wall measures 3.7 in (9.4 cm) tall.
– The leaf measures 4.5 in (11.4 cm) x 3 in (7.6 cm).
If your base is too big, go down to a 5.5 mm (I-9) hook. If it is too small, go up to a 6.5 mm (K-10.5) hook. Do not change the stitch counts. The roll needs the 16 in (40.6 cm) circumference that 48 sts give you.
Basket (Make 3)
Work in joined rounds: sl st to the first sc at the end of each round, then ch 1. The ch 1 does not count as a stitch. The joins form a seam, and this seam marks the center back of the basket.
Base
Rnd 1: MR, 6 sc in ring, join. (6 sts)
Rnd 2: Inc in each st around, join. (12 sts)
Rnd 3: [Sc 1, inc] 6 times, join. (18 sts)
Rnd 4: [Sc 2, inc] 6 times, join. (24 sts)
Rnd 5: [Sc 3, inc] 6 times, join. (30 sts)
Rnd 6: [Sc 4, inc] 6 times, join. (36 sts)
Rnd 7: [Sc 5, inc] 6 times, join. (42 sts)
Rnd 8: [Sc 6, inc] 6 times, join. (48 sts)
Check that the base lies flat and measures 5.1 in (13.0 cm) across.
Walls
Rnds 9–18: Sc in each st around, join. (48 sts in each round)
Work Rnd 9 through both loops. With no turning ridge, the base curves gently into the wall and gives the soft bowl shape.
Marking the basket: Count from the first st after the seam. Place markers in st 12 (right side), st 36 (left side), and sts 24 and 25 (center front). The markers show where the cords and leaf go later. Move them up into the border as you work it.
Continue with the Border section below. Then fasten off and weave in the ends.
Leaf Appliqué (Make 3)
The leaf is worked around a foundation chain. The first chain sits at the leaf’s tip, and the last chain is its rounded base.
Ch 13.
Rnd 1 (side A): Sc in the 2nd ch from the hook, hdc in the next 2 ch, dc in the next 6 ch, hdc in the next 2 ch. (11 sts)
(Base): 3 sc in the last ch. (3 sts)
(Side B): Working into the opposite side of the foundation chain, hdc in the next 2 ch, dc in the next 6 ch, hdc in the next 2 ch, sc in the last ch. (11 sts)
(Tip): Ch 2, sl st to the first sc.
Total: 11 + 3 + 11 = 25 sts plus a ch-2 tip sp.
Rnd 2: Ch 1. Sc in the first st, hdc in the next 9 sts, sc in the next st (side A, 11 sts). Work 2 sc in each of the next 3 sts (base, 6 sts). Sc in the next st, hdc in the next 9 sts, sc in the next st (side B, 11 sts). Work (sc, ch 2, sc) in the tip ch-2 sp, then join.
Total: 11 + 6 + 11 + 2 = 30 sts plus a ch-2 tip sp.
Rnd 3: Ch 1. Sc in the next 11 sts (side A). Work [sc 1, inc] 3 times across the base (9 sts). Sc in the next 11 sts (side B). Sc in the next sc, work (sc, ch 2, sc) in the tip ch-2 sp, then sc in the last sc. Join.
Total: 11 + 9 + 11 + 1 + 2 + 1 = 35 sts plus a ch-2 tip sp.
Fasten off and leave a 24 in (61.0 cm) tail for sewing.
Veins: Hold the leaf with the right side facing you and the tip pointing up.
- Center vein: Surface sl st along the foundation chain, starting 0.3 in (0.8 cm) above the base and ending 0.3 in (0.8 cm) below the tip. This takes about 12 surface sl sts.
- Side veins: Make 4 pairs. Space them evenly along the center vein, about 0.75 in (1.9 cm) apart, starting near the base. Each vein is 3 surface sl sts angled up and outward toward the edge, ending in Rnd 2. Mirror each vein on the other side so the pairs form upward-pointing V’s.
Fasten off the vein yarn on the back.
Hanging Tab and Cords
Hanging tab (make 1):
Ch 13.
Row 1: Sc in the 2nd ch from the hook and in each ch across, turn. (12 sts)
Row 2: Ch 1, sc2tog, sc 8, sc2tog, turn. (10 sts)
Row 3: Ch 1, sc across, turn. (10 sts)
Row 4: Ch 1, sc2tog, sc 6, sc2tog, turn. (8 sts)
Row 5: Ch 1, sc across, turn. (8 sts)
Row 6: Ch 1, sc2tog, sc 4, sc2tog, turn. (6 sts)
Rows 7–16: Ch 1, sc across, turn. (6 sts in each row)
Fasten off and leave a long tail. The tab is 4.9 in (12.4 cm) long. It is 4 in (10.2 cm) wide at Row 1 and narrows to 2 in (5.1 cm).
Cords (make 4):
Ch 20. Sl st in the back bump of the 2nd ch from the hook and in each ch across. (19 sl sts)
Each cord is 6 in (15.2 cm) long. Fasten off and leave long tails at both ends.
Make All Pieces
All 11 pieces are Olive Green:
– Baskets: 3
– Leaves: 3
– Cords: 4
– Tab: 1
Layout (front view):
        ( ring )
         [TAB]
   |   BASKET 1   |
   |  [ LEAF ]    |
   c              c   <- cords 1 & 2, 2 in gap
   |   BASKET 2   |
   |  [ LEAF ]    |
   c              c   <- cords 3 & 4, 2 in gap
   |   BASKET 3   |
   |  [ LEAF ]    |
Joining
Leaves: Center each leaf over the front markers (sts 24–25). Pin it so the tip rises 0.5 in (1.3 cm) above the rim and the base curves 0.3 in (0.8 cm) under onto the base. Leaf length: 3.7 + 0.5 + 0.3 = 4.5 in (11.4 cm).
Whipstitch through the back loops of Leaf Rnd 3, going around the leaf and catching one wall stitch each time. Leave the top 1 in (2.5 cm) of the tip unsewn so it stands free above the rim.
Cords: Each cord covers 6 in (15.2 cm):
– 3.7 in (9.4 cm) sewn down the outside wall of the upper basket
– 2 in (5.1 cm) hanging free as a gap
– 0.3 in (0.8 cm) sewn to the outside rim of the lower basket
Sew cords 1 and 2 to Basket 1 at st 12 and st 36. Sew them over the column of stitches from Border Rnd 1 down to Rnd 9, one sl st to one wall round. Then sew the cord tails to Basket 2 at st 12 and st 36, through Border Rnd 1. Repeat with cords 3 and 4 to link Basket 2 to Basket 3.
Tension: Sew firmly but not tightly. If the wall puckers behind a cord, your stitches are too tight. Hang a roll in the basket while you check.
Tab: Center Row 1 of the tab on the back of Basket 1, over the 12 sts centered on the seam. Overlap the tab 0.6 in (1.5 cm) onto the outside of the border and sew all the way around that overlap. Pass Rows 13–16 through the ring and fold them 1.3 in (3.3 cm) down the back of the tab. Sew the fold down through both layers.
The tab now shows 4.9 − 1.3 − 0.6 = 3.0 in (7.6 cm) above the rim.
Size checkpoint: 3.0 + 3.7 + 2.0 + 3.7 + 2.0 + 3.7 = 18.1 in (46.0 cm).
Border
Each basket gets a 2-round rim border. Work it straight after Rnd 18, before you sew anything on.
Border gauge: The same 12 sc = 4 in (10.2 cm). Two border rounds measure 0.6 in (1.5 cm).
Border Rnd 1: Ch 1, sc in each st around, join. (48 sts: 24 across the front half and 24 across the back half)
Border Rnd 2: Ch 1, rev sc in each st around, join. (48 sts: 24 front, 24 back)
Why the math works: The walls are 48 sts, and both border rounds stay at 48 sts. That is one stitch into each existing stitch, with nothing added. So the rim stays at the same 16 in (40.6 cm) circumference as the walls and does not flare or pull in. The front half is 24 sts, so the leaf markers at sts 24–25 stay centered. The cord markers at sts 12 and 36 stay exactly opposite each other.
Final Blocking
- Lightly mist each basket with water.
- Slide a toilet paper roll into each basket to shape the walls.
- Pin each leaf flat on a towel, with the tip pointed. Steam it lightly if you are using cotton blend.
- Check the rim: the circumference should be 16 in (40.6 cm) and the wall 3.7 in (9.4 cm) tall.
- Let everything dry completely before you sew.
- After joining, hang the holder and let the cords settle overnight.
Final Quality-Control Checklist
- Each basket has 48 sts in Rnds 8–18 and in both border rounds.
- Each base measures 5.1 in (13.0 cm) across.
- Each leaf has 35 sts plus the tip sp in Rnd 3.
- The leaves sit centered, with the tips 0.5 in (1.3 cm) above the rims.
- All three leaves have 4 pairs of side veins.
- The cords sit at sts 12 and 36, with 2 in (5.1 cm) gaps.
- The tab is centered over the back seam, and the ring is secure.
- The total length is 18.1 in (46.0 cm).
- All ends are woven in and hidden inside the baskets.
Troubleshooting
The base cups instead of lying flat: Your tension is tight. Loosen up, or go up a hook size.
The base ruffles: You may have added extra increases. Recount each round against the stated totals.
The roll is too tight: Check that you have 48 sts. If you do, your gauge is too small, so go up a hook size.
The leaf curls: Block it flat before sewing. Make sure the dc sections in Rnd 1 are not too tight.
The veins look flat: Work the surface sl sts a little looser and keep them on the front of the fabric.
The baskets tilt: The two cords are not the same length. Re-sew so both gaps are exactly 2 in (5.1 cm).
The tab stretches: Reinforce the sewing across all 12 sts, and avoid acrylic-only yarn.
Care
Hand wash in cool water, reshape the baskets over rolls and dry flat. Do not tumble dry, because heat can loosen the shape.
Final Notes
The measurements build on each other:
– 48 sts give a 16 in (40.6 cm) rim and a 5.1 in (13.0 cm) basket.
– 10 wall rounds give 3.1 in (7.9 cm), and the 2 border rounds bring the wall to 3.7 in (9.4 cm).
– The 4.5 in (11.4 cm) leaf rises 0.5 in (1.3 cm) above the rim.
– The 6 in (15.2 cm) cords leave 2 in (5.1 cm) gaps.
– The 3.0 in (7.6 cm) tab finishes the 18.1 in (46.0 cm) holder.
Check each number as you go, and the baskets will line up evenly.
Happy crocheting!