

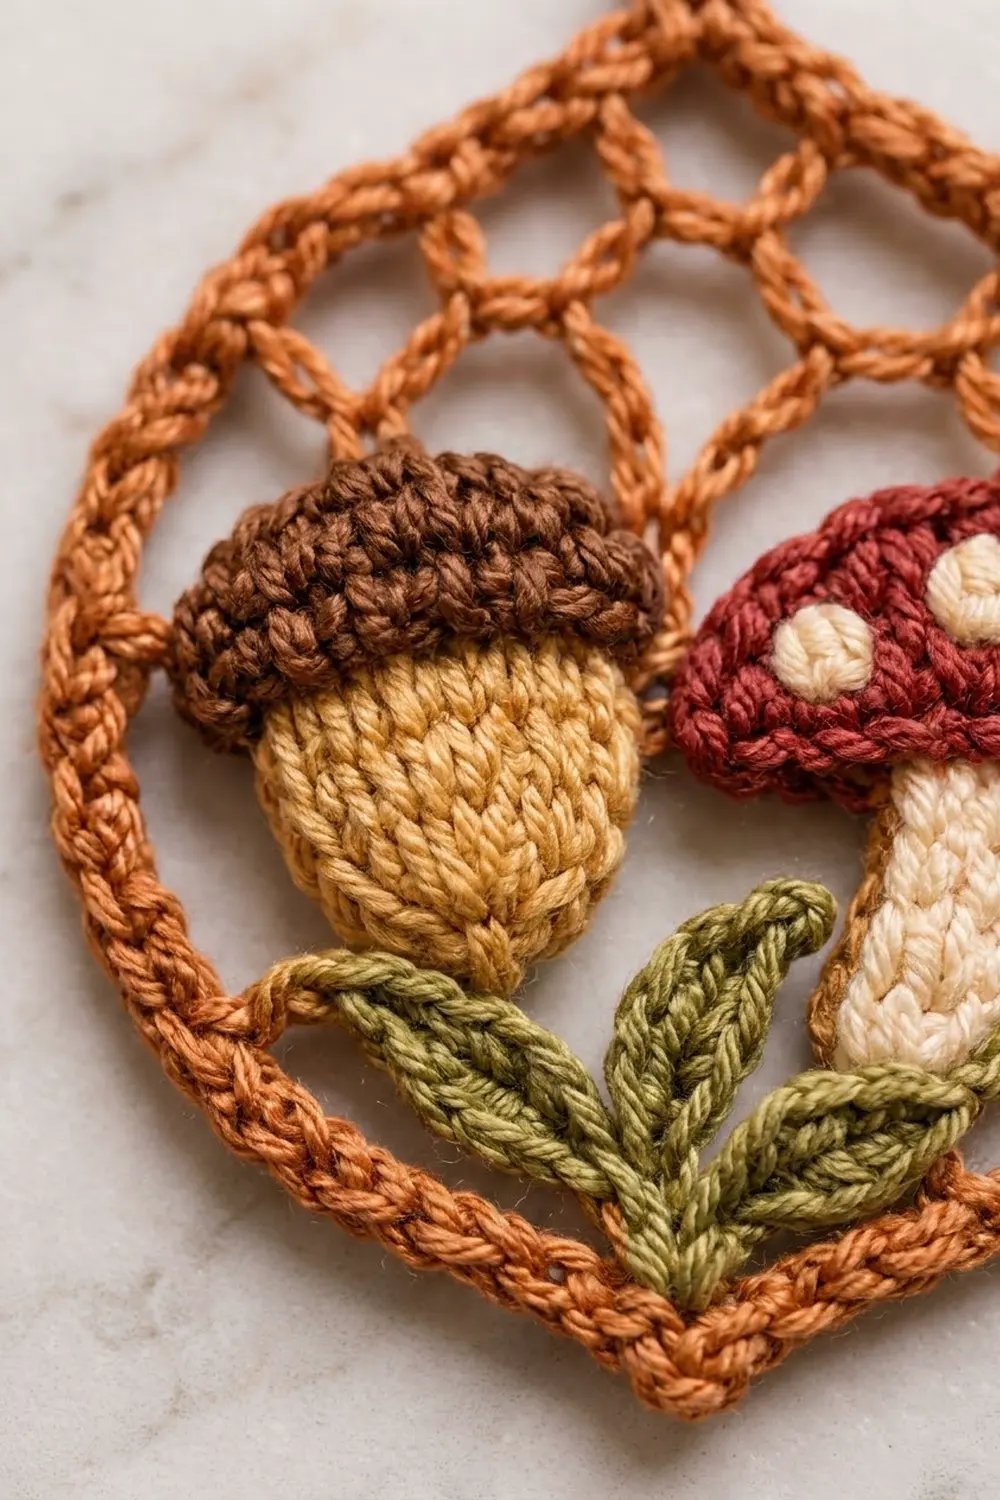
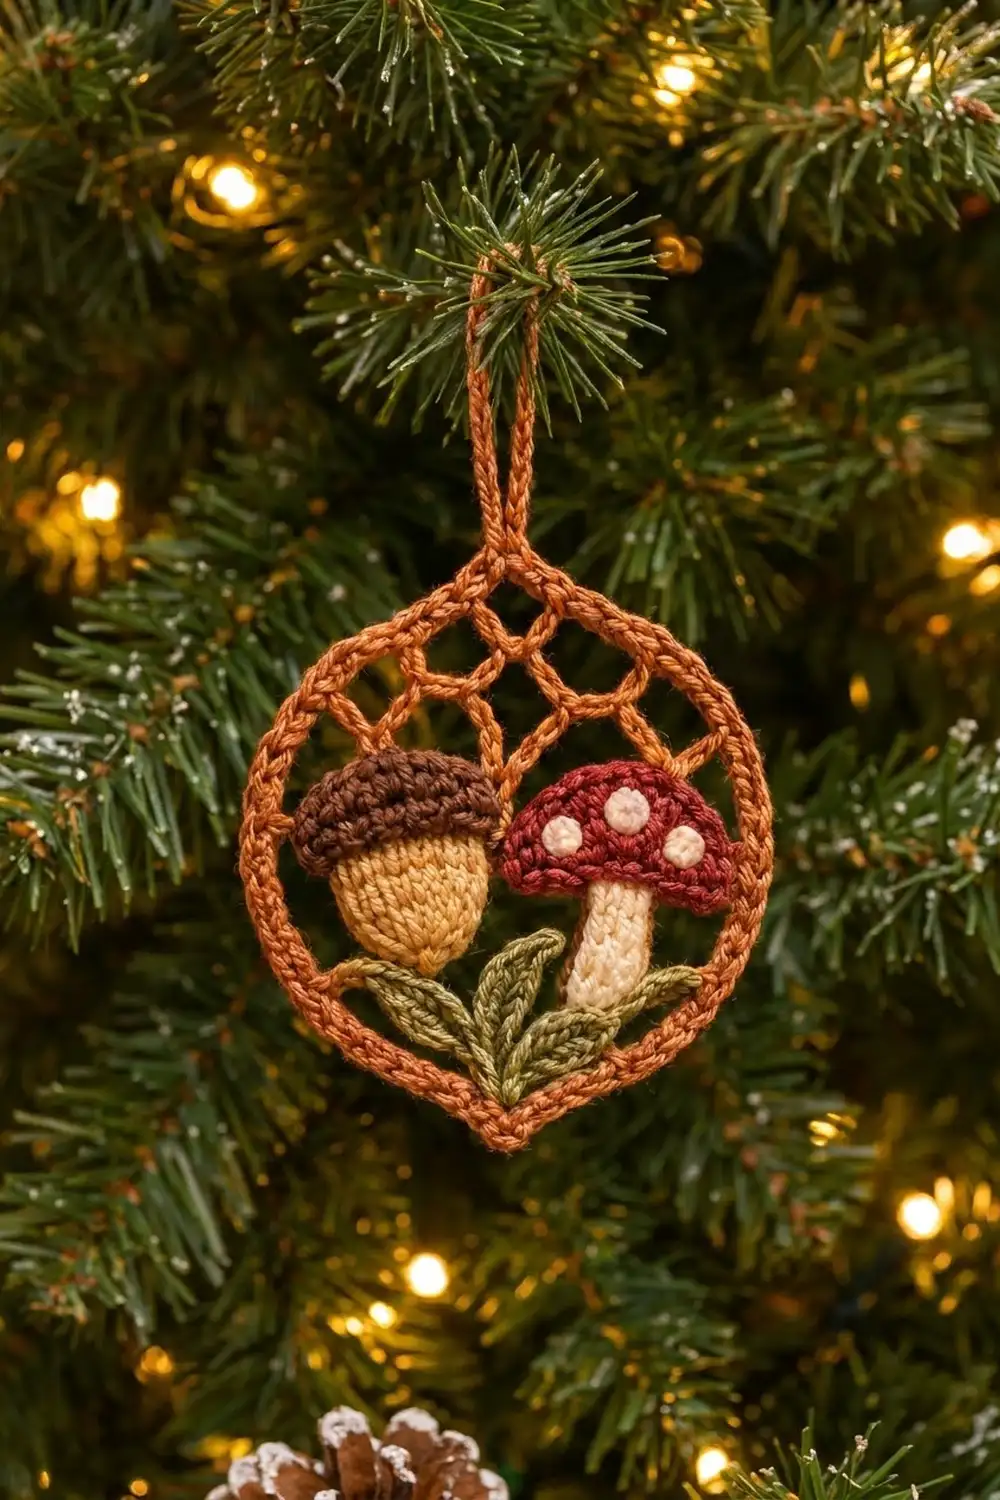
This little woodland ornament captures a forest floor inside a lacy teardrop. A corded rust frame holds an airy chain-mesh “canopy” across the top. Below it sit a chubby acorn and a red-capped toadstool, tucked into a spray of olive leaves.
The color palette is warm and autumnal: rust-copper, chocolate brown, golden tan, deep red, cream and olive green. It looks at home on a Christmas tree, a harvest garland hook or a gift tag.
This pattern uses US crochet terms. The finished ornament measures 3 in (7.6 cm) wide by 3.75 in (9.5 cm) tall, plus a hanging loop of about 1 in (2.5 cm), so it is 4.75 in (12.1 cm) tall overall.
Construction is simple. You crochet a single-crochet ring, then work a three-row chain mesh into the inner edge of its top half. Next you make the acorn, mushroom and leaves as small flat appliqués and sew them in. Finally, a two-round border creates the pointed tip and corded edge, and you add the hanging loop.
Finished Size and Construction
- Finished size: 3 in (7.6 cm) wide × 3.75 in (9.5 cm) tall; 4.75 in (12.1 cm) tall with the loop
- Skill level: Intermediate
- Terminology: US
- Yarn weight: Fingering / super fine (#1), cotton or cotton blend
- Hook: 2.25 mm (B-1)
- Number of pieces: One ornament, made from 1 frame, 1 acorn, 1 mushroom cap, 1 mushroom stem and 4 leaves
- Layout: Mesh fills the upper half of the frame; acorn on the left, mushroom on the right, leaves across the bottom
- Piece size before border (frame and mesh, pinned): 2.75 in (7.0 cm) × 3.5 in (8.9 cm)
- Border depth: 1/8 in (0.3 cm) on every side
Materials
Use a smooth, tightly plied mercerized cotton in fingering weight. Crisp stitch definition matters at this scale, and cotton holds the teardrop shape after blocking.
| Color | Used for | Amount |
|---|---|---|
| Rust / copper | Frame, mesh, border, loop | 10 g / 34 m |
| Chocolate brown | Acorn cap | 2 g / 7 m |
| Golden tan | Acorn nut | 2 g / 7 m |
| Deep red | Mushroom cap | 2 g / 7 m |
| Cream | Mushroom stem and dots | 2 g / 7 m |
| Olive green | Leaves | 2 g / 7 m |
All quantities include a generous margin for swatching and sewing tails.
Tools:
– 2.25 mm (B-1) crochet hook
– Tapestry needle with a small eye
– Scissors
– 4 stitch markers
– Rustproof pins and a foam blocking board
– Spray bottle
– Paper teardrop template, 2.75 in × 3.5 in (7.0 cm × 8.9 cm)
Abbreviations (US Terms)
- ch – chain
- sl st – slip stitch
- sc – single crochet
- hdc – half double crochet
- sc2tog – single crochet 2 together
- BLO – back loop only
- sp(s) – space(s)
- st(s) – stitch(es)
Special technique – free loops: After you work Rnd 1 into the foundation chain, the bottom loop of each chain is left unused along the inner edge of the ring. These are the “free loops.” The mesh is worked into them.
Gauge and Checkpoints
Gauge: 14 sc × 16 rows = 2 in (5.1 cm) square, which is 7 sc and 8 rows per 1 in (2.5 cm).
Make the frame ring first as your test piece, because every later measurement depends on it.
- Checkpoint 1 – swatch: 14 sc measure 2 in (5.1 cm).
- Checkpoint 2 – Rnd 1 ring: Laid flat as a circle, it measures about 3 in (7.6 cm) across, a circumference of about 9.5 in (24.1 cm).
- Checkpoint 3 – frame and mesh, pinned: 2.75 in × 3.5 in (7.0 cm × 8.9 cm).
- Checkpoint 4 – appliqués: The acorn is 1.25 in (3.2 cm) wide × 1.25 in (3.2 cm) tall. The mushroom is 1.25 in (3.2 cm) wide × 1.5 in (3.8 cm) tall when assembled.
- Checkpoint 5 – finished: 3 in × 3.75 in (7.6 cm × 9.5 cm).
If your ring is too big (more than 1/4 in or 0.6 cm over at any checkpoint), go down a hook size, or tighten your foundation chain. If it is too small, go up a hook size. Make all appliqués with the same hook as the frame so they fit the opening.
Part 1: Frame Ring
Use rust.
Foundation: Ch 66. Sl st into the first ch to form a ring, making sure the chain is not twisted.
Rnd 1: Ch 1, sc in the same ch and in each ch around. Sl st to the first sc to join. (66 sc)
Number the stitches for reference:
– St 1 is the top center.
– Sts 2–33 are the right side (32 sts).
– St 34 is the bottom point.
– Sts 35–66 are the left side (32 sts).
Total: 1 + 32 + 1 + 32 = 66.
Place markers in st 1 and st 34. Fasten off and leave a 6 in (15.2 cm) tail.
The free loop under each sc carries the same number as that sc. Check against Checkpoint 2.
Part 2: Chain Mesh
Use rust, with the right side facing. Work into the free loops on the inner edge only.
Row 1: Join with a sl st in free loop 55. [Ch 5, skip 3 loops, sc in next loop] 6 times. You will finish in loop 13. (6 ch-5 sps)
Loop 55 sits 12 stitches left of the top and loop 13 sits 12 stitches right of it, so the row is symmetrical.
Row 2: Sl st in free loops 14, 15 and 16. Ch 5, sc in the first ch-5 sp of Row 1. [Ch 5, sc in next ch-5 sp] 5 times. Ch 5, sl st in free loop 52. (7 ch-5 sps)
Row 3: Sl st in free loops 51, 50 and 49. Ch 5, sc in the first ch-5 sp of Row 2. [Ch 5, sc in next ch-5 sp] 6 times. Ch 5, sl st in free loop 19. (8 ch-5 sps)
Fasten off and weave in the ends.
Each row adds one space because the frame widens toward its middle. The mesh covers free loops 49–66 and 1–19, which is the top 18 stitches on each side plus the top center. Pin the frame to your template and check against Checkpoint 3. The mesh should be about 1.25 in (3.2 cm) deep.
Part 3: Acorn
The acorn is worked flat from the tip upward. Turn at the end of every row. The ch 1 at the start of a row does not count as a stitch.
With golden tan (nut):
- Row 1: Ch 2, 3 sc in 2nd ch from hook. (3)
- Row 2: Ch 1, 2 sc in first st, sc in next, 2 sc in last. (5)
- Row 3: Ch 1, 2 sc in first st, sc in next 3, 2 sc in last. (7)
- Rows 4–6: Ch 1, sc in each st. (7)
Change to brown in the last stitch of Row 6.
With chocolate brown (cap):
- Row 7: Ch 1, 2 sc in first st, sc in next 5, 2 sc in last. (9)
- Row 8: Ch 1, sc in BLO of each st. (9)
- Row 9: Ch 1, sc2tog, sc in next 5, sc2tog. (7)
- Row 10: Ch 1, sc2tog, sc in next 3, sc2tog. (5)
Acorn stem: Ch 3, sl st in 2nd and 3rd ch from hook, sl st in the top of the last sc. Fasten off with a 10 in (25.4 cm) tail.
Row 7 sticks out past the nut on both sides, which gives the cap its overhang. The BLO ridge in Row 8 gives the cap its bumpy texture.
Part 4: Mushroom
Stem (cream):
- Row 1: Ch 5, sc in 2nd ch from hook and in next 3 ch. (4)
- Row 2: Ch 1, sc in each st. (4)
- Row 3: Ch 1, sc2tog, sc in next 2. (3)
- Rows 4–8: Ch 1, sc in each st. (3)
Fasten off with a 10 in (25.4 cm) tail. The stem is 1 in (2.5 cm) tall and about 0.5 in (1.3 cm) wide, flaring slightly at the base.
Cap (deep red):
- Row 1: Ch 8, sc in 2nd ch from hook and in each ch across. (7)
- Row 2: Ch 1, 2 sc in first st, sc in next 5, 2 sc in last. (9)
- Row 3: Ch 1, sc in each st. (9)
- Row 4: Ch 1, sc2tog, sc in next 5, sc2tog. (7)
- Row 5: Ch 1, sc2tog, sc in next 3, sc2tog. (5)
- Row 6: Ch 1, sc2tog, sc in next st, sc2tog. (3)
Fasten off with a 10 in (25.4 cm) tail. The cap is 1.25 in (3.2 cm) wide and 0.75 in (1.9 cm) tall, with Row 1 as its flat underside.
Dots: With cream, embroider 4 French knots (3 wraps each) spread over the cap.
Assemble the mushroom: Center the top 2 rows of the stem behind Row 1 of the cap and whipstitch them in place. The stem overlaps the cap by 0.25 in (0.6 cm), so the assembled mushroom is 1.5 in (3.8 cm) tall.
Part 5: Leaves (Make 4)
Use olive green.
- Ch 7. Working toward the base: sl st in 2nd ch from hook, sc in next ch, hdc in next 2 ch, sc in next ch, sl st in last ch. (6 sts)
- Rotate the leaf and work along the free loops toward the tip: sl st in first loop, sc in next, hdc in next 2, sc in next, sl st in last. (6 sts)
- Sl st into the tip to close the leaf. (12 sts in total)
Fasten off with an 8 in (20.3 cm) tail. Each leaf is about 0.75 in (1.9 cm) long.
Part 6: Assembly
Lay the frame right side up on the template.
- Acorn: Place it on the left so its cap touches the lowest mesh scs and its left edge rests on the inner edge of the frame. Whipstitch it in 3 places: frame, mesh and cap edge.
- Mushroom: Place it on the right, with the cap touching the right inner edge and just meeting the acorn cap. Whipstitch the cap to the frame, to the mesh and to the acorn cap where they touch.
- Leaves: Arrange them in a fan above the bottom point. Point 1 leaf up and outward on each side, and point 2 up the center between the acorn tip and the mushroom stem. Layer the bases over the acorn tip and the stem base, then sew each leaf base to the frame just above st 34. Tack each leaf tip down with one small stitch.
Weave all tails into stitches of their own color.
Border
Use rust and work into the outer sc tops of Rnd 1. The border gauge is the same as the main gauge, 7 sc per 1 in (2.5 cm).
Rnd 2 (conversion round): Join with a sl st in st 1. Ch 1, sc in st 1.
– Right side (sts 2–33): [Sc in next 9, 2 sc in next] 3 times, sc in next 2. (35)
– Bottom point (st 34): 3 sc in st 34. (3)
– Left side (sts 35–66): Sc in next 2, [2 sc in next, sc in next 9] 3 times. (35)
Sl st to the first sc to join.
Count: 66 sts worked 1-per-stitch + 8 added (3 per side + 2 at the point) = 74 sts. That is 1 at the top + 35 on the right + 3 at the point + 35 on the left.
Rnd 3 (trim round): Ch 1, sl st in BLO of each st around. Sl st to the first sl st to join. 74 sts worked 1-per-stitch + 0 added = 74 sl sts.
Hanging loop: Ch 16 and sl st into the top center st to form a loop. Work 24 sc into the loop, over the chain, then sl st to the base. Fasten off and weave in the end.
Why the math works: Moving outward by 1/8 in (0.3 cm) lengthens the outline by about 0.8 in (2.0 cm), which equals about 6 stitches. The 3 increases on each side cover this, so the edge lies flat without ruffling. The 3-sc point turns the rounded bottom into a sharp tip.
The BLO slip stitches roll the front loops outward into the raised, corded ridge. Together the two border rounds add 1/8 in (0.3 cm) on every side. That takes the piece from 2.75 in × 3.5 in to 3 in × 3.75 in (7.6 cm × 9.5 cm).
Final Blocking
- Lightly mist the ornament until it is damp, not soaked.
- Lay it face up on the 2.75 in × 3.5 in template, with the border sitting just outside the template line.
- Pin the top center, the bottom point and both widest points first.
- Pin each mesh space open into a rounded diamond, and pin the bottom point sharp.
- Flatten the appliqués with your fingertips without stretching them.
- Measure 3 in × 3.75 in (7.6 cm × 9.5 cm) and adjust the pins.
- Let it dry completely, at least 6 hours, before unpinning.
Final Quality-Control Checklist
- Rnd 1 has 66 sc; Rnd 2 and Rnd 3 each have 74 sts.
- The mesh rows have 6, 7 and 8 ch-5 spaces, and the mesh is symmetrical.
- The acorn and mushroom are each 1.25 in (3.2 cm) wide.
- All appliqués are anchored in at least 3 places.
- The bottom point is sharp and centered under the leaves.
- The loop is centered above st 1.
- The ornament measures 3 in × 3.75 in (7.6 cm × 9.5 cm).
- No tails show on the front.
Troubleshooting
- The ring twisted: Before you join the foundation, check that every chain “V” faces the same way.
- The mesh droops or puckers: Your chains are too loose or too tight. Rework with ch 4 or ch 6 to match the frame.
- The appliqués don’t fit: Recheck your gauge. Larger appliqués can overlap the frame edge by up to 1/8 in (0.3 cm).
- The border ruffles: Rnd 2 is too loose. Work it with tighter tension rather than removing increases.
- The point is rounded: Re-pin it sharp while damp, or work (sc, hdc, sc) in st 34 instead of 3 sc.
- The ornament tilts on the tree: Re-center the loop on st 1.
Care
Spot clean with cool water and mild soap, then reshape and dry the ornament flat. Store it flat in tissue so the mesh stays open.
Final Notes
Each stage depends on the one before it:
– The gauge of 7 sc per 1 in (2.5 cm) gives a 66-st ring about 3 in (7.6 cm) across.
– The mesh and pinning shape it into a 2.75 in × 3.5 in (7.0 cm × 8.9 cm) teardrop.
– The 1.25 in (3.2 cm) appliqués fill the lower half.
– The 74-st border adds 1/8 in (0.3 cm), for a final 3 in × 3.75 in (7.6 cm × 9.5 cm) ornament.
Check each stage and the next one will fit.
Happy crocheting!