

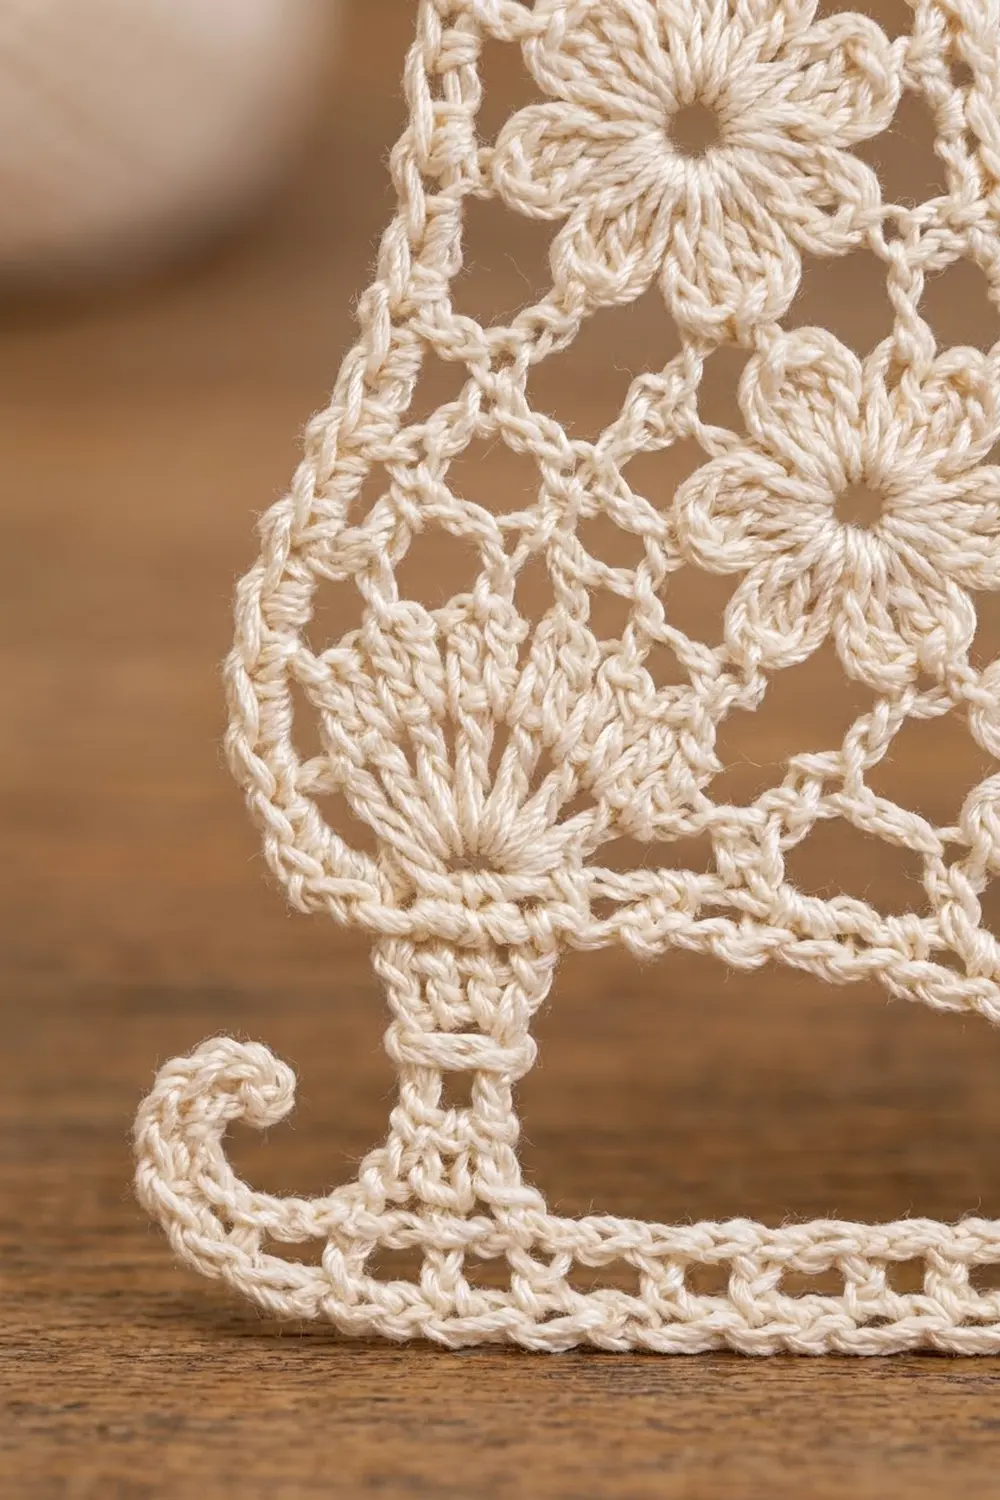
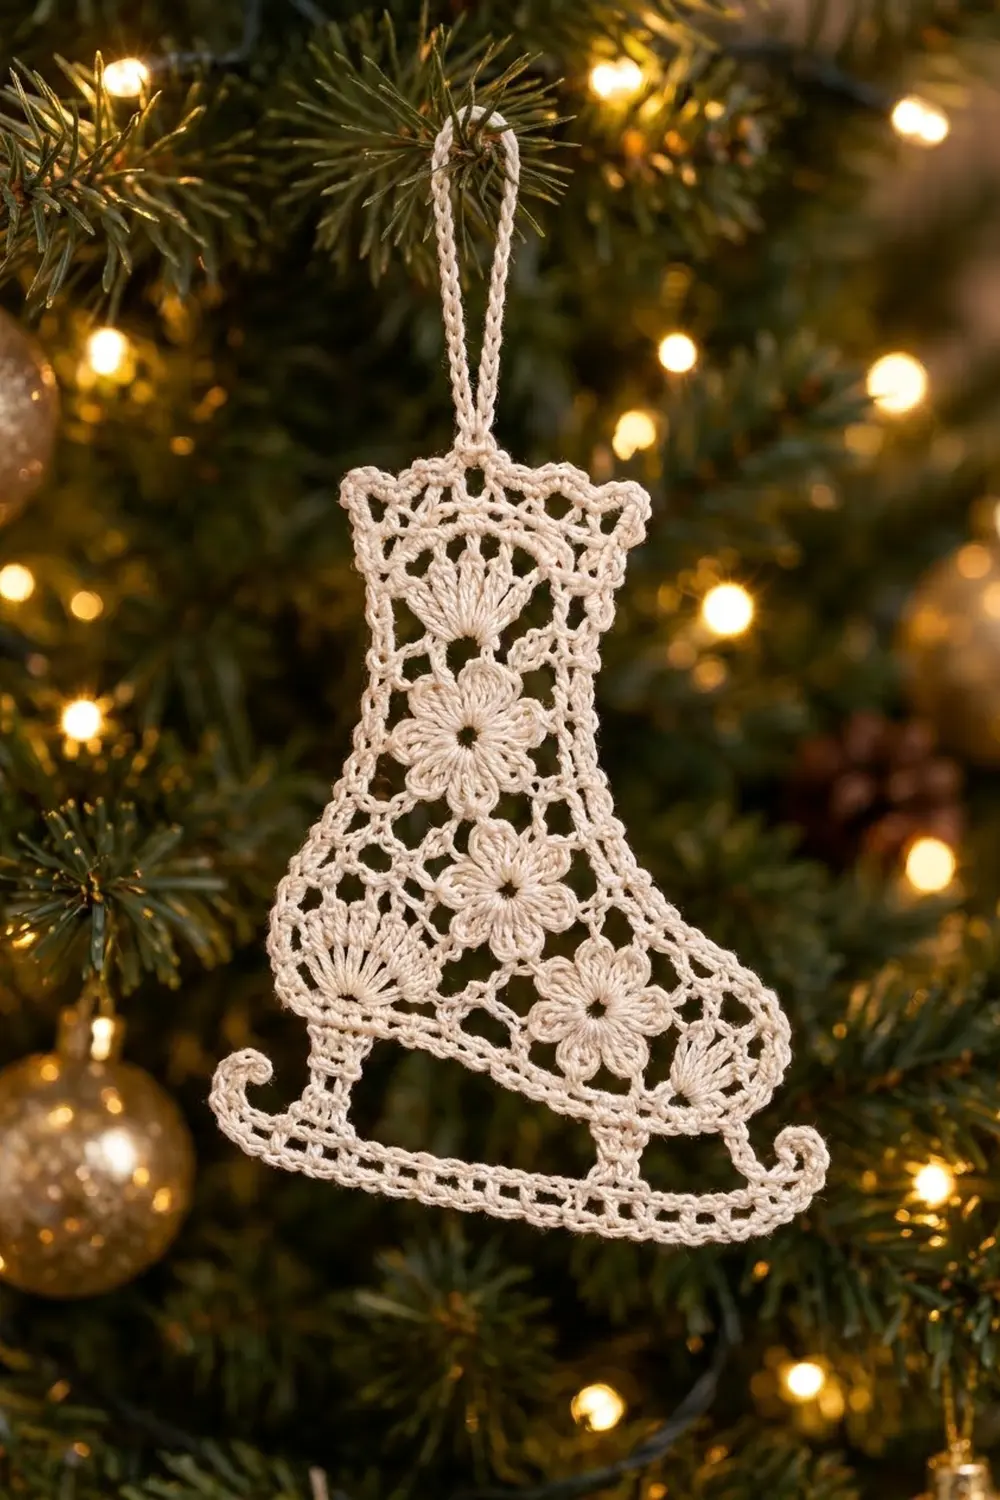
This lace ice skate looks old-fashioned and delicate, but it’s quick to make. It’s worked in cream size 10 cotton thread. The boot is open filet mesh with spoked fan shells, a little crown cuff and a curled blade. Four tiny six-petal flowers are sewn on top of the mesh in a soft diagonal, so the skate looks embroidered.
The single cream color suits a natural or vintage tree, but you can also use white, ivory or pale gold. Once stiffened, the ornament hangs flat and catches the tree lights through its open mesh.
This pattern uses US crochet terms. The finished ornament measures about 4 1/4 in (10.8 cm) wide and 4 7/8 in (12.4 cm) tall, not counting the 1 in (2.5 cm) hanging loop.
You’ll crochet the boot flat in rows from the sole up to the cuff, shaping the toe side with stepped decreases. Then you’ll work a single crochet outline, add the blade rail with two posts, make four small flowers, sew them on and stiffen the piece.
Finished Size and Construction
- Finished size: 4 1/4 in (10.8 cm) wide x 4 7/8 in (12.4 cm) tall, plus a 1 in (2.5 cm) loop
- Skill level: Intermediate (thread work, filet shaping)
- Terminology: US crochet terms
- Yarn weight: Size 10 cotton crochet thread (Lace, weight 0)
- Hook: 1.5 mm (US steel 8)
- Number of pieces: 1 ornament (boot, with the blade and loop worked on), plus 4 small flower appliqués sewn on
- Layout: Single piece; no grid
- Boot before border: 3 1/2 in (8.9 cm) wide at the foot x 4 in (10.2 cm) tall
- Border depth: 1/8 in (0.3 cm) outline on the heel, sole and front; the blade adds 3/4 in (1.9 cm) below the sole
Materials
Use a smooth, mercerized cotton thread. It shows stitch definition clearly, takes starch well and doesn’t fuzz. Avoid blends and acrylic thread, because they won’t hold a crisp shape after stiffening.
- Cream size 10 cotton thread: 6 g / 35 m (about 38 yd)
- 1.5 mm (US steel 8) crochet hook
- Fine tapestry needle
- 2 stitch markers
- Rustproof pins and a foam blocking board
- Fabric stiffener or a thick starch solution
- Plastic wrap
These quantities include a margin of about 20% for gauge swatching, sewing tails and the hanging loop.
Abbreviations (US Terms)
- ch – chain
- sl st – slip stitch
- sc – single crochet
- dc – double crochet
- dc3tog – double crochet 3 together (cluster)
- sk – skip
- sp – space
- st(s) – stitch(es)
- RS / WS – right side / wrong side
Special Stitches
- Mesh: ch 2, sk 2 sts (or one ch-2 sp), dc in the next dc. Each mesh is 3 sts wide.
- Fan: (dc, ch 1) 4 times, dc, all in the same st. This makes 5 dc with 4 ch-1 sps, and the center dc is the 3rd one. One fan replaces 2 meshes.
- Picot: ch 3, sl st in the 3rd ch from the hook.
- Petal cluster: dc3tog worked in one st. (Yo, insert hook, pull up a loop, yo, pull through 2) 3 times, then yo and pull through all 4 loops.
- Post: ch 4, sl st in the marked sole sc, sc in each of the 4 ch back down, then sl st in the rail sc you just made.
Gauge and Checkpoints
Gauge: 4 meshes and 4 mesh rows = 1 in (2.5 cm). One sc row is about 1/8 in (0.3 cm) tall. Edge stitches run about 12 sc per inch (4.7 sc per cm).
Make the boot first and check it before you make the flowers.
- After Row 2: 14 meshes = 3 1/2 in (8.9 cm) wide.
- After Row 9: 2 1/8 in (5.4 cm) tall; leg is 8 meshes = 2 in (5.1 cm) wide.
- After Row 15: 3 5/8 in (9.2 cm) tall; cuff is 10 meshes = 2 1/2 in (6.4 cm) wide.
- After Row 17: 4 in (10.2 cm) tall.
- After the outline: 3 3/4 in (9.5 cm) wide x 4 1/8 in (10.5 cm) tall.
If your boot is too big, try a 1.25 mm hook. If it’s too small, try a 1.65 mm hook. Small differences are fine for an ornament, but the blade rail must still line up with the sole (see the Border section).
Boot
The rows are numbered with the heel on the left and the toe on the right when the RS faces you. RS rows start at the toe, and WS rows start at the heel. The ch-5 at the start of a mesh row counts as dc + ch-2.
Row 1 (RS): Ch 44. Sc in the 2nd ch from the hook and in each ch across. Turn. (43 sc)
Row 2 (WS): Ch 5, sk 2 sc, dc in the next sc. Ch 2, sk 2 sc, dc in the next sc. Repeat from * across. Turn. (14 meshes, 15 dc)
Row 3 (RS, heel fan): Ch 5, dc in the next dc. (Ch 2, dc in the next dc) 11 times, for 12 meshes. Sk the ch-2 sp, Fan in the next dc, sk the ch-2 sp, dc in the 3rd ch of the turning ch. Turn. (12 meshes + 1 fan = 14 positions)
Row 4 (WS): Ch 5, dc in the center dc of the fan, ch 2, dc in the next dc. This restores 2 meshes. (Ch 2, dc in the next dc) 11 times. Turn, leaving the last mesh unworked. (13 meshes)
Row 5 (RS): Sl st in each of the next 3 sts. Ch 5, dc in the next dc. (Ch 2, dc in the next dc) 11 times. Turn. (12 meshes)
Row 6 (WS): Ch 5, dc in the next dc. (Ch 2, dc in the next dc) 10 times. Turn, leaving the last mesh unworked. (11 meshes)
Row 7 (RS, instep fan): Sl st in each of the next 3 sts. Ch 5, dc in the next dc, for 1 mesh. Sk the ch-2 sp, Fan in the next dc, sk the ch-2 sp, dc in the next dc. (Ch 2, dc in the next dc) 7 times. Turn. (1 mesh + 1 fan + 7 meshes = 10 positions)
Row 8 (WS): Ch 5, dc in the next dc. (Ch 2, dc in the next dc) 6 times, for 7 meshes. Ch 2, dc in the center dc of the fan, ch 2, dc in the next dc. Turn, leaving the last mesh unworked. (9 meshes)
Row 9 (RS): Sl st in each of the next 3 sts. Ch 5, dc in the next dc. (Ch 2, dc in the next dc) 7 times. Turn. (8 meshes)
Rows 10–12: Ch 5, dc in the next dc. (Ch 2, dc in the next dc) 7 times. Turn. (8 meshes each)
Row 13 (RS, cuff fan): Ch 5, dc in the next dc. (Ch 2, dc in the next dc) 2 times, for 3 meshes. Sk the ch-2 sp, Fan in the next dc, sk the ch-2 sp, dc in the next dc. (Ch 2, dc in the next dc) 3 times. Turn. (3 meshes + 1 fan + 3 meshes = 8 positions)
Row 14 (WS): Work 3 meshes. Ch 2, dc in the center dc of the fan, ch 2, dc in the next dc. Work 3 meshes. Turn. (8 meshes, 9 dc)
Row 15 (RS, flare): Ch 5, dc in the base of the ch, for 1 increase mesh. (Ch 2, dc in the next dc) 8 times. Ch 2, dc in the same st as the last dc, for 1 increase mesh. Turn. (10 meshes, 11 dc)
Row 16 (WS, conversion): Ch 1, sc in the first dc. 2 sc in the next ch-2 sp, sc in the next dc. Repeat from * 9 more times. Turn. (1 + (10 x 3) = 31 sc)
Row 17 (RS, crown): Ch 1, sc in the first sc. Sk 2 sc, (2 dc, picot, 2 dc) in the next sc, sk 2 sc, sc in the next sc. Repeat from * 4 more times. (6 sc + 5 crown points) Don’t fasten off.
This leaves three fans: one at the heel (Row 3), one on the instep slope (Row 7) and one just below the cuff (Row 13).
Flowers (make 4)
Rnd 1: Make a magic ring, ch 1, 12 sc in the ring, and sl st to the first sc. (12 sc)
Rnd 2: Ch 2, petal cluster in the next sc, ch 2, sl st in the next sc. Repeat from * 5 more times. The last sl st lands in the joining st. (6 petals)
Fasten off and leave a 6 in (15.2 cm) tail. Each flower measures about 3/4 in (1.9 cm) across, which covers 3 meshes.
Placement: Count columns from the heel, where column 1 is the heel-edge mesh. Center each flower over the dc between the two columns listed:
- Flower 1: Row 11, between columns 4 and 5 (center of the leg)
- Flower 2: Row 8, between columns 5 and 6
- Flower 3: Row 4, between columns 5 and 6
- Flower 4: Row 4, between columns 9 and 10 (toward the toe)
Tack each flower down with small stitches at the tip of every petal and at the center ring. They should lie flat on the RS, framed by the mesh around them.
Border
Border gauge: 12 sc per inch on every edge. That means 3 sc around each mesh-row end (4 rows = 1 in), 3 sc across each exposed step mesh (1/4 in), and 1 sc per foundation chain along the sole.
Outline Row (RS)
Continue from the end of Row 17 at the top of the heel. Ch 1 and work down the heel edge:
- Heel side: 2 sc in the end of Row 17, 1 sc in the end of Row 16, 3 sc in the end of each of Rows 15–2 (42 sc) and 1 sc in the end of Row 1. (46 sc)
- Heel corner: Ch 1.
- Sole: 1 sc in each free loop of the foundation chain. (43 sc) Mark the 7th sc from each end.
- Toe corner: Ch 1.
- Front side: 1 sc in the end of Row 1. Then work 3 sc in the end of each of Rows 2–15 (42 sc) and 3 sc across each of the 6 step edges (18 sc). Finish with 1 sc in the end of Row 16 and 2 sc in the end of Row 17. (64 sc)
Fasten off. The outline has 46 + 43 + 64 = 153 sc plus 2 corner ch.
Blade Rail
Row 1: Ch 50. Sc in the 2nd ch from the hook and in each ch across. Turn. (49 sc)
Row 2: Ch 4 (counts as dc + ch 1), sk 1 sc, dc in the next sc. Ch 1, sk 1 sc, dc in the next sc. Repeat from * across. Turn. (24 ch-1 meshes, 49 sts)
Row 3 (joining row): Hold the rail below the boot so that both RS face you, starting at the toe end. Ch 1, then sc in each of the first 9 sts. Sc in the 10th st and work a Post into the marked sole sc at the toe end. Sc in each of the next 29 sts. Sc in the 40th st and work a Post into the marked sole sc at the heel end. Sc in each of the last 9 sts. (9 + 1 + 29 + 1 + 9 = 49 sc, plus 2 posts)
Heel curl: Ch 5. Sc in the 2nd ch from the hook, 2 sc in the next ch, sc in the next ch and 2 sc in the last ch. (6 sc) Sl st in the end of rail Row 2, then fasten off.
Toe curl: Join with a sl st in the first sc of rail Row 3 at the toe end and ch 9. Sc in the 2nd ch from the hook. (Sc in the next ch, 2 sc in the next ch) 3 times, then sc in the last ch. (11 sc) Fasten off. The extra stitches make the tip curl upward.
Why the math works: The rail’s 49 sc measure 4 in (10.2 cm), and the sole’s 43 sc measure 3 1/2 in (8.9 cm). That leaves 3 extra sts, or 1/4 in (0.6 cm), at each end. Rail st 10 sits 3 sts past the sole’s end, so it lines up with sole sc 7, the marked st. Rail st 40 lines up with sole sc 7 from the other end in the same way. The posts land exactly 30 sts apart on both the rail and the sole, so they hang straight.
Hanging Loop
Join with a sl st in the picot of the 3rd (center) crown point and ch 24. Sl st in the same picot, then work 30 sc into the loop and sl st to join. Fasten off. (Loop height: 1 in / 2.5 cm)
Final Blocking
- Weave in all tails, but don’t trim them close until the ornament is stiffened.
- Soak the ornament in stiffener or thick starch, then gently squeeze out the excess.
- Cover the foam board with plastic wrap and lay the ornament RS up.
- Pin the heel edge straight and the sole flat. Check that the boot measures 3 3/4 in (9.5 cm) wide.
- Pin the blade rail parallel to the sole, 1/4 in (0.6 cm) below it, with the posts upright.
- Curl the toe tip upward into a rounded hook and pin it. Give the heel curl a smaller upward turn.
- Pin each crown point and open every mesh square. Fan the spokes of each fan shell evenly.
- Press the flower petals flat with a fingertip.
- Let it dry completely, at least 12 hours, before removing the pins. Then trim the tails.
Final Quality-Control Checklist
- The boot has 14 meshes at the foot, 8 at the leg and 10 at the flared cuff.
- There are 3 fans: at the heel, on the instep and below the cuff.
- All 4 flowers are tacked flat in a diagonal line.
- The outline has 46 / 43 / 64 sc with ch-1 corners.
- The rail has 49 sc, and the posts sit at the 7th sole sc from each end.
- The toe and heel curls both turn upward.
- The crown cuff has 5 even points.
- Final size is 4 1/4 in (10.8 cm) x 4 7/8 in (12.4 cm), plus the 1 in (2.5 cm) loop.
Troubleshooting
- The mesh is slanting: Your dc tension is uneven. Keep each dc the same height, and don’t pull the ch-2 tight.
- The toe steps look jagged: Make sure the sl sts at the start of Rows 5, 7 and 9 are loose, and keep exactly 3 sc on each step in the outline.
- The outline ruffles: You may have worked more than 3 sc per row end, or your hook may be too large.
- The outline puckers: Work the sc more loosely, or go up one hook size for this row only.
- The posts lean: Recount the marked sole sts. They must be the 7th from each end.
- The fans cup: Pin each spoke separately during blocking.
- The flowers curl: Tack all 6 petal tips down, not just the center.
Care
Dust the ornament gently, or wipe it with a barely damp cloth. If it softens, hand wash it, then starch and block it again flat before storing it in a box.
Final Notes
Each stage builds on the one before it:
- Gauge is 4 meshes and 4 rows per inch.
- That makes the foot 3 1/2 in (8.9 cm) wide and the boot 4 in (10.2 cm) tall.
- The outline at 12 sc per inch brings the boot to 3 3/4 in (9.5 cm) x 4 1/8 in (10.5 cm).
- The 49 sc rail extends exactly 1/4 in (0.6 cm) past each end of the sole.
- The blade adds 3/4 in (1.9 cm), for a finished skate of 4 1/4 in (10.8 cm) x 4 7/8 in (12.4 cm).
Check each measurement as you go, and every skate will hang straight on the tree. Happy crocheting!