

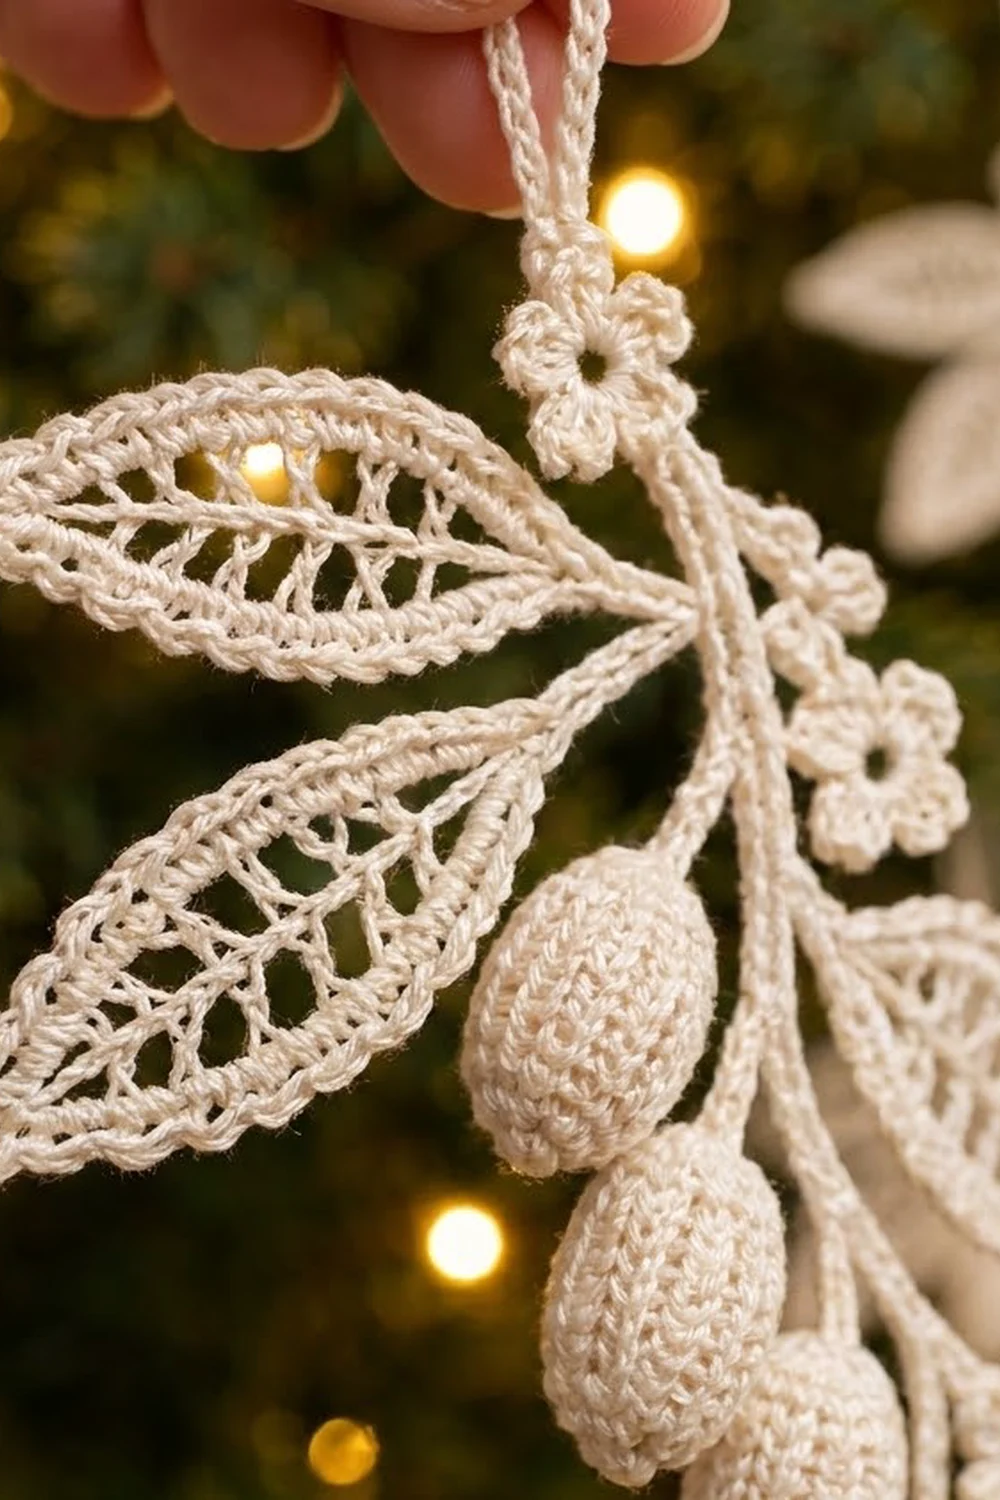
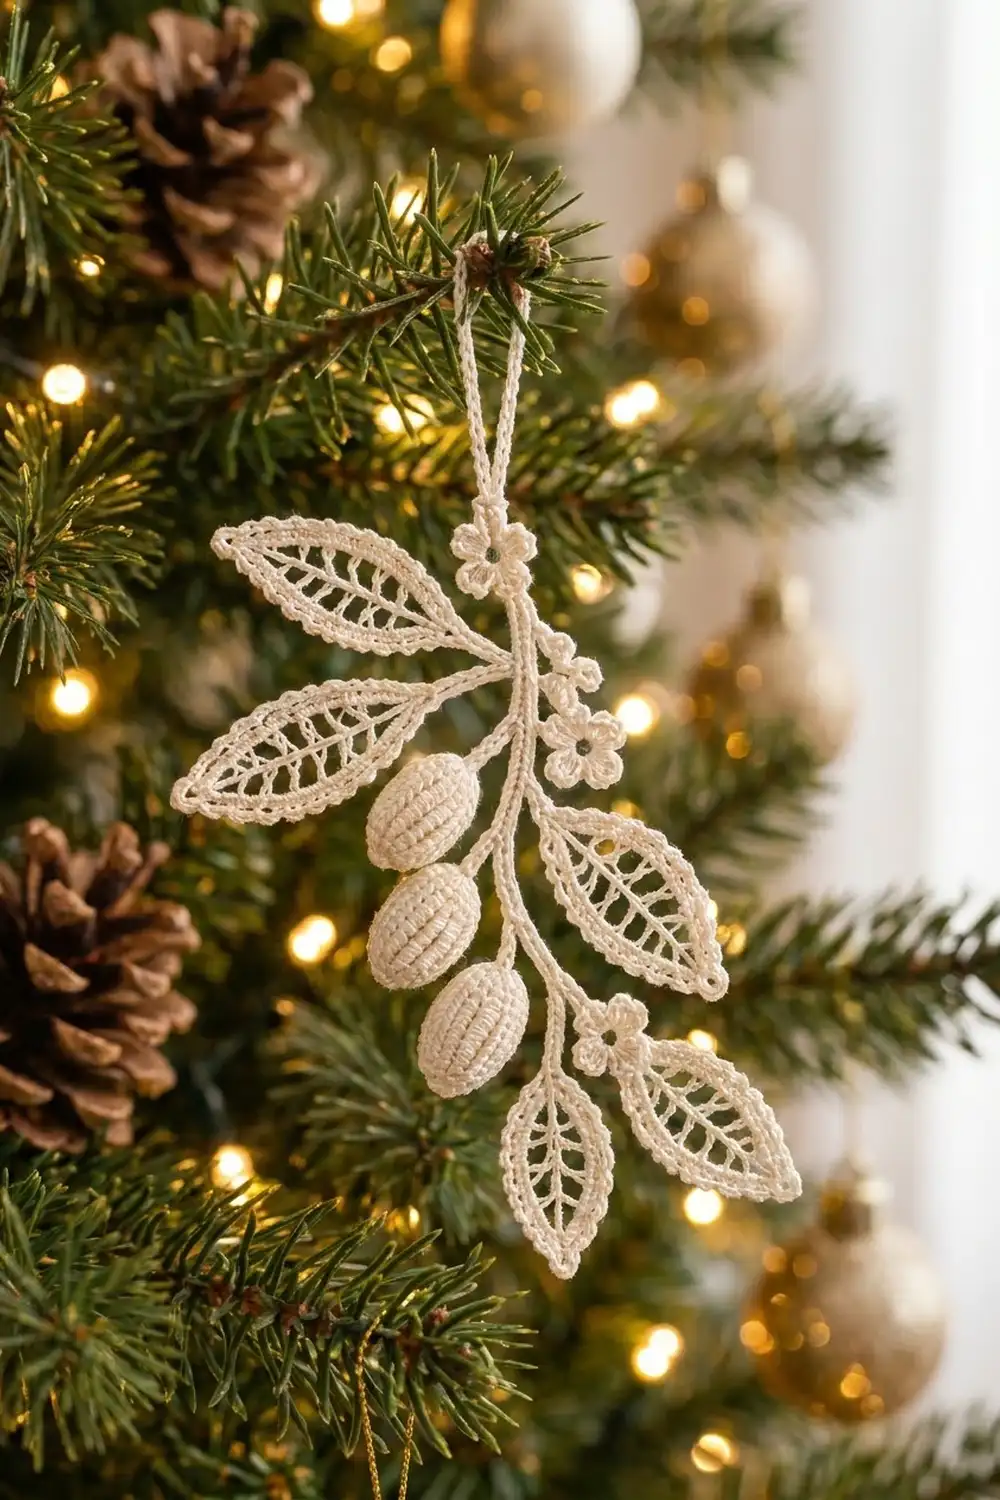
The Winter Olive Sprig is a delicate lace ornament made in fine ivory cotton thread. Its curved, corded stem carries six openwork leaves, three ribbed oval berries and three tiny five-petal flowers. A slim chain loop at the top lets it hang from a tree branch, a gift tag or a window latch.
The whole ornament uses one color, a warm cream or ivory, so the texture stands out. Each leaf has a solid center vein, open ladder-style side veins and a crisp single crochet outline that ends in a small point. The berries are firm little ovals with raised vertical ribs.
This pattern uses US crochet terms. The finished ornament measures about 5.5 in (14.0 cm) tall and 4 in (10.2 cm) wide, plus a 1 in (2.5 cm) hanging loop.
Construction is simple. You make six leaves, three berries and three flowers as small parts. Then you crochet one stem from chains and slip stitches, with short twigs along it. Each part is sewn to the end of its own twig, so you end up with one finished ornament.
Finished Size and Construction
- Finished size: 5.5 in (14.0 cm) tall x 4 in (10.2 cm) wide, not counting the loop
- Hanging loop: 1 in (2.5 cm) tall
- Skill level: Intermediate (fine thread, post stitches, small parts)
- Terminology: US crochet terms
- Thread weight: Size 10 cotton crochet thread (Lace, weight 0)
- Hook: 1.5 mm (US steel size 8)
- Number of pieces: One finished ornament, put together from 13 parts (6 leaves, 3 berries, 3 flowers, 1 stem)
- Layout: Leaves and berries alternate down a gently curved stem. Flowers sit at the top, in the middle and at the lower right.
- Leaf size: 1.75 in (4.4 cm) long x 0.9 in (2.3 cm) wide
- Leaf size before border: 1.6 in (4.1 cm) x 0.75 in (1.9 cm)
- Border depth: about 0.08 in (0.2 cm), one round of single crochet around each leaf
Materials
Choose a mercerized cotton thread in size 10. Mercerized cotton holds a crisp edge, blocks flat and keeps the lace openings clear. Avoid fuzzy or textured threads, which blur the ribs and the leaf veins.
- Ivory or cream size 10 cotton thread: 15 g, about 75 m (82 yd)
Tools:
- 1.5 mm (US steel size 8) crochet hook
- Fine tapestry needle that fits size 10 thread
- A small pinch of polyester fiberfill for the berries
- Rust-proof pins and a foam blocking board
- Spray starch or fabric stiffener (optional)
- Small sharp scissors
The amount above includes a margin of about 25 percent for your test leaf, sewing tails and a spare leaf if you need one.
Abbreviations (US Terms)
- ch – chain
- sl st – slip stitch
- sc – single crochet
- hdc – half double crochet
- dc – double crochet
- tr – treble crochet
- sc2tog – single crochet 2 together
- sk – skip
- st(s) – stitch(es)
- MR – magic ring
- rnd(s) – round(s)
Special stitch – Front Post Single Crochet (FPsc): Insert the hook from the front, around the back of the post of the stitch below, and out to the front again. Yarn over, pull up a loop, yarn over and pull through both loops. The stitch sits on the surface and forms the raised ribs on the berries.
Gauge and Checkpoints
Gauge: 12 sc and 13 sc rnds = 1 in (2.5 cm). Chains: 14 ch = 1 in (2.5 cm).
Make one complete leaf before anything else. It’s the best test of your tension because it uses chains, short stitches and tall stitches together.
Checkpoints:
- Leaf after Rnd 1: 1.5 in (3.8 cm) long
- Leaf after Rnd 2: 1.6 in (4.1 cm) x 0.75 in (1.9 cm)
- Leaf after edging: 1.75 in (4.4 cm) x 0.9 in (2.3 cm)
- Berry: 0.75 in (1.9 cm) long x 0.5 in (1.3 cm) wide
- Flower: 0.45 in (1.1 cm) across
- Stem foundation chain: 4 in (10.2 cm) for 56 ch
If your leaf is too big, switch to a 1.25 mm hook. If it is too small, try a 1.75 mm hook. Being off by 0.1 in (0.3 cm) per leaf is fine, as long as all six leaves match each other.
Leaves (Make 6)
Each leaf starts with a chain that becomes the center vein. You work around both sides of the chain, then add the open ribs.
Ch 20.
Rnd 1: 3 sc in 2nd ch from hook (base corner), sc in each of next 17 ch, 3 sc in last ch (tip corner). Rotate and work along the other side of the foundation chain: sc in each of next 17 ch. Join with sl st to first sc. (40 sc)
Stitch map for Rnd 2: sts 1–3 are the base corner (st 2 is the center), sts 4–20 are side one, sts 21–23 are the tip corner (st 22 is the tip) and sts 24–40 are side two.
Rnd 2: Sl st in next sc (st 2, base center). Ch 1, sc in same st.
Side one: Ch 3, sk 2 sts, dc in next st (st 5). Ch 3, sk 1, dc in next st (st 7). (Ch 4, sk 1, tr in next st) 4 times (sts 9, 11, 13, 15). (Ch 3, sk 1, dc in next st) 2 times (sts 17, 19).
Tip: Ch 3, sk 2 sts, (sc, ch 3, sc) in tip st (st 22).
Side two: Ch 3, sk 2 sts, dc in next st (st 25). Ch 3, sk 1, dc in next st (st 27). (Ch 4, sk 1, tr in next st) 4 times (sts 29, 31, 33, 35). (Ch 3, sk 1, dc in next st) 2 times (sts 37, 39).
Base: Ch 3, sk 2 sts (sts 40 and 1), join with sl st to first sc.
Rnd 2 count: 3 sc, 8 dc, 8 tr, 10 ch-3 spaces, 8 ch-4 spaces and 1 ch-3 tip loop. Each side has 8 ribs and 9 spaces (5 ch-3 and 4 ch-4).
The short dc ribs near the base and tip, with taller tr ribs in the middle, give the leaf its pointed oval shape. Don’t fasten off. Go straight on to the edging round in the Border section.
Berries (Make 3)
Work the berries in continuous rounds. Put a stitch marker in the first st of each round.
Rnd 1: 6 sc in MR. (6)
Rnd 2: 2 sc in each st around. (12)
Rnd 3: (Sc in next st, 2 sc in next st) 6 times. (18)
Rnds 4–9: (FPsc around next st, sc in next st) 9 times. (18) From Rnd 5 on, work each FPsc around the FPsc of the round below so the ribs stack in straight vertical lines. You will have 9 raised ribs.
Add a small pinch of fiberfill. Keep it light so the ribs stay visible.
Rnd 10: (Sc in next st, sc2tog) 6 times. (12)
Rnd 11: Sc2tog 6 times. (6)
Fasten off, leaving an 8 in (20.3 cm) tail. Weave the tail through the front loops of the last 6 sts and pull it closed. Keep the tail for sewing.
Flowers (Make 3)
Rnd 1: Ch 1, 10 sc in MR. Join with sl st to first sc. (10)
Rnd 2: (Hdc, dc, hdc) in next st, sl st in next st; repeat from * 4 more times. (5 petals: 15 petal sts + 5 sl st)*
Fasten off, leaving an 8 in (20.3 cm) tail. Pull the magic ring tight so the center is a small, neat circle.
Stem
To make the stem, you chain and then work back along the chain with slip stitches in the back bumps. This gives a rounded, corded look. Add short twigs as you go. The left and right directions below assume the front of the work is facing you.
Ch 56.
Sl st into the back bump of the 2nd ch from hook and next 5 ch. (6 stem sl st)
Twig 1 (Leaf 5, right): Ch 8, sl st in 2nd ch from hook and next 6 ch (7 sl st). Sl st in next 4 stem ch. (10 stem sl st)
Twig 2 (Leaf 4, left): Ch 8, sl st back along 7 ch. Sl st in next 6 stem ch. (16)
Twig 3 (Flower 3, right): Ch 6, sl st back along 5 ch. Sl st in next 4 stem ch. (20)
Twig 4 (Leaf 3, right): Ch 10, sl st back along 9 ch. Sl st in next 4 stem ch. (24)
Twig 5 (Berry 3, left): Ch 6, sl st back along 5 ch. Sl st in next 4 stem ch. (28)
Twig 6 (Berry 2, left): Ch 6, sl st back along 5 ch. Sl st in next 4 stem ch. (32)
Twig 7 (Berry 1, left): Ch 6, sl st back along 5 ch. Sl st in next 6 stem ch. (38)
Twig 8 (Flower 2, right): Ch 6, sl st back along 5 ch. Sl st in next 4 stem ch. (42)
Twig 9 (Leaf 2, left): Ch 10, sl st back along 9 ch. Sl st in next 4 stem ch. (46)
Twig 10 (Leaf 1, upper left): Ch 10, sl st back along 9 ch. Sl st in last 9 stem ch. (55 stem sl st)
Hanging loop: Ch 28, sl st in the last stem sl st. Fasten off and weave in.
Check: 6 + 4 + 6 + 4 + 4 + 4 + 4 + 6 + 4 + 4 + 9 = 55 sl st. That’s one fewer than the 56 ch because you skip the first ch.
Border: Leaf Edging Round
The edging is Rnd 3 of each leaf. It turns the open ribs into a smooth, slightly raised outline and sharpens the tip.
Border gauge: 3 sc fill each ch-3 space and 4 sc fill each ch-4 space. This matches the gauge of 12 sc per 1 in (2.5 cm) along the curved edge.
Rnd 3: Ch 1, sc in base sc.
Side one: 3 sc in each ch-3 space, 4 sc in each ch-4 space and 1 sc in each dc and tr, up to the tip sc. (39 sc)
Tip: Sc in sc, (2 sc, ch 2, 2 sc) in tip ch-3 loop, sc in next sc. (6 sc + ch-2 point)
Side two: Work as for side one, back to the base. (39 sc)
Join with sl st to first sc. Total: 85 sc and 1 ch-2 point. Fasten off, leaving an 8 in (20.3 cm) tail at the base.
Why the math works: each side has 5 ch-3 spaces (15 sc), 4 ch-4 spaces (16 sc) and 8 ribs (8 sc), so 15 + 16 + 8 = 39 sc. Two sides make 78 sc. Add 1 base sc and 6 tip sc for a total of 85. Each space gets as many sc as its chain length, so the edge lies flat without ruffling or cupping.
Assembling the Sprig
- Lay the stem flat, front side up, with the loop at the top. Curve the lower half gently to the right.
- Using each leaf’s base tail, sew Leaf 6 to the stem tip. Then sew Leaves 5, 4, 3, 2 and 1 to the ends of their twigs. Make 3 or 4 small stitches through the leaf base and the twig end.
- Sew each berry by its closing tail to Twigs 5, 6 and 7 so the berries hang downward.
- Sew Flower 3 to Twig 3 and Flower 2 to Twig 8. Sew Flower 1 to the top of the stem, right where the hanging loop begins.
- Weave all tails into the stem’s slip stitches and trim.
Final Blocking
- Soak the finished ornament in cool water and press it gently in a towel.
- Pin it face up on a foam board, with the hanging loop pointing straight up.
- Pin each leaf tip outward, and put at least one pin on each side of the leaf so the ribs open evenly.
- Shape each leaf to 1.75 in (4.4 cm) x 0.9 in (2.3 cm).
- Roll the berries between your fingers to round them. Don’t pin them flat.
- Spray lightly with starch or stiffener if you want a firmer ornament.
- Let it dry completely, usually 6 to 8 hours, before you remove the pins.
- Check the overall size: 5.5 in (14.0 cm) tall x 4 in (10.2 cm) wide.
Final Quality-Control Checklist
- All six leaves measure 1.75 in (4.4 cm) x 0.9 in (2.3 cm) and match each other.
- Each leaf edging has 85 sc and a clear ch-2 point.
- Leaf ribs are evenly spaced, with no twisted chain spaces.
- Each berry has 9 straight ribs and closes neatly at both ends.
- Each flower has 5 even petals and a tight center.
- All twigs are firmly attached, and no sewing stitches show on the front.
- The loop is 1 in (2.5 cm) tall and sits straight above Flower 1.
- The ornament hangs evenly without tipping to one side.
Troubleshooting
Leaf curls or cups: The edging is too tight. Block it again with more pins, or redo Rnd 3 with looser tension.
Leaf edge ruffles: Extra sc went into the spaces. Use exactly 3 sc per ch-3 space and 4 sc per ch-4 space.
Leaf is lopsided: Recheck the stitch map for Rnd 2. Both sides should have 4 dc, 4 tr and 9 spaces.
Berry ribs spiral: Make sure each FPsc goes around an FPsc from the round below, not around a plain sc.
Berry looks lumpy: Use less fiberfill and roll it gently while it’s damp.
Stem twists: Work the slip stitches into the back bumps only, and keep them loose enough for the hook to fit easily.
Ornament tips to one side: During blocking, bend the stem slightly near the berries to shift the weight.
Care
Hand wash in cool water with mild soap, press out the water in a towel and dry flat, pinned to a board. Store the ornament flat in a box between sheets of tissue paper so the leaves keep their shape.
Final Notes
The measurements follow a short, simple chain. Check your gauge at 12 sc per 1 in (2.5 cm). Your leaf should measure 1.6 in (4.1 cm) x 0.75 in (1.9 cm) after Rnd 2 and 1.75 in (4.4 cm) x 0.9 in (2.3 cm) after the 85-sc edging. Berries should be 0.75 in (1.9 cm) long and flowers 0.45 in (1.1 cm) across. Work a 4 in (10.2 cm) stem with ten twigs, put the ornament together, then block it to 5.5 in (14.0 cm) x 4 in (10.2 cm) with a 1 in (2.5 cm) loop.
After the first ornament, the rest go quickly. Make a few for your tree, tie one to a gift or hang one in a window to catch the light.
Happy crocheting!