

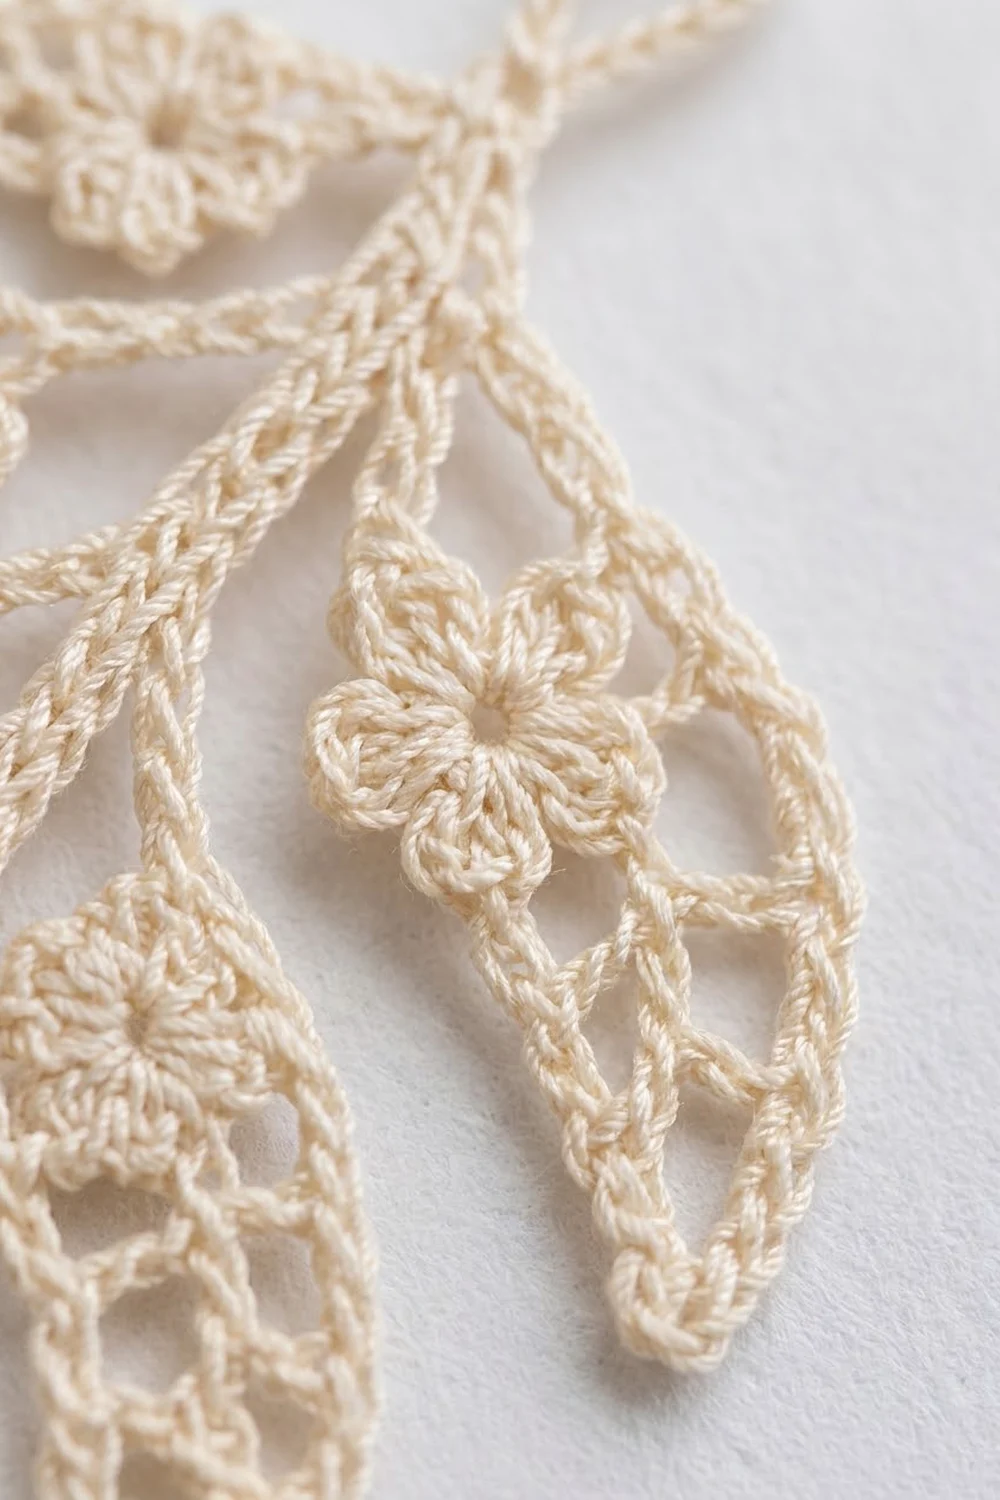
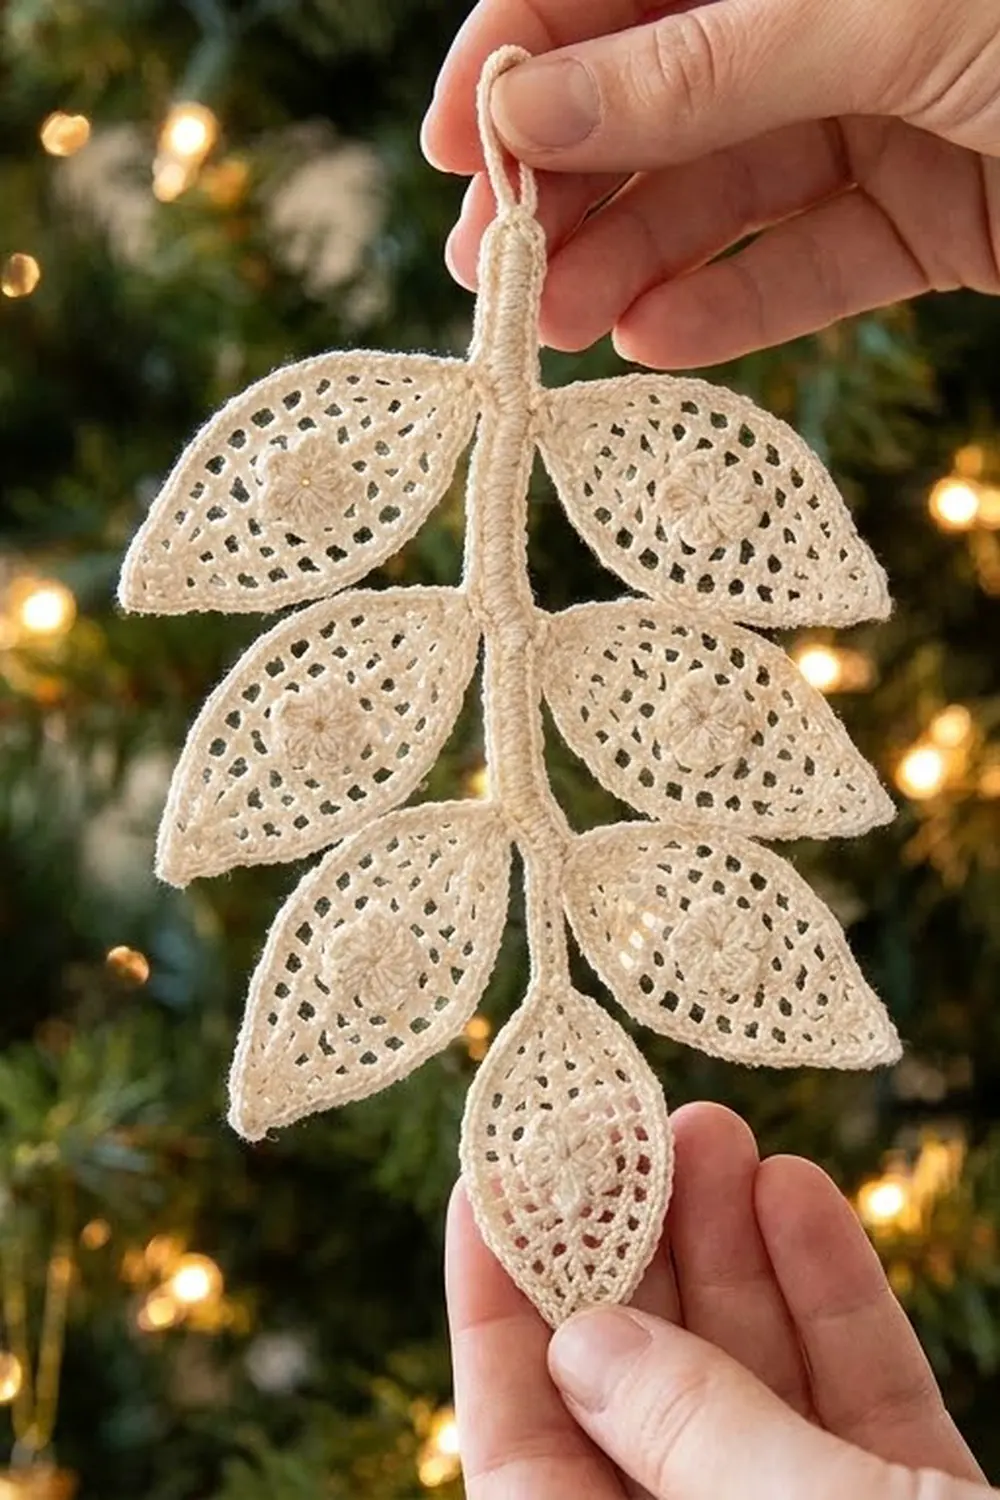
This delicate lace branch is crocheted in fine cream cotton thread. It has a slim central stem, a hanging loop at the top, and thirteen open-mesh leaves. A tiny five-petal flower sits near the base of each leaf, so from a distance the ornament looks like a soft, frosted sprig.
The style is classic and quiet. The single ivory color and the open mesh let tree lights glow through every leaf. It suits a natural or vintage Christmas tree, gift wrapping, or a window hook.
The pattern uses US crochet terms. The finished ornament measures 7 in (17.8 cm) long including the hanging loop and 3 in (7.6 cm) across at the widest leaves.
The whole branch is one continuous piece. First you chain the hanging loop and stem, then you work a tip leaf at the bottom. Next you climb back up the stem in single crochet and add twelve side leaves as you go. One outline round then frames every leaf. To finish, you sew a small crocheted flower onto each leaf and block the branch flat.
Finished Size and Construction
- Finished size: 7 in (17.8 cm) long x 3 in (7.6 cm) wide
- Skill level: Intermediate (fine thread, small hook, working into chain loops)
- Terminology: US crochet terms
- Yarn weight: Size 10 cotton crochet thread (Lace, weight 0)
- Hook: 1.75 mm steel hook
- Number of pieces: 1 branch, plus 13 tiny flower appliqués sewn on
- Layout: central stem; 1 tip leaf; 12 side leaves alternating right and left, 6 per side
- Piece sizes: large leaf 1.25 in x 0.75 in (3.2 cm x 1.9 cm); small leaf 0.875 in x 0.5 in (2.2 cm x 1.3 cm); flower 0.375 in (1.0 cm) across
- Size before border: 6.875 in x 2.75 in (17.5 cm x 7.0 cm)
- Border depth: 0.125 in (0.3 cm) on each leaf edge
Materials
Thread: Use mercerized size 10 cotton crochet thread. It has a slight sheen, holds starch well, and shows the mesh clearly. Avoid fuzzy or acrylic threads, which blur the lace and won’t hold a crisp leaf shape.
- Cream / ivory: 8 g, about 40 m (44 yd)
One ornament uses about 6 g (30 m). The quantity above includes a margin for your gauge swatch, the flower tails, and any frogging.
Tools:
- 1.75 mm steel crochet hook
- Fine tapestry needle (size 24)
- Small sharp scissors
- Blocking foam board and rustproof pins
- Spray starch or fabric stiffener
- Ruler or tape measure
Abbreviations (US Terms)
- ch – chain
- sl st – slip stitch
- sc – single crochet
- hdc – half double crochet
- dc – double crochet
- sk – skip
- sp(s) – space(s)
- st(s) – stitch(es)
- MR – magic ring
Special stitch – picot: Ch 3, then sl st into the top of the sc just made.
Leaf loop: A chain that closes back on itself at the leaf base. The loop folds flat into two layers. The fold forms the center vein, and you work stitches outward into its chains on both sides.
Gauge and Checkpoints
Gauge: 10 sc = 1 in (2.5 cm) and 10 ch = 1 in (2.5 cm), worked firmly.
Test your gauge first. Ch 21, then sc in the 2nd ch from hook and in each ch across, for 20 sc. The row should measure 2 in (5.1 cm). Then make one large leaf as a test piece (see Part 2) and measure it before you start the full branch.
Checkpoints:
- Stem chain of 50 ch: 5 in (12.7 cm).
- Large leaf after Rnd A: 1.125 in x 0.5 in (2.9 cm x 1.3 cm).
- Small leaf after Rnd A: 0.75 in x 0.375 in (1.9 cm x 1.0 cm).
- Branch before border, pinned flat: 6.875 in x 2.75 in (17.5 cm x 7.0 cm).
- Each flower: 0.375 in (1.0 cm) across.
- Finished, blocked ornament: 7 in x 3 in (17.8 cm x 7.6 cm).
Too big? Switch to a 1.5 mm hook or tighten your chains. Loose chains are the most common cause of oversized leaves.
Too small? Switch to a 2.0 mm hook. Leaves that are too tight curl and resist blocking.
Part 1: Hanging Loop and Stem
Hanging loop: Leave a 6 in (15.2 cm) tail. Ch 16, then sl st in the 1st ch to form a ring.
Stem chain: Ch 50. Check that the stem chain measures 5 in (12.7 cm), not counting the ring. Do not fasten off.
Part 2: Tip Leaf (Large Leaf)
The tip leaf is worked straight off the bottom of the stem, with no twig.
Leaf loop: Ch 24, then sl st in the 25th ch from hook. That chain is the last stem ch, so the sl st closes a loop of 24 ch. Fold the loop flat and number its chains 1 to 24, working away from the stem. Chains 1–11 are side A, chains 12–13 are the tip, and chains 14–24 are side B.
Rnd A (large leaf mesh):
- Side A: Sc in ch 1, hdc in ch 2, dc in ch 3, [ch 1, sk next ch, dc in next ch] 4 times. You now have 5 dc, ending in ch 11.
- Tip: Hdc in ch 12, ch 3, hdc in ch 13.
- Side B: Dc in ch 14, [ch 1, sk next ch, dc in next ch] 4 times, hdc in ch 23, sc in ch 24.
- Sl st in the leaf base.
Count: 16 sts (2 sc, 4 hdc, 10 dc) + 8 ch-1 sps + 1 ch-3 tip sp.
The two sides mirror each other exactly. The result is a pointed oval with a ladder of open mesh along each side of the center vein.
Part 3: Stem Return with Side Leaves
Now you work back up the stem toward the hanging loop. Leaves are numbered from the bottom, so Leaf 1 is the lowest.
Stem row: Sc in the same stem ch as the leaf join (stem sc 1). Then work 1 sc in each stem ch toward the loop. Make a side leaf right after stem sc 3, 7, 11, 15, 19, 23, 27, 31, 35, 39, 43, and 47. That places one leaf every 4 sc, or every 0.4 in (1.0 cm).
The leaves alternate sides. Odd-numbered leaves point right and even-numbered leaves point left. Fold each leaf to its side as you finish it. Blocking sets the final angle.
- Leaves 1–8 are large leaves: 4 right, 4 left.
- Leaves 9–12 are small leaves: 2 right, 2 left.
Large Side Leaf (make 8)
Twig: Ch 3, for a twig 0.3 in (0.8 cm) long.
Leaf loop: Ch 24, then sl st in the 25th ch from hook. That chain is the 3rd twig ch, so the sl st closes a 24-ch loop.
Rnd A: Work exactly as for the tip leaf’s Rnd A, ending with a sl st in the leaf base. Count: 16 sts + 8 ch-1 sps + 1 ch-3 tip sp.
Return: Sl st in each of the next 2 twig ch, then continue the stem row.
Small Side Leaf (make 4)
Twig: Ch 2, for a twig 0.2 in (0.5 cm) long.
Leaf loop: Ch 18, then sl st in the 19th ch from hook. That chain is the 2nd twig ch, so the sl st closes an 18-ch loop. Number the chains 1–18. Chains 1–8 are side A, chains 9–10 are the tip, and chains 11–18 are side B.
Rnd A (small leaf mesh):
- Side A: Sc in ch 1, hdc in ch 2, dc in ch 3, [ch 1, sk next ch, dc in next ch] 2 times, hdc in ch 8.
- Tip: Sc in ch 9, ch 3, sc in ch 10.
- Side B: Hdc in ch 11, dc in ch 12, [ch 1, sk next ch, dc in next ch] 2 times, hdc in ch 17, sc in ch 18.
- Sl st in the leaf base.
Count: 14 sts (4 sc, 4 hdc, 6 dc) + 4 ch-1 sps + 1 ch-3 tip sp.
Return: Sl st in the next twig ch, then continue the stem row.
Stem row count: After Leaf 12, work stem sc 48, 49, and 50. Total: 50 sc up the stem, with 12 side leaves.
Top: Work 24 sc into the hanging-loop ring, then sl st in the 1st of those sc. The loop is now firm and 0.75 in (1.9 cm) tall. Do not fasten off, because the border starts here.
Checkpoint: Pin the branch flat with the leaves angled upward at about 45 degrees. It should measure 6.875 in x 2.75 in (17.5 cm x 7.0 cm).
Part 4: Flowers (make 13)
Rnd 1: MR, ch 1, 5 sc in ring, sl st in 1st sc. Pull the ring fully closed. 5 sc.
Rnd 2: In each sc around, work (sl st, ch 2, dc, ch 2, sl st). 5 petals, each with 1 dc.
Fasten off, leaving an 8 in (20.3 cm) tail for sewing. Each flower measures 0.375 in (1.0 cm) across.
Border: Leaf Outline Round
The border is one continuous round. It goes down the left side of the branch, around the tip leaf, and back up the right side. It adds a solid sc frame 0.125 in (0.3 cm) deep to every leaf. Along the stem and twigs, a sl st edge thickens the branch.
Border gauge: 10 sc = 1 in (2.5 cm), the same as the main gauge. Work firmly so the mesh lies flat.
Large leaf outline (28 sc + 1 picot):
- Side A: Sc in sc, sc in hdc, sc in dc, [sc in ch-1 sp, sc in dc] 4 times: 11 sc.
- Tip: Sc in hdc, (2 sc, picot, 2 sc) in the ch-3 tip sp, sc in hdc: 6 sc + 1 picot.
- Side B: Sc in dc, [sc in ch-1 sp, sc in dc] 4 times, sc in hdc, sc in sc: 11 sc.
Small leaf outline (22 sc + 1 picot):
- Side A: Sc in sc, sc in hdc, sc in dc, [sc in ch-1 sp, sc in dc] 2 times, sc in hdc: 8 sc.
- Tip: Sc in sc, (2 sc, picot, 2 sc) in the ch-3 tip sp, sc in sc: 6 sc + 1 picot.
- Side B: Sc in hdc, sc in dc, [sc in ch-1 sp, sc in dc] 2 times, sc in hdc, sc in sc: 8 sc.
Working the round:
- Left side, top to bottom: Sl st in each stem st along the left edge. At each left-side leaf (Leaves 12, 10, 8, 6, 4, 2), sl st out along the twig, outline the leaf, then sl st back along the twig.
- Tip leaf: Outline it as a large leaf, with 28 sc + 1 picot.
- Right side, bottom to top: Sl st in each stem st along the right edge. At each right-side leaf (Leaves 1, 3, 5, 7, 9, 11), sl st out along the twig, outline the leaf, then sl st back.
- Sl st in the base of the hanging loop and fasten off.
Counts per side:
- Left side: 4 large leaves (4 x 28 = 112 sc) + 2 small leaves (2 x 22 = 44 sc) = 156 sc + 6 picots. Twigs: 4 x (3 + 3) + 2 x (2 + 2) = 32 sl st. Stem: 50 sl st.
- Tip leaf: 28 sc + 1 picot.
- Right side: Same as the left side: 156 sc + 6 picots, 32 twig sl st, 50 stem sl st.
- Round total: 340 sc, 13 picots, 164 sl st.
Why the math works: Each outline places exactly 1 sc on every stitch and every ch-1 sp of Rnd A. The only extras are the 4 sc and the picot in the tip space. A large leaf has 11 positions per side, plus 2 tip sts and 4 tip-space sc: 11 + 11 + 2 + 4 = 28. A small leaf has 8 positions per side, plus 2 tip sts and 4 tip-space sc: 8 + 8 + 2 + 4 = 22. Nothing is added at the leaf base, because the twig sl sts carry the round past it. That’s why each leaf grows by only 0.125 in (0.3 cm) at its edges.
Attaching the Flowers
Place one flower on the lower half of each leaf, centered over the vein about 0.25 in (0.6 cm) above the leaf base. Using the flower’s tail, whipstitch through the back of its center ring into the vein. Keep the stitches small and leave the petals free and slightly raised. Weave in all ends along the veins.
Final Blocking
- Soak the ornament in cool water, then roll it in a towel to remove excess moisture.
- Lay it face up on the blocking board.
- Pin the hanging loop. Then pin the stem in a straight line, 5 in (12.7 cm) from the loop base to the tip-leaf base.
- Angle each side leaf upward at about 45 degrees. Pin every leaf tip and picot.
- Open the mesh by pinning the large leaves to 0.75 in (1.9 cm) wide.
- Check the overall size: 7 in x 3 in (17.8 cm x 7.6 cm).
- Spray generously with starch, avoiding the flower centers.
- Let the ornament dry completely, usually 12–24 hours, before unpinning.
Final Quality-Control Checklist
- 13 leaves: 1 tip leaf, 8 large side leaves, 4 small side leaves
- 6 side leaves per side, alternating up the stem
- Stem has 50 sc and measures 5 in (12.7 cm)
- Each large leaf outline has 28 sc and each small leaf outline has 22 sc
- All 13 picots are crisp and pointed
- One flower is secured on each leaf
- Hanging loop is firm and 0.75 in (1.9 cm) tall
- Finished size is 7 in x 3 in (17.8 cm x 7.6 cm)
- No ends or knots are visible on the front
Troubleshooting
Leaves twist or cup: The leaf loop was chained too tightly. Re-chain more loosely, or pin both edges more closely when blocking.
Leaf is lopsided: One side has an extra stitch. Count 11 positions per side on large leaves or 8 on small leaves.
Stem curves sharply: The stem sc are tighter than the chain. Go up one hook size for the stem row only.
Gaps at the leaf base: Pull the closing sl st snug.
Flowers look flat: Close the magic ring fully and sew through the center only.
Care
Hand wash in cool water with mild soap, then reshape and re-starch. Store flat between sheets of tissue paper.
Final Notes
The measurements build on each other. A gauge of 10 sc = 1 in (2.5 cm) gives a 5 in (12.7 cm) stem. Large leaves of 1.125 in (2.9 cm) and small leaves of 0.75 in (1.9 cm) give a branch of 6.875 in x 2.75 in (17.5 cm x 7.0 cm) before the border. The 0.125 in (0.3 cm) outline then brings it to the finished 7 in x 3 in (17.8 cm x 7.6 cm). Check each stage as you go, and your branch will match.
Happy crocheting!