

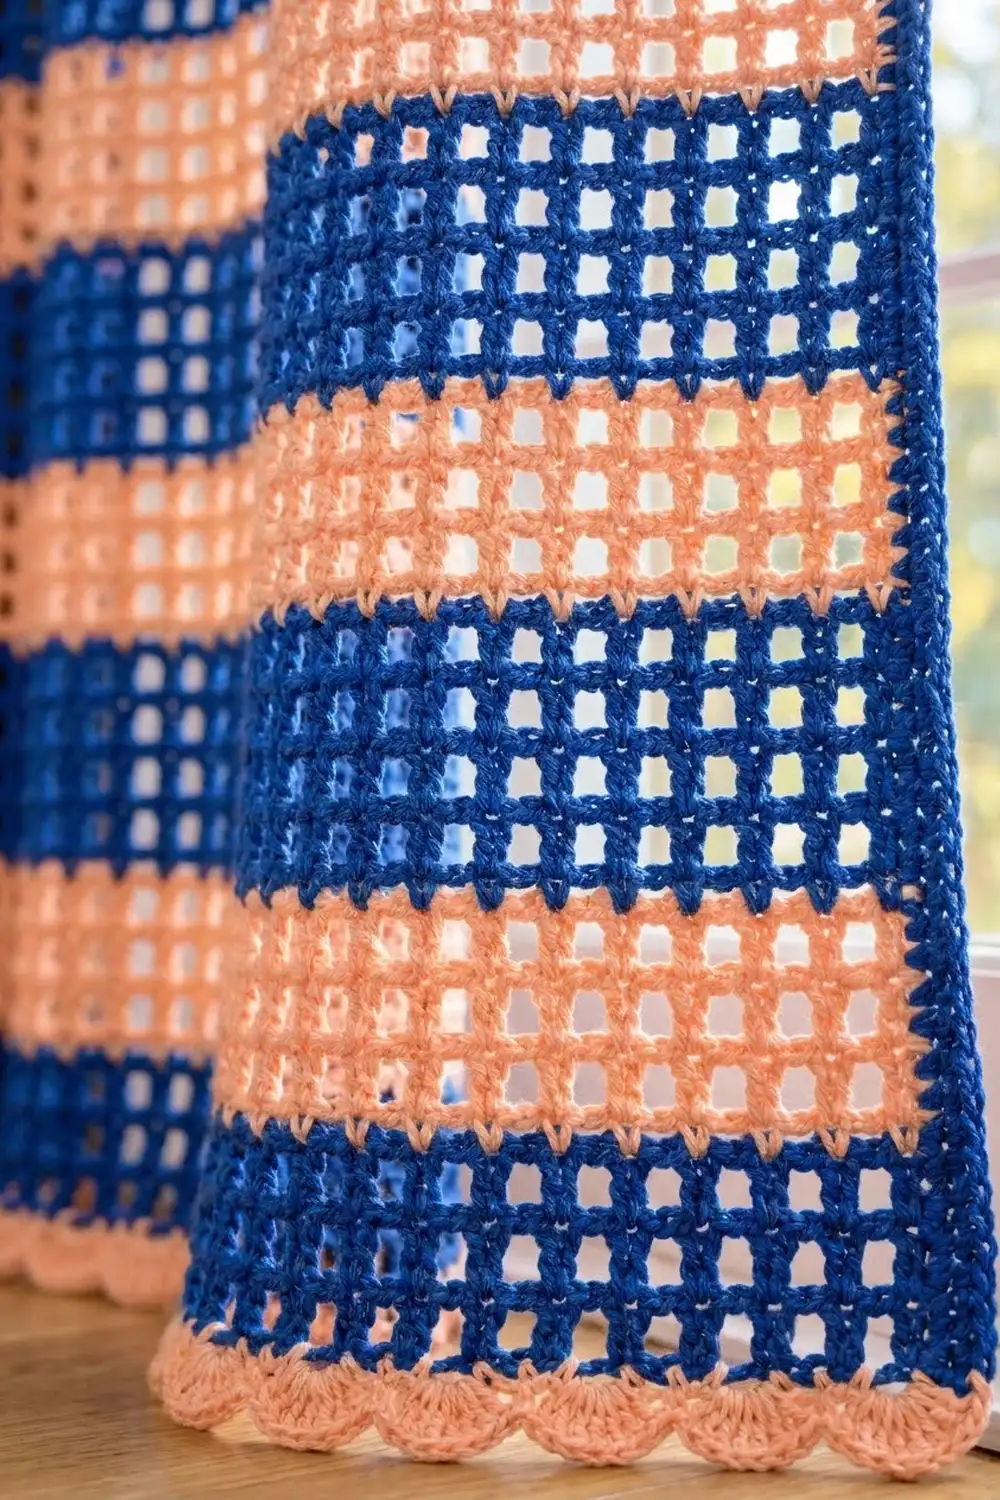
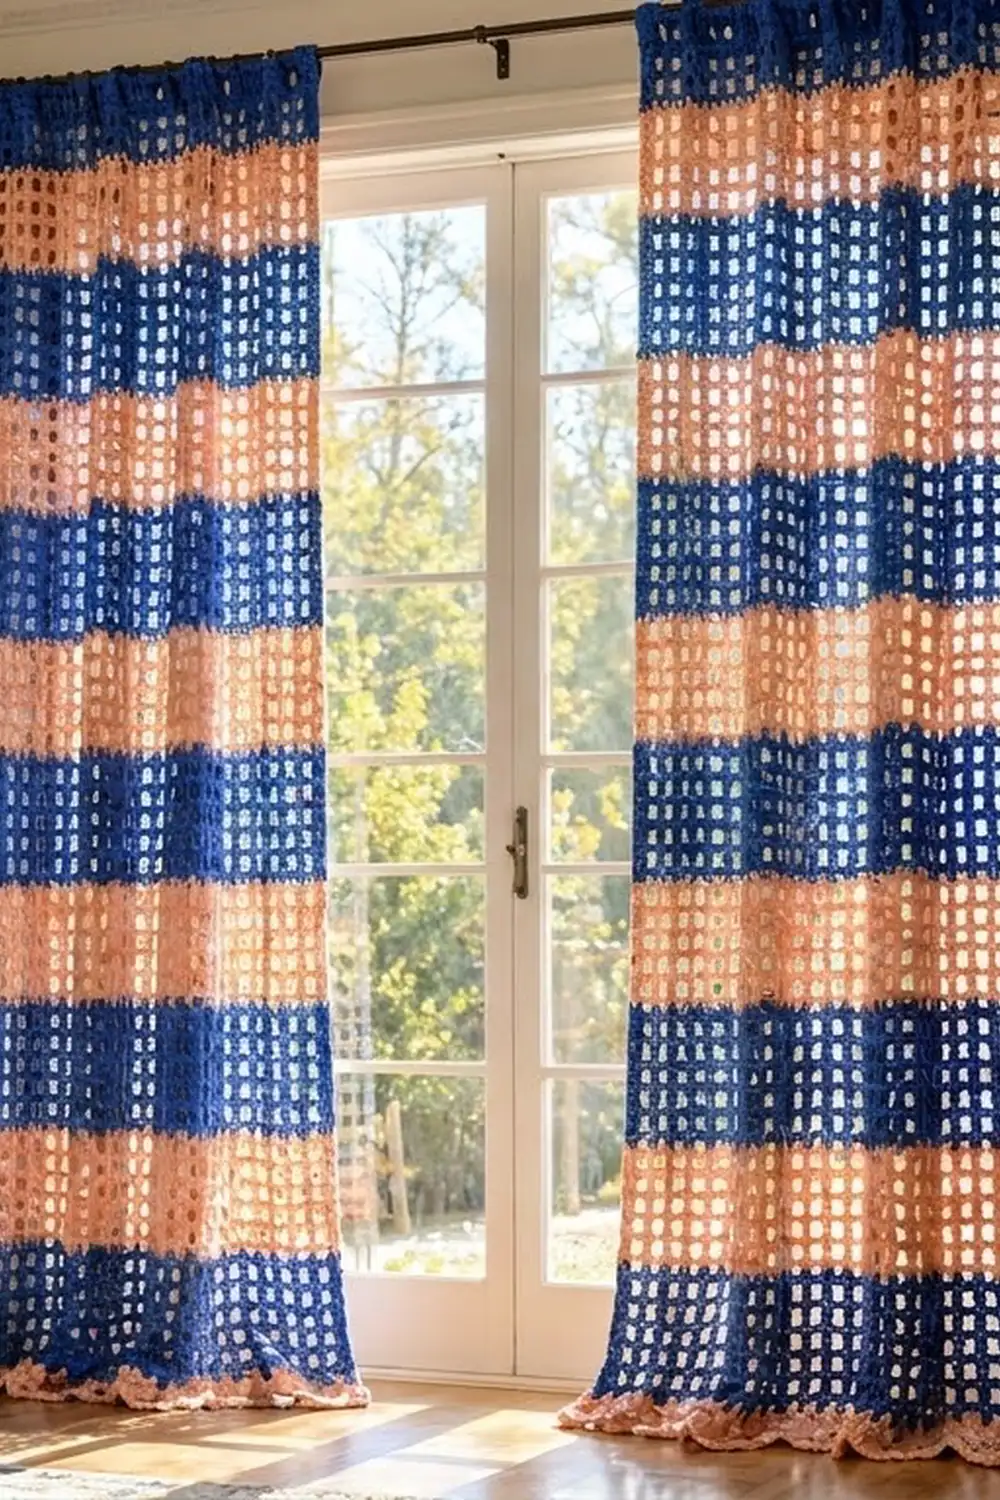
Coastal Sunrise is a breezy filet-mesh curtain panel striped in deep cobalt blue and soft peach. The open square grid lets daylight through while the bold bands give the window a cheerful, relaxed look.
Each panel is crocheted as one single rectangular piece. Hang two panels side by side for a full pair, as shown. They are never joined. The pattern below makes one panel. Repeat it for the second.
This pattern uses US crochet terms. One finished panel measures about 40.6 in wide x 71.3 in long (103.1 cm x 181.1 cm), including the border, rod casing, and scalloped hem.
Construction is simple. You work the mesh body in rows from the bottom up, changing color every four rows. A single round of blue single crochet tidies all four edges. A folded blue casing goes across the top and a peach shell scallop across the bottom.
Finished Size and Construction
- Finished size (one panel): 40.6 in x 71.3 in (103.1 cm x 181.1 cm)
- Skill level: Easy / advanced beginner
- Terminology: US crochet terms
- Yarn weight: Bulky (#5)
- Hook: 6.5 mm (US K-10½)
- Number of pieces: 1 per panel (make 2 for a pair; panels are not joined)
- Layout: 50 mesh squares wide x 68 rows tall, in 17 stripes of 4 rows each
- Mesh body size, before border: 40 in x 68 in (101.6 cm x 172.7 cm)
- Border depth: 0.3 in (0.8 cm) of single crochet on all sides, plus a 1.5 in (3.8 cm) folded casing at the top and a 1.2 in (3.0 cm) scallop at the bottom
Materials
Choose a smooth bulky yarn with good stitch definition. A cotton-acrylic blend hangs well and resists sun fading better than pure cotton. Fuzzy or splitty yarns will blur the mesh holes. Amounts assume about 100 m per 100 g (about 109 yd per 3.5 oz).
Per panel:
– Color A (cobalt blue): 550 g / 550 m
– Color B (peach): 400 g / 400 m
For a pair: Color A 1,100 g / 1,100 m; Color B 800 g / 800 m.
These quantities include a margin of roughly 15% for your swatch, tension differences, and weaving in ends.
Tools:
– 6.5 mm (US K-10½) crochet hook
– Tapestry needle
– Locking stitch markers
– Measuring tape
– Rust-proof pins and a spray bottle for blocking
– Curtain rod up to 0.75 in (1.9 cm) in diameter
Abbreviations (US Terms)
- ch – chain
- sc – single crochet
- dc – double crochet
- sk – skip
- sp – space
- st(s) – stitch(es)
- RS / WS – right side / wrong side
Mesh square: one dc post plus one ch-1 sp. A row of M mesh squares has M + 1 dc posts and M ch-1 sps, so it holds 2M + 1 sts.
Shell: 5 dc worked into the same stitch.
Gauge and Checkpoints
Mesh gauge: 5 mesh squares and 4 rows = 4 in x 4 in (10.2 cm x 10.2 cm), after light blocking. One mesh square is 0.8 in (2.0 cm) wide, and one row is 1 in (2.5 cm) tall.
Border gauge: 10 sc and 12 rows of sc = 4 in (10.2 cm).
Test swatch: Ch 24. Work Row 1 and Rows 2–8 of the mesh pattern below over 10 mesh squares. Block lightly. The swatch should measure 8 in x 8 in (20.3 cm x 20.3 cm).
- Too big: go down one hook size.
- Too small: go up one hook size.
- Width right but height off: adjust how high you pull up each dc loop. Row height matters for the stripe proportions and total length.
Checkpoints while working the panel:
– After Row 1: width 40 in (101.6 cm)
– After Row 4 (first stripe): 4 in (10.2 cm) tall
– After Row 20: 20 in (50.8 cm) tall
– After Row 40: 40 in (101.6 cm) tall
– After Row 68: 68 in (172.7 cm) tall
Measure the panel flat, without stretching. A tolerance of ±0.5 in (1.3 cm) in width is fine.
Mesh Body
Start with Color A. Every stripe is 4 rows. The color always changes at the end of an even-numbered row, so all changes happen at the same edge. Carry the unused color loosely up that edge. The border will cover it.
Foundation: With Color A, ch 104.
Row 1 (RS): Dc in 6th ch from hook (the skipped chs count as dc + ch-1 sp). Ch 1, sk next ch, dc in next ch. Repeat from * across. Turn. (50 mesh squares: 51 dc and 50 ch-1 sps = 101 sts)
Row 2: Ch 4 (counts as dc + ch 1). Dc in next dc. Ch 1, dc in next dc. Repeat from * across, working the last dc into the 3rd ch of the turning chain. Turn. (50 mesh squares, 101 sts)
Rows 3–4: Repeat Row 2. At the end of Row 4, work the final yarn over of the last dc with Color B. (50 mesh squares, 101 sts in each row)
Stripe sequence: Continue repeating Row 2 for every row. Change color at the end of every 4th row:
– Color A (blue) stripes: Rows 1–4, 9–12, 17–20, 25–28, 33–36, 41–44, 49–52, 57–60, 65–68 (9 stripes)
– Color B (peach) stripes: Rows 5–8, 13–16, 21–24, 29–32, 37–40, 45–48, 53–56, 61–64 (8 stripes)
At the end of Row 68, do not fasten off Color A. Fasten off Color B and weave in its tail.
Body check: 68 rows, each with 50 mesh squares (101 sts). The body measures 40 in x 68 in (101.6 cm x 172.7 cm).
Border
Border gauge reminder: 2.5 sc per inch (2.5 cm) across the width and along the sides.
Round 1 (conversion round, Color A): Ch 1 and do not turn. Work single crochet around the whole panel. Start along the top edge (Row 68) and work 3 sc into each corner stitch.
- Top edge: sc in each dc and each ch-1 sp across. That is 101 sts worked one per existing stitch, plus 2 extra sc in each of the 2 corner sts. Count: 101 + 4 = 105 sc, including both 3-sc corner groups.
- Long sides (each): Work into the row ends, alternating 2 sc and 3 sc per row end: 34 row ends x 2 sc + 34 row ends x 3 sc = 170 sc. This count does not include the corner groups.
- Bottom edge: 1 sc into each foundation ch at the base of a dc or ch-1 sp, for 101 sts. Add 2 extra sc in each corner: 101 + 4 = 105 sc, including both corner groups.
Join with a sl st to the first sc. (Total: 105 + 170 + 105 + 170 = 550 sc)
Why the math works: 101 sc across 40 in is about 2.5 sc per inch, which matches the border gauge. On the sides, 68 rows at 1 in each need about 2.5 sc per row end. Alternating 2 and 3 gives exactly 170 sc over 68 in, or 2.5 per inch. The edges therefore lie flat instead of rippling or pulling in.
Mark the center sc of each 3-sc corner group. Corner center to corner center, the top and bottom edges each hold 103 sts: 1 + 1 + 99 + 1 + 1.
Top Rod Casing (Color A)
Join Color A in the top-right corner center sc, or keep working with the attached yarn after moving to it with sl sts.
Row 1: Ch 1. Sc in the same st and in each st across to the next corner center sc. Turn. (103 sc)
Rows 2–9: Ch 1, sc in each sc across. Turn. (103 sc each row)
The casing is now 3 in (7.6 cm) tall. Fasten off, leaving a 100 in (254.0 cm) tail. Fold the casing in half toward the WS so that Row 9 meets the base of Row 1. Whipstitch along the full width with the tail. Leave both short ends open. The finished pocket is 1.5 in (3.8 cm) deep.
Bottom Scallop (Color B)
With the RS facing, join Color B in the bottom-left corner center sc.
Row 1: Ch 1. Sc in the same st. Sk 2 sts, 5 dc in next st (shell), sk 2 sts, sc in next st. Repeat from * 17 times in total. The last sc lands in the opposite corner center sc. Fasten off. (17 shells and 18 sc = 103 sts)
Why it fits: each repeat uses 6 sts, and 6 x 17 + 1 = 103. That is exactly the bottom edge count from corner center to corner center, so the shells sit evenly with no gaps or crowding. The scallop adds 1.2 in (3.0 cm).
Final panel: 40 in + 2 x 0.3 in = 40.6 in (103.1 cm) wide. In length: 68 in + 0.3 in + 0.3 in + 1.5 in casing + 1.2 in scallop = 71.3 in (181.1 cm).
Final Blocking
- Weave in all ends along the edges, inside the sc border or the dc posts, never across the open mesh.
- Lay the panel flat on clean towels or blocking mats. Large panels can be blocked in sections.
- Smooth each stripe so the mesh holes are square and the rows run straight across.
- Pin the long sides to 71.3 in (181.1 cm) and the width to 40.6 in (103.1 cm). Check that the measurements match at the top, middle, and bottom.
- Pin each scallop point so it opens evenly.
- Mist the panel thoroughly with water. Cotton blends can also take a light steam held above the fabric. Never press acrylic with an iron.
- Let it dry completely before unpinning, usually 24 hours.
- Block the second panel to the same measurements so the pair hangs evenly.
Final Quality-Control Checklist
- Every row has 50 mesh squares (101 sts).
- There are 17 stripes of 4 rows each, with blue at both the top and bottom of the body.
- All color changes are on the same edge, and the carried strands are hidden under the border.
- Border Round 1 totals 550 sc, with 105 on the top and bottom and 170 on each side.
- The casing has 9 rows of 103 sc, is folded and stitched, and has both ends open.
- The scallop has 17 even shells.
- The blocked panel measures 40.6 in x 71.3 in (103.1 cm x 181.1 cm).
- Both panels match within 0.5 in (1.3 cm).
Troubleshooting
- Panel gets narrower as you go: you are probably missing the last dc into the turning chain. Count the posts: there should be 51.
- Mesh holes look rectangular: your dc are too short or too tall compared with the ch-1 width. Adjust how high you pull up the loops, or change the hook size.
- Wavy side border: too many sc per row end. Check the 2/3 alternation.
- Side border pulls in: too few sc. Recount to 170.
- Casing too tight for the rod: add 2 more sc rows before folding, or use a thinner rod.
- Scallops crowd or gap: recount the bottom edge to 103 sts from corner center to corner center.
- Panels differ in length: compare row heights and block both panels together.
Care
Hand wash or machine wash on a gentle cold cycle in a mesh laundry bag, then dry flat and reshape. To keep the colors bright, avoid hanging the panels where strong afternoon sun hits them all day.
Final Notes
The measurement chain is simple: 5 mesh squares and 4 rows = 4 in (10.2 cm). That gives 50 mesh squares across 40 in (101.6 cm) and 68 rows for 68 in (172.7 cm). The border adds 0.3 in (0.8 cm) on each edge, the casing adds 1.5 in (3.8 cm), and the scallop adds 1.2 in (3.0 cm). One finished panel is 40.6 in x 71.3 in (103.1 cm x 181.1 cm). If your gauge is right at the swatch, every later count and measurement will fall into place. Make a second panel the same way for a full window.
Happy crocheting!