

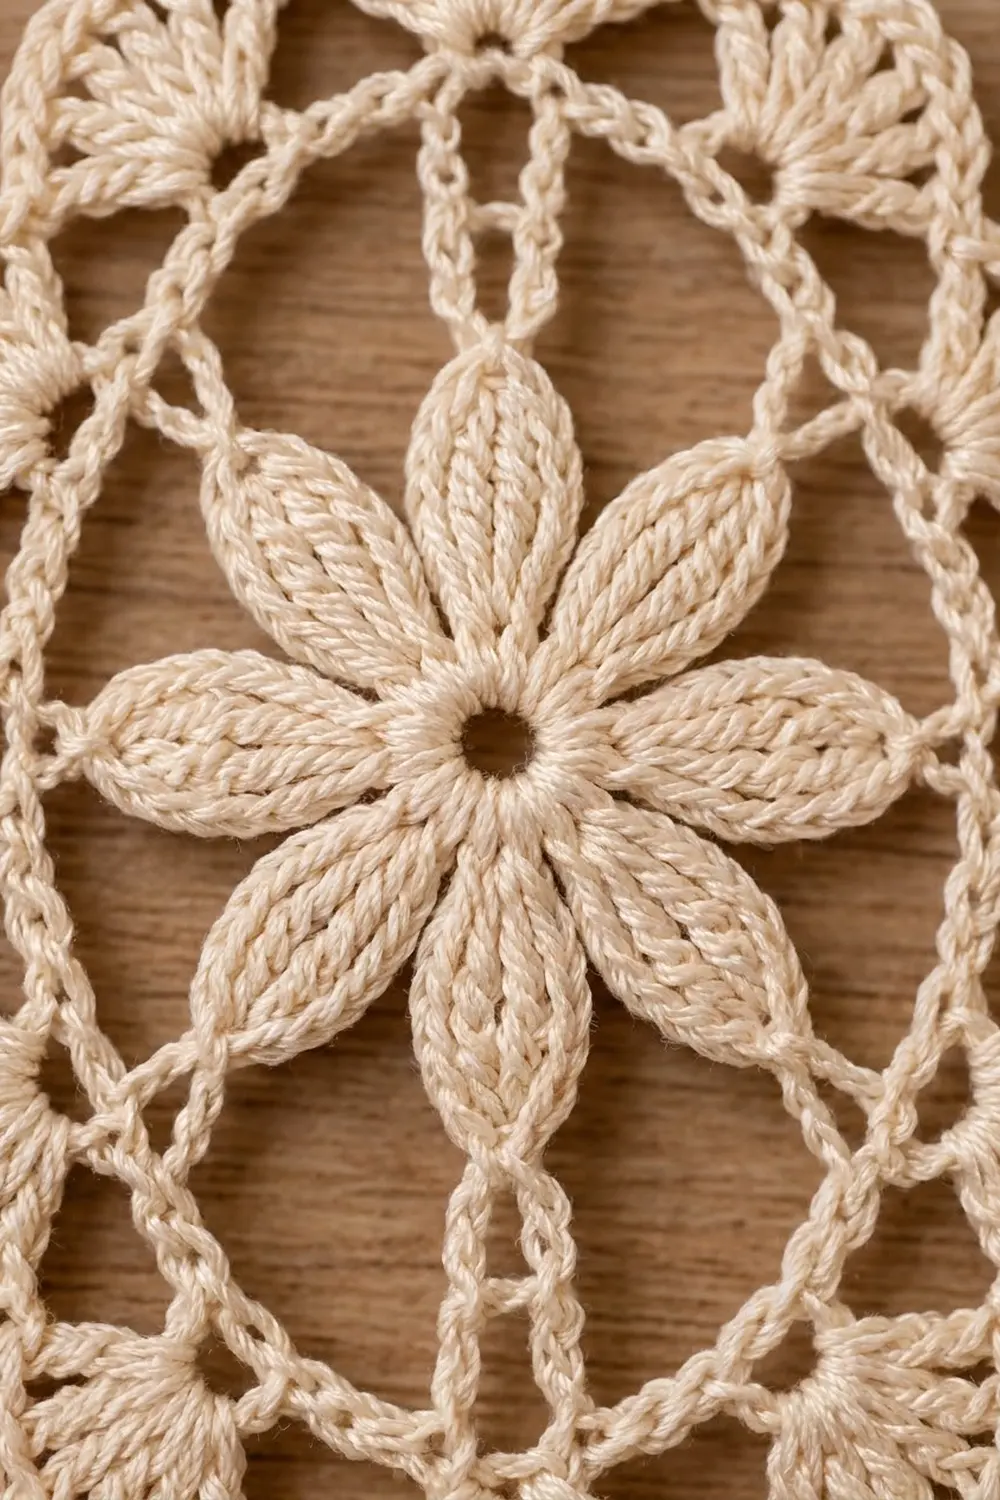
The Winter Bloom Lace Ornament is a single oval lace motif with a soft point at the top and bottom. An eight-petal flower sits in the center, and chain spokes hold it inside an oval frame. A ring of fan shells forms the scalloped outer edge, and a slim, covered hanging loop at the top finishes it.
It is worked in one color, a warm cream cotton thread, so it looks like heirloom tatting or vintage doily lace. It looks lovely on a green tree with warm lights, tied to a gift, or hung in a window.
This pattern uses US crochet terms. The finished ornament measures 3.75 in wide x 4.75 in tall (9.5 cm x 12.1 cm) without the loop. The hanging loop adds about 1.25 in (3.2 cm), for a total height of about 6 in (15.2 cm).
The whole ornament is one piece, worked in joined rounds from the center out. First you make the flower and add a chain ring. Next you raise posts of different heights to shape the oval and cover the frame with single crochet. Then you work the loops, fans, and scallop edge. Blocking with starch sets the final shape.
Finished Size and Construction
- Finished size: 3.75 in x 4.75 in (9.5 cm x 12.1 cm), plus a 1.25 in (3.2 cm) loop
- Skill level: Intermediate (clusters, tall stitches, lace spacing)
- Terminology: US
- Yarn weight: Lace (0), size 3 mercerized cotton crochet thread
- Hook: 2.25 mm (US B-1)
- Number of pieces: 1
- Layout: single oval motif, worked in rounds
- Piece size: 3.75 in x 4.75 in (9.5 cm x 12.1 cm)
- Size before border (after Rnd 5): 2.5 in x 3.25 in (6.4 cm x 8.3 cm)
- Border depth (Rnds 6-8): about 0.625 in (1.6 cm) at the sides and 0.75 in (1.9 cm) at the top and bottom points
Materials
Thread: Choose a smooth, mercerized cotton in size 3. Mercerized cotton holds starch well and shows each stitch clearly, which matters for the petals and fans. Avoid fuzzy or acrylic thread, because the lace will look blurry and won’t stay stiff.
- Cream / ivory: 8 g (22 m)
This quantity includes a margin for checking gauge on your first ornament and for weaving in ends. One 50 g ball makes several ornaments.
Tools:
- 2.25 mm (US B-1) crochet hook
- Fine tapestry needle
- Small sharp scissors
- 1 stitch marker
- Rust-proof pins and a foam blocking board
- Spray starch or fabric stiffener
- Paper and pencil for a blocking template
Abbreviations (US Terms)
- ch – chain
- sl st – slip stitch
- sc – single crochet
- dc – double crochet
- tr – treble crochet
- dtr – double treble crochet
- sk – skip
- sp(s) – space(s)
- st(s) – stitch(es)
- Rnd – round
Special stitch – Cluster (Cl): Work everything in the same stitch. *Yarn over twice, insert hook, yarn over and pull up a loop, (yarn over, pull through 2 loops) twice; repeat from * 3 more times (5 loops on hook). Yarn over and pull through all 5 loops. This is a 4-tr cluster, and its strands form the ridged, pointed petal.
Gauge and Checkpoints
Gauge isn’t critical for an ornament, but it controls the final size and how flat the lace lies. Use your first ornament as the test piece and check it at each stage.
- Base gauge: 8 sc = 1 in (2.5 cm) in Rnd 5.
- After Rnd 1: the circle is 0.75 in (1.9 cm) across, with a small open hole in the center.
- After Rnd 2: the flower is 1.75 in (4.4 cm) across, tip to tip.
- After Rnd 3: the chain ring is about 2 in (5.1 cm) across.
- After Rnd 5: the oval frame is 2.5 in x 3.25 in (6.4 cm x 8.3 cm).
- After Rnd 7: the fans reach 3.5 in x 4.5 in (8.9 cm x 11.4 cm).
- After Rnd 8: 3.75 in x 4.75 in (9.5 cm x 12.1 cm), before stiffening.
If your piece is too big: go down to a 2.0 mm hook, or tighten your chains. Loose chains in Rnd 4 are the most common cause of a floppy frame.
If your piece is too small or cupping: go up to a 2.5 mm hook. If only the frame cups, loosen the chains in Rnd 4 and Rnd 6 slightly.
Pattern
Rnd 1: Flower Center
Ch 6, sl st in first ch to form a ring.
Ch 3 (counts as dc), work 15 dc in the ring, sl st in top of beginning ch-3. (16 dc)
The ring stays open and becomes the small hole in the flower center.
Rnd 2: Petals
Ch 1, sc in same st as join, ch 4, Cl in next dc, ch 4, *sc in next dc, ch 4, Cl in next dc, ch 4; repeat from * 6 more times, sl st in first sc.
(8 sc, 8 Cl, 16 ch-4 sps = 80 sts)
Each petal is a ch-4 rising to a cluster tip and a ch-4 falling back down. Place a marker in the first Cl. This petal points to the top of the ornament.
Rnd 3: Chain Ring
Sl st in each of the next 4 ch and in the top of the first Cl (the marked one). Ch 1, sc in same Cl, *ch 6, sc in top of next Cl; repeat from * 6 more times, ch 6, sl st in first sc.
(8 sc, 8 ch-6 sps = 56 sts)
Each sc sits on a petal tip. Move the marker to the top sc.
Rnd 4: Spokes and Oval Shaping
This round builds the oval. You work the posts into the sc above each petal tip, and their different heights stretch the frame so it is taller than it is wide. Skip each ch-6 sp entirely; the new chains float above it.
Ch 5 in the marked sc (counts as dtr; top spoke), ch 8. Then work into the next 7 sc in order:
- tr in next sc, ch 8
- dc in next sc, ch 8 (right side spoke)
- tr in next sc, ch 8
- dtr in next sc, ch 8 (bottom spoke)
- tr in next sc, ch 8
- dc in next sc, ch 8 (left side spoke)
- tr in next sc, ch 8
Sl st in top of beginning ch-5.
(2 dtr, 4 tr, 2 dc, 8 ch-8 sps = 8 posts + 64 ch = 72 sts)
The posts become the straight spokes that run from the flower to the frame. The longest are at the top and bottom, and the shortest are at the sides.
Rnd 5: Solid Frame
Ch 1, sc in same st as join, sc in each ch and each post around (insert under the top 2 loops of each ch), sl st in first sc.
(72 sc: 8 posts + 64 ch worked 1-per-st, + 0 added)
Number the stitches in your head. St 1 is the top post, and st 37 is the bottom post, directly opposite. Each post is followed by 8 sc, so the posts fall on sts 1, 10, 19, 28, 37, 46, 55, and 64.
Checkpoint: the frame measures 2.5 in x 3.25 in (6.4 cm x 8.3 cm).
Rnd 6: Connecting Loops
Sl st in each of the next 3 sc (you are now at st 4). Ch 1, sc in same st, *ch 5, sk 5 sc, sc in next sc; repeat from * 10 more times (the last sc lands on st 70), ch 5, sk last 5 sc, sl st in first sc.
(12 sc, 12 ch-5 loops = 12 + 60 = 72 sts)
The loop between sts 34 and 40 straddles st 37, so it is centered at the bottom (Loop 6). The last loop, between sts 70 and 4, straddles st 1, so it is centered at the top (Loop 12).
Rnd 7: Fans
Ch 1, sc in same st as join.
- Loops 1-5: *7 dc in next ch-5 loop, sc in next sc; repeat from * 4 more times.
- Loop 6 (bottom): 7 tr in next ch-5 loop, sc in next sc.
- Loops 7-11: *7 dc in next ch-5 loop, sc in next sc; repeat from * 4 more times.
- Loop 12 (top): 7 tr in last ch-5 loop, sl st in first sc.
(12 sc, 70 dc, 14 tr = 96 sts; 12 fans)
The taller treble fans push out at the top and bottom, which creates the soft points of the oval.
Rnd 8: Scallop Edge
Sl st in first sc. *(Sc in next fan st, ch 2) 6 times, sc in 7th fan st, sl st in next sc; repeat from * 11 more times. The last sl st lands in the first sc of Rnd 7. Fasten off.
(84 sc, 72 ch-2 sps, 12 sl sts = 84 + 144 + 12 = 240 sts)
Each fan now has 7 sc with 6 small ch-2 bumps, which gives the textured, picot-like edge.
Hanging Loop
Find the top fan (worked into Loop 12). Join thread with a sl st in its 4th sc, the center of the fan. Ch 24, sl st in the same sc to form a loop. Work 32 sc into the ch-24 loop, sl st in the same sc. Fasten off.
Covering the chain with sc makes the loop sturdy and rope-like. It measures about 1.25 in (3.2 cm) tall.
Weave in all ends along the frame or inside the fans, where they disappear into solid stitches.
Border
Rnds 6-8 form the border of this single motif. Because the ornament is an oval, “sides” here means the left and right halves, plus the top and bottom points.
Border gauge: each ch-5 loop covers 6 frame sts, or 0.75 in (1.9 cm) of frame at 8 sc per inch.
Rnd 6 counts:
- Top point: 1 loop (Loop 12)
- Right side: 5 loops (Loops 1-5)
- Bottom point: 1 loop (Loop 6)
- Left side: 5 loops (Loops 7-11)
- Total: 12 loops, 12 sc, 72 sts
Rnd 7 counts:
- Top point: 1 fan of 7 tr
- Right side: 5 fans of 7 dc = 35 dc
- Bottom point: 1 fan of 7 tr
- Left side: 5 fans of 7 dc = 35 dc
- Plus 12 sc between fans: 96 sts total
Rnd 8 counts:
- Each fan: 7 sc + 6 ch-2 sps + 1 sl st = 20 sts
- Each side: 5 fans = 100 sts
- Top and bottom points: 20 sts each
- Total: 240 sts
Why the math works: Rnd 4 has 8 posts, each followed by 8 chains, so 8 x 9 = 72 sts. Rnd 5 keeps all 72. The border uses a 6-st repeat (1 sc + 5 skipped), and 72 / 6 = 12 loops exactly, with no leftover stitches. Starting Rnd 6 on st 4 shifts the repeat by 3 sts, so one loop is centered on st 1 (top) and another on st 37 (bottom). That keeps the ornament symmetrical and puts the treble fans right on the points.
Final Blocking
- Draw a template. On paper, draw an oval 3.75 in x 4.75 in (9.5 cm x 12.1 cm) with a slight point at the top and bottom. Mark a center line.
- Wet the ornament. Soak it in cool water for a few minutes, then press it gently in a towel. Don’t wring it.
- Pin the center. Lay the ornament over the template on the foam board. Pin the flower’s center hole and each petal tip so the petals sit evenly.
- Pin the spokes and frame. Pin at each of the 8 posts so the spokes run straight and the frame follows the oval line.
- Pin the edge. Place one pin in the center of each fan, then pin the top and bottom fans to the points.
- Stiffen. Spray starch generously, or brush on fabric stiffener. Let it soak in, then spray once more.
- Dry fully. Leave it pinned for at least 12 hours. Unpin only when it is completely dry and crisp.
- Shape the loop. Lay the hanging loop straight upward while it dries so it stands neatly.
Final Quality-Control Checklist
- Rnd 1 has 16 dc and a small open center hole.
- There are 8 petals, each a pointed 4-tr cluster.
- One petal points straight to the top and one straight to the bottom.
- Rnd 4 has 8 spokes: dtr at top and bottom, dc at the sides, tr on the diagonals.
- Rnd 5 has exactly 72 sc.
- Rnd 6 has 12 loops, with Loop 12 at the top and Loop 6 at the bottom.
- Rnd 7 has 12 fans: 10 dc fans and 2 tr fans at the points.
- Rnd 8 has 240 sts and an even scallop edge.
- The hanging loop is centered over the top fan.
- The finished size is 3.75 in x 4.75 in (9.5 cm x 12.1 cm).
- All ends are hidden and trimmed.
Troubleshooting
Petals look stubby. Make sure each Cl uses tr (yarn over twice), not dc. Pull up the first loop to full height.
Petals twist sideways. Keep the ch-4 sections relaxed and the same on both sides of every cluster.
Frame is round, not oval. Check the Rnd 4 post heights. The top and bottom must be dtr and the sides must be dc.
Frame ruffles. Your Rnd 4 chains are too loose. Tighten them, or use a 2.0 mm hook for that round only.
Frame cups. Your chains are too tight. Loosen them, or go up half a hook size for Rnds 4-5.
Fans are lopsided at the top and bottom. You started Rnd 6 on the wrong stitch. Recount: st 1 is the top post, and Rnd 6 begins on st 4.
Count is off in Rnd 7. Count fans, not stitches. You need 12 fans with 1 sc between each one.
Ornament droops on the tree. Starch it again and let it dry fully, or use a stronger stiffener.
Care
Hand wash in cool water with mild soap, then re-block and re-starch. Store flat in tissue paper between seasons to protect the shape.

Final Notes
The measurement chain is simple to follow. Rnd 1 gives a 0.75 in (1.9 cm) center, and Rnd 2 grows it to a 1.75 in (4.4 cm) flower. Rnds 3-5 build the oval frame at 2.5 in x 3.25 in (6.4 cm x 8.3 cm) on 72 stitches. Rnds 6-8 add 12 loops, 12 fans, and the scallop edge for a final 3.75 in x 4.75 in (9.5 cm x 12.1 cm). The hanging loop adds 1.25 in (3.2 cm), for about 6 in (15.2 cm) overall.
If each checkpoint matches, the finished piece will match too. Make one, check it, then make a whole set for the tree.
Happy crocheting!