

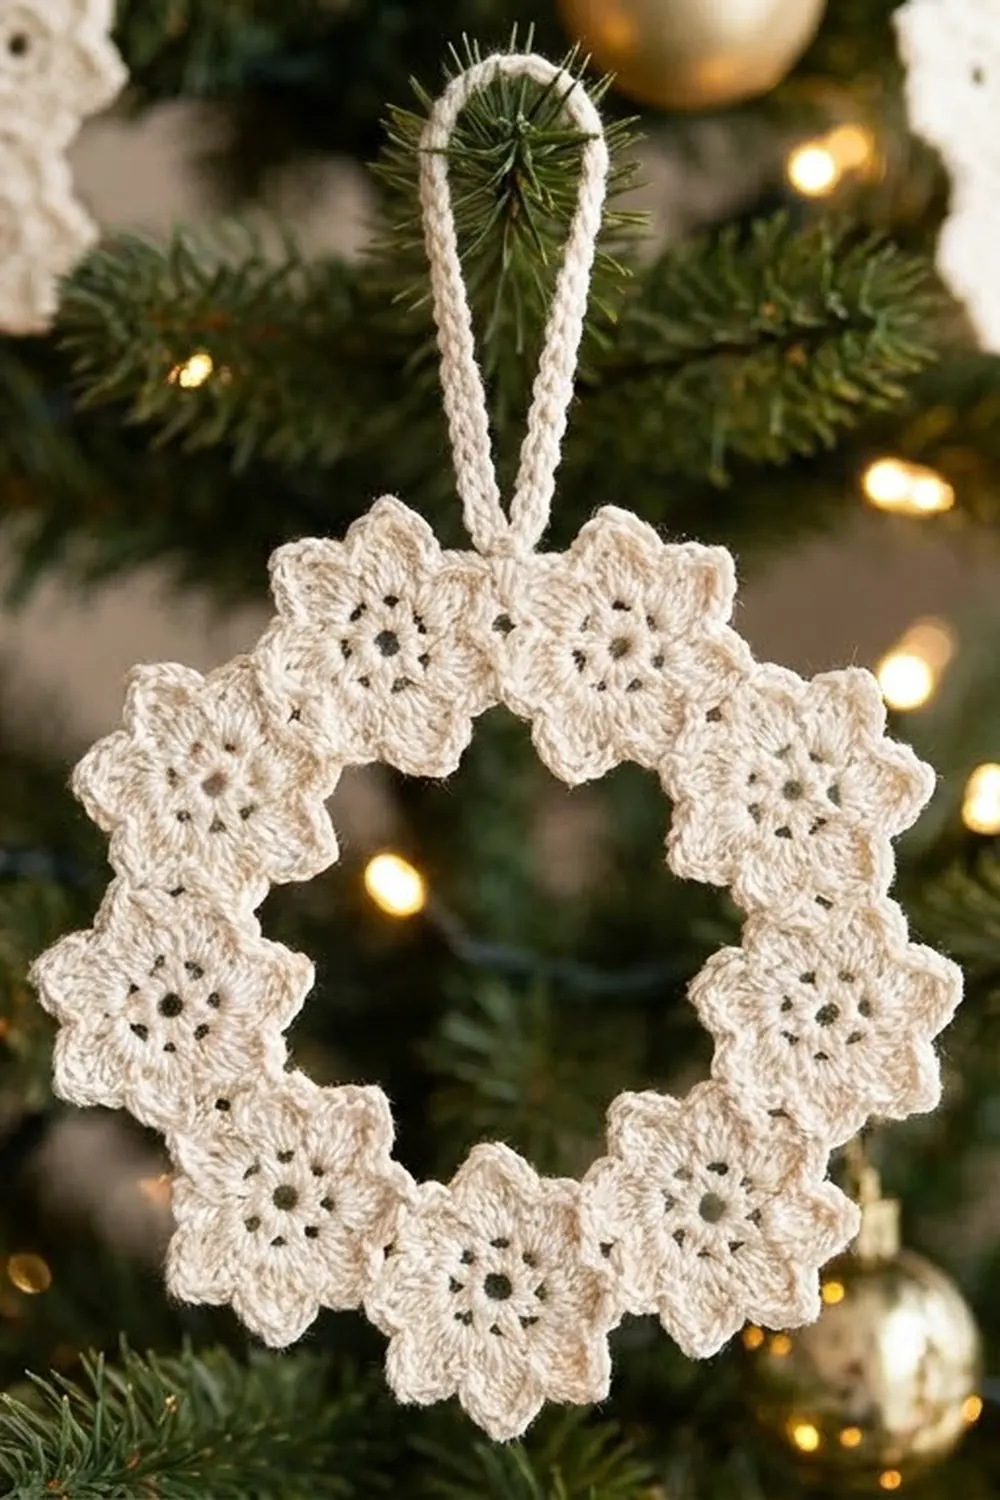
This little ornament is a lacy ring made from twelve tiny eight-petal flowers, joined petal tip to petal tip into a circle. The center is left open, so the tree lights and branches show through. A slim chain loop at the top lets it hang straight.
It is worked in a single shade of cream cotton thread. The finish is soft and vintage, like an old doily turned into a wreath. Make one for a gift tag, a package topper, or a whole set for the tree. Because each flower takes only a few minutes, it is also a good project for using up partial balls of thread.
The pattern uses US crochet terms. The finished ring is about 4.75 in (12.1 cm) across, with an open center of about 2.75 in (7.0 cm). The hanging loop adds about 1.5 in (3.8 cm) above the top flower.
Construction is simple. You crochet one complete flower first. Each following flower is joined to the one before it during its last round. The twelfth flower closes the circle. Last, you chain the hanging loop from the top flower. There is no separate border.
Finished Size and Construction
- Finished size: about 4.75 in (12.1 cm) outer diameter, not counting the loop
- Center opening: about 2.75 in (7.0 cm)
- Hanging loop: about 1.5 in (3.8 cm) tall
- Skill level: Intermediate (fine thread, join-as-you-go)
- Terminology: US crochet terms
- Yarn weight: Size 10 crochet cotton thread (Lace, weight 0)
- Hook: 1.75 mm steel hook
- Number of pieces: 12 flower motifs, joined into one ring
- Layout: a single circle of 12 motifs, joined at one petal tip on each side
- Piece size: each motif is 1 in (2.5 cm) across, tip to tip
- Size before border: 4.75 in (12.1 cm), the same as the finished size
- Border depth: 0 in (0 cm); the flower petals are the finished edge
Materials
Choose a mercerized cotton thread in size 10. Mercerized cotton holds crisp stitch definition, blocks flat, and takes a light starch well. Avoid fuzzy or acrylic threads, which blur the small openings.
- Cream (one color): 15 g, about 70 m (77 yd)
One ornament uses roughly 10 g. The amount above includes a margin for your test motif, the hanging loop, and weaving in tails.
Tools:
- 1.75 mm steel crochet hook
- Fine tapestry needle or thread needle
- Small sharp scissors
- Blocking mat or foam board
- Rustproof pins
- Spray starch or a fabric stiffener (optional, recommended)
- A round form about 2.75 in (7.0 cm) across, such as a jar lid (optional)
Abbreviations (US Terms)
- ch: chain
- sl st: slip stitch
- sc: single crochet
- dc: double crochet
- sp: space
- st(s): stitch(es)
- rnd: round
- beg: beginning
Special stitch: joining tip (jt). Where you would normally ch 2 at a petal tip, do this instead: ch 1, take the hook out of the loop, and insert it from the front through the matching ch-2 tip sp of the neighboring motif. Pick up the dropped loop and pull it through, then ch 1. The joined tip still counts as one tip sp.
Gauge and Checkpoints
Always make one test motif before you start the ornament. The size of the whole ring depends on this one measurement.
Gauge: one complete motif (Rnds 1–3) measures 1 in (2.5 cm) across, from one petal tip to the opposite tip, after a light press.
Checkpoints:
- After Rnd 1: about 0.45 in (1.1 cm) across
- After Rnd 2: about 0.75 in (1.9 cm) across
- After Rnd 3: 1 in (2.5 cm) across
- Six joined motifs, laid in a straight line: about 6 in (15.2 cm) long
- Finished, blocked ring: 4.75 in (12.1 cm) across
If your motif is too big (1.1 in / 2.8 cm or more), go down to a 1.5 mm hook. If it is too small (0.9 in / 2.3 cm or less), go up to a 2 mm hook. Small differences add up quickly. If each of the 12 motifs is 0.1 in too large, the ring comes out about 0.5 in (1.3 cm) wider.
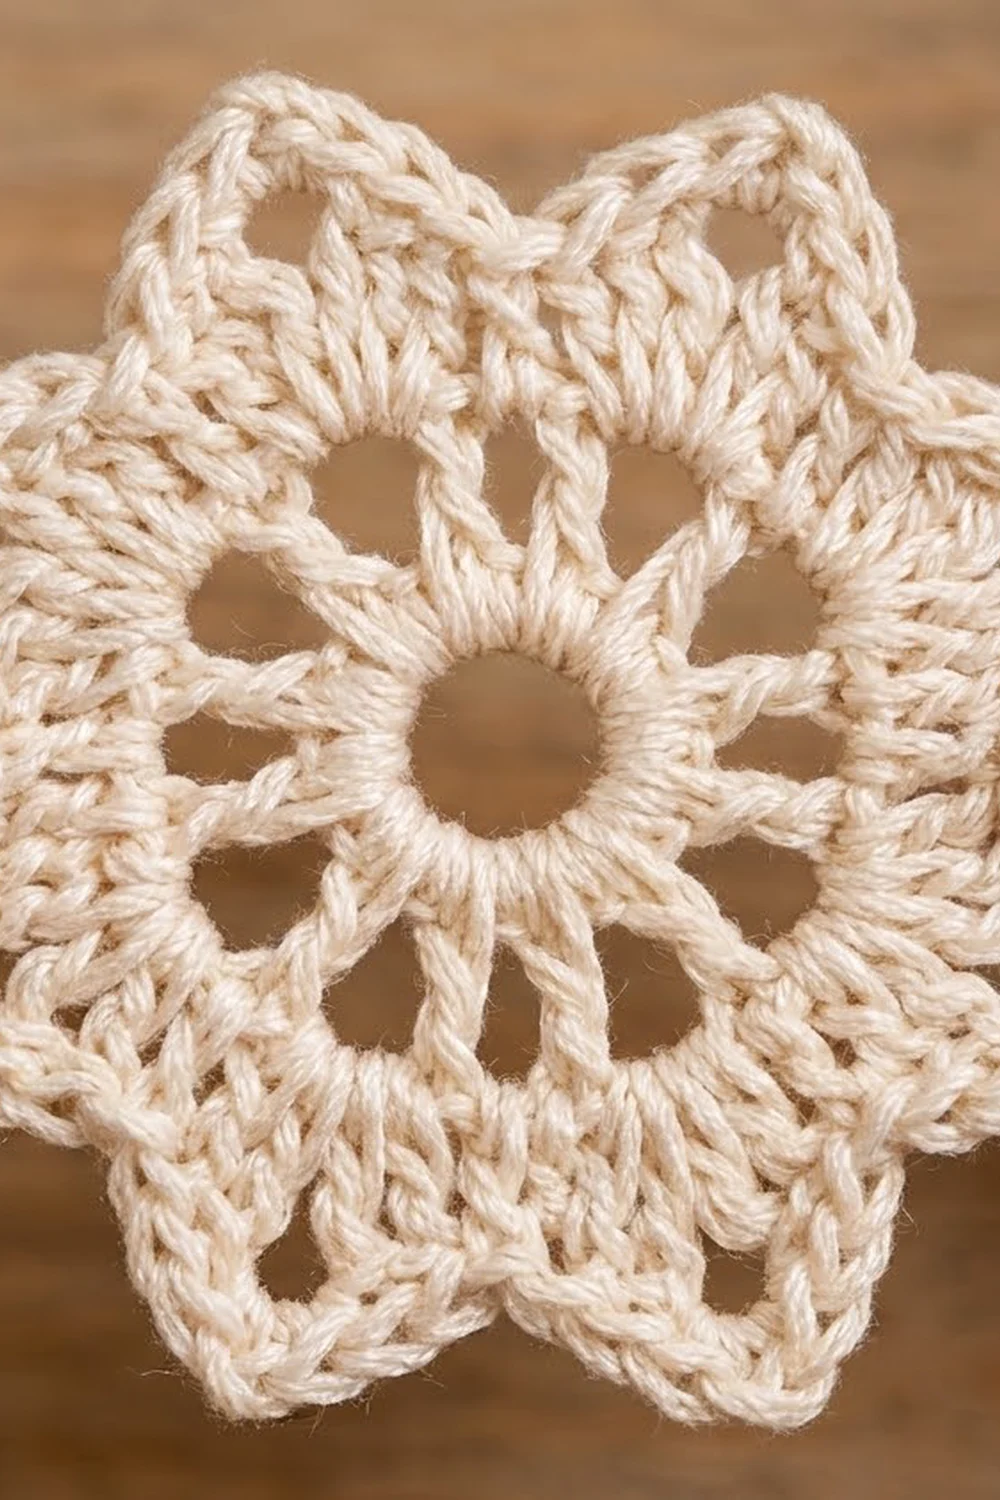
Flower Motif
Make 1 motif complete. All the later motifs follow the same rounds but join to their neighbors on Rnd 3.
Rnd 1: Make a magic ring (or ch 4 and sl st to form a ring). Ch 3 (counts as dc), then work 15 dc into the ring. Sl st to the top of beg ch-3. Pull the ring closed. (16 dc)
Rnd 2: Ch 5 (counts as dc + ch 2). Dc in next dc, ch 2; repeat from * 14 more times. Sl st to the 3rd ch of beg ch-5. (16 dc, 16 ch-2 sps)*
This round makes the ring of small spoke openings around the center that you see in each flower.
Rnd 3 (petals): Sl st into the first ch-2 sp. Ch 1, sc in the same sp. In the next ch-2 sp, work (2 dc, ch 2, 2 dc) to make one petal; sc in the next ch-2 sp; repeat from * 6 more times. In the last ch-2 sp, work (2 dc, ch 2, 2 dc). Sl st to the first sc. (8 petals: 8 sc, 32 dc, 8 ch-2 tip sps)*
Fasten off, leaving a 6 in (15.2 cm) tail. Each petal is 1 sc + 4 dc + 1 tip, so 8 petals × 4 dc = 32 dc. The ch-2 at each tip gives the petal its small pointed scallop.
Numbering the tips: Number the petal tips 1 to 8 in the order you work them. Tips 1 and 5 sit directly opposite each other, and these are the joining tips. Tips 2, 3 and 4 face the outside of the ring. Tips 6, 7 and 8 face the center opening. Keep the right side of every motif facing you so this order stays the same on every motif.
Make All Pieces
Cream: 12 motifs in total (1 complete motif plus 11 joined motifs, all in cream).
Layout grid (M = motif, numbered in working order):
            M1 (loop)
      M12           M2
   M11                 M3
  M10                   M4
   M9                  M5
      M8            M6
            M7
Each motif touches only its two neighbors. Tip 5 of each motif joins tip 1 of the next one. Tip 5 of M12 joins tip 1 of M1 to close the ring.
Joining
The motifs are joined as you go, on Rnd 3, so no sewing is needed.
Motifs 2–11: Work Rnds 1 and 2 as written. On Rnd 3, work the first petal (tip 1) as (2 dc, jt into tip 5 of the previous motif, 2 dc). Finish the round normally with plain ch-2 tips. Fasten off.
Motif 12: Work Rnds 1 and 2. On Rnd 3, work tip 1 as a joining tip into tip 5 of M11. Continue the round normally until you reach the fifth petal. Work tip 5 as a joining tip into tip 1 of M1, then finish the round. This closes the circle.
Stitch-to-stitch logic: Each joining tip replaces a ch-2 with ch 1 + sl st + ch 1. The petal still has exactly 4 dc, and the tip still counts as one tip sp, so every motif keeps its count of 8 sc, 32 dc and 8 tips. There are 12 joins in total: 11 made on tip 1 of motifs 2–12, plus 1 closing join on tip 5 of M12.
Tension advice: Keep the ch 1 on each side of the join at the same tension as your other chains. A tight join pulls the petals into sharp points, and a loose join lets the ring wobble. Before each join, lay the new motif next to the last one and check that neither motif is twisted.
Size checkpoint: After joining six motifs, lay them in a straight line. The strip should be about 6 in (15.2 cm) long. Once M12 is joined, the ring curves on its own, because the outer tips (2–4) spread apart and the inner tips (6–8) crowd together. Before blocking, it should measure close to 4.75 in (12.1 cm) across.
Border and Hanging Loop
This ornament has no added border rounds. The scalloped petal tips are the finished edge, both outside and inside. A border would fill in the delicate, open look.
Border gauge: not applicable. The edge counts come straight from the motifs:
- Outer edge: 12 motifs × 3 free tips (tips 2–4) = 36 outer tips
- Inner edge: 12 motifs × 3 free tips (tips 6–8) = 36 inner tips
- Joined tips: 12 joins × 2 tips = 24 tips
Why the math works: 36 + 36 + 24 = 96, which equals 12 motifs × 8 tips. Every tip is used exactly once, and no stitches are added at the seams.
Hanging loop: With the right side facing, join cream with a sl st into tip 3 of M1, the center outer tip. Ch 25, then sl st back into the same tip 3 sp. Fasten off and weave in the tail. The loop is about 1.5 in (3.8 cm) tall. For a sturdier loop, work 1 sl st into each ch back around before you fasten off.
Final Blocking
- Weave in all tails first. Run each tail back through the dc stitches of its own motif.
- Soak the ring in cool water for a few minutes. Press out the water gently in a towel; do not wring it.
- Lay the ring right side up on your blocking mat. If you have a 2.75 in (7.0 cm) round form, place it in the center.
- Pin the 12 motif centers into an even circle so the opening is round.
- Pin the outer tips (2–4) of each motif outward. Check that the outer diameter is 4.75 in (12.1 cm).
- Open each petal tip with a pin so the scallops are crisp.
- Spray with starch or brush on a diluted stiffener. Let the ring dry completely, for at least 12 hours.
- Unpin it and check that it hangs flat from the loop.
Final Quality-Control Checklist
- 12 motifs, each with 8 petals and 16 spokes around the center
- Every motif measures about 1 in (2.5 cm) across
- 12 joins, each at a single petal tip, with no twisted motifs
- 36 free outer tips and 36 free inner tips
- Outer diameter about 4.75 in (12.1 cm), center opening about 2.75 in (7.0 cm)
- Hanging loop at tip 3 of M1, about 1.5 in (3.8 cm) tall
- All tails woven in and trimmed close
- Ring hangs flat and balanced
Troubleshooting
There is a hole in the center of the motif. Use a magic ring and pull it tight before Rnd 2. Weave the tail around the ring once more to secure it.
The motif cups or ruffles. Check that Rnd 1 has exactly 16 dc and Rnd 2 has exactly 16 ch-2 sps. Ruffling usually means the hook is too large. Cupping usually means the chains are too tight.
The petals look lopsided. Make sure each petal sits in a single ch-2 sp, with the sc in the sp between petals. If two petals share a space, you have skipped a ch-2 sp.
The ring is oval, not round. Either one or more motifs are a different size, or a join went into the wrong tip. Count the tips: every join should be tip 5 to tip 1, with 3 free tips on each side.
A motif is twisted. Undo Rnd 3 back to the join and redo it with the right side of both motifs facing you.
The ring flops when hung. Starch it more firmly, or block it over a round form so the inner tips hold their shape.
The ring tilts on its loop. The loop isn’t centered. Move it to tip 3, the middle outer tip of M1.
Care
Hand wash in cool water with mild soap, lay flat, and reshape while damp. Re-starch after washing to bring back the crisp shape.
Final Notes
The whole ornament grows from one measurement. A 16-dc center becomes 16 spokes and then 8 petals, giving a 1 in (2.5 cm) motif. Six joined motifs make a 6 in (15.2 cm) strip, and twelve of them curve into a 4.75 in (12.1 cm) ring with a 2.75 in (7.0 cm) open center. Check that first motif, keep your joins even, and block on a round form. Then make a few more for the tree or to give away.
Happy crocheting!