

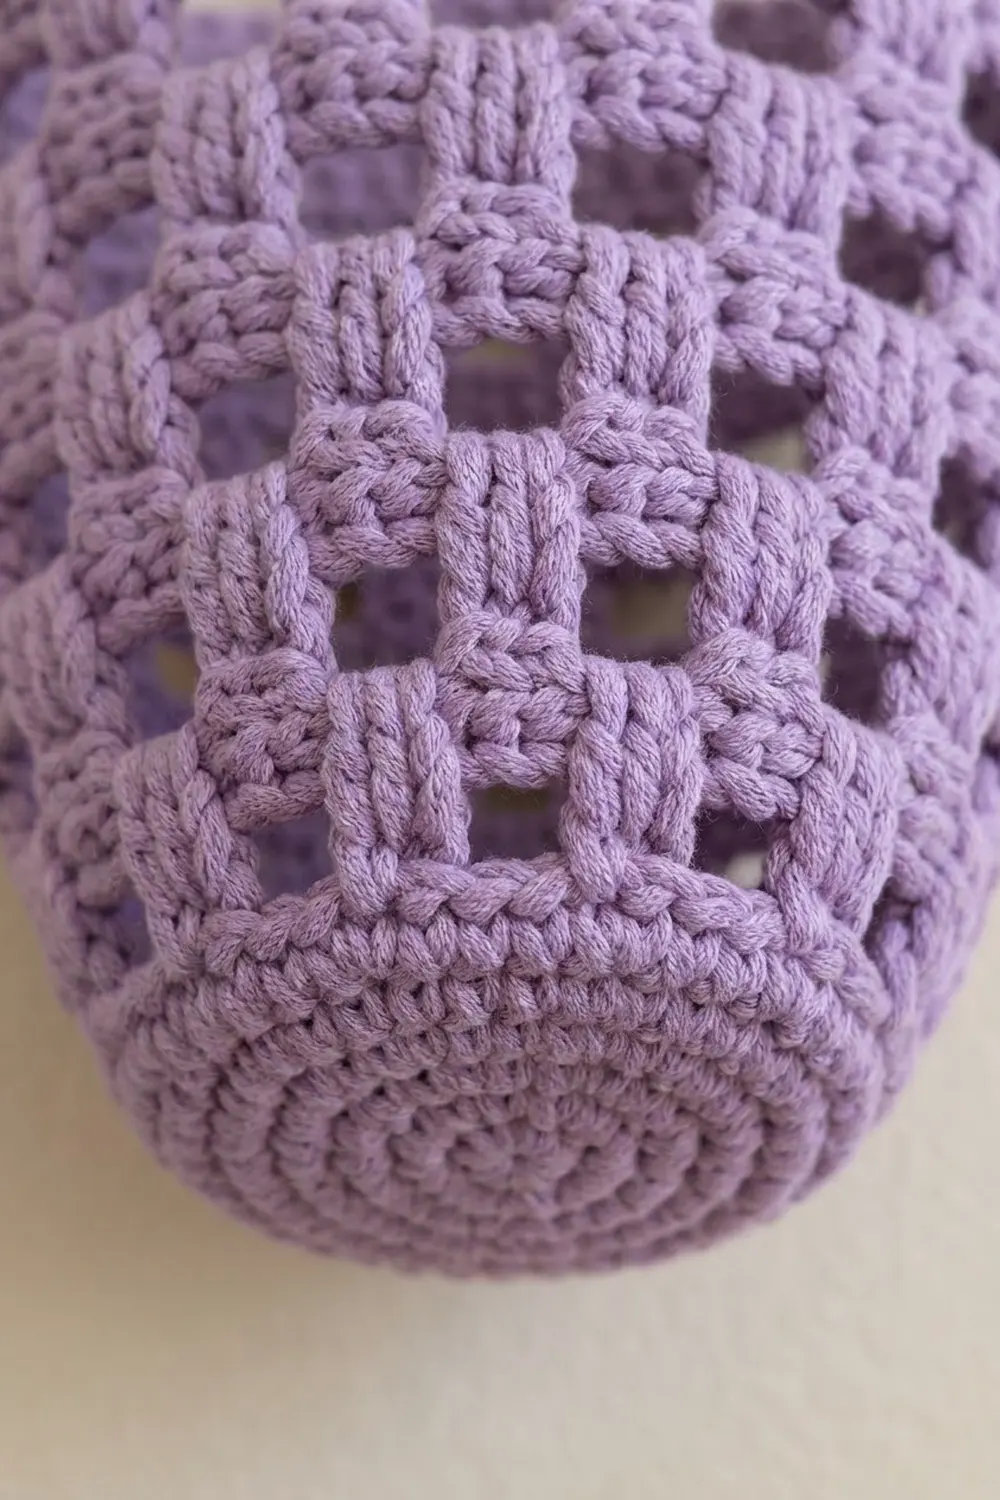
The Lavender Lattice Bag Keeper is a hanging, tapered holder for plastic grocery bags. You stuff bags in at the top and pull them out one at a time through a small opening at the bottom. The body is a lattice of solid blocks and square windows, so you can see the bags inside. A solid band finishes the top, and a sturdy covered loop at the back of the rim hangs it on a hook.
The sample is soft lavender, which looks fresh against a plain kitchen wall. A warm rust or terracotta version works just as well, and two in different colors make a matching pair: one for shopping bags, one for bin liners. Each holder is worked in a single color.
This pattern uses US crochet terms. The finished holder is 8 in (20.3 cm) wide across the top when laid flat and 11 in (27.9 cm) tall, plus a loop about 2.5 in (6.4 cm) high. The top opening is about 5.1 in (13.0 cm) across, and the dispensing hole is about 1.9 in (4.8 cm) across.
You start at the small bottom opening with a chain ring. Solid single crochet rounds grow into a rounded taper. After that, double crochet mesh rounds alternate with single crochet rounds, and stitches are added twice to widen the cone. A solid top band, a slip-stitch edge around the bottom opening and the hanging loop finish it. It is one seamless piece with no sewing.
Finished Size and Construction
- Finished size: 8 in (20.3 cm) wide flat x 11 in (27.9 cm) tall, plus a 2.5 in (6.4 cm) loop
- Skill level: Easy
- Terminology: US
- Yarn weight: Bulky (#5)
- Hook: 6 mm (US J-10)
- Number of pieces: 1
- Layout: joined rounds, worked from the bottom opening up
- Piece size: 8 in (20.3 cm) wide flat x 11 in (27.9 cm) tall
- Size before top band (border): 8 in (20.3 cm) wide flat x 9 in (22.9 cm) tall
- Top band (border) depth: 2 in (5.1 cm)
Materials
Choose a bulky (#5) cotton or cotton blend. It gives a firm fabric that keeps its cone shape when stuffed. Acrylic also works, but it is softer and may stretch more over time.
- Lavender (main color): 100 g, about 140 m (153 yd)
- Optional second holder in rust/terracotta: another 100 g, about 140 m (153 yd)
Tools:
- 6 mm (US J-10) crochet hook
- 1 locking stitch marker
- Tapestry needle
- Scissors
- Tape measure
- Rust-proof pins, a spray bottle and a towel for blocking
These quantities include a margin of about 15 percent. The holder itself uses roughly 85 g.
Abbreviations (US Terms)
- ch – chain
- sl st – slip stitch
- sc – single crochet
- dc – double crochet
- sk – skip
- sp – space
- st(s) – stitch(es)
- inc – 2 sc in the same stitch
- rnd(s) – round(s)
Special stitch – mesh block: dc in each of the next 4 sts, ch 2, sk the next 2 sts. One block uses 6 sts of the previous round and makes 6 sts (4 dc + 2 ch).
Counting rule for sc rounds above mesh: put 1 sc in each dc and 2 sc in each ch-2 sp. This turns every block back into 6 sc.
Gauge and Checkpoints
Gauge: 12 sc and 12 sc rnds = 4 in (10.2 cm). One mesh round plus the sc round above it = 1 in (2.5 cm) tall.
Work Rnds 1–6 and measure before going further. This is your test section, and it tells you whether the whole holder will come out right. Measure every checkpoint with the piece pressed flat, without stretching it.
- After Rnd 1: 18 sts, 3 in (7.6 cm) wide flat.
- After Rnd 6: 36 sts, 6 in (15.2 cm) wide flat, 2 in (5.1 cm) tall.
- After Rnd 12: 42 sts, 7 in (17.8 cm) wide flat, 6 in (15.2 cm) tall.
- After Rnd 20: 48 sts, 8 in (20.3 cm) wide flat, 9 in (22.9 cm) tall.
- After Rnd 26: 48 sts, 8 in (20.3 cm) wide flat, 11 in (27.9 cm) tall.
If your piece is too big, change to a 5.5 mm (US I-9) hook and start again. If it is too small, change to a 6.5 mm (US K-10.5) hook. Change only the hook, not the stitch counts. Every count is a multiple of the 6-stitch mesh block.
Pattern
Join every round with a sl st to the first stitch (or to the top of the starting ch-3 on mesh rounds). Mark the first stitch of each round and move the marker up as you go. Do not turn.
Base (Solid Taper)
Foundation: Ch 18 loosely and sl st to the first ch to make a ring. Do not twist the chain.
Rnd 1: Ch 1, sc in each ch around, join. (18 sc)
Rnd 2: Ch 1, sc in next 2 sts, inc; repeat from * 6 times total, join. (24 sc)
Rnd 3: Ch 1, sc in next 3 sts, inc; repeat from * 6 times total, join. (30 sc)
Rnd 4: Ch 1, sc in next 4 sts, inc; repeat from * 6 times total, join. (36 sc)
Rnds 5–6: Ch 1, sc in each st around, join. (36 sc)
Checkpoint: 6 in (15.2 cm) wide flat and 2 in (5.1 cm) tall. The quick increases in Rnds 2–4 make the rounded tip of the cone. Rnds 5–6 make the solid section just above the bottom opening.
Lattice Body
Rnd 7 (mesh): Ch 3 (counts as first dc), dc in next 3 sts, ch 2, sk next 2 sts (first block made). Work 1 mesh block; repeat from * 4 more times. Join to the top of the ch-3. (6 blocks: 24 dc + 6 ch-2 sps = 36 sts)
Rnd 8 (sc): Ch 1, sc in each dc and 2 sc in each ch-2 sp, join. (36 sc)
Rnd 9 (mesh): Repeat Rnd 7. (6 blocks, 36 sts)
Rnd 10 (conversion and increase): Ch 1. For each block, work 2 sc in the first dc, 1 sc in each of the next 3 dc, and 2 sc in the ch-2 sp. Join. (36 sts worked 1 per existing st + 6 increases = 42 sc)
Rnd 11 (mesh): Ch 3, dc in next 3 sts, ch 2, sk 2. Work 1 mesh block; repeat from * 5 more times. Join. (7 blocks: 28 dc + 7 ch-2 sps = 42 sts)
Rnd 12 (sc): Ch 1, sc in each dc and 2 sc in each ch-2 sp, join. (42 sc)
Checkpoint: 7 in (17.8 cm) wide flat, 6 in (15.2 cm) tall.
Rnd 13 (mesh): Repeat Rnd 11. (7 blocks, 42 sts)
Rnd 14 (conversion and increase): Ch 1. For each of the first 6 blocks, work 2 sc in the first dc, 1 sc in each of the next 3 dc, and 2 sc in the ch-2 sp. For the 7th block, work 1 sc in each of the 4 dc and 2 sc in the ch-2 sp. Join. (42 sts worked 1 per existing st + 6 increases = 48 sc)
Rnd 15 (mesh): Ch 3, dc in next 3 sts, ch 2, sk 2. Work 1 mesh block; repeat from * 6 more times. Join. (8 blocks: 32 dc + 8 ch-2 sps = 48 sts)
Rnd 16 (sc): Ch 1, sc in each dc and 2 sc in each ch-2 sp, join. (48 sc)
Rnds 17–20: Repeat Rnds 15–16 twice. (48 sts each round)
You now have 7 rows of square windows. Each window is 2 sts wide, about 2/3 in (1.7 cm), and separated by 4-dc blocks and solid sc bands. Checkpoint: 8 in (20.3 cm) wide flat, 9 in (22.9 cm) tall.
Border
The border has two parts: the solid top band, worked as a continuation of the body, and a sl st edge around the bottom opening. The border gauge is the same as the body: 12 sc and 12 rnds = 4 in (10.2 cm). Lay the holder flat with the round joins at center back. Each flat “side” (front and back) then has half the round’s stitches.
Top Band
Rnds 21–26: Ch 1, sc in each st around, join. (48 sc each round; 24 sc per flat side)
Six rounds at 3 rnds per 1 in (2.5 cm) add exactly 2 in (5.1 cm). The total height is 9 in + 2 in = 11 in (27.9 cm). Do not fasten off.
Why the math works: 48 sc at 12 sts per 4 in (10.2 cm) is 16 in (40.6 cm) around. That is 8 in (20.3 cm) per flat side, matching the last mesh round exactly. There are no increases in the band, so the rim stands straight up and doesn’t flare.
Hanging Loop
Find the center back by counting: the join of Rnd 26 is at the back.
Loop: Ch 18. Sk the next 5 sts of Rnd 26 and sl st in the 6th st. The chain arch spans 6 sts, 2 in (5.1 cm), along the rim.
Covering round: Ch 1, then work 24 sc into the ch-18 arch, working around the chain rather than into the chain stitches. Pack the stitches closely so the chain is hidden. Sl st into the st at the base of the starting ch-18. (24 sc on the loop)
The loop is about 6 in (15.2 cm) long along its curve and stands about 2.5 in (6.4 cm) above the rim. Fasten off, then weave the tail back and forth through both loop bases twice to reinforce them.
Bottom Opening Edge
Join the yarn with a sl st in any free loop of the foundation chain. Sl st loosely in each free loop around and join. (18 sl sts; 9 per flat side) Fasten off.
This edge adds no height and doesn’t tighten the opening. It firms the edge so bags slide out cleanly without stretching it. The opening is 18 sts, or 6 in (15.2 cm) around, which is about 1.9 in (4.8 cm) across.
Final Blocking
- Weave in all ends on the inside, following the sc rounds so the tails stay hidden.
- Mist the holder with water until it is damp, not soaked. For cotton, you can also steam lightly from above, keeping the iron off the yarn.
- Stuff the holder firmly with a rolled towel or plastic bags so it takes its cone shape.
- Press each mesh window into a square with your fingers, and line up the blocks in tidy columns.
- Lay it on its back and check the width: 8 in (20.3 cm) at the top, 7 in (17.8 cm) at Rnd 12 and 6 in (15.2 cm) at Rnd 6.
- Pin the hanging loop upright to dry in its arch shape.
- Let it dry completely before removing the stuffing.
Final Quality-Control Checklist
- Rnd 26 has 48 sc, and each flat side measures 8 in (20.3 cm).
- The total height is 11 in (27.9 cm), not counting the loop.
- There are 7 rows of windows: 6 windows in Rnds 7 and 9, 7 in Rnds 11 and 13, and 8 in Rnds 15, 17 and 19.
- Each mesh round has blocks of 4 dc and ch-2 spaces only, with no stray extra dc at the join.
- The top band is 6 solid rounds deep, 2 in (5.1 cm).
- The loop is centered on the back and firmly anchored at both ends.
- The bottom opening is about 1.9 in (4.8 cm) across and lets a bag pass through when gently pulled.
- All ends are woven in on the inside.
Troubleshooting
The cone flares or ruffles at the bottom. Your chain ring may be too tight compared with Rnds 2–4. Chain loosely, or make the foundation chain with a 6.5 mm hook.
The mesh round count is off. Remember that the ch-3 counts as a dc. The first block is ch 3 + 3 dc, not ch 3 + 4 dc.
The windows look like slits instead of squares. Your dc are too short. Pull up the first loop of each dc a little taller, or check that you are working 2 sc into each ch-2 sp, not 1.
The round seam slants to one side. This is normal in joined rounds. Keep the joins at the back, under the loop, and it won’t show.
The rim curls inward. Your sc in the top band are too tight. Loosen your tension or go up half a hook size for Rnds 21–26 only.
Bags fall out on their own. Add one more sc round to the base (18 sc) before the bottom edge. The opening stays the same size but becomes firmer.
Care
Hand wash in cool water with mild soap, gently press out the water, and dry flat while stuffed with a towel to keep the cone shape. Cotton versions can be machine washed on a gentle cycle in a laundry bag.

Final Notes
The measurement chain is short and easy to check. Check gauge at 12 sts = 4 in (10.2 cm). The base reaches 6 in (15.2 cm) wide and 2 in (5.1 cm) tall at 36 sts. The lattice widens to 7 in (17.8 cm) at 42 sts and then 8 in (20.3 cm) at 48 sts, reaching 9 in (22.9 cm) tall. The 2 in (5.1 cm) top band brings the holder to 11 in (27.9 cm), and the loop adds 2.5 in (6.4 cm) above the rim. If each checkpoint matches, the finished keeper will hang neatly and dispense one bag at a time.
Happy crocheting!