

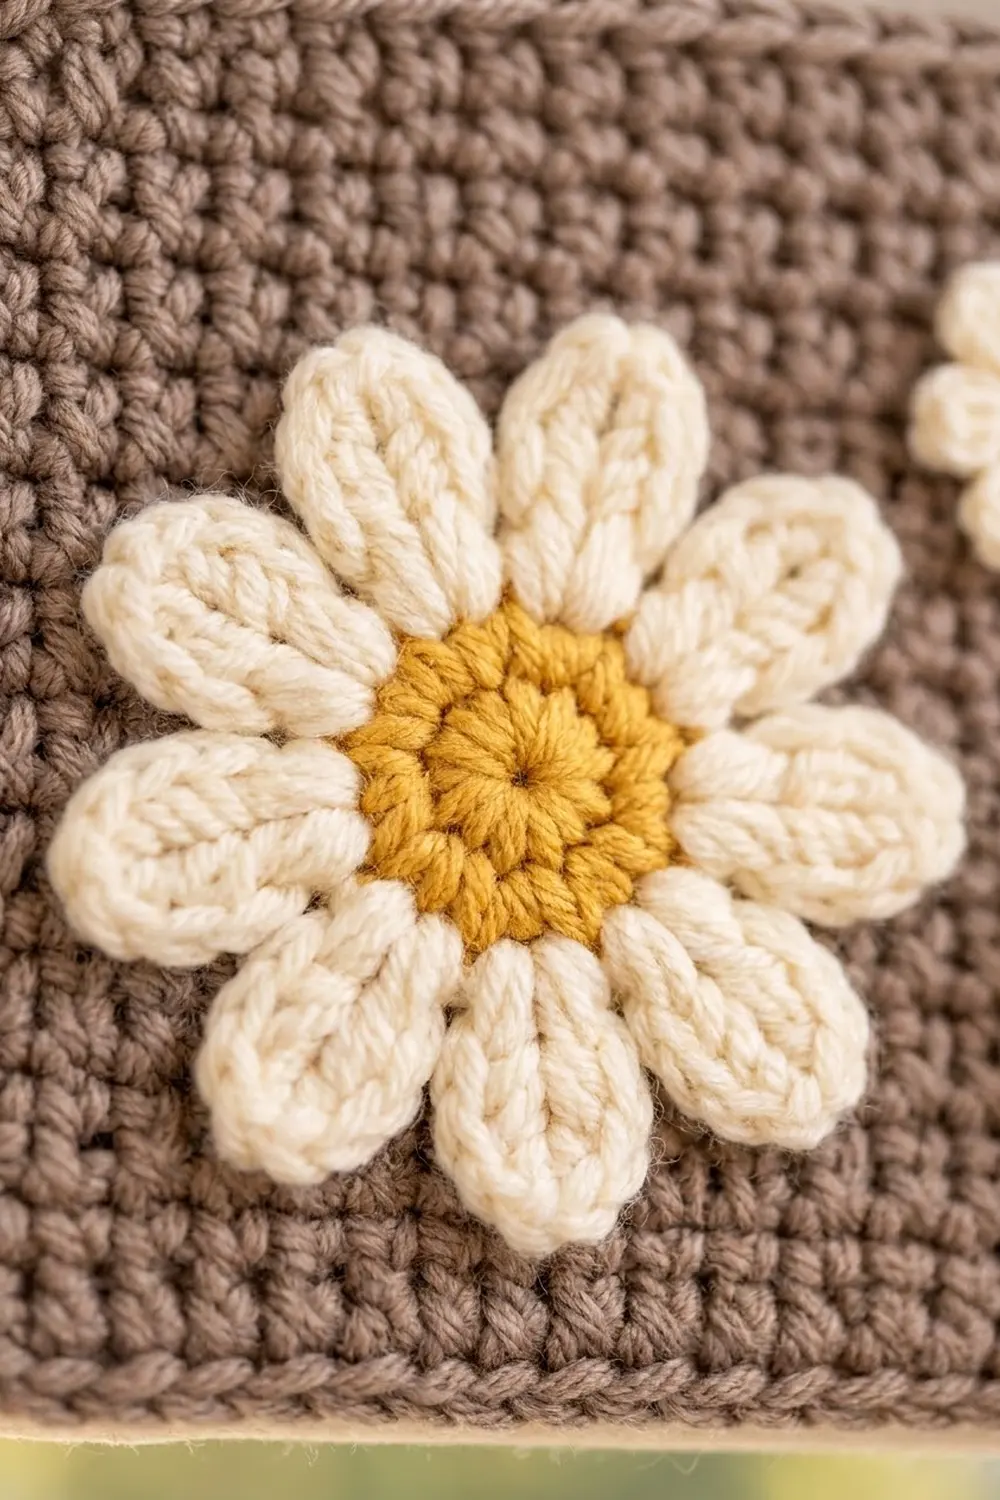
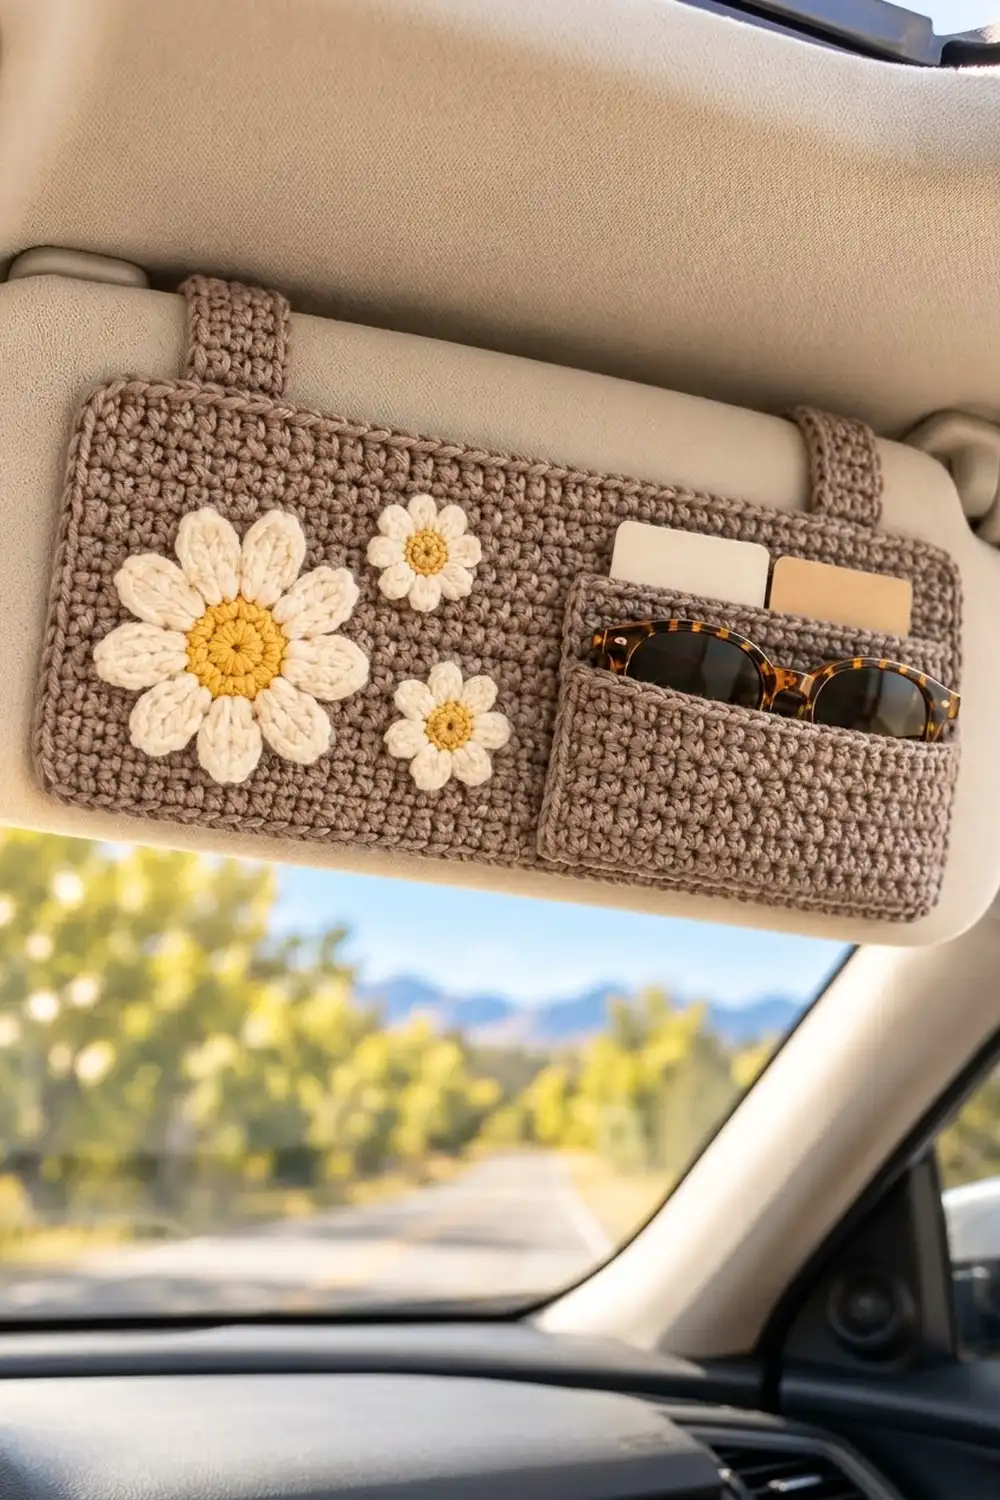
The Daisy Drive Visor Organizer is a slim, rectangular panel that straps onto your car’s sun visor. A pocket on the right holds sunglasses and cards. Three appliqué daisies sit on the left: one large flower and two small ones.
The main fabric is a warm taupe worked in tight single crochet, so it looks like a fine woven texture. The daisies have creamy white petals around mustard-yellow centers. The overall look is cozy, a bit retro, and practical.
This pattern uses US crochet terms. The finished panel measures 12 x 5 in (30.5 x 12.7 cm) including the border.
Construction is simple. You crochet a flat panel in rows, add a two-round single crochet border, then make a bordered pocket, two straps, and three daisies. Everything is sewn together by hand with a tapestry needle.
Finished Size and Construction
- Finished panel size: 12 x 5 in (30.5 x 12.7 cm)
- Skill level: Easy
- Terminology: US crochet terms
- Yarn weight: Worsted (#4), cotton or cotton blend
- Hook: 4.5 mm (US 7)
- Number of pieces: 7 (1 panel, 1 pocket, 2 straps, 1 large daisy, 2 small daisies)
- Layout: pocket on the lower right, daisies on the left, straps along the top edge
- Panel size before border: 11 x 4 in (27.9 x 10.2 cm)
- Border depth: 2 rounds, about 1/2 in (1.3 cm) per side
- Pocket size: about 5 x 3.5 in (12.7 x 8.9 cm) with its border
- Strap size: 1.25 x 12 in (3.2 x 30.5 cm) each
- Large daisy: about 3.25 in (8.3 cm) across
- Small daisies: about 2 in (5.1 cm) across
Materials
Choose a smooth cotton or cotton-blend worsted yarn. Cotton holds its shape well, copes with heat in a parked car, and shows stitch definition clearly. Acrylic also works, but it can stretch a little in strong sun.
- Taupe (main color): 120 g / about 205 m
- Cream (petals): 15 g / about 26 m
- Mustard yellow (centers): 5 g / about 9 m
These amounts assume about 170 m per 100 g, and they already include a safety margin.
Tools:
- 4.5 mm (US 7) crochet hook
- Tapestry needle
- Scissors
- Stitch markers (4)
- Measuring tape
- Pins or clips
- Blocking mat and spray bottle
Abbreviations (US Terms)
- ch – chain
- sc – single crochet
- hdc – half double crochet
- dc – double crochet
- sl st – slip stitch
- st(s) – stitch(es)
- rep – repeat
- RS – right side
Special stitch – corner group: work 3 sc in the same stitch. The middle sc of the group is the corner stitch. Place a marker in it.
Gauge and Checkpoints
Gauge: 16 sc and 18 rows = 4 in (10.2 cm) in sc worked in rows.
Make a 20-st swatch of 20 rows before you start. Measure across the middle, not at the edges. If you have more stitches than 16 per 4 in (10.2 cm), go up a hook size. If you have fewer, go down a hook size.
Use the pocket as your test piece. It’s small and uses the same stitch, so if it matches its checkpoint, the panel will too.
Checkpoints:
- Pocket before border: 4.5 in (11.4 cm) wide x about 3.1 in (7.9 cm) tall
- Pocket after border: about 5 x 3.5 in (12.7 x 8.9 cm)
- Panel after Row 18: 11 x 4 in (27.9 x 10.2 cm)
- Panel after border: 12 x 5 in (30.5 x 12.7 cm)
If the panel is too big after Row 18, rip it back and remake it with a smaller hook. Don’t try to fix the size in the border. If it’s a little small, light blocking can stretch it by about 1/4 in (0.6 cm). If it’s smaller than that, use a larger hook.
Main Panel
With taupe, ch 45.
Row 1: Sc in 2nd ch from hook and in each ch across, turn. (44 sc)
Rows 2–18: Ch 1 (does not count as a st), sc in each st across, turn. (44 sc)
Checkpoint: 11 x 4 in (27.9 x 10.2 cm). Don’t fasten off. Go straight into the border.
Panel Border
Border gauge: the same 16 sc per 4 in (10.2 cm). Each sc round adds about 1/4 in (0.6 cm) per side.
Round 1 (conversion round): Ch 1. Along the top edge, work a corner group in the first st, sc in next 42 sts, corner group in last st. Down the side, sc in the end of Rows 17 through 2 (16 sc). Along the bottom edge (in the foundation chain), work a corner group in the first st, sc in next 42 sts, corner group in last st. Up the other side, sc in the end of Rows 2 through 17 (16 sc). Join with sl st to first sc.
Stitch count: (44 + 16 + 44 + 16 = 120 sts worked 1 per stitch or row end) + (8 extra sts from the four corner groups) = 128 sc.
Per side, counting both corner sts: long sides 46 sc, short sides 20 sc. Check: 46 + 46 + 20 + 20 − 4 shared corners = 128.
Round 2 (growth round): Ch 1, sc in each st around, working a corner group in each marked corner st. Move the markers up. Join. (136 sc)
Per side, counting both corner sts: long sides 48 sc, short sides 22 sc. Check: 48 + 48 + 22 + 22 − 4 = 136.
Fasten off and weave in ends.
Why the math works: At this gauge, one sc row is almost exactly as tall as one sc is wide. That means 1 sc per row end lies flat along the 16 inner rows. The corner groups cover Rows 1 and 18. Each round needs 2 extra sts at every corner because the outer edge is longer than the inner edge, which gives +8 per round. Two rounds of about 1/4 in (0.6 cm) each add 1/2 in (1.3 cm) per side. That takes the panel from 11 x 4 in (27.9 x 10.2 cm) to 12 x 5 in (30.5 x 12.7 cm).
With taupe, ch 19.
Row 1: Sc in 2nd ch from hook and in each ch across, turn. (18 sc)
Rows 2–14: Ch 1, sc in each st across, turn. (18 sc)
Checkpoint: 4.5 in (11.4 cm) wide x about 3.1 in (7.9 cm) tall.
Border Round (conversion round): Ch 1. Along the top, work a corner group in the first st, sc in next 16 sts, corner group in last st. Down the side, sc in the end of Rows 13 through 2 (12 sc). Along the bottom, work a corner group in the first st, sc in next 16 sts, corner group in last st. Up the side, sc in the end of Rows 2 through 13 (12 sc). Join.
Stitch count: (18 + 12 + 18 + 12 = 60 sts worked 1 per stitch or row end) + (8 extra corner sts) = 68 sc.
Per side, counting corner sts: top and bottom 20 sc, sides 16 sc. Check: 20 + 20 + 16 + 16 − 4 = 68.
Checkpoint: about 5 x 3.5 in (12.7 x 8.9 cm). Leave a 36 in (91.4 cm) tail for sewing.
Straps (make 2)
With taupe, ch 6.
Row 1: Sc in 2nd ch from hook and in each ch across, turn. (5 sc)
Rows 2–54: Ch 1, sc in each st across, turn. (5 sc)
Checkpoint: 1.25 x 12 in (3.2 x 30.5 cm). Leave a 12 in (30.5 cm) tail.
Fit tip: Wrap a measuring tape around your visor from top to bottom. Subtract 5 in (12.7 cm) for the panel and add 1 in (2.5 cm) for the sewn ends. Change the number of rows to match. Every 9 rows adds or removes 2 in (5.1 cm).
Large Daisy (make 1)
Round 1: With mustard, make a magic ring. Ch 1, 10 sc in ring. Pull the ring closed and join with sl st to first sc. (10 sc)
Round 2 (growth round): Ch 1, 2 sc in each st around. Join. (20 sc) Fasten off mustard.
Checkpoint: the center is about 1.25 in (3.2 cm) across.
Round 3 (petals): Join cream with sl st in any st. *Ch 6, sc in 2nd ch from hook, hdc in next ch, dc in next 2 ch, hdc in last ch (5 petal sts), skip next st of Round 2, sl st in following st; rep from * 9 more times. The last sl st lands in the joining st. (10 petals)
Fasten off, leaving a 12 in (30.5 cm) cream tail for sewing.
Checkpoint: about 3.25 in (8.3 cm) across.
Small Daisies (make 2)
Round 1: With mustard, make a magic ring. Ch 1, 8 sc in ring. Join. (8 sc) Fasten off mustard.
Checkpoint: the center is about 0.75 in (1.9 cm) across.
Round 2 (petals): Join cream with sl st in any st. *Ch 4, sc in 2nd ch from hook, hdc in next ch, hdc in last ch (3 petal sts), sl st in next st of Round 1; rep from * 7 more times. The last sl st lands in the joining st. (8 petals)
Fasten off, leaving a 10 in (25.4 cm) tail.
Checkpoint: about 2 in (5.1 cm) across.
Make All Pieces
Quantities per color:
- Taupe: 1 panel, 1 pocket, 2 straps
- Mustard: 3 daisy centers (1 large, 2 small)
- Cream: 3 petal rounds (1 large, 2 small)
Layout on the RS of the panel (12 in / 30.5 cm wide):
+---[strap]--------------------------[strap]---+
|              (small)        +--------------+ |
|   ( LARGE )                 |    POCKET     | |
|              (small)        |               | |
+-----------------------------+--------------+-+
Joining
Pocket:
- Pin the pocket so its right and bottom edges sit 1/4 in (0.6 cm) inside the panel’s outer edge. Leave the top edge of the pocket open.
- Using the pocket tail, whipstitch the two sides and the bottom to the panel. Go through the back loop of each pocket border st and one strand of the panel fabric directly underneath.
- Work one whipstitch per pocket border st: 16 + 20 + 16 − 2 shared corners = 50 stitches. Stop at the top corners so the opening stays clean.
- Keep your tension even and snug. Pulling too tight will pucker the panel. Leave a little ease across the bottom so sunglasses fit.
- Reinforce each top corner with 2 extra stitches, since that’s where the most strain goes.
Daisies: Center the large daisy 2.5 in (6.4 cm) from the panel’s left edge. Place one small daisy above it to the right and the other below it to the right, about 1.5 in (3.8 cm) apart. Sew around the edge of each mustard center with matching yarn. Then add a small tack stitch at the tip of each petal so the petals lie flat.
Straps: On the back of the panel, place each strap 1.5 in (3.8 cm) in from a short side. Overlap one end 1/2 in (1.3 cm) behind the top border and whipstitch across all 5 sts, going over twice. Wrap the strap around the visor and sew the other end the same way behind the bottom border.
Size checkpoint: The panel should still measure 12 x 5 in (30.5 x 12.7 cm). If it has shrunk, the seams are too tight. Unpick them and sew them again more loosely.
Final Blocking
- Weave in all remaining ends on the back, following the direction of the stitches.
- Lay the organizer face up on a blocking mat.
- Pin it to 12 x 5 in (30.5 x 12.7 cm). Pin the corners first, then the edges.
- Spray evenly until damp, not soaked.
- Use your fingers to shape each daisy petal so it’s rounded and points straight out from the center.
- Slip a piece of folded card into the pocket so it dries open.
- Let it dry completely, at least 12 hours, before unpinning.
Final Quality-Control Checklist
- Panel measures 12 x 5 in (30.5 x 12.7 cm)
- Border counts are 128 and 136 sc, with even corners
- Pocket is about 5 x 3.5 in (12.7 x 8.9 cm), with a 68-st border
- Pocket seams are smooth and the top corners are reinforced
- Large daisy has 10 petals and each small daisy has 8
- Daisies lie flat with no curling petals
- Straps are equal in length and sewn on securely
- No yarn ends show on the front
Troubleshooting
Panel edges are wavy: There are too many sts along the short sides of the border. Recount to 16 sc per short side in Round 1.
Corners cup: The corner groups are missing or too tight. Work 3 sc in each corner st on every round.
Panel slants: A st was skipped or added at the row ends. Count 44 sc every few rows.
Daisy ruffles: The petal chains are too loose. Use a smaller hook for the petals only.
Daisy center cups: Round 2 is too tight. Work it more loosely or block it flat.
Organizer slides on the visor: The straps are too long. Remove rows, or sew the ends again with a deeper overlap.
Care
Hand wash in cool water with mild soap, press the water out in a towel, and dry flat. Don’t wring it or put it in a hot dryer.
Final Notes
Here’s the full measurement chain. The gauge is 16 sc x 18 rows = 4 in (10.2 cm). The panel is 44 sc x 18 rows, which gives 11 x 4 in (27.9 x 10.2 cm). The border goes from 128 sc to 136 sc and brings the panel to 12 x 5 in (30.5 x 12.7 cm). The pocket is 18 sc x 14 rows plus a 68-st border, about 5 x 3.5 in (12.7 x 8.9 cm). Each strap is 5 sc x 54 rows, and the three daisies go on the left.
Check each number as you go and everything will fit together neatly.
Happy crocheting!