

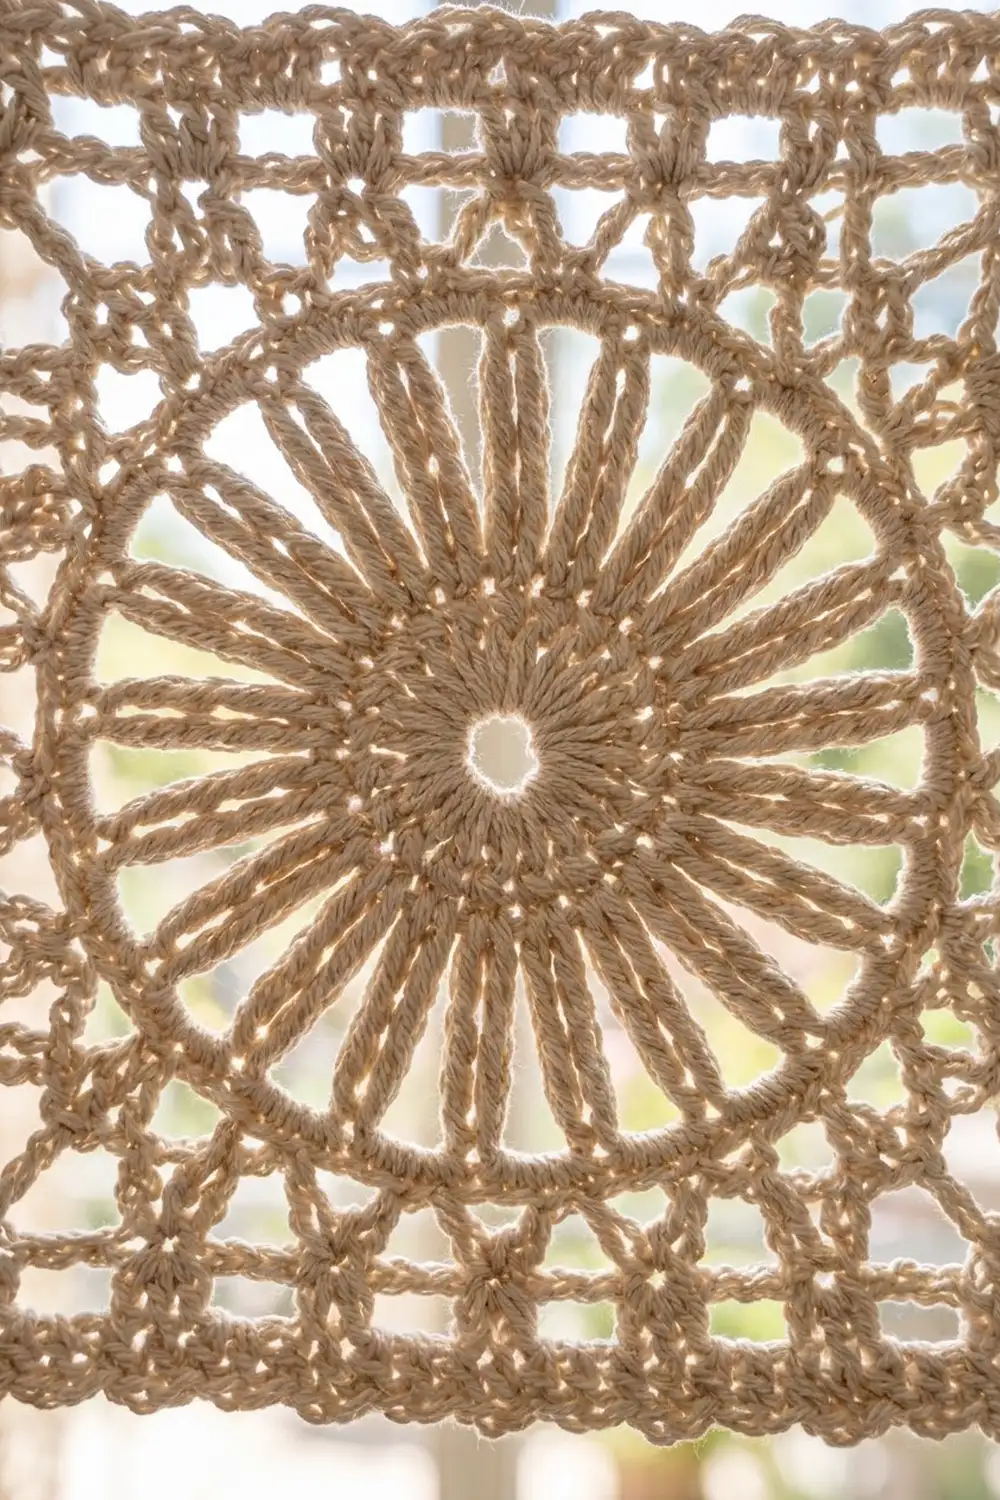
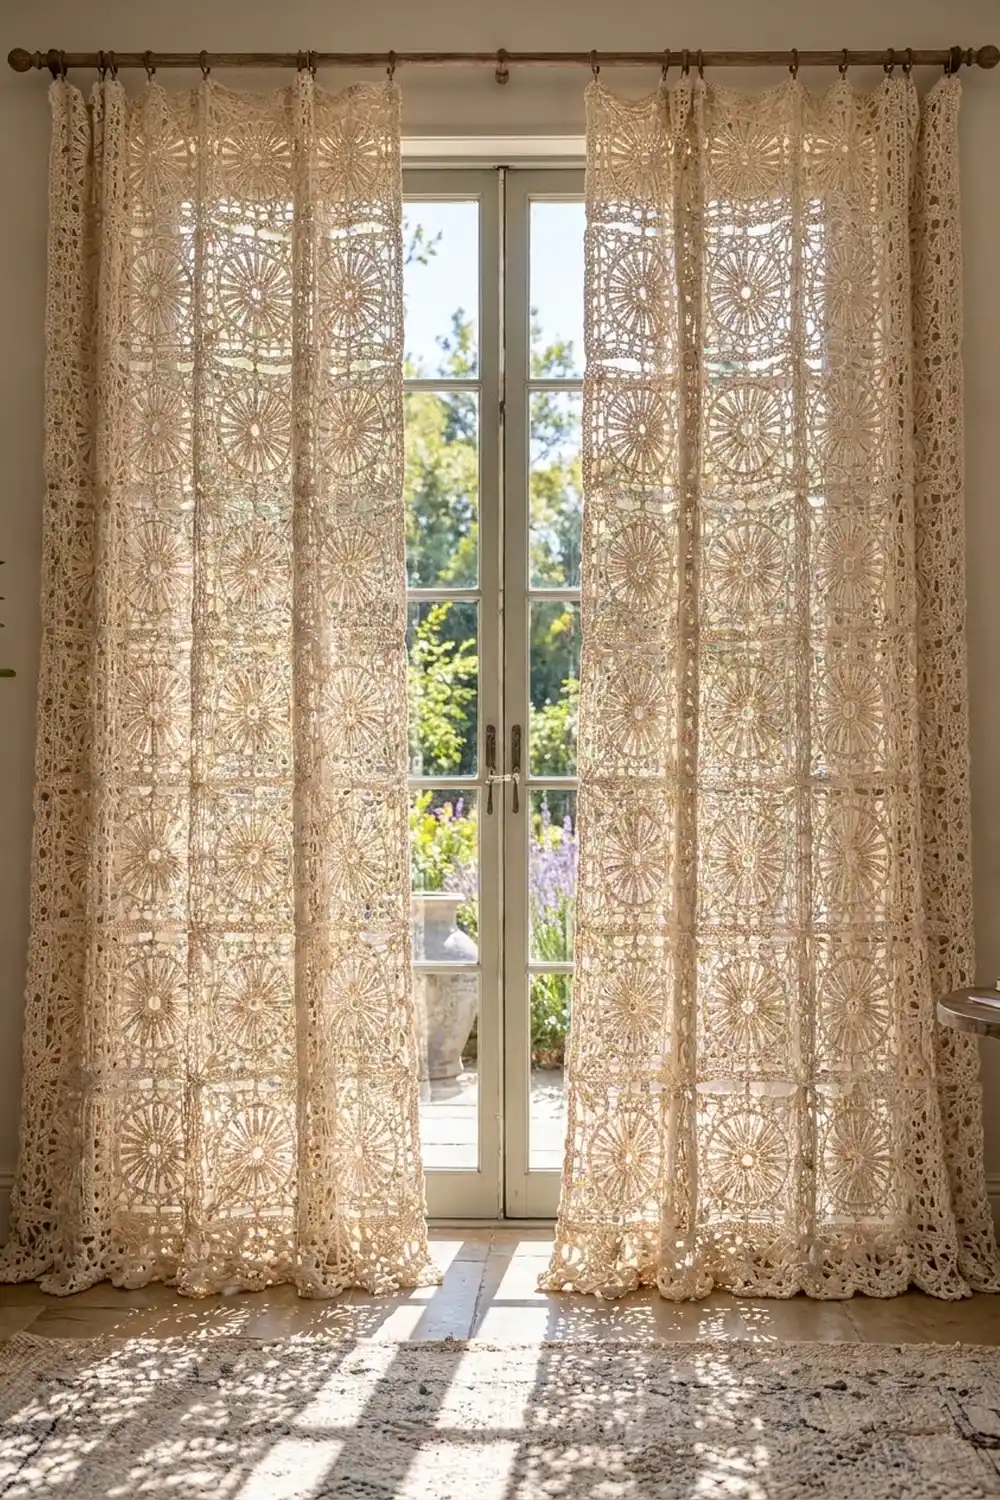
These Sunwheel Lace Curtain Panels are made from simple square motifs. Each square has a small open center, a ring of long spokes, a solid circular rim, and an outer frame of little filet-style windows. Hang them in a sunny window and the light shows through every spoke and window, making soft patterns on the floor.
The panels use one color, a natural cream or ecru cotton, so the texture carries the design. The style is cottage and farmhouse lace: light, a little vintage, and easy to live with. All instructions use US crochet terms.
Each finished panel measures 30 x 86 inches (76.2 x 218.4 cm) after blocking and border. That is 4 motifs across and 12 motifs down, and each motif is 7 x 7 inches (17.8 x 17.8 cm). The pattern makes one panel. Make two for a pair, as shown.
Construction is straightforward. You crochet each motif in the round, from the center out to a square. Then you join the motifs with a flat slip-stitch seam, first into strips of 4 and then strip to strip. A two-round shell border finishes all four edges.
Finished Size and Construction
- Finished panel size: 30 x 86 in (76.2 x 218.4 cm)
- Skill level: Intermediate
- Terminology: US crochet terms
- Yarn weight: DK / light worsted (weight 3) cotton
- Hook: 4.0 mm (G-6)
- Number of pieces: 48 motifs per panel (96 for a pair)
- Layout: 4 motifs across x 12 motifs down
- Motif size: 7 x 7 in (17.8 x 17.8 cm), blocked
- Size before border: 28 x 84 in (71.1 x 213.4 cm)
- Border depth: 1 in (2.5 cm) on every side
Materials
Yarn: Use a smooth mercerized or combed cotton in DK weight (around 120 m per 50 g). Cotton gives the spokes crisp stitch definition and keeps its shape when it hangs. Avoid fuzzy or very soft acrylic yarns, because the lace will blur and stretch under its own weight.
- Cream / natural ecru: 620 g (about 1,490 m) per panel; 1,240 g (about 2,980 m) for a pair
These quantities include a margin of about 15% for gauge differences, joining, and the border. One motif uses about 10 g (about 24 m).
Tools:
- 4.0 mm (G-6) crochet hook
- Tapestry needle
- Scissors
- Rust-proof pins and blocking mats (or a towel-covered carpet)
- Spray bottle with water
- Measuring tape
- Stitch markers
- Curtain clip rings or a rod with rings, for hanging
Abbreviations (US Terms)
- ch – chain
- sl st – slip stitch
- sc – single crochet
- hdc – half double crochet
- dc – double crochet
- tr – treble crochet (yarn over twice)
- dtr – double treble crochet (yarn over 3 times)
- sk – skip
- sp – space
- st(s) – stitch(es)
- RS – right side
- rep – repeat
Special stitch – Shell: 5 dc worked into the same stitch.
Beginning chains: The starting chain counts as the first stitch: ch 3 = 1 dc, ch 4 = 1 tr, ch 5 = 1 dtr. Ch 1 at the start of an sc round does not count as a stitch.
Gauge and Checkpoints
Make one complete motif first and block it before starting the full set. With 48 motifs per panel, a small size error grows fast. A motif that is only 1/4 in (0.6 cm) too big makes the panel 3 in (7.6 cm) too long.
Motif gauge: One motif = 7 x 7 in (17.8 x 17.8 cm) after blocking. The final round has 27 sc per side, about 3.9 sc per inch (2.5 cm).
Checkpoints:
- After Round 4 (circle rim): diameter about 4 in (10.2 cm), lying flat.
- After Round 6 (solid square): about 6 x 6 in (15.2 x 15.2 cm).
- After Round 8 (finished motif): 7 x 7 in (17.8 x 17.8 cm), blocked.
If your motif is too big, go down to a 3.75 mm hook. If it is too small, go up to 4.5 mm. If the circle cups after Round 4, your tr spokes are too short, so pull each loop up a little taller. If it ruffles, your chains are too loose.
Motif (Make 48 per Panel)
Work in the round with the RS facing. Do not turn.
Round 1: Ch 8, sl st to the first ch to form a ring. Ch 1, work 24 sc into the ring. Sl st to the first sc. (24 sc)
The ring stays open and forms the small center hole.
Round 2: Ch 4 (counts as dc + ch 1), dc in next sc, ch 1; rep from * around. Sl st to the 3rd ch of the beginning ch-4. (24 dc, 24 ch-1 sps)*
Round 3: Ch 6 (counts as tr + ch 2), tr in next dc, ch 2; rep from * around. Sl st to the 4th ch of the beginning ch-6. (24 tr, 24 ch-2 sps)*
Each tr sits directly on top of a dc, which gives you 24 straight spokes. The spaces get wider toward the outside, just like the wheel in the photo.
Round 4 (circle rim, conversion round): Ch 1, sc in the same st, 2 sc in the next ch-2 sp, sc in next tr, 2 sc in next ch-2 sp; rep from * around. Sl st to the first sc. (72 sc = 24 sc worked 1-per-tr + 48 sc worked into the spaces)*
This solid round closes the wheel into a firm circle. Check the diameter: about 4 in (10.2 cm).
Round 5 (squaring round): Each side uses 18 sts of Round 4.
Ch 5 (counts as dtr), (ch 3, dtr) in the same st to make the first corner. Ch 2, sk 2, tr in next st, ch 2, sk 2, dc in next st, ch 2, sk 2, hdc in next st, ch 2, sk 2, dc in next st, ch 2, sk 2, tr in next st, ch 2, sk 2*, (dtr, ch 3, dtr) in next st for the corner; rep from * 2 more times, then from * to ** once. Sl st to the top of the beginning ch-5.
(8 dtr, 20 side sts, 24 ch-2 sps, 4 corner ch-3 sps)
Each side uses 1 corner st + 5 sts + 6 skip-2 groups = 1 + 5 + 12 = 18 sts. Times 4 sides, that is 72. The stitches get shorter from the dtr corners down to the hdc at mid-side, which squares the circle and leaves a ring of open arches around the wheel.
Round 6 (solid square, conversion round): Sl st into the corner ch-3 sp. Ch 3 (counts as dc), (dc, ch 3, 2 dc) in the same sp. *Dc in each st and 2 dc in each ch-2 sp across to the next corner, (2 dc, ch 3, 2 dc) in the corner ch-3 sp; rep from * around, finishing the last side at the first corner. Sl st to the top of the beginning ch-3.
(92 dc = 28 sts worked 1-per-stitch + 48 dc in ch-2 sps + 16 dc in corner sps; 4 corner ch-3 sps)
Each side, from corner space to corner space, has 2 + 1 + 12 + 5 + 1 + 2 = 23 dc.
Checkpoint: about 6 x 6 in (15.2 x 15.2 cm).
Round 7 (filet windows): Sl st into the next dc and into the corner ch-3 sp. Ch 3 (counts as dc), (ch 3, dc) in the same sp. *Dc in the first dc of the side, (ch 1, sk 1, dc in next dc) 11 times, (dc, ch 3, dc) in the corner ch-3 sp; rep from * around, leaving out the final corner. Sl st to the top of the beginning ch-3.
(56 dc, 44 ch-1 sps, 4 corner ch-3 sps)
Each side has 1 corner dc + 12 side dc + 1 corner dc = 14 dc, with 11 ch-1 windows. Check: 1 + (11 x 2) = 23 sts used per side. These are the small square windows in the outer frame.
Round 8 (edging, conversion round): Sl st into the corner ch-3 sp. Ch 1, (sc, ch 2, sc) in the same sp. *Sc in each dc and each ch-1 sp across to the next corner, (sc, ch 2, sc) in the corner sp; rep from * around, leaving out the final corner. Sl st to the first sc. Fasten off and weave in the ends.
(108 sc = 56 sc worked 1-per-dc + 44 sc in ch-1 sps + 8 sc in corner sps; 4 corner ch-2 sps)
Per side: 27 sc = 1 corner sc + 14 sc in the dc + 11 sc in the spaces + 1 corner sc. This count already includes the corner sc at each end. The ch-2 corner spaces are not part of the count.
Block the motif to 7 x 7 in (17.8 x 17.8 cm) and confirm your gauge before you continue.
Make All Pieces
Make 48 motifs in cream per panel, or 96 motifs for a pair. All the motifs are identical.
Block the motifs in batches of 8 to 12 before joining. Blocked squares line up stitch for stitch much more easily.
Layout for one panel (each M = one 7 in / 17.8 cm motif):
Row 1:   M  M  M  M
Row 2:   M  M  M  M
Row 3:   M  M  M  M
Row 4:   M  M  M  M
Row 5:   M  M  M  M
Row 6:   M  M  M  M
Row 7:   M  M  M  M
Row 8:   M  M  M  M
Row 9:   M  M  M  M
Row 10:  M  M  M  M
Row 11:  M  M  M  M
Row 12:  M  M  M  M
4 across x 12 down = 48 motifs = 28 x 84 in (71.1 x 213.4 cm).
Joining
Method: Flat slip-stitch seam through the back loops.
Lay two motifs side by side, both RS up, with the edges to be joined touching. Insert the hook into the back loop of a stitch on the left motif, then into the back loop of the matching stitch on the right motif, and sl st. The seam lies flat and leaves a neat line of front loops on the RS.
Stitch-to-stitch logic:
- Sl st through both corner ch-2 sps.
- Sl st through each matching pair of sc, 27 pairs per side.
- Sl st through both corner ch-2 sps at the far end.
Stitches always match 27 to 27. The seam is worked into existing stitches and adds no stitches to either motif.
Order:
- Join the 4 motifs of each row into a strip (3 seams per strip). Make 12 strips.
- Join the strips to each other along their long edges (11 long seams). Each long seam is 4 x 27 = 108 sc pairs, plus a sl st through the paired corner sps at each motif boundary.
Tension: Keep your slip stitches as loose as the sc underneath. Tight seams pucker, and a curtain shows every pucker against the light. If needed, use a hook one size larger for joining only.
Size checkpoint: Each strip of 4 should measure 28 in (71.1 cm). The joined panel should measure 28 x 84 in (71.1 x 213.4 cm). Check after the first strip and again after every 3 strips.
Border
Border gauge: The border keeps the motif edge gauge of 27 sc per 7 in (17.8 cm), about 3.9 sc per inch.
Starting counts:
- Short edges (top and bottom): 4 motifs x 27 sc = 108 sts
- Long edges (sides): 12 motifs x 27 sc = 324 sts
On the outer edge, skip the corner ch-2 sps at each seam; they add no stitches. The panel’s 4 outer corner ch-2 sps become the border corners.
Border Round 1: With RS facing, join the yarn in the first sc after any panel corner. Ch 1, sc in the same st. Sc in each sc across the side, skipping the seam corner sps. At each panel corner, ch 2 over the corner sp. Rep around. Sl st to the first sc.
(108 sc on each short edge, 324 sc on each long edge, 864 sc total, plus 4 corner ch-2 sps)
Border Round 2 (shells): Sl st into the corner ch-2 sp. Ch 1, (sc, ch 3, sc) in the same sp. *[Sk 2, shell in next st, sk 2, sc in next st] across the side, (sc, ch 3, sc) in the corner ch-2 sp; rep from * around, leaving out the final corner. Sl st to the first sc. Fasten off.
(18 shells per short edge, 54 shells per long edge, 144 shells total)
Why the math works: Each shell repeat uses exactly 6 sts. 108 ÷ 6 = 18 repeats and 324 ÷ 6 = 54 repeats, with nothing left over. Because the border keeps the motif gauge, the edges will not stretch or pull in. That works out to 4.5 shells per motif. Round 1 adds about 1/4 in (0.6 cm) and the shells add about 3/4 in (1.9 cm), for a 1 in (2.5 cm) border.
Final panel: 28 + 1 + 1 = 30 in (76.2 cm) wide by 84 + 1 + 1 = 86 in (218.4 cm) long.
Final Blocking
- Weave in any remaining ends along the seam lines, where they hide best.
- Soak the panel in cool water. Press out the water gently without wringing.
- Roll it in towels to remove more moisture.
- Lay it flat on mats or a towel-covered carpet. Work in sections if space is limited.
- Pin the 4 outer corners first, at 30 x 86 in (76.2 x 218.4 cm).
- Pin along the seam lines so every motif is square at 7 in (17.8 cm).
- Pin each shell along the border so the scallops are even.
- Let it dry completely, at least 24 hours, before unpinning.
Final Quality-Control Checklist
- [ ] All 48 motifs measure 7 x 7 in (17.8 x 17.8 cm)
- [ ] Every motif has 24 spokes and 27 sc per side
- [ ] Every seam matches 27 sts to 27 sts, corner to corner
- [ ] Seams lie flat with no puckers
- [ ] The panel measures 28 x 84 in (71.1 x 213.4 cm) before the border
- [ ] The border has 18 shells on each short edge and 54 on each long edge
- [ ] The finished panel measures 30 x 86 in (76.2 x 218.4 cm)
- [ ] The two panels of a pair match in length to within 1/2 in (1.3 cm)
- [ ] All ends are woven in and trimmed
Troubleshooting
Circle cups after Round 4: The tr spokes are too short. Pull each loop up taller and redo Round 3.
Circle ruffles: The ch-2 sps are too long or loose. Tighten your chains.
Motif corners pull in: Make the dtr corners taller and keep the ch-3 corner spaces at full length.
Side count is not 27: Recount Round 7. You need 11 ch-1 windows per side.
Seams pucker: Rework them with a larger hook and looser slip stitches.
Border waves: You probably worked into the seam corner sps. Skip them so the counts stay at 108 and 324 sts.
Panel stretches when hung: Cotton lace often does this. Block firmly. If needed, hang it for a day and then re-block.
Care
Hand wash, or machine wash on a gentle cool cycle in a mesh laundry bag. Lay flat to dry and re-block to 30 x 86 in (76.2 x 218.4 cm).
Final Notes
The size of the whole curtain comes from a short chain of measurements. The 4 in (10.2 cm) circle becomes a 6 in (15.2 cm) square, and then a 7 in (17.8 cm) motif with 27 sc per side. A grid of 4 x 12 motifs makes 28 x 84 in (71.1 x 213.4 cm). The 1 in (2.5 cm) shell border brings each panel to 30 x 86 in (76.2 x 218.4 cm). Check each step and the panel will hang straight.
Happy crocheting!