

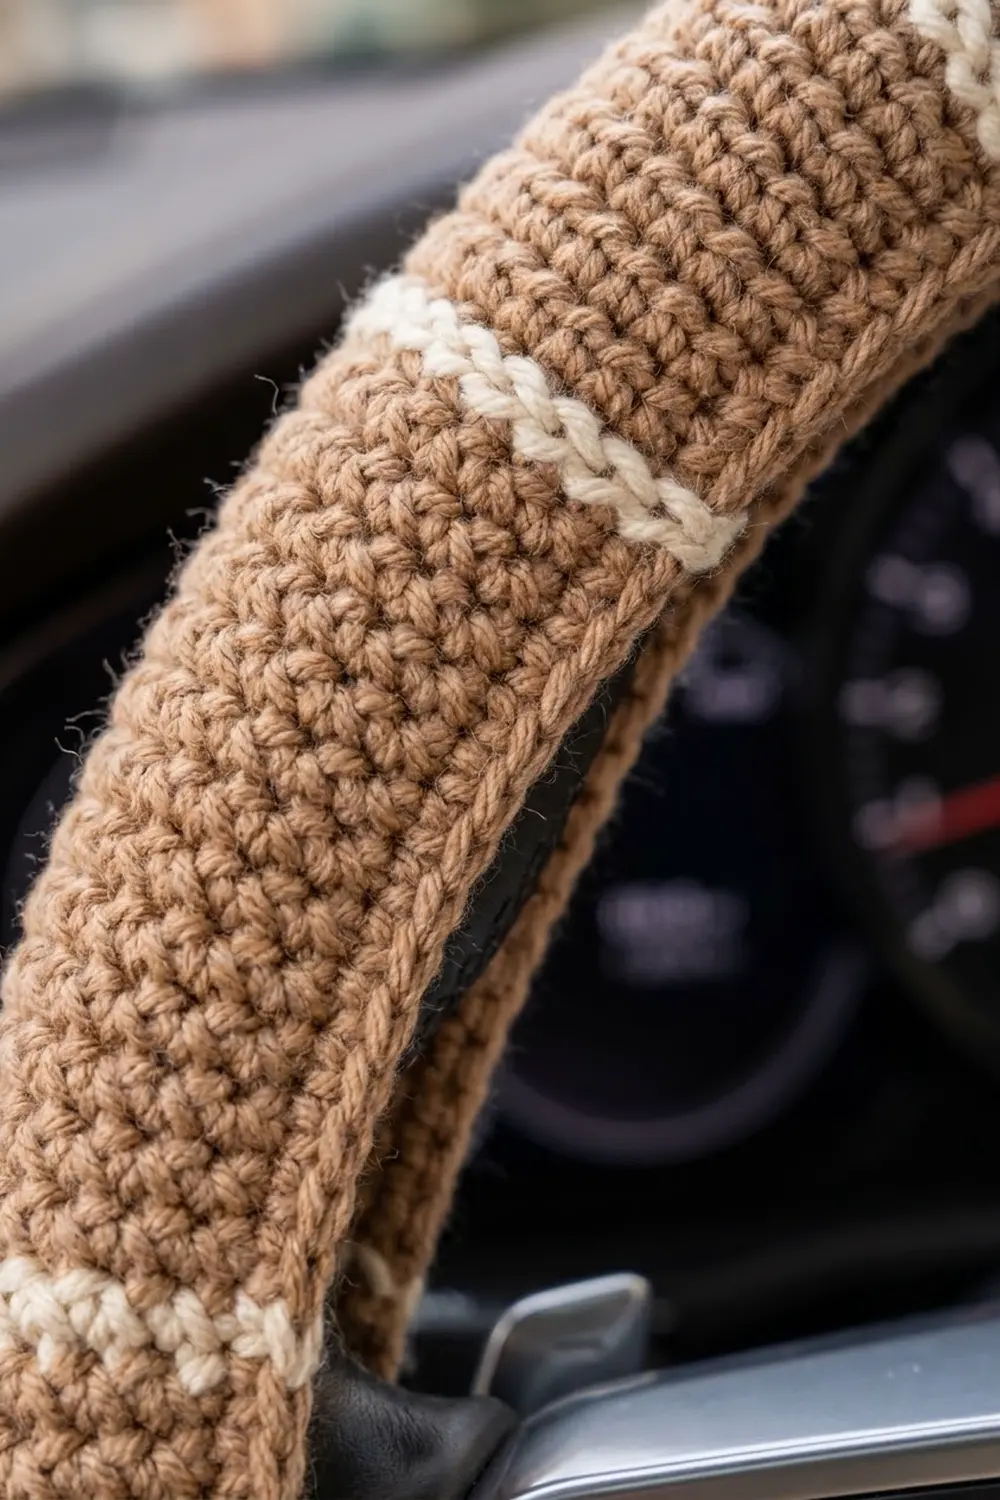
This steering wheel cover is a simple, tailored accessory for your car. It is worked in a warm latte tan with thin cream stripes spaced evenly around the wheel. The ribbed fabric feels soft but firm under your hands and has a quietly classic look.
The pattern uses US crochet terms. The cover is one flat strip worked in short rows of single crochet through the back loop only, which gives a fine ridged texture. Rows 9 and 10 of every 10-row repeat are cream, and together they make one crisp stripe around the grip.
The finished strip measures 4.75 in x 42.5 in (12.1 cm x 108.0 cm) after the edging. It fits a standard steering wheel about 15 in (38.1 cm) across with a grip circumference of about 4.75–5 in (12.1–12.7 cm).
Construction is simple. You crochet one long striped strip, add a single round of edging, block it, and then wrap it around the rim. The long edges are whipstitched together on the inner back of the rim, and the two short ends are sewn together to close the ring.
Finished Size and Construction
- Finished strip size: 4.75 in x 42.5 in (12.1 cm x 108.0 cm)
- Fits: wheel about 15 in (38.1 cm) across, grip 4.75–5 in (12.1–12.7 cm) around
- Skill level: Easy
- Terminology: US crochet terms
- Yarn weight: Worsted (#4)
- Hook: 5.0 mm (US H-8)
- Number of pieces: 1
- Layout: one long strip, wrapped and seamed on the wheel
- Piece size before border: 4.25 in x 42 in (10.8 cm x 106.7 cm)
- Border depth: 0.25 in (0.6 cm) on every edge
- Stripes: 21 cream stripes, spaced every 2 in (5.1 cm)
Materials
Choose a smooth worsted weight yarn with good grip and durability. A cotton blend or a sturdy acrylic works well. Avoid very fuzzy yarns, which pill quickly when your hands rub them every day. Pure cotton is lovely but stretches less, so you may need to work 1 extra stitch per row for a comfortable fit.
Yarn (approx. 200 m per 100 g):
- Tan (Color A): 90 g, about 180 m (197 yd)
- Cream (Color B): 25 g, about 50 m (55 yd)
These quantities include a margin of roughly 20% for gauge swatches, the edging, and the seaming yarn.
Tools:
- 5.0 mm (US H-8) crochet hook
- Tapestry needle with a blunt tip
- Scissors
- Stitch markers (2–3)
- Flexible tape measure
- Spray bottle and blocking mat or towel
- Rust-proof pins
Abbreviations (US Terms)
- ch – chain
- sc – single crochet
- st(s) – stitch(es)
- BLO – back loop only
- sc-blo – single crochet in the back loop only
- sc2tog – single crochet 2 together
- rep – repeat
- RS / WS – right side / wrong side
Special stitch – sc-blo: Insert the hook under the back loop only of the next stitch (the loop farthest from you), yarn over, pull up a loop, yarn over, and pull through both loops on the hook. When you work it back and forth, the unused front loops stand up as ridges that run parallel to the rows.
Sc2tog over row ends: Insert the hook into the next row end, pull up a loop, insert into the following row end, pull up a loop, yarn over, and pull through all 3 loops on the hook.
Gauge and Checkpoints
Gauge: 16 sts and 20 rows = 4 in (10.2 cm) in sc-blo rows.
That gives 4 sts per inch and 5 rows per inch. Every measurement in this pattern comes from those two numbers, so gauge matters more than usual. A cover that is too loose will twist on the wheel. A cover that is too tight will be very hard to seam.
Test before you commit. Work the first 10 rows of the pattern, which is one complete stripe repeat. Lay the piece flat without stretching it and measure.
- Width after Row 1: 17 sts = 4.25 in (10.8 cm)
- Length after Row 10: 2 in (5.1 cm)
- Length after Row 50: 10 in (25.4 cm)
- Length after Row 105: 21 in (53.3 cm)
- Length after Row 210: 42 in (106.7 cm)
- After the border: 4.75 in x 42.5 in (12.1 cm x 108.0 cm)
If your piece is too big: switch to a 4.5 mm hook and test again.
If your piece is too small: switch to a 5.5 mm hook and test again.
If only the row gauge is off: keep the width correct and work more or fewer 10-row repeats. Go by the measured length, not just the row count.
Measuring your wheel. Wrap a tape measure around the grip to find the grip circumference. Then measure the wheel across, outer edge to outer edge. On a 15 in (38.1 cm) wheel, the center line of the grip is about 13.5 in (34.3 cm) across, which is about 42.4 in (107.7 cm) around. The 42.5 in (108.0 cm) strip matches that center line closely.
To adjust length, add or remove full 10-row repeats. Each repeat is 2 in (5.1 cm). To adjust width, add or remove 1 chain in the foundation for each 0.25 in (0.6 cm).
Pattern: The Striped Strip
Stripe sequence: 8 rows Color A, then 2 rows Color B. You work this 10-row repeat 21 times, for a total of 210 rows.
Color changes: Change color on the final yarn over of the last stitch of the previous row. Both color blocks have an even number of rows, so every color change happens at the same edge. Carry the unused color loosely up that edge instead of cutting it. Mark this edge as the carry edge. It will be hidden inside the seam later.
Turning chains: The ch 1 at the start of each row does not count as a stitch.
Foundation: With Color A, ch 18.
Row 1 (RS): Sc in the 2nd ch from the hook and in each ch across. Turn. (17 sts)
This first row uses both loops so the starting edge is firm.
Row 2: Ch 1, sc-blo in each st across. Turn. (17 sts)
Rows 3–8: Rep Row 2. At the end of Row 8, change to Color B on the last yarn over. (17 sts in each row)
You are now at the carry edge. Do not cut Color A.
Row 9: With Color B, ch 1, sc-blo in each st across. Turn. (17 sts)
Row 10: Ch 1, sc-blo in each st across. Change to Color A on the last yarn over. Turn. (17 sts)
The first stripe is complete. The two cream rows sit side by side and read as one clean line across the strip.
Checkpoint: The piece should measure 4.25 in x 2 in (10.8 cm x 5.1 cm).
Rows 11–18: With Color A, rep Row 2. Change to Color B at the end of Row 18. (17 sts in each row)
Rows 19–20: With Color B, rep Row 2. Change to Color A at the end of Row 20. (17 sts in each row)
Rows 21–210: Continue the stripe sequence. Work 8 rows of Color A and 2 rows of Color B, ending with the Color B stripe on Rows 209–210. (17 sts in each row)
Stripe count check: You should have 21 cream stripes. The strip starts with tan and ends with cream. Once the ends are joined, every tan block sits between two cream stripes, so the spacing stays even all the way around.
At the end of Row 210, fasten off Color B. Keep Color A attached at the carry edge to use for the border.
Checkpoint: The strip should measure 4.25 in x 42 in (10.8 cm x 106.7 cm), with 210 rows and 17 sts in each row.
Border
The border is a single round of sc in Color A worked all the way around the strip. It squares off the edges, hides the carried yarn, and gives you neat, even stitches to seam through.
Border gauge: The border uses the same 4 sts per inch as the body. The long edges have 5 rows per inch, so you work 4 sts for every 5 row ends. This keeps the edge flat, so it neither ruffles nor pulls in.
Corner rule: Each corner is a ch-1 space. The corner chains are not counted in the per-side totals below.
Border Round: With Color A, ch 1. Rotate the strip so you are working along the top edge of Row 210.
- Short edge 1 (top of Row 210): Sc in each of the 17 sts across. (17 sc = 17 worked 1-per-st + 0 extra)
- Corner: Ch 1.
- Long edge 1 (row ends): Sc in each of the next 3 row ends, sc2tog over the next 2 row ends; rep from * 42 times. (168 sts: 210 row ends worked as 42 groups, each turning 5 row ends into 4 sts)*
- Corner: Ch 1.
- Short edge 2 (underside of foundation chain): Sc in each of the 17 foundation loops. (17 sc = 17 worked 1-per-st + 0 extra)
- Corner: Ch 1.
- Long edge 2 (row ends): Sc in each of the next 3 row ends, sc2tog over the next 2 row ends; rep from * 42 times. (168 sts)*
- Corner: Ch 1. Join with a slip stitch to the first sc.
Round total: 17 + 168 + 17 + 168 = 370 sts, plus 4 ch-1 corner spaces.
Leave a long Color A tail, about 60 in (152.4 cm), for sewing the short ends later. Fasten off.
Why the math works:
- Each long edge has 210 row ends at 5 rows per inch, which is 42 in (106.7 cm). 168 sts at 4 sts per inch is also 42 in (106.7 cm), so the border matches the body exactly.
- Each short edge has 17 sts at 4 sts per inch, which is 4.25 in (10.8 cm). The border adds 0.25 in (0.6 cm) on each side, so the width becomes 4.75 in (12.1 cm).
- The length also grows by 0.25 in (0.6 cm) at each end, so it becomes 42.5 in (108.0 cm).
- On the wheel, the two long edges meet each other. Both have 168 sts, so the seam matches stitch for stitch.
Checkpoint: The bordered strip should measure 4.75 in x 42.5 in (12.1 cm x 108.0 cm).
Final Blocking
Block the strip flat before you seam it onto the wheel. A blocked strip lies straighter and seams more evenly.
- Weave in all loose ends along the carry edge, working them into the border stitches.
- Lay the strip on a blocking mat or folded towel, right side up.
- Gently straighten it to 4.75 in x 42.5 in (12.1 cm x 108.0 cm). Do not stretch it past these numbers.
- Check that the cream stripes run straight across, at right angles to the long edges.
- Pin along both long edges every 3 in (7.6 cm).
- Mist the strip evenly with water until it is damp but not soaked.
- Let it dry completely, usually 6–8 hours.
- Unpin and measure again.
Fitting and Seaming the Cover
- Clean and dry the steering wheel.
- Cut a 72 in (182.9 cm) length of Color A and thread it onto the tapestry needle.
- Lay the strip around the outer edge of the wheel, RS facing out, with the short ends meeting at the bottom center.
- Wrap the strip over the grip so the long edges meet on the inner back side of the rim, facing the dashboard.
- Starting at the bottom, whipstitch the two long edges together through the back loop of each matching border stitch. Stitch 1 of one edge meets stitch 1 of the other edge.
- Pull each stitch snug but not tight. The seam should close completely without puckering.
- When you reach a spoke, take the yarn behind the spoke to the other side. Leave the seam open only where the spoke joins the rim, then resume whipstitching.
- Ease the fabric as you go so the stripes stay evenly spaced and straight.
- Use the long border tail to sew the two short edges together, matching 17 border stitches to 17 border stitches.
- Fasten off and weave the tails into the seam.
Seam checkpoint: After seaming, the cover should not twist or slide when you turn the wheel. Each stripe should wrap all the way around the grip in an unbroken ring.
Final Quality-Control Checklist
- Every row has 17 sts.
- The strip has 210 rows in total.
- There are 21 cream stripes, each 2 rows deep and spaced every 2 in (5.1 cm).
- The finished strip measures 4.75 in x 42.5 in (12.1 cm x 108.0 cm).
- The border has 168 sts on each long edge and 17 sts on each short edge.
- All carried strands are hidden inside the seam.
- The seam sits on the inner back of the rim, not where your hands grip.
- The cover does not twist or slide when the wheel turns.
- No yarn crosses the horn pad, airbag area, or controls.
Troubleshooting
The strip is getting narrower. You may be skipping the last stitch of a row. Count 17 sts after each row.
The edges look wavy. Work the first and last stitch of each row a little tighter.
The stripes look jagged. Change color on the last yarn over of the previous row, not at the start of the new row.
The carried yarn is pulling the edge. Loosen the carried strand before each color change.
The cover is too loose on the wheel. Remove one 10-row repeat, 2 in (5.1 cm), or use a smaller hook.
The cover is too tight to seam. Add one 10-row repeat, or add 1 st to each row for an extra 0.25 in (0.6 cm) of width.
The border ruffles. Check that you are working the sc2tog in every group of 5 row ends.
Care
Wipe the cover with a damp cloth and a little mild soap, then let it air dry on the wheel. For a full wash, snip the seam, hand wash in cool water, dry flat, and sew it back on.

Final Notes
This cover depends on one simple measurement chain. A gauge of 16 sts and 20 rows to 4 in (10.2 cm) makes a strip 17 sts wide, or 4.25 in (10.8 cm). After 210 rows, the strip reaches 42 in (106.7 cm). The border adds 0.25 in (0.6 cm) on every edge, bringing the finished piece to 4.75 in x 42.5 in (12.1 cm x 108.0 cm). That strip wraps snugly around a 15 in (38.1 cm) wheel, with 21 evenly spaced cream stripes.
Check your gauge first, measure your wheel, and adjust in full 10-row repeats if needed. Your cover will fit well and look polished every time you drive.
Happy crocheting!