

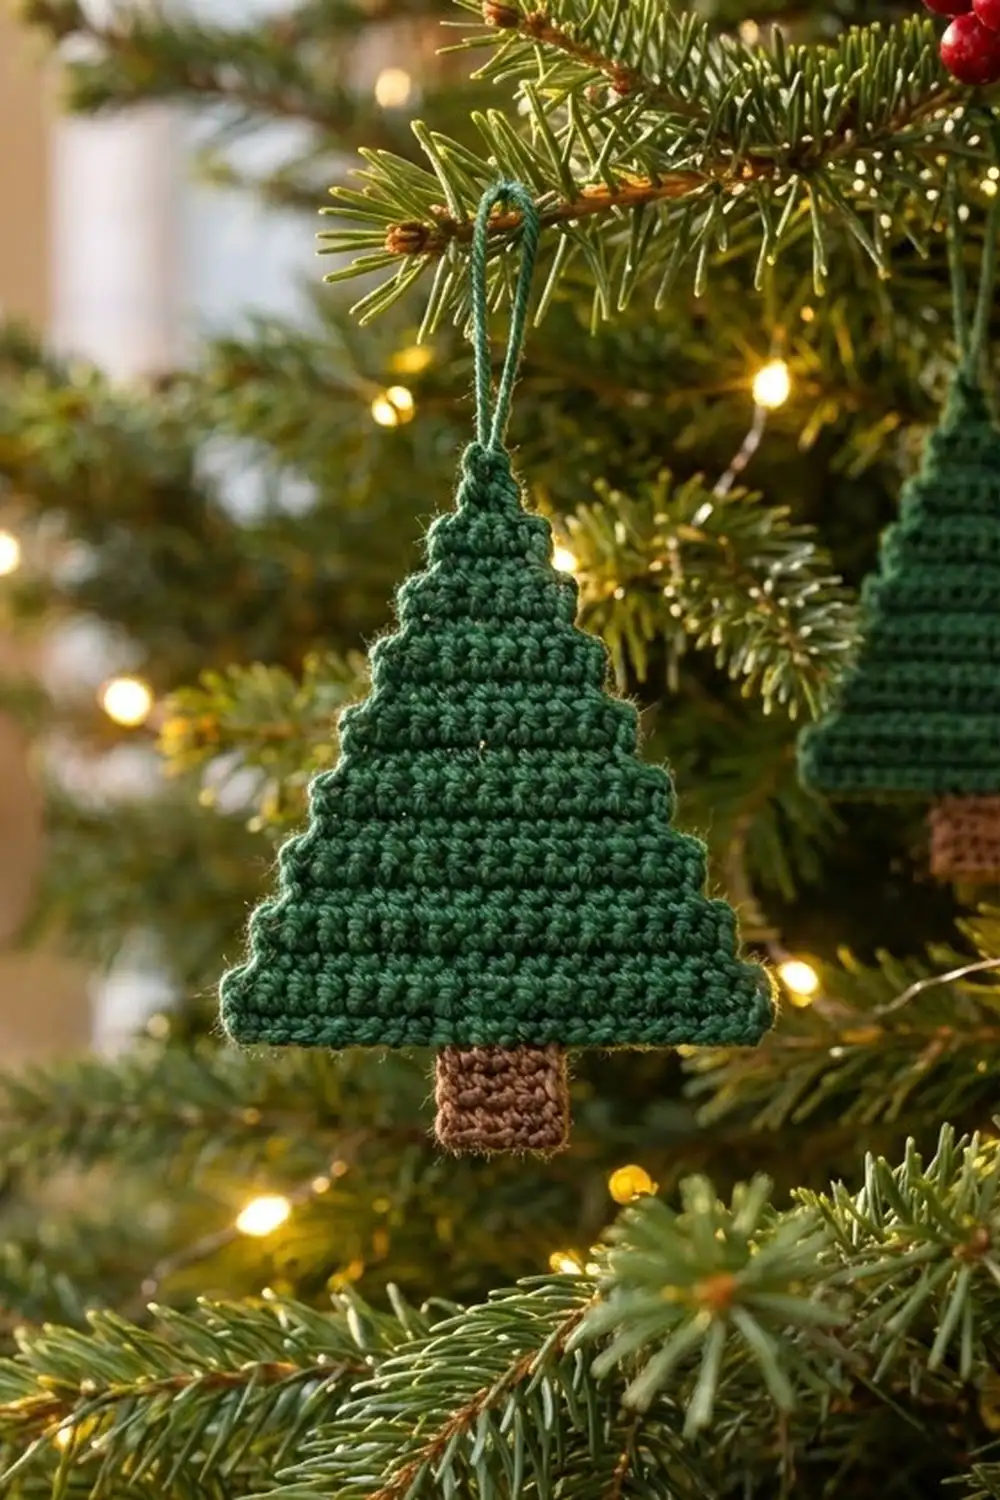
The Stepped Pine ornament is a small, flat Christmas tree with crisp staircase edges and neat horizontal tiers. It’s a quick make with a graphic, modern look, and it hangs nicely on a real tree, a gift package, or a door knob.
The palette is simple: deep forest green for the tree and hanging loop, and warm brown for the trunk. A firm sport-weight cotton gives clean stitch definition. A slim slip-stitch outline makes every step look sharp.
The pattern uses US crochet terms. The finished tree measures 3.5 in (8.9 cm) wide and 3.5 in (8.9 cm) tall. With the trunk it is 4.5 in (11.4 cm) tall, not counting the loop, and the loop adds about 2 in (5.1 cm).
Construction is straightforward. You work the tree from the bottom up in rows of single crochet, making two rows per tier. Each new tier steps in by one stitch on each side. You then work the trunk into the foundation chain, outline the tree with slip stitches, and chain a loop at the tip.
Finished Size and Construction
- Finished size (tree): 3.5 in x 3.5 in (8.9 cm x 8.9 cm)
- Total height without loop: 4.5 in (11.4 cm)
- Trunk: about 0.8 in (2.0 cm) wide x 1 in (2.5 cm) tall
- Hanging loop: about 2 in (5.1 cm)
- Skill level: Easy
- Terminology: US crochet terms
- Yarn weight: Sport (#2), cotton or cotton blend
- Hook: 2.75 mm (US C-2)
- Number of pieces: 1 (single flat ornament)
- Layout: One stand-alone tree. No joining needed.
- Piece size before border: 3.5 in x 3.5 in (8.9 cm x 8.9 cm)
- Border depth: about 1/16 in (0.2 cm), a slip-stitch outline only
Materials
Yarn: Use a smooth, tightly plied sport-weight cotton. Cotton holds the stepped corners crisply and won’t fuzz. Avoid fluffy or brushed yarns, because they blur the tier ridges.
- Forest green (Color A): 10 g, about 35 m (38 yd), for the tree, border, and loop
- Medium brown (Color B): 3 g, about 10 m (11 yd), for the trunk
These quantities include a margin for a gauge test and weaving in ends.
Tools:
- 2.75 mm (US C-2) crochet hook
- Tapestry needle
- Scissors
- Rustproof pins and a foam blocking mat
- Spray bottle or steam iron
- Ruler or tape measure
Abbreviations (US Terms)
- ch: chain
- sc: single crochet
- sl st: slip stitch
- st(s): stitch(es)
- BLO: back loop only
- RS / WS: right side / wrong side
Special technique – Step Row: Turn without chaining. Sl st in the first st. Ch 1 (this does not count as a st). Sc in BLO of each st across until 1 st remains, and leave that last st unworked. A Step Row has 2 fewer sts than the row before it. The sl st at one end and the unworked st at the other end form the stair steps on each side.
Gauge and Checkpoints
Gauge: 24 sc x 24 rows = 4 in (10.2 cm) in sc, worked firmly. That is 6 sts and 6 rows per inch (2.5 cm).
Square gauge matters here. Stitches and rows are the same size, so the triangle comes out as wide as it is tall, and the slip-stitch border can use one stitch per row end.
Test with the ornament itself. The tree is small, so work Rows 1–2 and measure them.
- Checkpoint 1 (after Row 2): The width should be 3.5 in (8.9 cm) across 21 sts.
- Checkpoint 2 (after Row 12): The height from the foundation edge should be 2 in (5.1 cm).
- Checkpoint 3 (after Row 21): The tree should be 3.5 in (8.9 cm) tall and 3.5 in (8.9 cm) wide.
- Checkpoint 4 (after the trunk): The trunk should be 1 in (2.5 cm) tall.
If the piece is too big: Go down to a 2.5 mm (US B-1.5) hook. If it is too small: Go up to a 3.0 mm hook. If only the height is off, adjust how hard you pull up each loop, since a looser pull makes taller sc.
Tree (Color A)
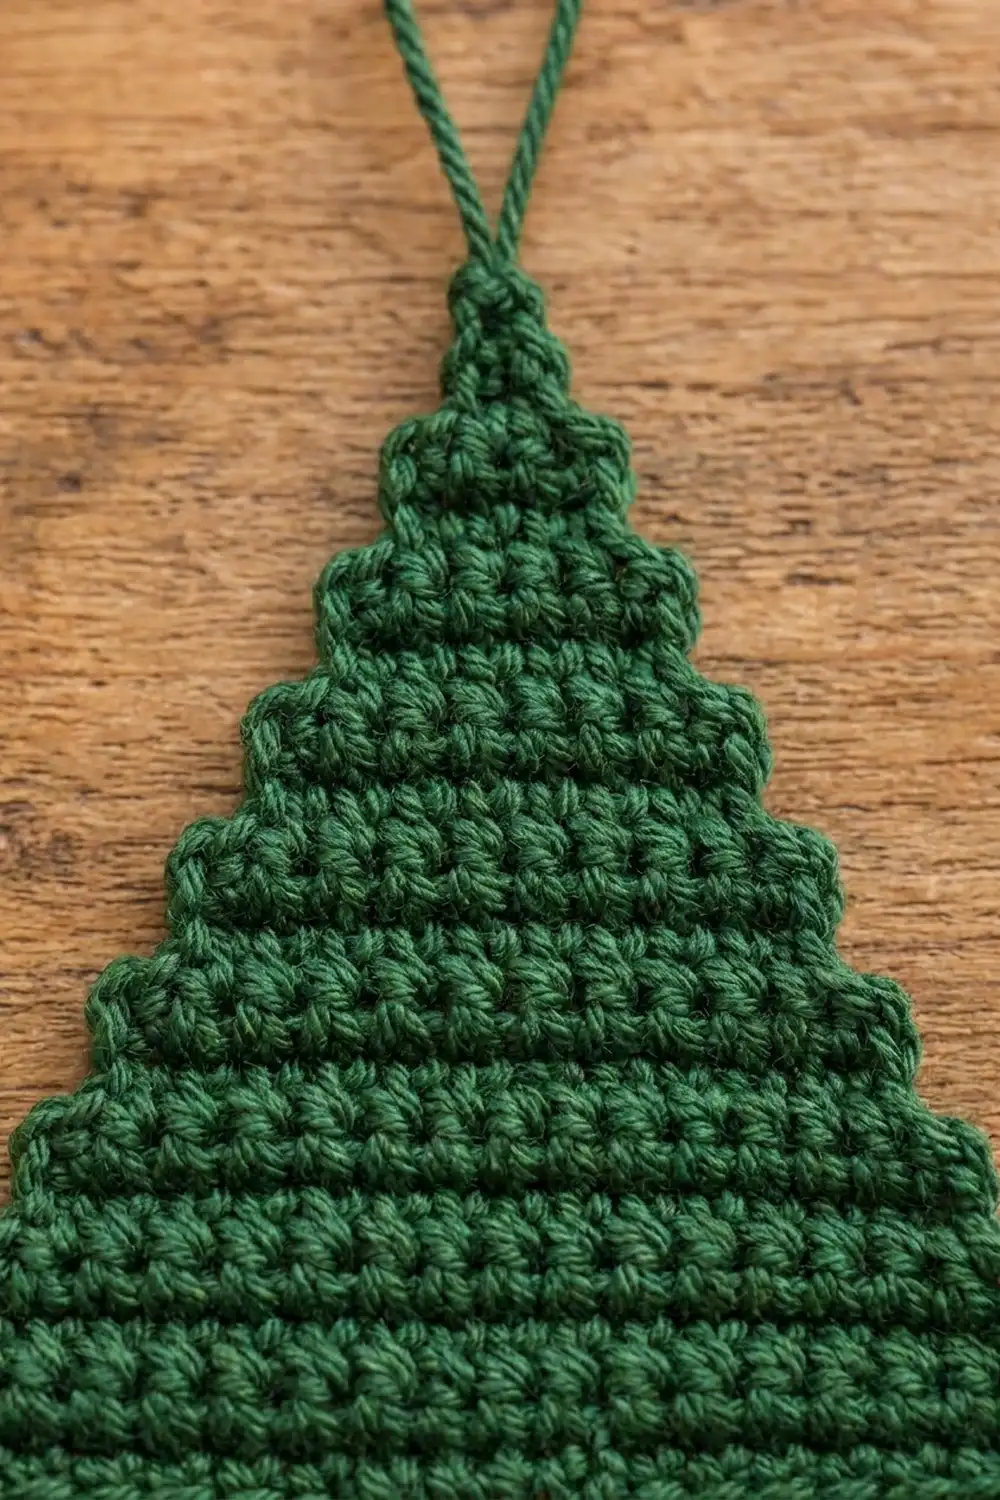
Every RS row from Row 3 onward is a Step Row worked in BLO. On the RS, the unused front loops form the thin ridge line between tiers.
Each tier has two rows: a Step Row (RS) followed by a plain row (WS). The exceptions are Tier 1, which has Rows 1–2, and the tip, which is a single row.
Row 1 (RS): With Color A, ch 22. Sc in the 2nd ch from the hook and in each ch across. (21 sc)
Row 2 (WS): Ch 1, turn. Sc in each st across. (21 sc)
Checkpoint 1: 3.5 in (8.9 cm) wide.
Row 3 (RS): Step Row. (19 sc)
Row 4 (WS): Ch 1, turn. Sc in each st across. (19 sc)
Row 5: Step Row. (17 sc)
Row 6: Ch 1, turn. Sc across. (17 sc)
Row 7: Step Row. (15 sc)
Row 8: Ch 1, turn. Sc across. (15 sc)
Row 9: Step Row. (13 sc)
Row 10: Ch 1, turn. Sc across. (13 sc)
Row 11: Step Row. (11 sc)
Row 12: Ch 1, turn. Sc across. (11 sc)
Checkpoint 2: 2 in (5.1 cm) tall.
Row 13: Step Row. (9 sc)
Row 14: Ch 1, turn. Sc across. (9 sc)
Row 15: Step Row. (7 sc)
Row 16: Ch 1, turn. Sc across. (7 sc)
Row 17: Step Row. (5 sc)
Row 18: Ch 1, turn. Sc across. (5 sc)
Row 19: Step Row. (3 sc)
Row 20: Ch 1, turn. Sc across. (3 sc)
Row 21 (tip): Step Row. Sl st in the 1st st, ch 1, sc in BLO of the center st, and leave the last st unworked. (1 sc)
Fasten off and leave a 4 in (10.2 cm) tail.
Checkpoint 3: 3.5 in x 3.5 in (8.9 cm x 8.9 cm).
Count summary: Tier k (Rows 2k−1 and 2k) has 21 − 2(k − 1) sts. That gives 21, 19, 17, 15, 13, 11, 9, 7, 5, and 3 sts for Tiers 1–10, and 1 st for the tip. The piece has 11 tiers over 21 rows. At 6 rows per inch, that is 3.5 in (8.9 cm).
Trunk (Color B)
Hold the tree upside down with the RS facing you, so the free loops of the foundation chain run across the top.
The base has 21 sts. The trunk uses the center 5 sts and leaves 8 sts free on each side (8 + 5 + 8 = 21).
Row 1: Join Color B with a sl st in the free loop of the 9th st from the edge. Ch 1. Sc in the same loop and in the next 4 free loops. (5 sc)
Rows 2–6: Ch 1, turn. Sc in each st across. (5 sc)
Fasten off and weave in the ends along the trunk’s side edges.
Checkpoint 4: The trunk is 1 in (2.5 cm) tall and about 0.8 in (2.0 cm) wide.
Border (Color A Slip-Stitch Outline)
Border gauge: Each row end and each exposed stitch top gets 1 sl st. Keep the sl sts loose enough that the edge lies flat. They should match the sc stitch width, about 6 per inch (2.5 cm).
The border runs around the tree only. It starts and ends at the trunk, so no green crosses the brown trunk.
Turn the tree upright with the RS facing you.
Bottom right: Join Color A with a sl st in the first free foundation loop to the right of the trunk. Sl st in the next 7 free loops. (8 sl st)
Corner: Ch 1.
Right side: Work 1 sl st in each row end and 1 sl st in each exposed step stitch, moving up to the tip. The order is Row 1 end, Row 2 end, step, Row 3 end, Row 4 end, step, and so on, ending with the Row 21 end. (21 row ends + 10 steps = 31 sl st)
Tip: Sl st in the top of the Row 21 sc. (1 sl st)
Left side: Work down the left side in the same way. (31 sl st)
Corner: Ch 1.
Bottom left: Sl st in each of the 8 free foundation loops, stopping at the trunk. (8 sl st)
Total: 8 + 31 + 1 + 31 + 8 = 79 sl st, plus 2 corner chains. Fasten off and weave the tail into the base of the trunk.
Why the math works: Each side has 21 rows, so it has 21 row ends. There are 11 tiers, so there are 10 steps between them, and each step leaves exactly one stitch top exposed. That gives 31 per side.
The bottom edge has 21 sts, minus the 5 used by the trunk, which leaves 8 on each side. The gauge is square, so one sl st per row end lies as flat as one sl st per stitch. The outline adds only about 1/16 in (0.2 cm) all around, so the tree still measures 3.5 in (8.9 cm) after the border.
Hanging Loop (Color A)
Join Color A with a sl st in the tip sl st and ch 24. That is about 4 in (10.2 cm) of chain.
Sl st back into the same tip stitch to close the loop, which then stands about 2 in (5.1 cm) tall. Fasten off. Tie the two tails in a small square knot at the base of the loop, then weave them down into the top tier.
Final Blocking
- Lightly spritz the ornament with water until it is damp, not soaked.
- Lay it RS up on the blocking mat.
- Pin the two bottom corners 3.5 in (8.9 cm) apart.
- Pin the tip so it is 3.5 in (8.9 cm) above the center of the base.
- Pin each step corner gently so the stair edges sit square.
- Pin the trunk straight, 1 in (2.5 cm) long and centered.
- Let it dry completely. You can steam it lightly instead, as long as the iron never touches the yarn.
- Unpin it and check the measurements again.
Final Quality-Control Checklist
- Tree is 3.5 in (8.9 cm) wide and 3.5 in (8.9 cm) tall
- 11 tiers, each with a visible front-loop ridge on the RS
- Both sides have 10 even steps
- Trunk has 8 green sts free on each side and is 1 in (2.5 cm) tall
- Border has 31 sl st per side and doesn’t ruffle or pull
- Loop is centered at the tip and securely knotted
- All ends are woven in and invisible from the RS
Troubleshooting
- The sides slope instead of stepping: You’re probably working sc2tog instead of a Step Row. Use the sl st at the start and leave the last st unworked.
- No ridge lines: Make sure the RS Step Rows are worked in BLO.
- The tree leans to one side: Check that each Step Row decreases exactly 1 st at each end, not 2 at one end.
- The trunk is off-center: Count to the 9th foundation loop again, so there are 8 free loops on each side.
- The border ruffles: You may have added extra sl sts at the steps. Use only 1 per step.
- The border puckers: Your sl sts are too tight. Loosen up or use a 3.0 mm hook for the border only.
Care
Hand wash in cool water, press out the moisture with a towel, and dry flat. Re-pin the steps if needed. Store the ornament flat between seasons so the loop doesn’t stretch.
Final Notes
The measurement chain is simple. Square gauge of 6 sts and 6 rows per inch gives a 21-st base of 3.5 in (8.9 cm). Twenty-one rows give a matching 3.5 in (8.9 cm) height across 11 tiers. A 6-row trunk adds 1 in (2.5 cm), and the slip-stitch outline adds almost nothing. If you check gauge at Row 2, you’ll end up with the tree you planned.
Happy crocheting!