

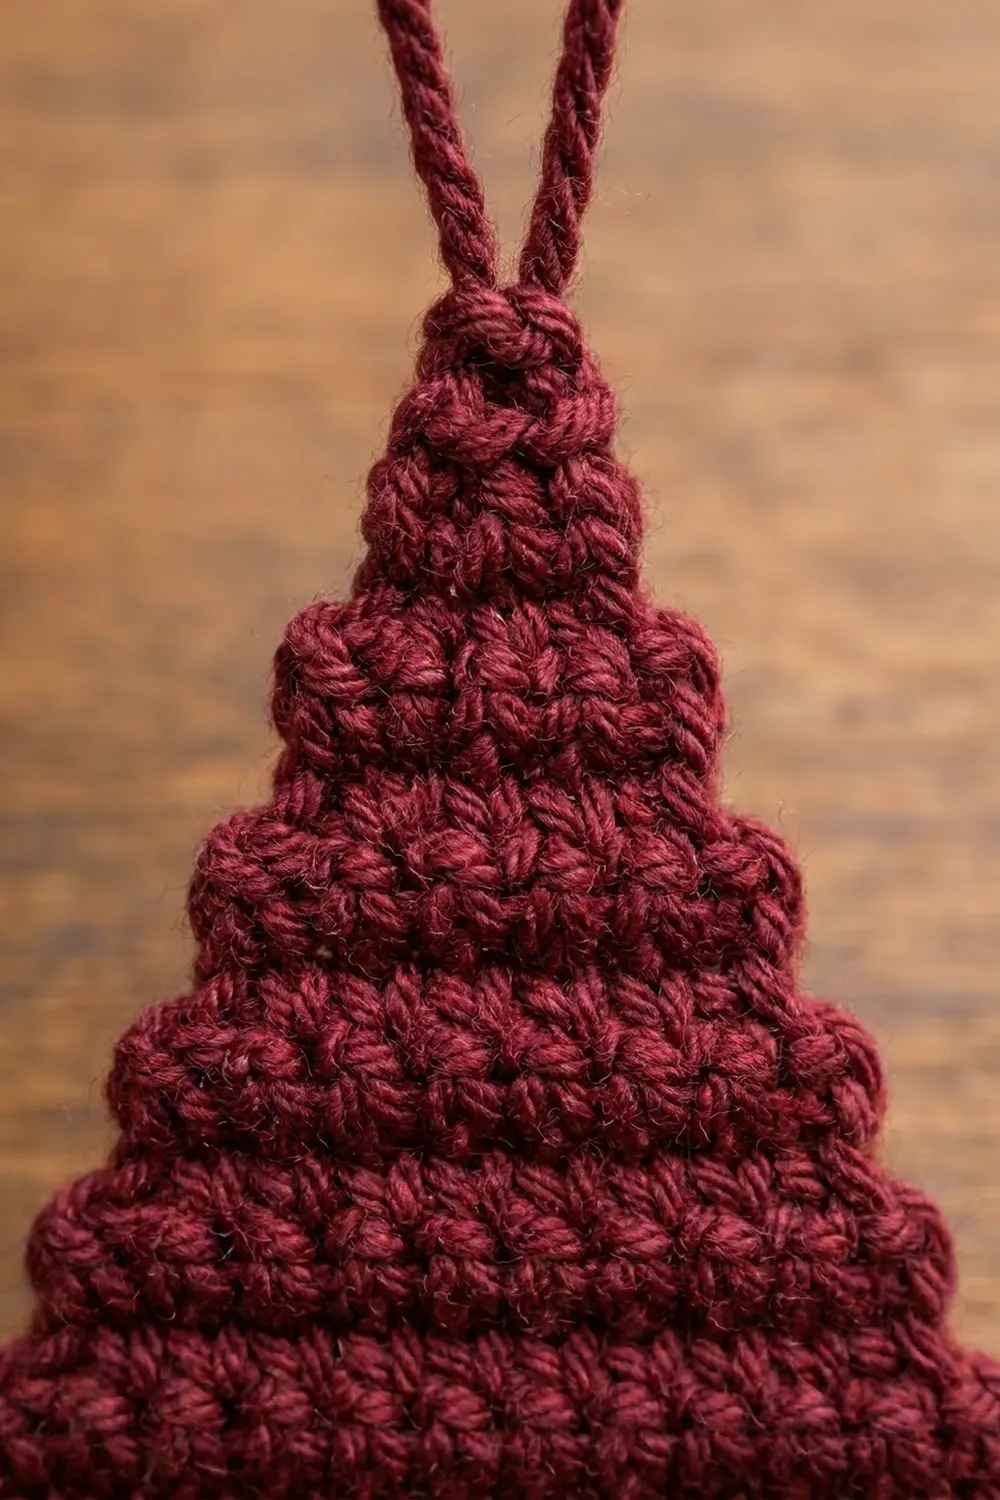
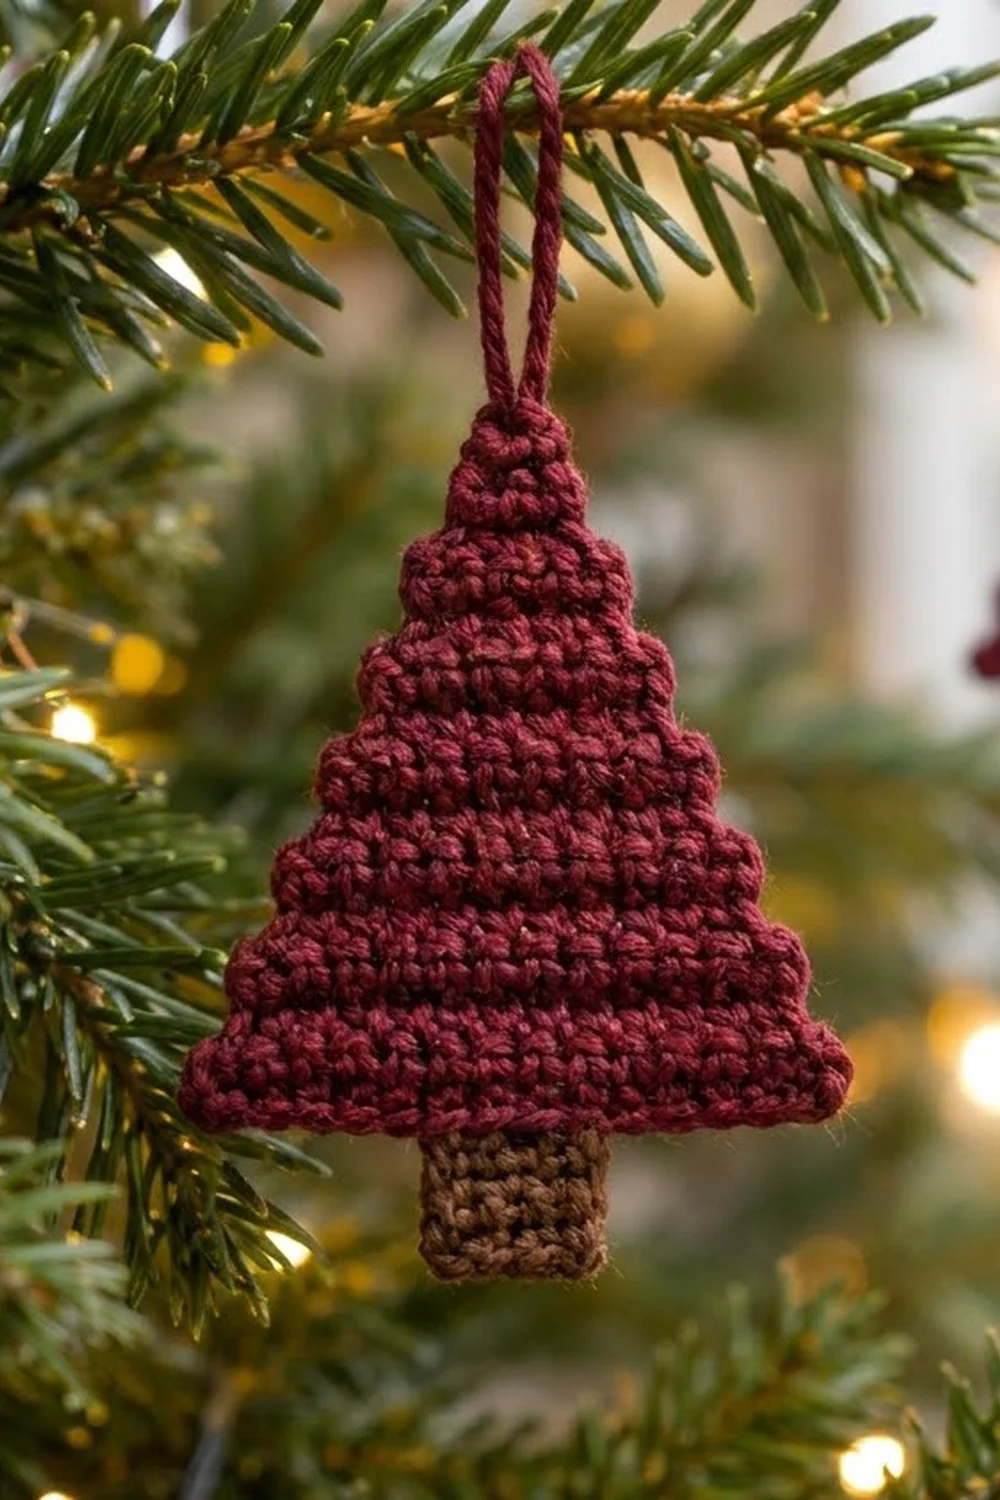
This little tree is one of the quickest ornaments you can make for the holidays. It is a flat triangle of single crochet in deep burgundy. It has a neat stepped edge on both sides, a fine ridge line across every tier, and a tidy brown trunk underneath.
The look is calm and slightly old-fashioned, like a wooden ornament or a cross-stitch motif. Burgundy looks rich and warm against green branches, and the small brown trunk grounds the shape. A chain loop at the tip makes it ready to hang straight away.
The pattern uses US crochet terms. The finished ornament measures 3 in (7.6 cm) wide and 3.2 in (8.1 cm) tall including the trunk, with a 3 in (7.6 cm) hanging loop above the tip.
Construction is simple. You work the tree body in rows from the base up, losing one stitch at each edge every second row to create the steps. Then you add the trunk by working into the free loops of the foundation chain. You finish with a chain loop worked straight off the last stitch. It is one piece with no sewing.
Finished Size and Construction
- Finished size: 3 in (7.6 cm) wide x 3.2 in (8.1 cm) tall, plus a 3 in (7.6 cm) loop
- Skill level: Easy
- Terminology: US crochet terms
- Yarn weight: Sport weight (CYC #2 Fine)
- Hook: 2.75 mm (US C-2)
- Number of pieces: 1 (tree body, trunk and loop all worked in one piece)
- Layout: Single flat ornament, no joining
- Tree body size: 3 in (7.6 cm) wide x 2.6 in (6.6 cm) tall
- Trunk size: 0.7 in (1.8 cm) wide x 0.6 in (1.5 cm) tall
- Size before border: Same as finished size
- Border depth: None; the stepped edge is the finished edge
Materials
Choose a smooth sport weight yarn that shows each stitch clearly. A cotton or cotton-blend yarn gives the crisp ridges and sharp steps seen here. Acrylic works too, but steam-block it gently so the triangle lies flat. Avoid fuzzy or brushed yarns, which blur the ledges.
Yarn:
- Burgundy (tree and loop): 6 g, about 18 m (19.7 yd)
- Brown (trunk): 2 g, about 6 m (6.6 yd)
These amounts include extra yarn for tails and the hanging loop. One small ball of each color will make many ornaments.
Tools:
- 2.75 mm (US C-2) crochet hook
- Tapestry needle
- Scissors
- Stitch marker (optional, to mark the right side)
- Rust-proof pins and a foam blocking mat
- Spray bottle or steam iron
- Ruler or tape measure
Abbreviations (US Terms)
- ch: chain
- sc: single crochet
- sc2tog: single crochet 2 together
- sl st: slip stitch
- st(s): stitch(es)
- sk: skip
- BLO: back loop only
- RS / WS: right side / wrong side
Special technique (step decrease): At the start of a step row, ch 1, turn, skip the first st, then work across and leave the last st unworked. This removes one stitch at each edge and leaves a small square ledge on both sides. Do not use sc2tog for these steps, because sc2tog slants the edge instead of stepping it.
Gauge and Checkpoints
Gauge: 6 sc and 7 rows = 1 in (2.5 cm) in rows of sc.
The ornament is small, so the ornament itself is your best test piece. Make one, measure it at each checkpoint below, and adjust before making a batch.
Checkpoints:
- After Row 2: 18 sts, width 3 in (7.6 cm).
- After Row 8: 12 sts, width 2 in (5.1 cm); total height about 1.1 in (2.8 cm).
- After Row 18: tree body height 2.6 in (6.6 cm).
- After the trunk: total height 3.2 in (8.1 cm).
If your piece is too big, go down one hook size, to 2.5 mm. If it is too small, go up one size, to 3.0 mm. Check the row height as well as the width. If the width is right but the tree is too tall, your rows are loose. Try holding the working yarn a little more firmly.
Tree Body
Use burgundy. The foundation row is the RS row. Place a marker on the RS if you like.
Row 1 (RS): Ch 19. Sc in 2nd ch from hook and in each ch across. (18 sts)
Row 2 (WS): Ch 1, turn. Sc in each st across. (18 sts)
Rows 1–2 form Tier 1, the widest band. From here, every tier has two rows: an odd-numbered RS step row worked in BLO, and an even-numbered WS row worked through both loops. Working BLO on the RS leaves the front loops of the previous row showing as a fine horizontal ridge on the front. These ridges make the visible tier lines.
Row 3 (RS, step row): Ch 1, turn. Sk first st, sc BLO in each st across until 1 st remains, leave last st unworked. (16 sts)
Row 4 (WS): Ch 1, turn. Sc in each st across. (16 sts)
Row 5 (RS, step row): Ch 1, turn. Sk first st, sc BLO in each st until 1 st remains, leave last st unworked. (14 sts)
Row 6 (WS): Ch 1, turn. Sc in each st across. (14 sts)
Row 7 (RS, step row): Work as Row 5. (12 sts)
Row 8 (WS): Ch 1, turn. Sc in each st across. (12 sts)
Checkpoint: the piece should be 2 in (5.1 cm) across Row 8 and about 1.1 in (2.8 cm) tall.
Row 9 (RS, step row): Work as Row 5. (10 sts)
Row 10 (WS): Ch 1, turn. Sc in each st across. (10 sts)
Row 11 (RS, step row): Work as Row 5. (8 sts)
Row 12 (WS): Ch 1, turn. Sc in each st across. (8 sts)
Row 13 (RS, step row): Work as Row 5. (6 sts)
Row 14 (WS): Ch 1, turn. Sc in each st across. (6 sts)
Row 15 (RS, step row): Work as Row 5. (4 sts)
Row 16 (WS): Ch 1, turn. Sc in each st across. (4 sts)
Row 17 (RS, step row): Work as Row 5. (2 sts)
Row 18 (WS, tip): Ch 1, turn. Sc2tog over the 2 sts. (1 st)
Do not fasten off. The tree body is now 2.6 in (6.6 cm) tall.
Stitch count summary: 18, 18, 16, 16, 14, 14, 12, 12, 10, 10, 8, 8, 6, 6, 4, 4, 2, 1. That is 179 sc in total for the tree body.
Hanging Loop
Keep going with burgundy from the tip stitch.
Ch 36. Sl st into the same tip st to close the loop. Fasten off, leaving a 4 in (10.2 cm) tail.
The chain is about 6 in (15.2 cm) long, so the folded loop hangs about 3 in (7.6 cm) above the tip. Weave the tail down into the top two rows. Then weave it back up through the base of the loop once to lock it.
Trunk
The trunk is worked into the free loops of the foundation chain, centered under the base.
Turn the tree upside down with the RS facing you, so the foundation edge is on top. The 18 free loops of the foundation chain sit along this edge. Count 7 loops in from the right-hand corner. You will work the trunk over loops 8, 9, 10 and 11, which leaves 7 loops free on each side.
Row 1 (RS): Join brown with a sl st in loop 8. Ch 1, sc in the same loop and in each of the next 3 loops. (4 sts)
Row 2 (WS): Ch 1, turn. Sc in each st across. (4 sts)
Row 3 (RS): Ch 1, turn. Sc in each st across. (4 sts)
Row 4 (WS): Ch 1, turn. Sc in each st across. (4 sts)
Fasten off. The trunk measures 0.7 in (1.8 cm) wide and 0.6 in (1.5 cm) tall. Total stitches in the trunk: 16 sc.
Weave the brown tails into the trunk only, so no brown shows through the burgundy. Weave the burgundy foundation tail into the WS of the first tier.
Edge Finish (No Added Border)
This design has no border round. The stepped shape is the finished edge. A round of sc or a sl st outline would round off the ledges and hide the step effect.
Edge gauge: Each step is 1 st wide and 2 rows tall. At the stated gauge, each ledge is about 0.17 in (0.4 cm) across and 0.29 in (0.7 cm) high.
Per-side counts:
- Base edge: 18 foundation sts, with 4 trunk sts centered and 7 free sts on each side.
- Left edge: 8 ledges (one at the start of each step row, Rows 3–17), then the tip.
- Right edge: 8 ledges (one at the end of each step row, Rows 3–17), then the tip.
Why the math works: Each of the 8 step rows removes exactly 2 sts, one per side. Starting from 18 sts, 18 − (8 × 2) = 2 sts remain for Row 17. The sc2tog in Row 18 closes them to a single tip stitch. Because both sides lose stitches evenly, the tip sits exactly over the center of the base. The 4 trunk stitches (loops 8–11) sit exactly under that center line.
Final Blocking
- Weave in all remaining tails before blocking.
- Lay the ornament RS up on a blocking mat.
- Pin the two base corners 3 in (7.6 cm) apart.
- Pin the tip so the tree body measures 2.6 in (6.6 cm) from base to tip, centered over the trunk.
- Pin the bottom corner of each ledge lightly so every step sits square, not curled.
- Pin the trunk straight down, 0.6 in (1.5 cm) below the base.
- For cotton or wool, mist with water. For acrylic, hold a steam iron just above the piece without touching it.
- Let it dry completely, then unpin.
- Lay the hanging loop flat so it dries straight without twisting.
Final Quality-Control Checklist
- Base is 18 sts and 3 in (7.6 cm) wide.
- Tree body has 18 rows and is 2.6 in (6.6 cm) tall.
- Each side shows 8 clean ledges, all the same size.
- Ridge lines appear on the RS at every tier: Rows 3, 5, 7, 9, 11, 13, 15 and 17.
- Tip is a single stitch, centered above the base.
- Trunk is 4 sts wide and 4 rows tall, with 7 free foundation sts on each side.
- Total height is 3.2 in (8.1 cm) without the loop.
- Hanging loop is secure and about 3 in (7.6 cm) long.
- No tails visible on the RS.
Troubleshooting
The sides slant instead of stepping. You may be using sc2tog or working into the first stitch. Skip the first stitch completely and leave the last stitch unworked on every step row.
The tree leans to one side. One step row probably lost a stitch on only one side. Count every step row; each should be exactly 2 sts shorter than the row before.
No ridge lines on the front. Make sure the step rows are RS rows and are worked in BLO. If the ridges show on the back, your RS marker is on the wrong side of the piece.
The triangle curls or cups. Your tension is tight. Go up a hook size or block more firmly with steam.
The trunk is off-center. Recount the foundation loops. Loops 8–11 must have exactly 7 loops free on each side.
Gaps at the ledge corners. Pull the first stitch of each step row snug after the turning chain.
The loop stretches over time. Use a smaller hook for the chain, or work it with two strands of burgundy.
Care
Hand wash in cool water and lay flat to dry, reshaping the steps while damp. Store the ornament flat in tissue between seasons so the loop and tip keep their shape.
Final Notes
Every measurement in this ornament follows from the one before. A gauge of 6 sc and 7 rows per 1 in (2.5 cm) gives an 18 st base that is 3 in (7.6 cm) wide. Eight step rows remove 2 sts each, bringing the count down to 2 sts in Row 17 and 1 tip st in Row 18. That makes a tree body 2.6 in (6.6 cm) tall. A 4 st, 4 row trunk adds 0.6 in (1.5 cm), for a total of 3.2 in (8.1 cm). The 36 ch loop adds a 3 in (7.6 cm) hanger. Check your base width and Row 8 width, and every ornament in your batch will match.
You can make one in an evening. Then make a dozen for gift tags, for the tree, or to string together on your own.
Happy crocheting!