

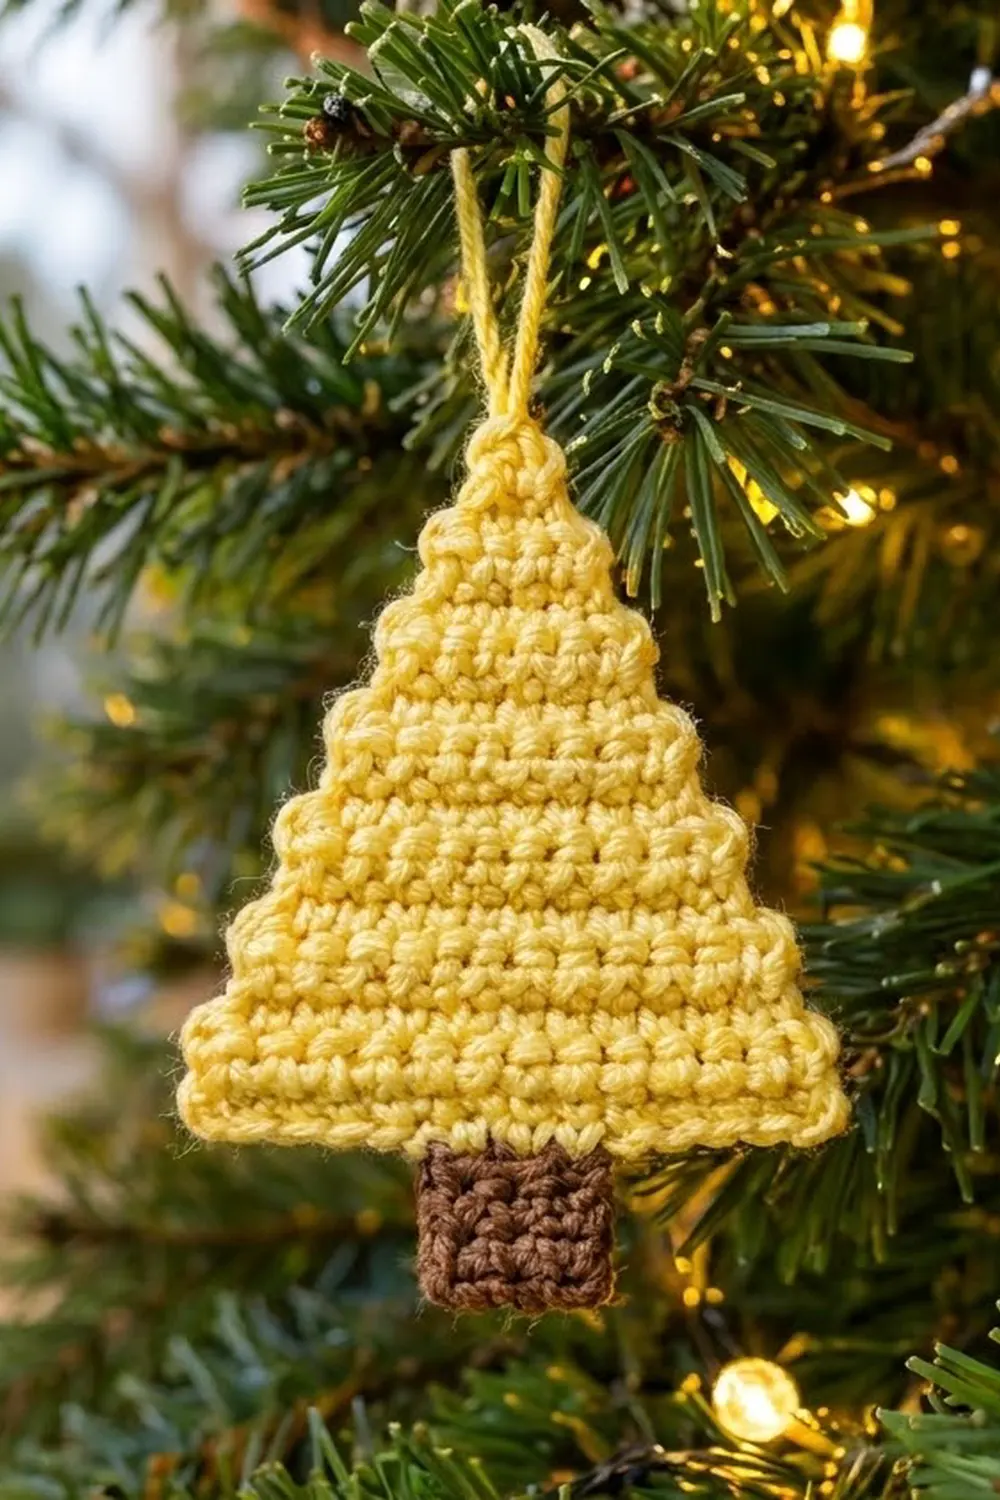
The Golden Pine is a small, flat Christmas tree ornament in soft butter yellow, with a short brown trunk and a slim hanging loop. The yellow triangle shows neat horizontal ridges of single crochet. Its sides step in gently, like the tiers of a real pine.
The style is simple and warm. Pale yellow glows against dark green branches and warm string lights. It also looks lovely tied to a gift, clipped to a garland, or hung in a window. You only need two colors and a few grams of yarn, so it is a good stash-buster for the season.
The pattern uses US crochet terms. The finished ornament measures about 3.4 in (8.6 cm) wide and 3.5 in (8.9 cm) tall from tip to trunk bottom, not counting the loop. The loop adds about 1.5 in (3.8 cm).
The construction is straightforward:
- Work the yellow triangle in rows from the bottom up, decreasing at both ends every other row until one stitch remains.
- Work one round of single crochet border around the triangle.
- Chain a hanging loop at the tip.
- Work the brown trunk in rows directly off the bottom edge.
There is no sewing except weaving in ends.
Finished Size and Construction
- Finished size: 3.4 in (8.6 cm) wide x 3.5 in (8.9 cm) tall, plus a 1.5 in (3.8 cm) loop
- Skill level: Easy
- Terminology: US crochet terms
- Yarn weight: DK (light, #3)
- Hook: 3.5 mm (US E-4)
- Number of pieces: 1. This is a single flat ornament; the trunk and loop are worked directly onto it.
- Layout: Triangle with the trunk centered at the bottom and the loop at the tip
- Triangle size before border: 3 in (7.6 cm) wide x 2.5 in (6.4 cm) tall
- Border depth: about 0.2 in (0.5 cm), one round of single crochet
- Trunk size: 1 in (2.5 cm) wide x 0.7 in (1.8 cm) tall
Materials
Choose a smooth DK yarn in cotton or a cotton blend. Cotton gives crisp stitch definition, which makes the horizontal ridges stand out. It also keeps the small triangle flat and firm on the branch. Acrylic works too, but it may need a little more blocking to lie perfectly flat. Avoid fuzzy or brushed yarns, because they blur the stepped edges.
- Yellow (Color A): 8 g, about 19 m
- Brown (Color B): 2 g, about 5 m
These quantities include a small margin for weaving in ends and for redoing a row or two.
Tools:
- 3.5 mm (US E-4) crochet hook
- Tapestry needle
- Scissors
- Stitch marker
- Blocking mat and rust-proof pins
- Spray bottle with water
- Ruler or tape measure
Abbreviations (US Terms)
- ch: chain
- sc: single crochet
- sl st: slip stitch
- st(s): stitch(es)
- sp: space
- sc2tog: single crochet 2 together (decrease)
- sc3tog: single crochet 3 together (double decrease)
Special stitches:
- sc2tog: Insert the hook in the next st, yarn over, and pull up a loop. Insert the hook in the following st, yarn over, and pull up a loop (3 loops on hook). Yarn over and pull through all 3 loops. This makes one stitch from two.
- sc3tog: Pull up a loop in each of the next 3 sts (4 loops on hook). Yarn over and pull through all 4 loops. This makes one stitch from three.
The turning ch 1 never counts as a stitch in this pattern.
Gauge and Checkpoints
Gauge: 20 sc and 24 rows = 4 in (10.2 cm) in rows of single crochet. That is 5 sc and 6 rows per 1 in (2.5 cm).
The ornament is small, so it works as its own gauge test. Make one triangle first and measure it before you add the border and trunk.
Checkpoints:
- After Row 1: width is 3 in (7.6 cm).
- After Row 8: height is about 1.3 in (3.3 cm).
- After Row 15: height is 2.5 in (6.4 cm).
- After the border: width at the base is about 3.4 in (8.6 cm).
- After the trunk: total height is about 3.5 in (8.9 cm).
If your piece is too big: go down to a 3.25 mm (US D-3) hook, or work more firmly.
If your piece is too small: go up to a 3.75 mm (US F-5) hook.
A small difference is fine for an ornament. What matters most is a dense fabric, with no gaps showing when the tree hangs in front of lights. If you see light through the stitches, go down a hook size even if your width is correct.
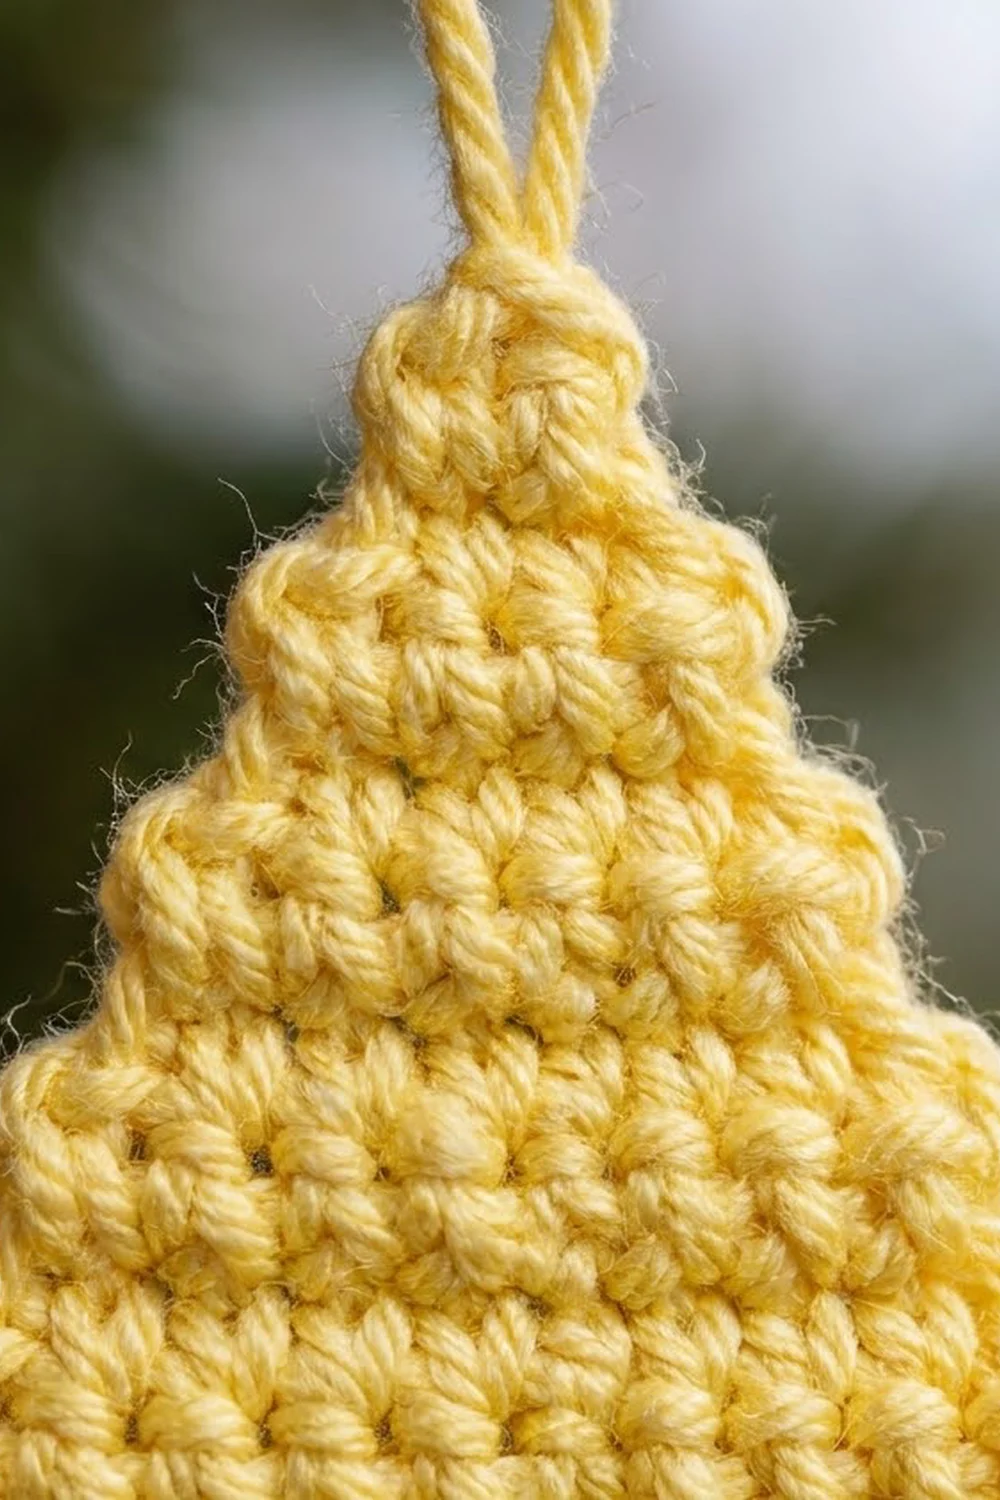
Tree Triangle
With Color A, ch 16.
Row 1: Sc in 2nd ch from hook and in each ch across. (15 sts)
Row 2: Ch 1, turn. Sc in each st across. (15 sts)
Row 3 (decrease row): Ch 1, turn. Sc2tog, sc in next 11 sts, sc2tog. (13 sts)
Row 4: Ch 1, turn. Sc in each st across. (13 sts)
Row 5 (decrease row): Ch 1, turn. Sc2tog, sc in next 9 sts, sc2tog. (11 sts)
Row 6: Ch 1, turn. Sc in each st across. (11 sts)
Row 7 (decrease row): Ch 1, turn. Sc2tog, sc in next 7 sts, sc2tog. (9 sts)
Row 8: Ch 1, turn. Sc in each st across. (9 sts)
Checkpoint: the piece should be about 1.3 in (3.3 cm) tall.
Row 9 (decrease row): Ch 1, turn. Sc2tog, sc in next 5 sts, sc2tog. (7 sts)
Row 10: Ch 1, turn. Sc in each st across. (7 sts)
Row 11 (decrease row): Ch 1, turn. Sc2tog, sc in next 3 sts, sc2tog. (5 sts)
Row 12: Ch 1, turn. Sc in each st across. (5 sts)
Row 13 (decrease row): Ch 1, turn. Sc2tog, sc in next st, sc2tog. (3 sts)
Row 14: Ch 1, turn. Sc in each st across. (3 sts)
Row 15: Ch 1, turn. Sc3tog. (1 st)
Do not fasten off.
The triangle is now 15 rows tall, which is 2.5 in (6.4 cm) at 6 rows per inch. It is 15 sts wide at the base, which is 3 in (7.6 cm) at 5 sts per inch.
Why the counts work:
- Six sc2tog rows each remove 2 sts, one at each end: 15 – 12 = 3.
- The final sc3tog removes 2 more: 3 – 2 = 1.
- The plain rows between the decrease rows create the gentle stepped tiers along the sides.
Always work the decreases in the first two and last two stitches of a row. If you decrease anywhere else, the tree will lean.
Border
The border is one round of single crochet in Color A, worked around all three sides of the triangle. It tidies the row ends, sharpens the corners, and frames the ridges.
Border gauge: On the slanted sides, work 1 sc in each row end. On the bottom, work 1 sc in each foundation chain loop.
Counting note: The side counts below are single crochet only. Each corner is a separate ch-1 space and is not included in any side count.
Border Round: Ch 1. Rotate the work so you can go down the first slanted side.
- Side 1: Work 1 sc in the end of each row, from Row 15 down to Row 1. (15 sc)
- Bottom corner: Ch 1.
- Bottom edge: Working into the opposite side of the foundation ch, sc in each of the 15 loops. (15 sc)
- Bottom corner: Ch 1.
- Side 2: Work 1 sc in the end of each row, from Row 1 up to Row 15. (15 sc)
- Tip corner: Ch 1.
- Sl st in the first sc of Side 1 to join.
Round total: 45 sc (15 + 15 + 15) plus 3 ch-1 corner spaces.
Why the math works:
- Each slanted side is 15 rows tall, so its 15 row ends take 15 sc.
- Each slanted side measures about 2.9 in (7.4 cm). At 5 sts per inch, 15 sc covers 3 in (7.6 cm), close enough that the edge lies flat without ruffling or pulling.
- The bottom has 15 foundation loops for 15 sc, matching the 15 sts of Row 1 exactly.
- The ch-1 at each corner gives the turn enough room to stay crisp without bunching.
Do not fasten off yet. Go straight on to the loop.
Hanging Loop
After joining the border, ch 20. Sl st into the tip ch-1 sp, right next to the join. Fasten off and leave a 4 in (10.2 cm) tail.
The 20 chains fold in half into a slim loop about 1.5 in (3.8 cm) tall. For a firmer, cord-like loop, work 1 sl st into the back bump of each chain before you join to the tip. This gives the twisted, rounded look of a thin cord and helps the loop hold its shape on the branch.
Weave the tail down through the tip stitches to anchor the loop securely.
Trunk
The trunk is worked in rows directly into the bottom edge of the border, centered under the tree.
Hold the ornament with the bottom edge at the top and the right side facing you. Count the 15 bottom-edge border sc, starting from the right-hand corner. Place a marker in the 6th sc.
Row 1: Join Color B with a sl st in the marked 6th sc. Ch 1, sc in the same st and in the next 4 sts. (5 sts)
This leaves 5 free sc on each side of the trunk: 5 + 5 + 5 = 15.
Row 2: Ch 1, turn. Sc in each st across. (5 sts)
Row 3: Ch 1, turn. Sc in each st across. (5 sts)
Row 4: Ch 1, turn. Sc in each st across. (5 sts)
Fasten off.
The trunk is 5 sts wide, which is 1 in (2.5 cm), and 4 rows tall, which is about 0.7 in (1.8 cm).
Weave in all ends on the wrong side. Hide brown tails inside the brown trunk and yellow tails inside the yellow stitches so no color shows through on the front.
Final Blocking
- Lay the ornament face up on a blocking mat.
- Pin the tip first. Then pin both bottom corners to make a symmetrical triangle 3.4 in (8.6 cm) wide at the base.
- Pin the trunk straight down from the center so it measures 1 in (2.5 cm) wide.
- Check that the total height from tip to trunk bottom is 3.5 in (8.9 cm).
- Mist evenly with water until damp, not soaked.
- Gently smooth the slanted sides straight with your fingertips.
- Leave it to dry completely, at least a few hours.
- Remove the pins. Lay the loop flat and straight while it finishes drying.
For acrylic yarn, hold a steam iron above the work instead of misting. Never press the iron onto the stitches.
Final Quality-Control Checklist
- Row 1 has 15 sts and Row 15 has 1 st.
- Every decrease row lost exactly 2 sts.
- Both slanted sides match, with even steps.
- The border has 15 sc on each of its three sides and a ch-1 at each corner.
- The trunk is centered, with 5 free sc on each side.
- The trunk is 5 sts wide and 4 rows tall.
- The loop is firm and sits exactly at the tip.
- All ends are woven in and hidden.
- The finished size is about 3.4 in (8.6 cm) wide x 3.5 in (8.9 cm) tall.
Troubleshooting
The sides are uneven. You probably missed or doubled a decrease. Count your stitches after every odd row.
The tree leans to one side. Each decrease must use the first two and last two stitches of the row. Do not decrease in the middle.
The border ruffles. Your border is looser than the body. Work the border round only with a hook one size smaller.
The border pulls the sides inward. You may have skipped some row ends. Check that each slanted side has 15 sc.
The trunk is off-center. Recount the bottom border. The trunk must start in the 6th of the 15 sc.
The tip looks blunt. Pull the sc3tog snug, and make sure you did not skip the tip ch-1.
The ornament curls. Block it flat again, and check that you worked 1 sc per row end along the sides.
The loop is floppy. Rework it with the sl st pass along the back bumps.
Care
Hand wash in cool water with mild soap. Roll it in a towel to remove water, reshape it, and dry it flat.
Final Notes
The whole ornament follows one simple measurement chain:
- The 15-stitch foundation gives a 3 in (7.6 cm) base.
- Fifteen rows make a triangle 2.5 in (6.4 cm) tall.
- The border adds about 0.2 in (0.5 cm) on every edge, bringing the base to about 3.4 in (8.6 cm).
- The 4-row trunk adds about 0.7 in (1.8 cm), for a total height of about 3.5 in (8.9 cm).
- The loop adds another 1.5 in (3.8 cm) for hanging.
If your gauge matches at Row 1 and Row 8, every later checkpoint will line up. Once you have made one tree, the next ones go quickly. Try a whole set in yellow for a matching golden tree.
Happy crocheting!