

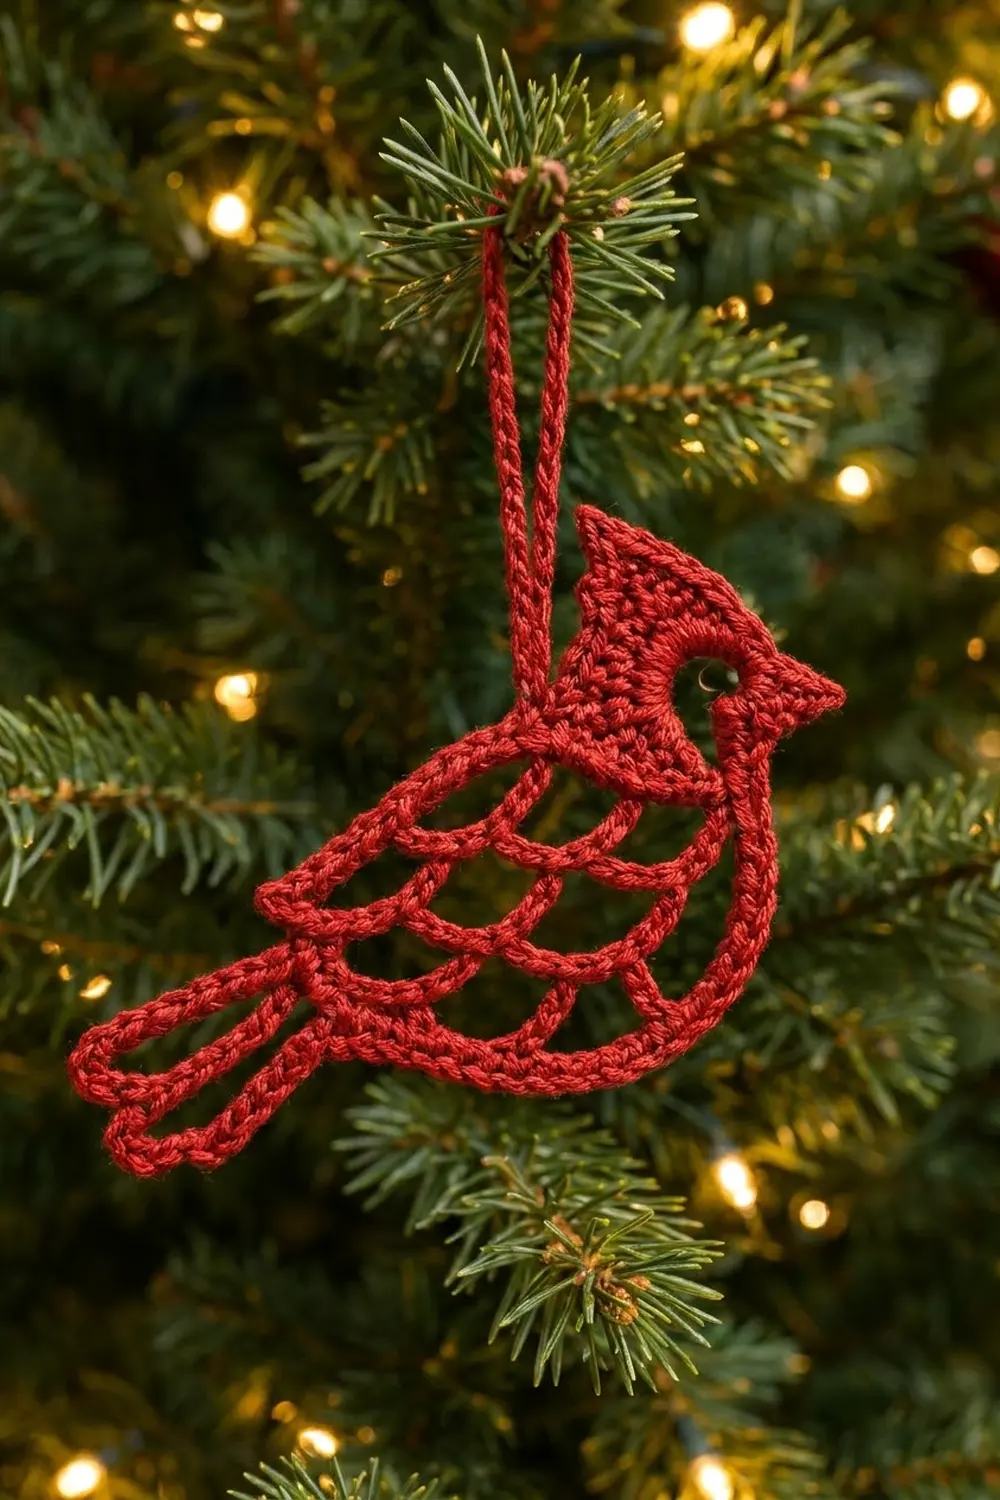
This Lacy Red Cardinal is a flat Christmas ornament made in one piece, with a solid head and an airy body filled with feather scallops. It hangs beautifully on a tree because the light shows through every arch.
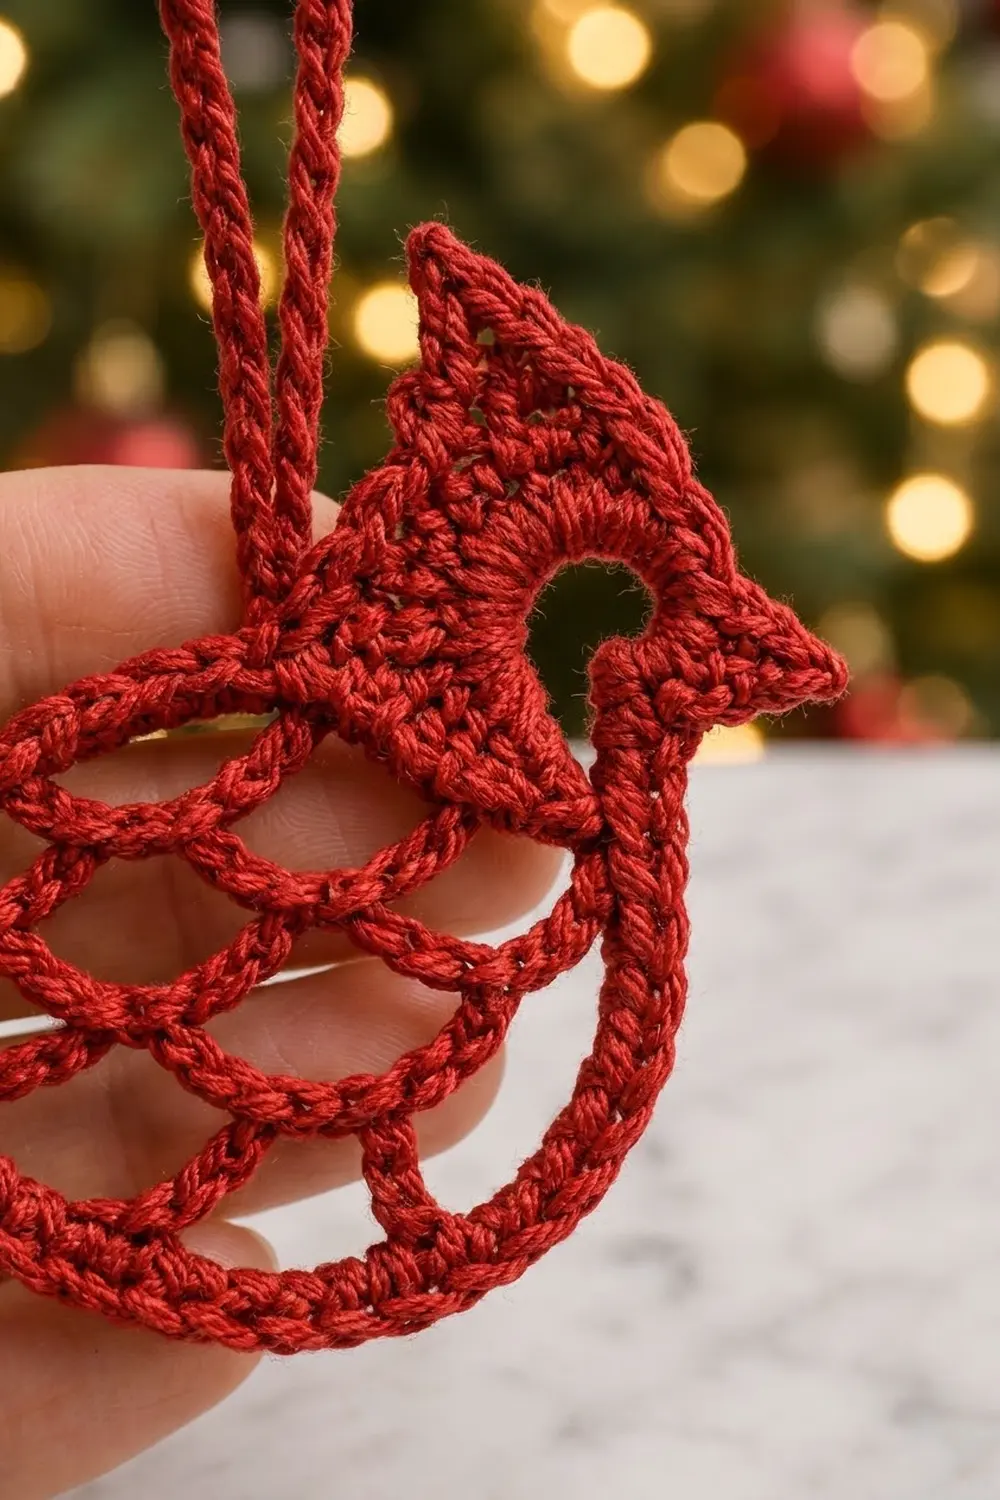
The design uses one color only: a bright cardinal red cotton thread. The solid head carries all the character, with a tall jagged crest, a pointed beak, and a little open eyelet for the eye. Everything else is a corded outline and stacked scallops.
This pattern is written in US crochet terms. The finished ornament measures about 5 in (12.7 cm) wide and 3.5 in (8.9 cm) tall, not counting the hanging loop.
Most of the work is continuous and the construction is simple. You work the head in the round, build the body frame and two tail loops from foundation single crochet, fill the body with four rows of corded arches, add one edging round around the body, and finish with a hanging loop.
Finished Size and Construction
- Finished size: 5 in (12.7 cm) wide x 3.5 in (8.9 cm) tall
- Skill level: Intermediate
- Terminology: US crochet terms
- Yarn weight: Size 3 cotton crochet thread
- Hook: 2.25 mm (US B-1)
- Number of pieces: 1
- Layout: Single flat ornament, bird in profile facing right
- Piece size before border: 4.75 in (12.1 cm) x 3.25 in (8.3 cm)
- Head size: 1 in (2.5 cm) across after Round 3
- Border depth: 1 round of sc, about 1/8 in (0.3 cm)
Materials
Choose a firmly twisted, mercerized cotton thread in size 3. Mercerized cotton gives the outline its crisp, corded look and holds the arches open after blocking. Avoid fuzzy or very soft yarn because it blurs the lattice.
- Cardinal red, size 3 cotton thread: 15 g, about 25 m
These quantities include a margin of about 20%. One ornament uses roughly 21 m (13 g), so one standard ball makes many cardinals.
Tools:
- 2.25 mm (US B-1) crochet hook
- Tapestry needle
- Locking stitch markers (4 or 5)
- Small sharp scissors
- Blocking mat or foam board, and rust-proof pins
- Spray bottle with water
- Optional: spray starch for a stiffer ornament
Abbreviations (US Terms)
- ch – chain
- sl st – slip stitch
- sc – single crochet
- hdc – half double crochet
- dc – double crochet
- tr – treble crochet
- fsc – foundation single crochet
- st(s) – stitch(es)
- sk – skip
- [ ] – repeat the steps in brackets the stated number of times
Special stitches:
fsc (foundation single crochet): Ch 2, insert hook in 2nd ch from hook, yarn over, pull up a loop, yarn over, pull through 1 loop (this is the “chain” of the stitch), yarn over, pull through 2 loops. For each following fsc, insert hook in the “chain” of the previous fsc and repeat. When you start fsc from an existing stitch, insert the hook into that stitch for the first fsc. Each fsc has a chain edge and an sc edge. Together they make the thick cord you see on the outline and arches.
Spike-L (large point): Ch 6, sl st in 2nd ch from hook, sc in next ch, hdc in next ch, dc in next ch, tr in last ch. (5 sts along the point.)
Spike-S (small point): Ch 4, sl st in 2nd ch from hook, sc in next ch, hdc in last ch. (3 sts along the point.)
Center of an arch: The space between the 3rd and 4th fsc of a 6-fsc arch.
Gauge and Checkpoints
Gauge: 8 sc or 8 fsc = 1 in (2.5 cm) in size 3 thread with a 2.25 mm hook.
Use the head as your gauge test. It takes only a few minutes and tells you whether your tension will give the right size.
Checkpoints:
- After Round 3: the head circle measures 1 in (2.5 cm) across.
- After Round 4: the head measures about 1.5 in (3.8 cm) from back of head to beak tip.
- Back frame (24 fsc): 3 in (7.6 cm) long.
- Belly frame (28 fsc): 3.5 in (8.9 cm) long, following its curve.
- Before edging: 4.75 in (12.1 cm) x 3.25 in (8.3 cm).
- After edging and blocking: 5 in (12.7 cm) x 3.5 in (8.9 cm).
If your head is too big: go down to a 2.0 mm hook. If too small: go up to a 2.5 mm hook. An error of 1/8 in (0.3 cm) on the head circle grows to about 1/2 in (1.3 cm) across the whole bird, so fix it now.
Head
You work the head in the round, and the ring in the center becomes the eye. With the right side facing and the bird facing right, Round 4 starts at the back of the neck. It goes down around the chest, forward to the beak, over the crown and crest, and back to the neck.
Round 1: Ch 4, sl st in first ch to form a ring. Ch 1, 12 sc in ring. Sl st in first sc to join. (12 sts)
Keep the ring open and don’t pull the tail tight. This hole is the eye.
Round 2: Ch 1, [sc in next st, 2 sc in next st] 6 times. Sl st in first sc. (18 sts)
Round 3: Ch 1, [sc in next 2 sts, 2 sc in next st] 6 times. Sl st in first sc. (24 sts)
Checkpoint: 1 in (2.5 cm) across. Turn the circle so the join sits at the left side, which is the back of the neck. The eye is now in the middle, and Round 4 shapes the head so the beak lands slightly forward of the eye.
Round 4 (shaping round): Ch 1. Number the Round 3 sts from 1 to 24 and work as follows:
- Sc in sts 1–11 (back of neck, chest and throat).
- Hdc in st 12, Spike-L, hdc in st 13 (beak).
- Sc in sts 14–16 (forehead).
- Hdc in st 17, dc in st 18, Spike-L, dc in st 19, Spike-S, dc in st 20, hdc in st 21 (crest).
- Sc in sts 22–24 (back of crown).
- Sl st in first sc to join.
Count: 11 + 2 + 3 + 5 + 3 = 24 base sts, plus 3 points: Spike-L beak (5 sts), Spike-L crest (5 sts) and Spike-S crest (3 sts), for 13 point sts. Total 37 sts.
The large crest point stands tallest at the front of the crown, and the small point trails behind it. This gives the crest its jagged, swept-back look. Do not fasten off.
Place markers in st 1 (back of neck), st 3, st 5, and st 7 (lower chest). These are your anchor points.
Body Frame and Tail
The frame is one continuous cord of fsc. It runs from the back of the neck out to the tail and back along the belly.
Back: Starting in head st 1, fsc 24. (24 fsc)
Place a marker in the 24th fsc. This is the tail junction. Checkpoint: 3 in (7.6 cm).
Upper tail loop: Fsc 14, sl st in the 24th back fsc (tail junction). (14 fsc)
Lower tail loop: Fsc 14, sl st in the same tail junction st. (14 fsc)
Lay the two loops side by side, with the lower one angled slightly downward. Each loop is a long, narrow oval just under 1 in (2.5 cm) long.
Belly: Fsc 28, curving the cord down and around, then sl st in head st 7 (lower chest marker). (28 fsc)
Checkpoint: 3.5 in (8.9 cm) along the curve.
Frame total: 24 + 14 + 14 + 28 = 80 fsc. Fasten off.
Number the back fsc 1–24 from the head toward the tail. Number the belly fsc 1–28 from the tail toward the head. Work the lattice into the inner edge of the frame, which is the edge facing into the body.
Feather Lattice
Four rows of corded arches fill the body. Each row anchors into the centers of the arches above it, so the arches stack like scales or feathers.
Row 1 (toward tail): Join thread with sl st in back fsc 3. [Fsc 6, sk next 4 back sts, sl st in next back st] 4 times. (4 arches, 24 fsc)
The arches anchor at back sts 3, 8, 13, 18, and 23 and hang just below the back line. Do not fasten off.
Row 2 (toward head): Fsc 4, sl st in center of arch 4 (the arch at the tail end). [Fsc 6, sl st in center of next arch] 3 times. Fsc 4, sl st in head st 3. (3 full arches + 2 half arches, 26 fsc)
Count: 4 + 18 + 4 = 26.
Row 3 (toward tail): Fsc 4, sl st in center of the first full arch of Row 2 (the one nearest the head). [Fsc 6, sl st in center of next full arch] 2 times. Fsc 6, sl st in tail junction. (1 half arch + 3 full arches, 22 fsc)
Count: 4 + 12 + 6 = 22.
Row 4 (toward head, tacking row): This row zigzags between the Row 3 arches and the belly.
- Fsc 3, sl st in belly st 5.
- Fsc 3, sl st in center of the Row 3 arch at the tail end.
- Fsc 3, sl st in belly st 12.
- Fsc 3, sl st in center of next Row 3 arch.
- Fsc 3, sl st in belly st 19.
- Fsc 3, sl st in center of next Row 3 arch.
- Fsc 3, sl st in belly st 26.
- Fsc 3, sl st in head st 5.
(8 segments x 3 fsc = 24 fsc) Fasten off.
Lattice total: 24 + 26 + 22 + 24 = 96 fsc.
Checkpoint: before edging, the bird measures 4.75 in (12.1 cm) x 3.25 in (8.3 cm). The arches should lie flat without pulling the back or belly inward.
Border
The border is one round of sc worked only around the outside of the body and tail. The head already has its finished edge from Round 4.
Border gauge: 8 sc = 1 in (2.5 cm), the same as the fsc frame.
Border round: With the right side facing, join with sl st in head st 1. Work into the outer edge of the frame, which is the edge away from the lattice:
- Back: Sc in each of the 24 back fsc. (24 sc)
- Upper tail loop: Sc in first 6 fsc, 2 sc in each of next 2 fsc (the tip), sc in last 6 fsc. (14 worked 1-per-stitch + 2 added = 16 sc)
- Lower tail loop: Work as upper tail loop. (14 + 2 = 16 sc)
- Belly: Sc in each of the 28 belly fsc. (28 sc)
- Sl st in head st 7. Fasten off.
Border total: 24 + 16 + 16 + 28 = 84 sc. That is the 80 frame sts worked 1-per-stitch plus 4 increases at the tail tips.
Why the math works: One sc per fsc keeps the border exactly as long as the frame, so the back and belly stay flat instead of ruffling or cupping. Each tail tip turns a full 180 degrees, so it needs 2 extra sts to round the curve. The single round adds 1/8 in (0.3 cm) on every outer edge. This takes the bird from 4.75 in (12.1 cm) x 3.25 in (8.3 cm) to 5 in (12.7 cm) x 3.5 in (8.9 cm).
Hanging Loop
Join with sl st in head st 22, at the back of the crown just behind the small crest point. Ch 20, sl st in the same st. Fasten off.
The loop hangs about 1.25 in (3.2 cm) above the head. If you want a thicker cord that matches the outline, work 1 sc in each ch back along the loop before joining.
Final Blocking
- Weave in all ends along the back of the frame cord, never through the arches.
- Lay the bird face down on the blocking mat.
- Mist evenly with water until damp, not soaked.
- Pin the beak tip and both crest points first, so they stay sharp.
- Pin the back line straight and the belly into a smooth curve, checking for 5 in (12.7 cm) x 3.5 in (8.9 cm).
- Pin each tail loop open into a narrow oval.
- Pin the center of every arch so each scallop is round and open.
- Open the eye eyelet with the hook tip and pin it if it has closed up.
- Optional: mist lightly with spray starch.
- Let it dry completely, at least 6 hours, before unpinning.
Final Quality-Control Checklist
- Head: 24 base sts plus 3 points; eye open and visible.
- Crest: large point in front, small point behind.
- Frame: 24 back fsc, two 14-fsc tail loops, 28 belly fsc.
- Lattice: 4 rows, 96 fsc total; Row 4 tacked to belly at sts 5, 12, 19, and 26.
- Border: 84 sc, with 2 increases at each tail tip.
- Size: 5 in (12.7 cm) x 3.5 in (8.9 cm).
- Hanging loop secure at head st 22.
- All ends hidden in the frame cord.
Troubleshooting
Head cups like a bowl: Your sc are too tight. Go up a hook size or loosen your tension in Rounds 2–3.
Crest points flop: Work the spike chains firmly and pin them hard when blocking. Starch helps.
Back line bows inward: The Row 1 arches are too short. Check that you skipped exactly 4 sts and made 6 fsc per arch.
Belly ruffles: You added extra sc in the border. Count exactly 28 belly sc.
Lattice puckers the body: Your fsc are tighter than the frame. Loosen your tension slightly on the lattice rows only.
Tail loops twist: Make sure each fsc loop is not rotated before the sl st into the tail junction.
Eye hole closed: You pulled the starting tail tight. Loosen it with the hook tip and re-block.
Care
Hand wash in cool water with mild soap, press out water in a towel, and re-block flat. Re-apply starch if you want the ornament stiff again.
Final Notes
Here is the measurement chain. The head reaches 1 in (2.5 cm) after Round 3 and about 1.5 in (3.8 cm) with its points. The 24-fsc back measures 3 in (7.6 cm), and the 28-fsc belly measures 3.5 in (8.9 cm). Before the border, the bird is 4.75 in (12.1 cm) x 3.25 in (8.3 cm). One 84-sc border round adds 1/8 in (0.3 cm) per edge, for a finished cardinal of 5 in (12.7 cm) x 3.5 in (8.9 cm).
If your head matches the gauge, every later checkpoint follows from it. Make one, hang it in the light, and you will want a whole flock.
Happy crocheting!