

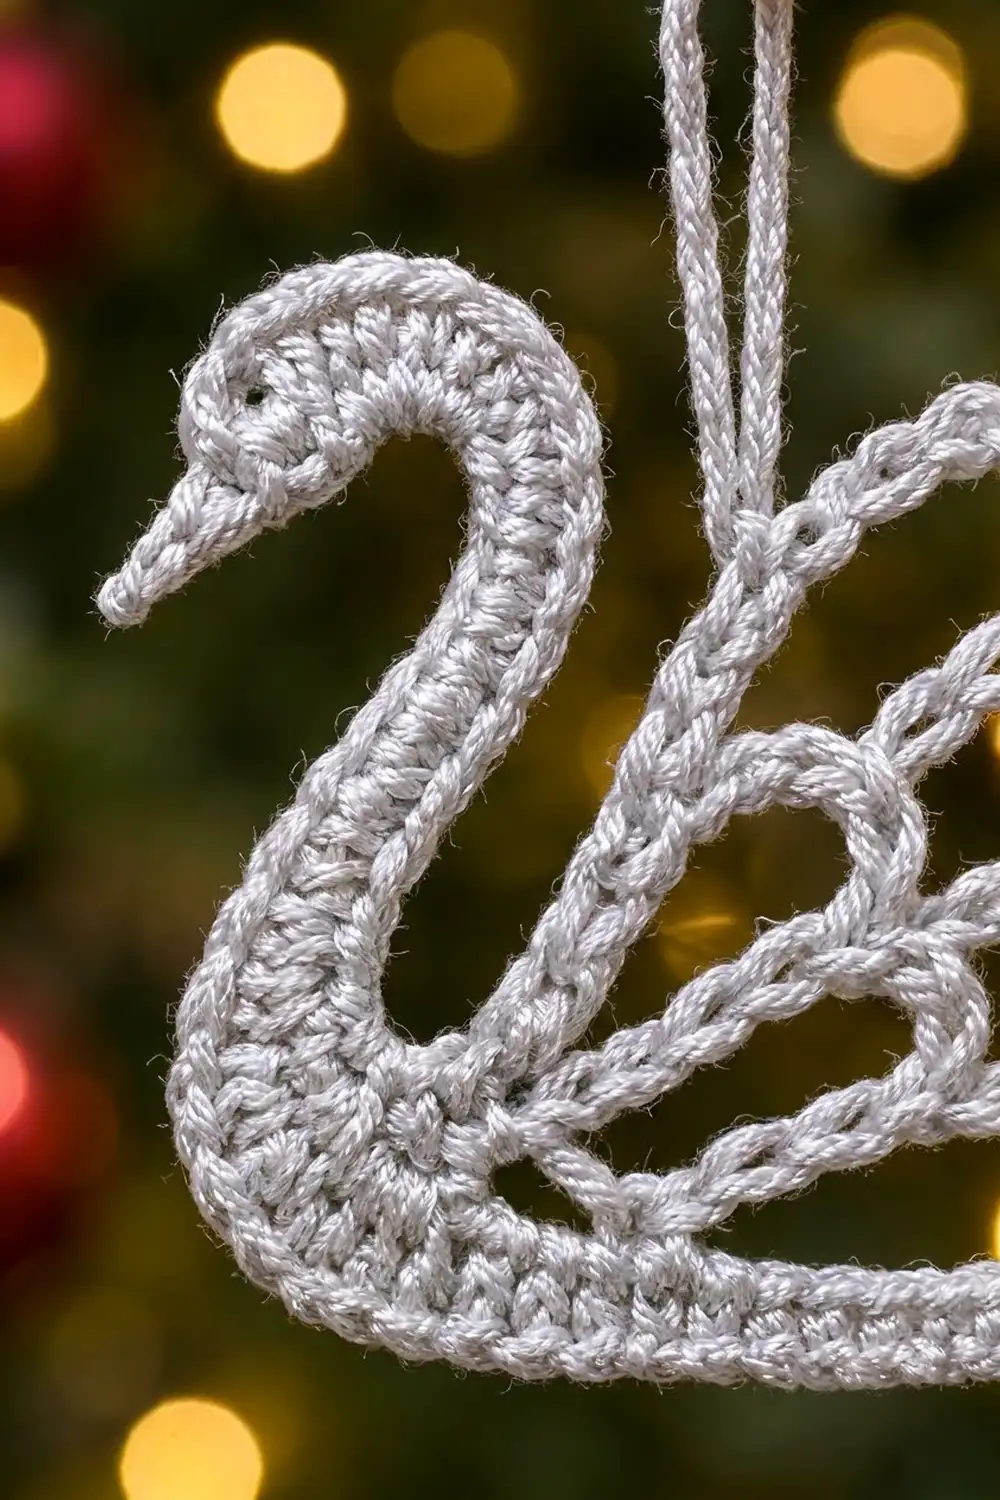
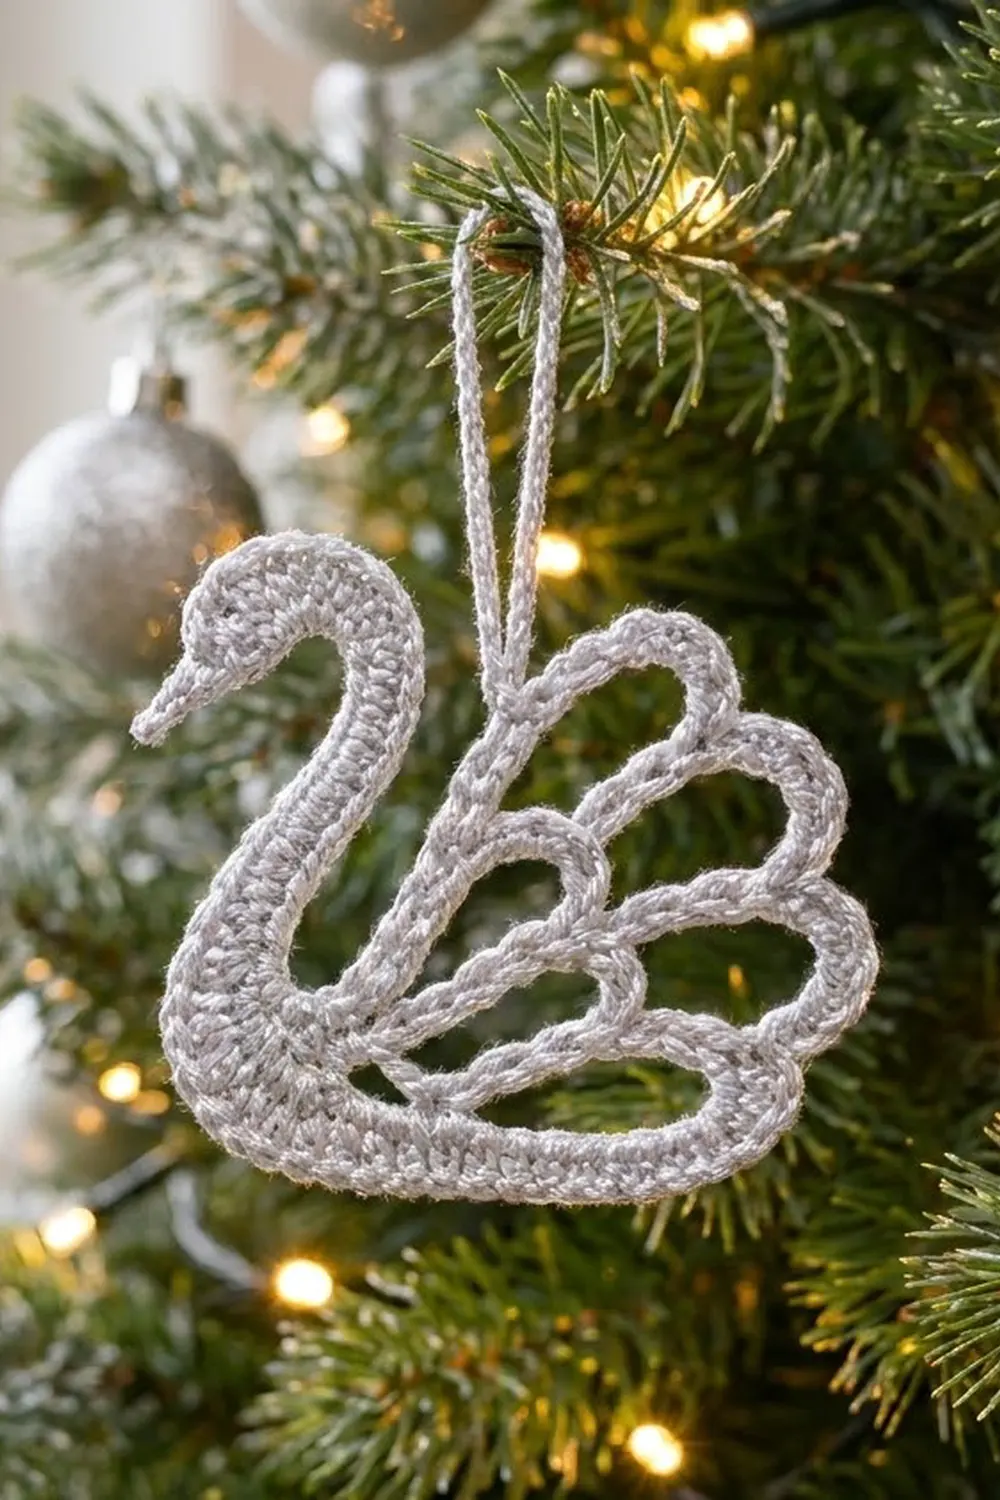
This Silver Swan Ornament is a small, elegant openwork piece with a strong outline and an airy fan-shaped wing. A solid band forms the tail, chest, neck and hooked head. Four covered chain loops spread out from the inside corner to form the feathers.
It uses one color only: a pale silver-gray fingering-weight thread with a gentle metallic sheen. The texture is simple and crisp, so the shape does the talking. It looks lovely on a tree, tied to a gift, or hung in a window.
The pattern uses US crochet terms. The finished swan measures about 3 1/4 in (8.3 cm) wide and 3 in (7.6 cm) tall, plus a hanging loop of about 1 in (2.5 cm).
You make it in three steps. First, work a core strip around both sides of a foundation chain. Next, work one shaping and edging round that curves the strip into a swan and adds the beak. Finally, add four wing loops along the inner edge. The hanging loop is built into the top wing loop.
Finished Size and Construction
- Finished size: 3 1/4 in (8.3 cm) wide x 3 in (7.6 cm) tall, plus a 1 in (2.5 cm) hanging loop
- Skill level: Intermediate
- Terminology: US crochet terms
- Yarn weight: Fingering / super fine (#1)
- Hook: 2.25 mm (US B-1)
- Number of pieces: 1 (single piece, no sewing)
- Layout: One swan outline with an attached four-loop wing fan
- Piece size: 3 1/4 in x 3 in (8.3 cm x 7.6 cm)
- Size before border: Core strip 5 1/4 in (13.3 cm) long x 1/4 in (0.6 cm) wide, laid straight
- Border depth: 1 round, about 1/8 in (0.3 cm) on each long edge, bringing the band to 1/2 in (1.3 cm) wide
Materials
Choose a smooth, tightly plied fingering-weight thread. Mercerized cotton with a metallic strand, or a cotton-and-polyester sparkle blend, gives clean stitch definition and holds the curves well. Avoid fuzzy or very stretchy yarns, because the wing loops need to keep a firm shape.
- Silver-gray (only color): 5 g, about 20 m (21.9 yd)
These amounts include a comfortable margin for a test strip, weaving in ends and small differences in tension. One 25 g ball will make several swans.
Tools:
- 2.25 mm (US B-1) crochet hook
- Tapestry needle
- Small sharp scissors
- 4 locking stitch markers
- Blocking board or foam mat
- Rust-proof pins
- Spray bottle with water
- Optional: fabric stiffener or diluted white glue
Abbreviations (US Terms)
- ch – chain
- sl st – slip stitch
- sc – single crochet
- hdc – half double crochet
- dc – double crochet
- st(s) – stitch(es)
- ch-loop – the loop formed by a chain anchored at both ends
- RS – right side
Special stitch – Beak: Ch 5, sc in 2nd ch from hook, hdc in next ch, dc in next 2 ch. This makes a small, solid cone of 4 sts that points away from the head.
Petal join: Take the hook out of the working loop. Insert the hook from front to back in the named sc of the previous petal. Pick up the dropped loop and pull it through, then continue.
Gauge and Checkpoints
Gauge: 8 sc = 1 in (2.5 cm) with a 2.25 mm hook.
Make one test swan before you make a set. A small ornament can handle a little variation, but the wing loops only sit neatly if the band is the right length.
- Checkpoint 1 (after Round 1): Lay the core strip straight. It should measure 5 1/4 in (13.3 cm) long and about 1/4 in (0.6 cm) wide.
- Checkpoint 2 (after Round 2): The band should be about 1/2 in (1.3 cm) wide and should already curve into a swan shape on its own.
- Checkpoint 3 (after the wing): Petal 1 should reach about 1 3/4 in (4.4 cm) from its base to its tip.
If the strip measures more than 5 1/2 in (14.0 cm), go down to a 2.0 mm hook. If it measures less than 5 in (12.7 cm), go up to a 2.5 mm hook. Fix your gauge here, before the wing, because the petal lengths are matched to this strip.
Part 1: Core Strip
You work the core strip around both sides of a foundation chain, starting at the tail end and finishing at the head end.
Ch 43.
Round 1 (RS): Sc in 2nd ch from hook and in next 40 ch (41 sc). Work 3 sc in last ch. Turn the piece so you can work along the other side of the foundation chain. Sc in next 40 ch. Work 2 sc in the same ch as the first sc. Join with sl st to first sc. (86 sc)
Stitch map for Round 1:
- Sts 1–41: inner edge (top of body, back of neck, top of crown)
- Sts 42–44: head end (the 3-sc group)
- Sts 45–84: outer edge (under the head, front of neck, chest, bottom of body)
- Sts 85–86: tail end
Place a marker in st 1 and in st 43. Check Checkpoint 1 now.
Part 2: Shaping and Edging Round
This single round is the border of the swan. Increases on the outer edge at the chest and on the inner edge at the crown bend the strip into its S-curve.
Round 2: Ch 1. Work the inner edge, head, outer edge and tail as follows.
Inner edge (sts 1–41):
- Sc in sts 1–33. (33 sc)
- [Sc in next st, 2 sc in next st] 4 times over sts 34–41. (12 sc)
- Inner edge total: 33 worked 1-per-stitch + 12 from the crown section = 45 sc
Head (sts 42–44):
- 2 sc in st 42.
- In st 43 work: sc, Beak, sc.
- 2 sc in st 44.
- Head total: 6 sc plus the Beak
Outer edge (sts 45–84):
- Hdc in sts 45–54 (under the head). (10 hdc)
- Hdc in sts 55–62 (front of neck). (8 hdc)
- [Hdc in next st, 2 hdc in next st] 5 times over sts 63–72 (chest). (15 hdc)
- Hdc in sts 73–84 (bottom of body). (12 hdc)
- Outer edge total: 40 worked 1-per-stitch + 5 increases = 45 hdc
Tail (sts 85–86):
- 2 sc in st 85, 2 sc in st 86.
- Tail total: 4 sc
Join with sl st to first sc. Fasten off and weave in the starting tail.
Round 2 total: 100 sts (45 + 6 + 45 + 4), plus the Beak.
Lay the piece RS up. Bend the strip so the chest increases sit at the bottom-left curve and the crown increases curve over the top of the head. The beak should point down and to the left. Check Checkpoint 2.
Part 3: Wing Petals
The wing is four chain loops covered in sc. All four are anchored on the inner edge between Round 2 sts 12 and 23. Count Round 2 inner-edge sts from the tail end. Sts 1–33 line up one-to-one with Round 1.
With RS facing, place markers in Round 2 sts 12, 15, 18 and 21.
Petal 1 (lowest, points toward the tail): Join yarn with sl st in st 14. Ch 32, sl st in st 12. Do not turn. Work 40 sc into the ch-loop, then sl st in st 14. (40 sc)
Sc 1–20 form the lower side of the petal, and sc 21–40 form the upper side.
Move over: Sl st in next 3 sts (sts 15, 16 and 17).
Petal 2: Ch 30, sl st in st 15. Do not turn. Work 10 sc into the ch-loop. Make a Petal join into sc 30 of Petal 1. Work 28 sc into the ch-loop, then sl st in st 17. (38 sc)
Move over: Sl st in sts 18, 19 and 20.
Petal 3: Ch 28, sl st in st 18. Do not turn. Work 9 sc into the ch-loop. Make a Petal join into sc 29 of Petal 2. Work 27 sc into the ch-loop, then sl st in st 20. (36 sc)
Move over: Sl st in sts 21, 22 and 23.
Petal 4 and Hanging Loop (highest, points up): Ch 26, sl st in st 21. Do not turn. Work 9 sc into the ch-loop. Make a Petal join into sc 27 of Petal 3. Work 8 more sc into the ch-loop, which brings you to the tip with 17 sc made. Ch 20, then sl st in the top of the last sc made to form the hanging loop. Work 17 sc into the rest of the ch-loop, then sl st in st 23. (34 sc, plus a ch-20 hanging loop)
Fasten off and weave in the end along the back of the inner edge.
Each petal has about 1 1/4 times as many sc as chains (32 ch to 40 sc, 30 to 38, 28 to 36, 26 to 34). That ratio lets the stitches round the tip of the teardrop without ruffling. Check Checkpoint 3. Petal 1 should measure about 1 3/4 in (4.4 cm), Petal 2 about 1 5/8 in (4.1 cm), Petal 3 about 1 1/2 in (3.8 cm) and Petal 4 about 1 3/8 in (3.5 cm).
Border
The border of this design is Round 2, which you worked in Part 2. This section gathers its numbers in one place so you can check your work.
Border gauge: One round, about 1/8 in (0.3 cm) on each long edge. Sc on the inner edge keeps it flat for the wing anchors. Hdc on the outer edge gives the body a slightly fuller bottom line.
Counts per side:
- Inner edge: 41 Round 1 sts become 45 sc (33 + 12)
- Head: 3 Round 1 sts become 6 sc plus the Beak
- Outer edge: 40 Round 1 sts become 45 hdc (10 + 8 + 15 + 12)
- Tail: 2 Round 1 sts become 4 sc
- Total: 86 sts become 100 sts plus the Beak
Why the math works: A curving strip only needs extra stitches on the outside of each curve. At the chest, the outside of the curve is the outer edge, so the 5 increases go there. At the crown, the outside of the curve is the inner edge, so the 4 increases go there. The two curves bend in opposite directions, so their increases sit on opposite edges, and that gives the neck its S shape. The head and tail ends each double their stitches (3 to 6 and 2 to 4) so they turn smoothly, like the ends of an oval.
Final Blocking
- Weave in all ends before blocking and trim them close.
- Spray the swan lightly with water until it is damp but not dripping.
- Lay it RS up on the blocking board.
- Pin the tail tip, the chest curve and the top of the crown first. Check that the swan is 3 1/4 in (8.3 cm) wide and 3 in (7.6 cm) tall.
- Pin the beak so it points down and to the left.
- Open each petal into a teardrop and pin each tip. Fan them out from Petal 1 (toward the tail) to Petal 4 (pointing up).
- Pin the hanging loop straight up so it lies flat.
- For a stiffer ornament, brush on fabric stiffener or diluted glue, then pin it again.
- Let it dry completely, at least 12 hours, before you remove the pins.
Final Quality-Control Checklist
- The band is an even 1/2 in (1.3 cm) wide all around, with no gaps at the chest.
- The beak is firm and points down and to the left.
- Round 2 counts are 45 inner, 6 head plus the Beak, 45 outer and 4 tail.
- All four petals are anchored between sts 12 and 23 and fan out evenly.
- Each petal join lies flat with no puckering.
- The hanging loop rises from the tip of Petal 4 and is centered above the wing.
- The finished size is 3 1/4 in x 3 in (8.3 cm x 7.6 cm).
- All ends are hidden and the piece lies flat.
Troubleshooting
The strip curls into a spiral instead of an S-curve. Check that the chest increases are on the outer edge and the crown increases are on the inner edge.
The petal tips ruffle. There are too many sc for the loop. Work 2 fewer sc per petal, or tighten your sc slightly.
The petals pull tight and buckle the band. Add 2 sc per petal, or chain a little more loosely.
The beak flops. Work it tightly, and add a dab of stiffener at its base when blocking.
Gaps show at the head end. Pull the 3-sc group in Round 1 snug, and keep the Round 2 increases tight.
The wing tilts too far right. While the piece is damp, pin Petal 1 lower along the body and Petal 4 closer to the neck.
Care
Spot clean with cool water and mild soap, then pin flat to dry. Store the swan flat in a box between holiday seasons so the loops keep their shape.
Final Notes
The whole swan depends on a short chain of measurements. Get the core strip to 5 1/4 in (13.3 cm) at 8 sc per 1 in (2.5 cm). Round 2 brings the band to 1/2 in (1.3 cm) wide with 100 sts and shapes the swan as you go. The four petals range from 1 3/8 in (3.5 cm) to 1 3/4 in (4.4 cm). Together they give a finished ornament of 3 1/4 in x 3 in (8.3 cm x 7.6 cm). If each stage measures correctly, the finished swan will too.
Happy crocheting!