

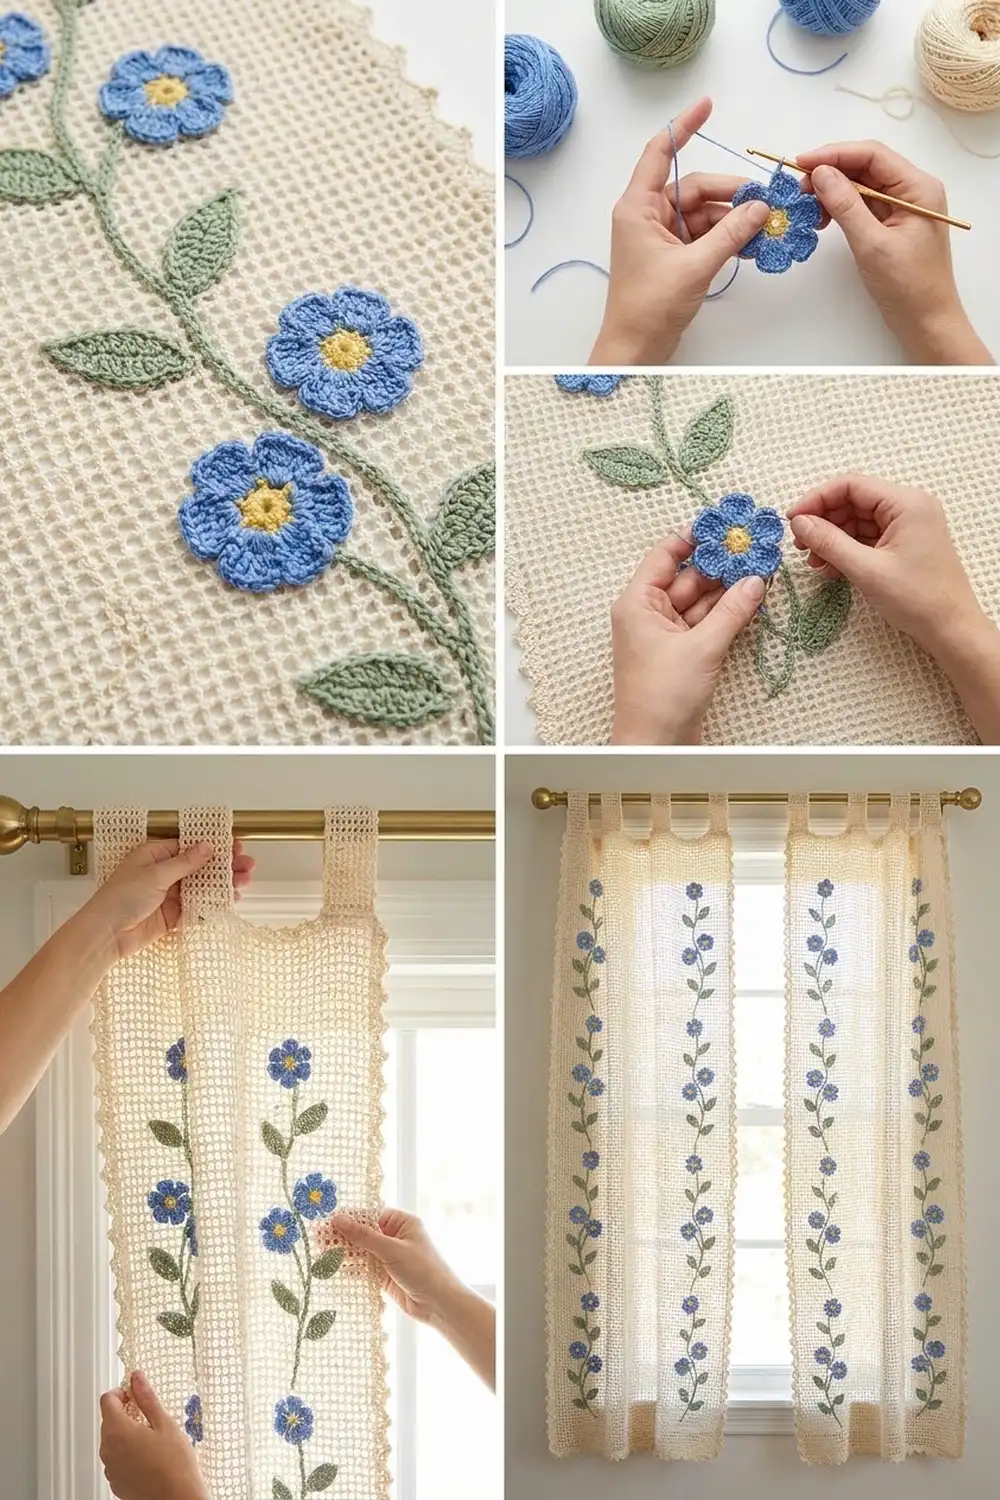
This curtain panel is a soft cream filet mesh with climbing vines of tiny blue flowers. Each flower has five rounded petals and a butter-yellow center, and sage-green leaves sit along a slender green stem. The bottom edge is a lacy scalloped hem, and solid tabs at the top slide straight onto a curtain rod.
The look is cottage-romantic but light. The open mesh lets daylight through, and the appliqués add color without weighing the fabric down. You’ll use four colors: cream, cornflower blue, soft yellow and sage green.
The pattern uses US crochet terms. One finished panel is 24.5 in (62.2 cm) wide and 49 in (124.5 cm) long, measured from the top edge to the scallop points. The tab loops add 2.5 in (6.4 cm), so the total hanging height is 51.5 in (130.8 cm). The photo shows a matching pair, so you make two identical panels.
The construction is simple. You work the mesh in rows from the hem up. Then you add one round of single crochet border, three rows of scallops along the bottom and seven tabs along the top. Finally, you work the vines in surface slip stitch and sew on the flowers and leaves.
Finished Size and Construction
- Finished panel size: 24.5 in x 49 in (62.2 cm x 124.5 cm), plus 2.5 in (6.4 cm) tab loops
- Skill level: Intermediate
- Terminology: US crochet terms
- Yarn weight: DK / light worsted (#3) cotton
- Hook: 4.0 mm (G-6)
- Number of pieces: 2 separate panels. Each panel is 1 mesh piece with 27 flowers and 54 leaves sewn on.
- Layout: 3 vertical vines per panel, 8 in (20.3 cm) apart
- Mesh size before border: 48 squares x 94 rows = 24 in x 47 in (61.0 cm x 119.4 cm)
- Border depth: 0.25 in (0.6 cm) on the sides and top. At the hem it’s 1.75 in (4.4 cm): the 0.25 in (0.6 cm) round plus 1.5 in (3.8 cm) of scallops.
Materials
Use a smooth mercerized or combed cotton in DK weight. Cotton gives crisp mesh, blocks well and won’t sag under its own weight the way acrylic can. The quantities below are for two panels, based on about 125 m per 50 g.
- Cream (main color): 350 g / 875 m
- Cornflower blue (petals): 50 g / 125 m
- Soft yellow (flower centers): 20 g / 50 m
- Sage green (leaves and vines): 50 g / 125 m
All quantities include a margin of roughly 15% for gauge differences and swatching.
Tools:
– 4.0 mm (G-6) crochet hook
– Tapestry needle
– Rustproof pins and a blocking surface at least 25 x 50 in (63.5 x 127.0 cm)
– About 20 stitch markers
– Measuring tape
Abbreviations (US Terms)
- ch – chain
- sl st – slip stitch
- sc – single crochet
- hdc – half double crochet
- dc – double crochet
- sk – skip
- sp – space
- st(s) – stitch(es)
- RS / WS – right side / wrong side
Surface slip stitch: Hold the yarn behind the work. Insert the hook from front to back through a mesh space, yarn over, and pull a loop through the fabric and through the loop on your hook.
Picot: Ch 3, then sl st in the 3rd ch from the hook.
Gauge and Checkpoints
Gauge: 8 mesh squares and 8 rows = 4 in (10.2 cm). Each square is 3 sts wide, so this works out to 6 sts per inch. Single crochet is also worked at 6 sc per inch.
Test one piece first. Ch 27 and work Row 1 (25 dc). Then work 7 mesh rows as written below, which gives you 8 squares across. Block the swatch, let it dry and measure it. It should be 4 x 4 in (10.2 x 10.2 cm).
Checkpoints:
– After Row 1: 145 sts, 24 in (61.0 cm) wide
– After Row 20: 10 in (25.4 cm) tall
– After Row 94: 24 x 47 in (61.0 x 119.4 cm)
– After Border Round 1: 24.5 x 47.5 in (62.2 x 120.7 cm)
– After the scallops: 24.5 x 49 in (62.2 x 124.5 cm)
If your swatch is too big, go down 0.5 mm. If it’s too small, go up 0.5 mm. If only the height is off, change how far you pull up the first loop of each dc. Taller dc make taller rows.
Mesh Panel
With cream, ch 147.
Row 1 (RS): Dc in the 4th ch from the hook and in each ch across. The skipped ch-3 counts as a dc. Turn. (145 sts)
Row 2: Ch 5 (counts as dc + ch 2). Sk 2 sts and dc in the next st. Ch 2, sk 2 sts, dc in the next st 47 times. Your last dc goes in the top of the turning ch. Turn. (48 squares: 49 dc + 48 ch-2 sps)
Rows 3–93: Ch 5 (counts as dc + ch 2). Sk the ch-2 sp and dc in the next dc. Ch 2, dc in the next dc across, working the last dc in the 3rd ch of the turning ch-5. Turn. (48 squares)
Every row should have exactly 49 vertical dc posts. Count them every 10 rows.
Row 94 (WS): Ch 3 (counts as dc). 2 dc in the next ch-2 sp, dc in the next dc 48 times, working the last dc in the 3rd ch of the turning ch-5. Don’t fasten off. (145 sts: 1 + 48 x 3)
You now have 94 rows of 0.5 in (1.3 cm) each, for 47 in (119.4 cm).
Border
Border gauge: 6 sc per inch on every edge. Each dc row end is 0.5 in (1.3 cm) tall, so 3 sc per row end gives exactly 6 sc per inch along the sides.
Round 1 (RS): Ch 1 and turn.
– Top: 3 sc in the first st, sc in the next 143 sts, 3 sc in the last st. (149 sts)
– Side: 3 sc in each of the 94 row ends. (282 sc)
– Bottom: Work into the base of the Row 1 sts. 3 sc in the first st, sc in the next 143 sts, 3 sc in the last st. (149 sts)
– Side: 3 sc in each of the 94 row ends. (282 sc)
Join with a sl st to the first sc and fasten off. (862 sts: 149 + 282 + 149 + 282)
The top and bottom counts of 149 come from the 145 edge sts plus 2 extra sc at each end, since every corner gets 3 sc. Mark the center sc of each corner group.
The math works because the panel is 47 in (119.4 cm) long and 47 x 6 = 282 sc. The 145 sts across match the 24 in (61.0 cm) width at 6 per inch. That means the edges neither ruffle nor pull in.
Scalloped Hem
You’ll work the scallops over the 145 sts between the two bottom corner-center sts. With the RS facing, join cream in the first sc after one bottom corner center.
Scallop Row 1 (RS): Ch 1, sc in the same st. Sk 5 sts, 9 dc in the next st, sk 5 sts, sc in the next st 12 times. Turn. (121 sts: 12 fans of 9 dc + 13 sc)
Each repeat uses 12 sts, and 1 + (12 x 12) = 145, so the repeats fit exactly. Twelve scallops at 2 in (5.1 cm) each span 24 in (61.0 cm).
Scallop Row 2: Ch 1, sl st in the first sc. [Dc in the next dc, ch 1] 8 times, dc in the next dc, sl st in the next sc 12 times. Turn. (217 sts: 12 x (9 dc + 8 ch-1 sps) + 13 sl sts)
Scallop Row 3: Ch 1, sl st in the first sl st. Sc in the next dc, [(sc, picot, sc) in the next ch-1 sp, sc in the next dc] 8 times, sl st in the next sl st 12 times. Fasten off. (Each scallop has 25 sc and 8 picots, for 300 sc, 96 picots and 13 sl sts in total)
The hem should be 1.5 in (3.8 cm) deep at each scallop point.
Tabs
The tabs go across the 147 top sts, counting from one corner-center st to the other and including both. You’ll make 7 tabs of 9 sts with 6 gaps of 14 sts between them: (7 x 9) + (6 x 14) = 63 + 84 = 147. Mark the first st of each tab: sts 1, 24, 47, 70, 93, 116 and 139.
Tab Row 1: With the RS facing, join cream in a marked st. Ch 1, then sc in the same st and the next 8 sts. Turn. (9 sc)
Tab Rows 2–25: Ch 1, sc in each st across, turn. (9 sc)
Each tab strip should measure 1.5 x 5 in (3.8 x 12.7 cm). Fold it to the WS and whipstitch the last row along the WS of Row 94 to form a 2.5 in (6.4 cm) loop.
Make All Pieces
Flower (make 27 per panel, 54 in total)
With yellow, make a magic ring.
Rnd 1: Ch 1, then work 10 sc in the ring. Join and change to blue. (10 sc)
Rnd 2: Ch 1, 2 sc in each st, join. (20 sc)
Rnd 3: Sc in the next st, (hdc, 2 dc) in the next st, (2 dc, hdc) in the next st, sc in the next st 5 times. Join and fasten off. (5 petals of 8 sts, 40 sts in total)
The pair of sc between each two petals creates the small dips that separate them. Each flower is 2 in (5.1 cm) across.
Leaf (make 54 per panel, 108 in total)
With green, ch 7.
Side 1: Sc in the 2nd ch from the hook, hdc in the next ch, dc in the next 2 ch, hdc in the next ch, sc in the last ch. (6 sts)
Side 2: Ch 2 for the point. Rotate and work into the free loops of the foundation ch: sc in the first ch, hdc in the next ch, dc in the next 2 ch, hdc in the next ch, sc in the last ch. Ch 2 for the second point, then sl st to the first sc. Fasten off, leaving a 6 in (15.2 cm) tail. (12 sts + 2 ch-2 points)
Each leaf is 1.25 in (3.2 cm) long.
Repeat the Mesh Panel, Border, Scalloped Hem and Tabs sections to make the second panel.
Layout Grid (one panel, RS facing)
Number the dc posts 1 to 49 from left to right. Center the vines on posts 9, 25 and 41. This puts each outer vine 8 squares (4 in / 10.2 cm) in from its edge, with 16 squares (8 in / 20.3 cm) between vines.
Row 90   L L      L L      L L     (vine tips)
Row 86    F        F        F
Row 81   L L      L L      L L
 ...   (flower every 10 rows, leaf pair between)
Row 11   L L      L L      L L
Row  6    F        F        F
Row  3    |        |        |      (vine starts)
        post 9   post 25  post 41
- Flowers (F): Rows 6, 16, 26, 36, 46, 56, 66, 76 and 86, for 9 per vine
- Leaf pairs (L L): Rows 11, 21, 31, 41, 51, 61, 71, 81 and 90, for 18 leaves per vine
Attaching the Appliqués
Vines: With green and the RS facing, work surface slip stitch up the mesh spaces from Row 3 to Row 90, with 1 sl st per row (88 sl sts). Work 4 rows in the space to the left of the post, then 4 rows in the space to the right, and keep alternating. This makes a gentle wave of 22 segments.
Keep your tension relaxed. Each sl st should lie flat across its space without pulling the posts together. After each vine, check that the panel still measures 24 in (61.0 cm) wide.
Flowers: Center each flower over the vine at its marked row. With a split strand of cream yarn, sew it down through the dips between the petals and around Rnd 2. This leaves the petals free.
Leaves: Angle each pair upward, one on each side of the stem, with the leaf bases touching the vine. Whipstitch around each leaf’s edge using its tail.
Weave all ends along the dc posts so both sides of the curtain look clean.
Final Blocking
- Soak the panel in cool water for 15 minutes.
- Roll it in a towel to press out the water. Don’t wring it.
- Lay the panel flat with the RS up and pin the body to 24.5 x 47.5 in (62.2 x 120.7 cm).
- Pin each of the 12 scallop points so the panel measures 49 in (124.5 cm) long.
- Lay a straightedge along each vine column so the mesh lines stay vertical.
- Lift the flower petals slightly with your fingertips.
- Let it dry completely, which takes 24–48 hours. Leave the tabs unpinned.
Final Quality-Control Checklist
- Row 94 has 145 sts, and every mesh row has 49 posts.
- Border Round 1 has 862 sts: 149 / 282 / 149 / 282.
- There are 12 scallops, each with 8 picots.
- There are 7 evenly spaced tabs, each 9 sc wide and forming a 2.5 in (6.4 cm) loop.
- The 3 vines sit on posts 9, 25 and 41, and each has 9 flowers and 18 leaves.
- The blocked panel measures 24.5 x 49 in (62.2 x 124.5 cm).
- Both panels match within 0.5 in (1.3 cm).
Troubleshooting
The mesh leans diagonally: Use ch 5 for every turning chain, and always work the last dc into its 3rd ch.
The squares are taller than they are wide: Pull up shorter loops on your dc, or use a smaller hook.
The sides ripple after the border: Your sc is looser than 6 per inch. Rework the sides with a smaller hook instead of skipping row ends.
The sides pull in: Go up 0.5 mm for Border Round 1.
The scallops cup: Work the fan dc more loosely, and pin the scallop points firmly when you block.
The vines pucker: Pull them out and redo them with a hook one size larger.
Care
Hand wash in cool water with a mild detergent and dry flat, re-pinning the scallops if they need it. Don’t hang the panel while it’s wet, because the weight of the water stretches the mesh.

Final Notes
Every measurement in this pattern comes from the same gauge. Each mesh square is 0.5 in (1.3 cm), so 48 squares make 24 in (61.0 cm) and 94 rows make 47 in (119.4 cm). The 6-per-inch border adds 0.25 in (0.6 cm) per edge, which brings the panel to 24.5 x 47.5 in (62.2 x 120.7 cm). Twelve 2 in (5.1 cm) scallops add 1.5 in (3.8 cm) for a 49 in (124.5 cm) panel. Seven 2.5 in (6.4 cm) tab loops finish it for the rod. If you check each checkpoint along the way, both panels will hang straight and match.
Happy crocheting!