

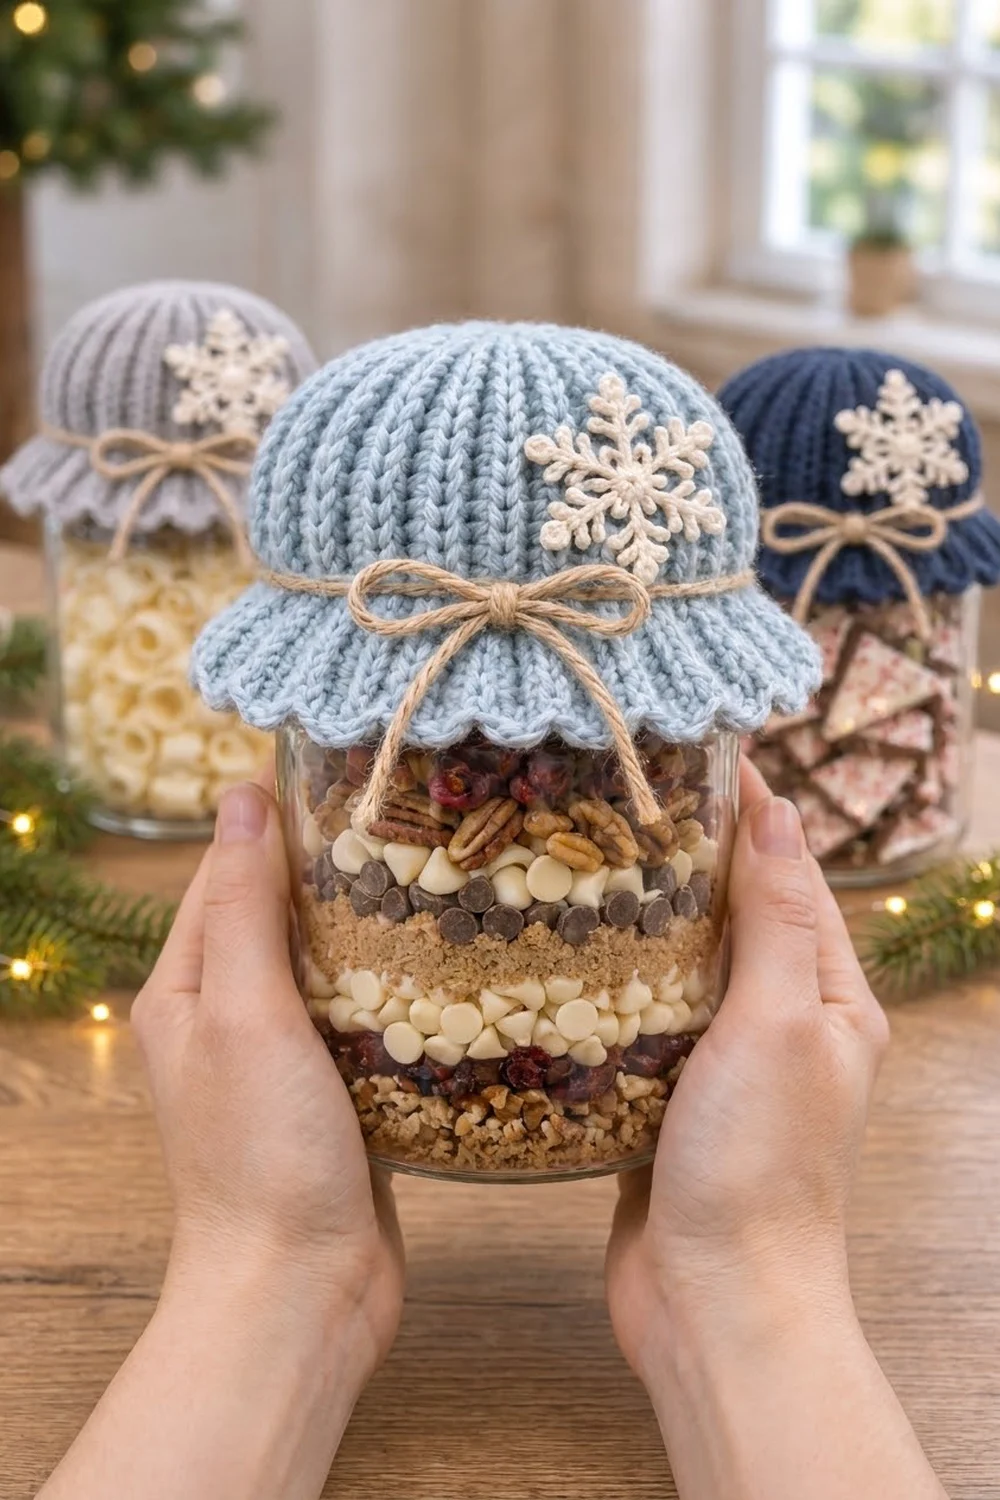
This little jar cover looks like a tiny winter hat. A ribbed dome sits over the lid, a ruffled scalloped brim flares out around the jar shoulder, and a cream snowflake appliqué sits on the upper side of the crown. Natural twine is tied in a bow around the base of the dome.
The main sample is soft powder blue with a cream snowflake and tan jute twine. The pattern looks just as good in heather gray or deep navy, so you can make a matching set for gift jars filled with cookie mix, marshmallows or candy.
The pattern uses US crochet terms. The finished cover measures 12″ (30.5 cm) around the dome unstretched and stretches to about 13″ (33.0 cm). It stands about 4.5″ (11.4 cm) tall on the jar and fits jars about 3.5″ (8.9 cm) across, such as a wide-mouth pint jar.
Construction is simple. You work the cover from the top down in joined rounds. A small dc crown comes first, then front-post ribbing forms the vertical ribs, then a flared brim ends with a scallop round. You crochet the snowflake separately in finer cotton and sew it on, then tie on the twine last.
Finished Size and Construction
- Finished size: 12″ (30.5 cm) dome circumference unstretched; 4.5″ (11.4 cm) tall on the jar; about 6.5″ (16.5 cm) across the brim edge laid flat
- Skill level: Easy-intermediate (uses post stitches)
- Terminology: US crochet terms
- Yarn weight: Worsted (#4) for the cover; DK (#3) cotton for the snowflake
- Hooks: 5.0 mm (H-8) for the cover; 3.5 mm (E-4) for the snowflake
- Number of pieces: 1 cover plus 1 snowflake appliqué
- Layout: Single piece worked in the round; no joining
- Size before the brim (border): 12″ (30.5 cm) around and 4.75″ (12.1 cm) from the center top down the side, at the end of Round 10
- Brim (border) depth: 1.25″ (3.2 cm)
Materials
Choose a smooth worsted yarn with good stitch definition so the ribs stand out. Acrylic and wool blends both work well. Light, frosty colors show the rib shadows best. Dark navy gives a bolder contrast behind the cream snowflake. For the snowflake, use a mercerized cotton DK; it holds crisp picots.
- Color A, powder-blue worsted: 45 g / 90 m (98 yd)
- Color B, cream cotton DK: 5 g / 12 m (13 yd)
- Natural jute twine: 24″ (61.0 cm)
- 5.0 mm (H-8) and 3.5 mm (E-4) crochet hooks
- Tapestry needle
- Stitch marker
- Scissors
- Spray starch (optional, for the snowflake)
- A jar about 3.5″ (8.9 cm) across, for fitting
These quantities include a margin of about 10-15% for checking gauge and weaving in ends. For a set of three covers, buy one full skein of each cover color and one small ball of cream cotton. One ball is enough for all three snowflakes.
Abbreviations (US Terms)
- ch: chain
- sl st: slip stitch
- sc: single crochet
- dc: double crochet
- FPdc: front post double crochet
- BPdc: back post double crochet
- MR: magic ring
- sk: skip
- st(s): stitch(es)
Special stitches
- FPdc: Yo. Insert the hook from front to back to front around the post of the stitch. Yo and pull up a loop, then (yo, pull through 2 loops) twice.
- BPdc: Yo. Insert the hook from back to front to back around the post, then finish as a dc.
- Picot: Ch 3, then sl st in the chain or stitch named in the instructions.
Gauge and Checkpoints
Rib gauge: 16 sts and 9 rounds = 4″ (10.2 cm) in FPdc/BPdc ribbing with the 5.0 mm hook, measured unstretched.
The cover itself is your best swatch. Work Rounds 1-5, then lay the piece flat without stretching it. Measure across the crown and around the widest round.
Checkpoints:
- After Round 1: about 1.25″ (3.2 cm) across
- After Round 2: about 2.25″ (5.7 cm) across, lying flat
- After Round 3: about 3.25″ (8.3 cm) across; the edge starts to cup into a dome
- After Round 10: 12″ (30.5 cm) around and 4.75″ (12.1 cm) from the center top down the side
- After Round 13: 6″ (15.2 cm) from the center top to the scallop edge
If the cover is too big (more than 12.5″ or 31.8 cm around at Round 10), switch to a 4.5 mm hook. If it is too small (under 11.5″ or 29.2 cm), switch to a 5.5 mm hook. Height is easy to adjust. Each rib round adds about 0.5″ (1.3 cm), so you can add or remove a round anywhere in Rounds 4-10.
Remember that ribbing stretches. The cover should feel a little snug as you ease it over the lid, then relax and grip the jar once it is on.
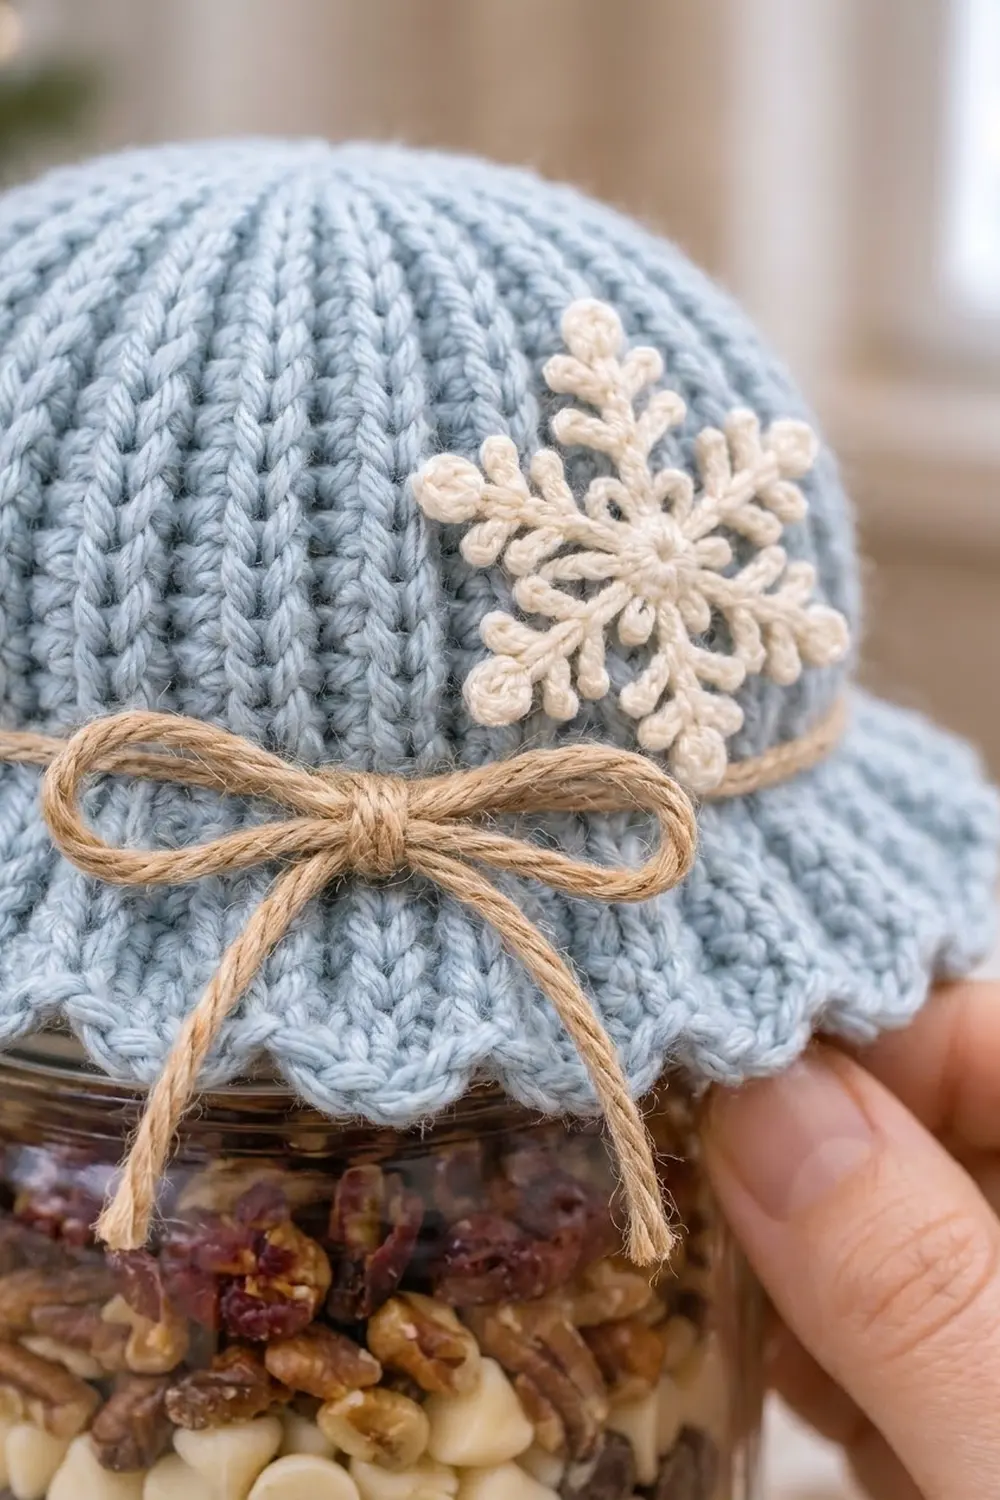
Jar Cover
Use Color A and the 5.0 mm hook. The ch 2 at the start of each round does not count as a stitch. Join each round with a sl st to the first stitch. Put a marker in the first stitch of each round so you can find the join easily.
Crown
Round 1: MR, ch 2, 12 dc in the ring. Pull the ring closed and join. (12 sts)
Round 2: Ch 2, 2 dc in each st around. Join. (24 sts)
Round 3 (growth round, sets up the ribs): Ch 2. FPdc around the post of the next st, then dc in the top of that same st; repeat from * around. Join. (48 sts: 24 FPdc + 24 dc)*
These 24 FPdc start your 24 ribs, which spread out from the top center.
Ribbed Dome
Round 4: Ch 2. FPdc around the next FPdc, BPdc around the next dc; repeat from * around. Join. (48 sts: 24 FPdc + 24 BPdc)*
Rounds 5-10: Ch 2. FPdc around the next FPdc, BPdc around the next BPdc; repeat from * around. Join. (48 sts each round)*
You now have 7 rib rounds (Rounds 4-10). The ribs pull in slightly, so the dome hugs the lid. Check that it measures 12″ (30.5 cm) around and 4.75″ (12.1 cm) down the side. Try it on the jar. The end of Round 10 should sit just below the lid ring.
Fitting tip: For a regular-mouth jar about 3″ (7.6 cm) across, use a 4.5 mm hook for the whole cover. The dome will then measure about 11″ (27.9 cm) around, and all the stitch counts stay the same.
Border: Ruffled Scallop Brim
The brim flares out as you add stitches, then ends with a scallop round.
Border gauge: In the brim’s dc fabric, 18 sts = 4″ (10.2 cm) at the base of the brim. Each brim round adds about 0.5″ (1.3 cm), and the scallop round adds about 0.25″ (0.6 cm). Together that makes the 1.25″ (3.2 cm) brim.
Round 11 (conversion round): Ch 2. FPdc around the next FPdc, 2 dc in the top of the next BPdc; repeat from * around. Join. (72 sts = 48 sts worked 1 per stitch + 24 extra)*
Round 12: Ch 2. FPdc around the next FPdc, dc in each of the next 2 dc; repeat from * around. Join. (72 sts: 24 FPdc + 48 dc)*
The FPdc ribs carry on down into the brim, so the rib lines run all the way to the scallops.
Round 13 (scallop round): Ch 1. Sc in the next st, sk 1 st, 5 dc in the next st, sk 1 st; repeat from * around. Join to the first sc. (18 scallops; 108 sts: 18 sc + 90 dc)*
Fasten off and weave in the ends.
Why the math works: A round piece has no sides, so the brim is counted in repeats. Round 10 has 24 rib pairs (48 sts). Round 11 adds 1 stitch to each pair, which gives 24 × 3 = 72. Round 13 uses a 4-stitch repeat (sc, sk, 5 dc, sk), and 72 ÷ 4 = 18 scallops with no stitches left over. Each scallop puts 6 sts over 4 base stitches, which makes the soft ruffle along the edge.
Snowflake Appliqué
Use Color B and the 3.5 mm hook.
Round 1: MR, ch 3 (counts as a dc), 11 dc in the ring. Pull the ring closed and join to the top of the ch-3. (12 sts)
Round 2 (arms): Repeat the following steps 6 times in total:
- Sl st in the next st, then ch 6. This is the arm chain.
- Tip: (ch 3, sl st in the 6th ch of the arm) 3 times. This makes a three-picot cluster.
- Sl st in each of the next 2 ch, working down the arm.
- Side branch: (ch 3, sl st in the same ch) twice.
- Sl st in each of the remaining 3 ch of the arm.
- Sl st in the next center st.
Join after the sixth arm. (6 arms; 18 tip picots and 12 side picots)
Each arm uses 2 center stitches, one before it and one after it. That gives 6 arms × 2 = 12 sts, which matches Round 1 exactly. Keep your chain tension the same for every arm so all six come out the same length.
Fasten off, leaving a 10″ (25.4 cm) tail for sewing.
The snowflake measures about 2.75″ (7.0 cm) from one tip to the opposite tip. Pin it flat, mist it with spray starch if you like, and let it dry before sewing.
Attaching the Snowflake and Twine
Place the snowflake on the upper right of the dome, with its center about 1″ (2.5 cm) below the top and off to one side. Sew it on with the cream tail. Take small stitches through the center ring and through the base and tip of each arm. Keep the stitches behind the picots so the picots stay raised.
Wrap the twine around the cover along Round 10, at the base of the dome where the brim begins. For a secure hold, weave it over and under the FPdc ribs. Put the cover on the jar, pull the twine snug and tie a bow at the front. Trim the ends to about 3″ (7.6 cm) and knot each end so it doesn’t fray. Thin satin ribbon or baker’s twine works in place of jute.
Final Blocking
- Lightly dampen the cover with a spray bottle; don’t soak it.
- Slip it over an empty jar or another rounded object about 3.5″ (8.9 cm) across.
- Gently ease the dome down so the ribs run straight from the center top.
- Spread out the brim and shape each of the 18 scallops with your fingers.
- Let it dry completely on the jar.
- Block the snowflake separately: pin each arm and tip picot flat and let it dry before you sew it on.
- If you used acrylic, hold a steam iron just above the fabric for a moment to set the shape. Don’t press the iron onto it.
Final Quality-Control Checklist
- Round 10 has 48 sts, with 24 straight FPdc ribs.
- The dome measures 12″ (30.5 cm) around, unstretched.
- Rounds 11 and 12 each have 72 sts.
- Round 13 has 18 even scallops, with no gap at the join.
- The cover stands about 4.5″ (11.4 cm) tall on the jar.
- The snowflake has 6 arms, each with a three-picot tip and a pair of side picots.
- The snowflake is sewn flat on the upper side of the dome.
- The twine sits along Round 10 and is tied in a centered bow.
- All ends are woven in securely.
Troubleshooting
The ribs spiral. You probably worked some post stitches around the wrong posts. Every FPdc must go around the FPdc directly below it.
The crown has a hole or a bump. Pull the magic ring tight before you join Round 1, then weave the tail in a circle around the center.
The dome is too shallow. Add one rib round anywhere in Rounds 4-10. Each round adds about 0.5″ (1.3 cm).
The brim won’t ruffle. Check that Round 11 really has 72 sts. If your yarn is stiff, try a 5.5 mm hook for Rounds 11-13 only.
The brim ruffles too much. Work 4 dc in each scallop of Round 13 instead of 5.
The scallops are uneven. Count stitches in Round 12. A missing stitch shifts the 4-stitch repeat and leaves a squashed scallop at the join.
The snowflake curls. Starch it and pin it flat to dry. Tight chains often cause curling, so try a hook half a size larger.
The snowflake arms are different lengths. Count the 6 arm chains on each arm before you work the tip picots.
The cover slides off. Tie the twine tighter, or weave a round of elastic thread through Round 10 on the wrong side.
The join is visible. Join into the top of the first stitch rather than the ch 2, then start the next round in that same stitch.
Care
Hand wash in cool water, press out the water with a towel, and dry the cover flat or on a jar. Remove the twine before washing.
Final Notes
Follow the measurement chain and the cover will fit. Round 1 measures 1.25″ (3.2 cm) across, the crown reaches 3.25″ (8.3 cm) at Round 3, and the dome is 12″ (30.5 cm) around by 4.75″ (12.1 cm) deep at Round 10. The brim then adds 1.25″ (3.2 cm), with 72 sts and 18 scallops, for a total of 6″ (15.2 cm) from the center top to the edge. Once one cover fits your jar, make a few more in gray or navy for a matching gift set.
Happy crocheting!