

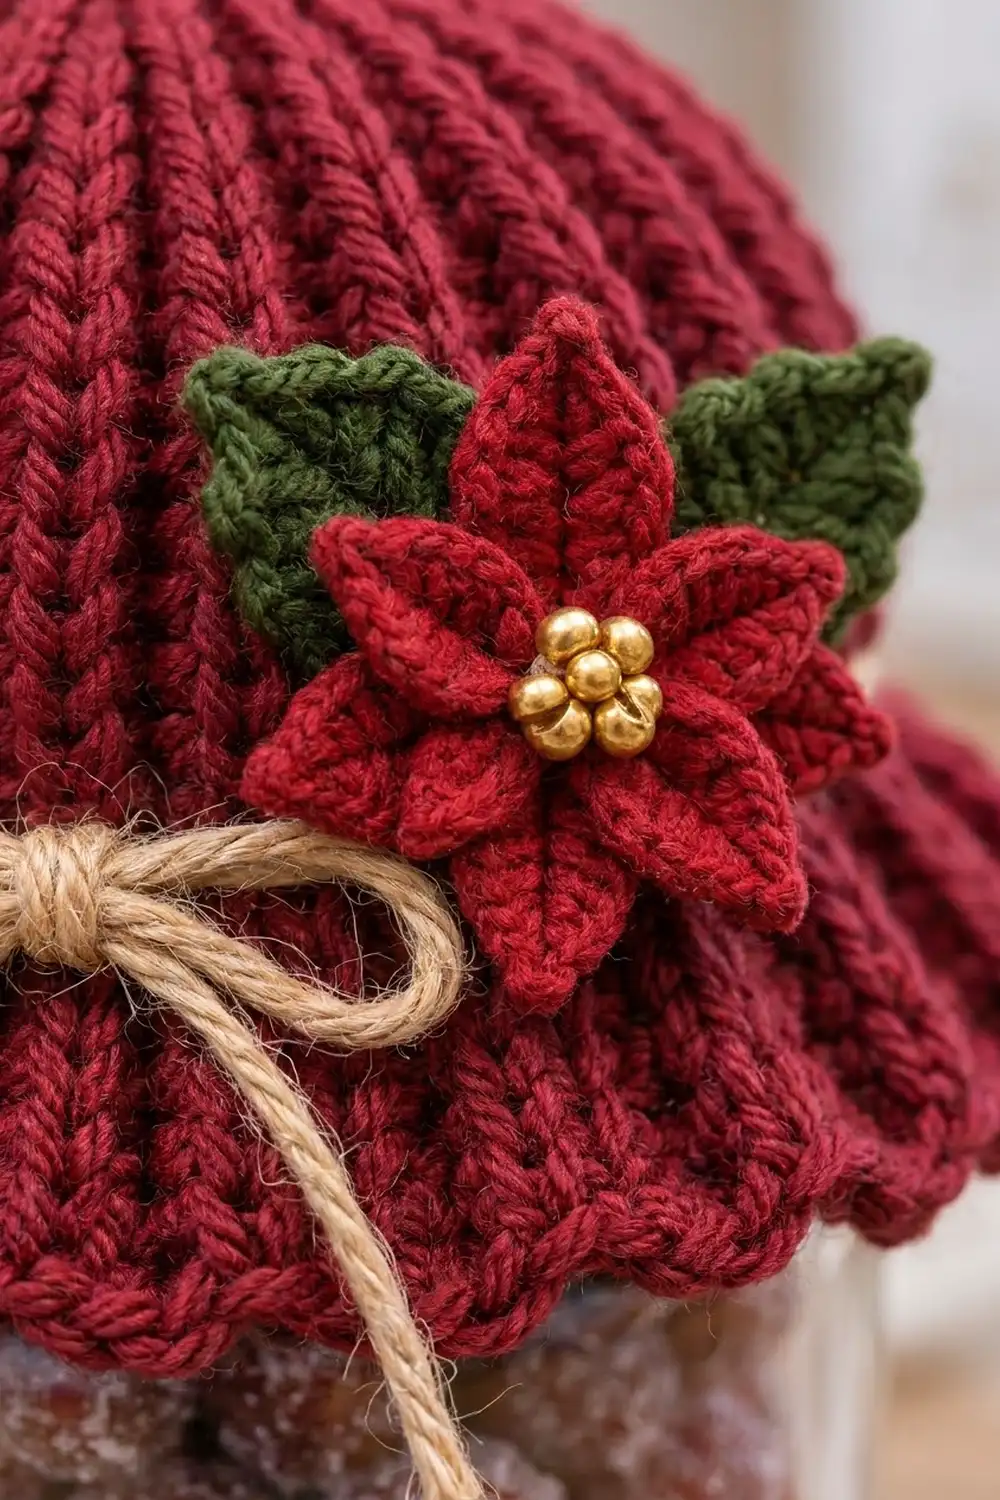
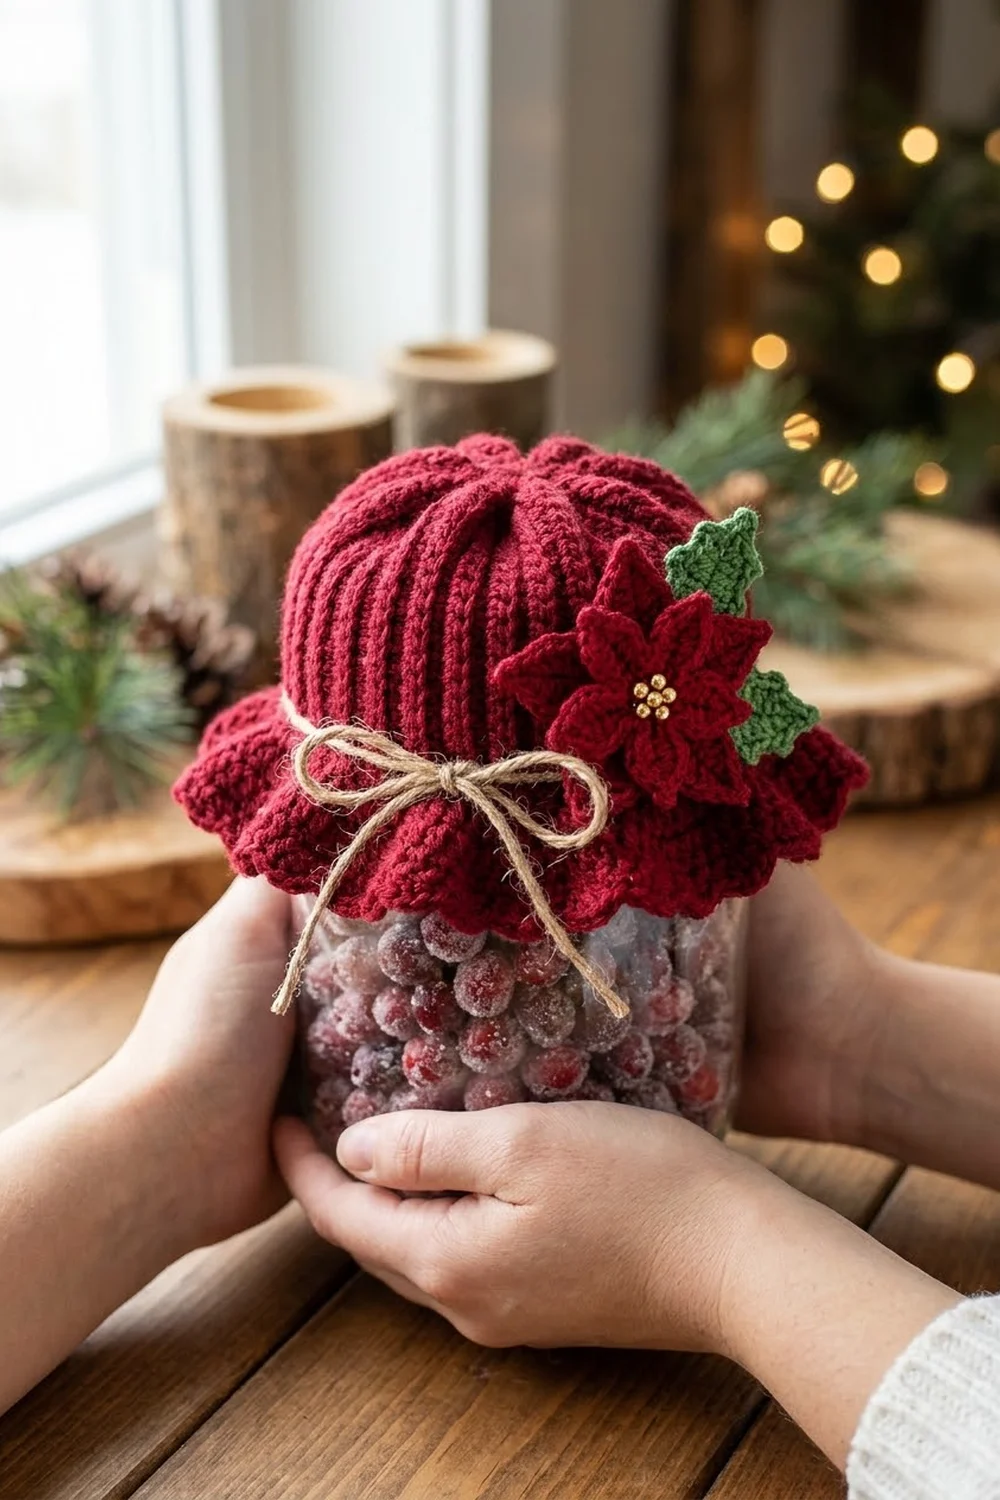
The Poinsettia Bonnet Jar Topper is a soft, ribbed cover that slips over the lid of a regular-mouth jar. It has a gathered, rounded crown, a flared scalloped ruffle at the hem, a jute twine bow, and a small layered poinsettia with two green leaves and a cluster of gold beads in the middle.
The main color is a deep cranberry red. The leaves are forest green, the center is gold, and the natural twine gives it a rustic, homemade look. Fill the jar with cookies, candy, or sugared cranberries and you have a finished holiday gift.
This pattern uses US crochet terms. The finished topper is 10 in (25.4 cm) around at the base of the ribbing and 6.25 in (15.9 cm) from the crown center to the scalloped edge. It fits jars with a lid about 2.75 in (7.0 cm) across.
You make the ribbed body as one flat rectangle in back-loop single crochet, seam it into a tube, and gather the top closed. Then you work a three-round ruffle into the lower edge. The poinsettia and leaves are made separately and sewn on.
Finished Size and Construction
- Finished size: 10 in (25.4 cm) around × 6.25 in (15.9 cm) from crown to hem
- Skill level: Easy
- Terminology: US crochet terms
- Yarn weight: Worsted (#4 medium)
- Hooks: 4.5 mm (US 7) for the body, 3.75 mm (US F-5) for the flower and leaves
- Number of pieces: 1 topper, plus 1 flower and 2 leaves sewn on
- Layout: Single piece. One rectangle seamed into a tube, no motifs to join
- Piece size (rectangle): 5 in (12.7 cm) wide × 10 in (25.4 cm) long
- Size before border: Tube 10 in (25.4 cm) around × 5 in (12.7 cm) tall
- Border depth: 1.25 in (3.2 cm) ruffle
Materials
Choose a smooth worsted-weight acrylic or cotton blend with clear stitch definition so the ribs show up well. A slightly matte yarn makes the ribs look most like knitting.
- Color A, Cranberry Red: 25 g, about 50 m (body, ruffle, and flower)
- Color B, Forest Green: 3 g, about 6 m (leaves)
- Gold accent: 7 gold beads, 6 mm, or about 1 m of gold embroidery floss for French knots
- Jute twine: 24 in (61.0 cm)
Tools:
- 4.5 mm (US 7) crochet hook
- 3.75 mm (US F-5) crochet hook
- Tapestry needle
- Sewing needle and red thread (for the beads)
- Scissors
- Stitch marker
- Measuring tape
- A regular-mouth jar for fitting
All quantities include a margin of roughly 20% for your gauge swatch and weaving in ends.
Abbreviations (US Terms)
- ch – chain
- sl st – slip stitch
- sc – single crochet
- hdc – half double crochet
- dc – double crochet
- BLO – back loop only
- FLO – front loop only
- MR – magic ring
- sk – skip
- st(s) – stitch(es)
- rep – repeat
Special stitch – sc BLO: Insert the hook only under the back loop of the stitch (the loop farthest from you), yarn over and pull up a loop, yarn over and pull through both loops. When you work every row this way, the unworked front loops make raised ridges. Every 2 rows form one ridge and one valley, which looks like a knit rib.
Gauge and Checkpoints
Gauge: 16 sts and 20 rows = 4 in (10.2 cm) in sc BLO with the 4.5 mm hook.
Make one test rectangle before starting the topper. Chain 17, work 20 rows of sc BLO, and measure in the middle of the swatch, not at the edges.
Checkpoints:
- After Row 1: Row is 5 in (12.7 cm) long. That’s the topper’s height, crown to hem.
- After Row 10: Piece is 2 in (5.1 cm) wide across the rows.
- After Row 50: Rectangle is 5 in × 10 in (12.7 cm × 25.4 cm).
- After seaming: Tube is 10 in (25.4 cm) around.
- After the ruffle: Total length is 6.25 in (15.9 cm).
If your piece is too big, change to a 4 mm (US G-6) hook. If it’s too small, change to a 5 mm (US H-8) hook. Getting the row gauge right matters most, because the number of rows sets the circumference. If your stitch gauge matches but your row gauge doesn’t, add or remove rows in pairs until the rectangle measures 10 in (25.4 cm). After that, recheck the border math (see the Border section).
Ribbed Body
With Color A and the 4.5 mm hook, ch 21.
Row 1: Sc in the 2nd ch from hook and in each ch across. (20 sc)
Row 2: Ch 1 (does not count as a st), turn. Sc BLO in each st across. (20 sc)
Rows 3–50: Repeat Row 2. (20 sc per row)
The rows run the length of the topper, so the ridges go straight down from crown to hem. You’ll have 25 ridges. One long edge of the rectangle becomes the crown and the other becomes the hem. Both long edges are made of 50 row ends.
Check: 5 in × 10 in (12.7 cm × 25.4 cm). Do not fasten off.
Seam
Fold the rectangle so Row 50 lies against the foundation chain, with the right side inside. Ch 1. Working through both loops of each Row 50 st and the matching foundation ch, sl st across. (20 sl sts) Fasten off, leaving a 6 in (15.2 cm) tail. Turn the tube right side out.
Check: tube is 10 in (25.4 cm) around and 5 in (12.7 cm) tall.
Gathered Crown
Thread a 12 in (30.5 cm) length of Color A onto the tapestry needle. Pick one long edge to be the crown. Weave in and out through the 50 row ends along that edge, one row end at a time. Pull firmly until the hole closes completely, then go through the gathered stitches twice more and knot securely on the inside. Weave in the tail.
The crown now forms a rounded dome. The ridges fan out from the center like the ribs of a bonnet.
Border: Scalloped Ruffle
Border gauge: 15 sc = 2.5 in (6.4 cm) on Round 1 when stretched slightly over the jar. The extra 10 sts are what start the flare.
The ruffle is worked in the round along the remaining long edge. It has no corners or sides, so every round is counted all the way around.
Round 1 (conversion round): With the right side facing, join Color A at the seam row end. Ch 1. Sc in each of the next 4 row ends, 2 sc in the next row end; rep from * 9 more times. Join with a sl st to the first sc.
Count: 50 sc (1 per row end) + 10 increase sc = 60 sc.*
Check: depth 0.25 in (0.6 cm).
Round 2 (growth round): Ch 3 (counts as dc). Dc BLO in the next st, 2 dc BLO in the next st. Dc BLO in each of the next 2 sts, 2 dc BLO in the next st; rep from * 18 more times. Join with a sl st to the top of the ch-3.
Count: 80 dc.* (20 repeats × 4 dc)
Working in back loops continues the vertical rib texture into the ruffle.
Check: depth 0.75 in (1.9 cm).
Round 3 (scallop round): Ch 1. Sc in the same st. Sk 1 st, 5 dc in the next st, sk 1 st, sc in the next st; rep from * 18 more times, then sk 1 st, 5 dc in the next st, sk 1 st. Join with a sl st to the first sc. Fasten off.
Count: 20 scallops; 20 sc + 100 dc = 120 sts.*
Check: border depth 1.25 in (3.2 cm). Total length 6.25 in (15.9 cm).
Why the math works: The tube edge has 50 row ends, and at 5 rows per inch that’s 10 in. One sc per row end keeps Round 1 flat at the same 10 in, and the 10 extra sc start a gentle flare. Round 2 adds 1 dc for every 3 sts (60 + 20 = 80). Each scallop in Round 3 takes exactly 4 sts (sc, sk, 5-dc fan, sk), so 80 ÷ 4 = 20 scallops with nothing left over.
If you changed the row count in the body, Round 1 must still end on a number divisible by 3, and Round 2 must end on a number divisible by 4.
Poinsettia
With Color A and the 3.75 mm hook:
Round 1: Make a MR. Ch 1, 10 sc in the ring. Pull the ring closed and join with a sl st to the first sc. (10 sc)
Round 2, large petals (worked in FLO): *Ch 7. Starting in the 2nd ch from hook, sl st, sc, hdc, dc, dc, dc (6 sts along the chain). Sk the next st of Round 1, sl st in FLO of the next st; rep from * 4 more times. (5 large petals)
Each petal is about 1.25 in (3.2 cm) long: pointed at the tip and wide at the base.
Round 3, small petals (worked in BLO of Round 1): Fold the large petals forward. Sl st in BLO of the 2nd st of Round 1 so the small petals sit between the large ones. *Ch 5. Starting in the 2nd ch from hook, sl st, sc, hdc, dc (4 sts). Sk the next st, sl st in BLO of the next st; rep from * 4 more times. (5 small petals) Fasten off, leaving a 12 in (30.5 cm) tail for sewing.
The small petals stand up in front of the large ones and are offset between them, giving two stacked layers. The finished flower is about 3 in (7.6 cm) across.
Center: Sew 7 gold beads in a tight cluster over the ring (1 in the middle, 6 around it). If you don’t want beads, use gold floss to make 7 French knots.
Leaves (Make 2)
With Color B and the 3.75 mm hook, ch 8.
Round 1: Starting in the 2nd ch from hook, sc, hdc, dc, dc, hdc, sc (6 sts). Work 3 sc in the last ch for the tip. Rotate and work along the other side of the chain: sc, hdc, dc, dc, hdc, sc (6 sts). Join with a sl st to the first st. (15 sts)
Round 2 (picot edge): *Sl st in each of the next 3 sts, ch 2, sl st in the same st as the last sl st; rep from * 4 more times. (15 sl sts, 5 picots) Fasten off, leaving a tail for sewing.
Each leaf measures about 1.75 in (4.4 cm) long. The picots give the edge a serrated, holly-like look.
Assembly
- Place the topper on the jar. Position the flower on the side, about 1.5 in (3.8 cm) below the crown center and slightly off-center.
- Tuck one leaf behind the upper left of the flower and one behind the upper right, so they angle up and out.
- Sew the leaves to the body first, then sew the flower on top, stitching through Round 1 so the petals stay free.
- Wrap the twine around the topper just above Round 1 of the ruffle, below the flower. Tie a bow at the front and trim the tails to about 3 in (7.6 cm).
Final Blocking
- Lightly mist the topper with water, or steam it from 1 in (2.5 cm) away. Never press acrylic with an iron.
- Slide it over the jar or a similar-sized cylinder.
- Smooth the ribs so they run straight down from the crown.
- Spread each scallop into an even fan with your fingers.
- Flatten the flower and leaves gently and open up the petal tips.
- Let everything dry completely on the form before you add the twine.
Final Quality-Control Checklist
- Rectangle had 20 sts in every row and 50 rows.
- The seam is straight and the ridges line up across it.
- The crown is fully closed, with no hole at the center.
- Round 1 = 60 sc, Round 2 = 80 dc, Round 3 = 20 scallops.
- Circumference is 10 in (25.4 cm) and length is 6.25 in (15.9 cm).
- The flower has 5 large and 5 small petals, offset from each other.
- Beads are secure and both leaves are firmly attached.
- All ends are woven in on the inside.
Troubleshooting
- Ridges are faint: Make sure you’re working only in the back loop, and that every row starts with ch 1, turn.
- Rectangle slants or shrinks: You’re skipping the last st. Count 20 sts every row.
- Topper is too loose on the jar: Remove 2 rows, or tie the twine a little tighter.
- Ruffle doesn’t flare: Recount Round 2. It should have 80 sts. If it’s still flat, go up one hook size for Rounds 2–3.
- Ruffle waves too much: Your dc are loose. Use the 4 mm hook for Round 2.
- Petals curl backward: Block them flat, or work the chains a little more loosely.
- Crown puckers unevenly: Weave through every row end at an even depth before you pull.
Care
Hand wash cool, reshape, and lay flat to dry. Remove the twine and support the beads during washing.
Final Notes
Everything comes from one measurement chain. Row 1 sets the height at 20 sts = 5 in (12.7 cm). Fifty rows set the circumference at 10 in (25.4 cm). Those 50 row ends give 60 sc, then 80 dc, then 20 scallops, for a 1.25 in (3.2 cm) ruffle and a total length of 6.25 in (15.9 cm). Check your gauge first and count every round, and the topper will fit your jar.
Happy crocheting!