

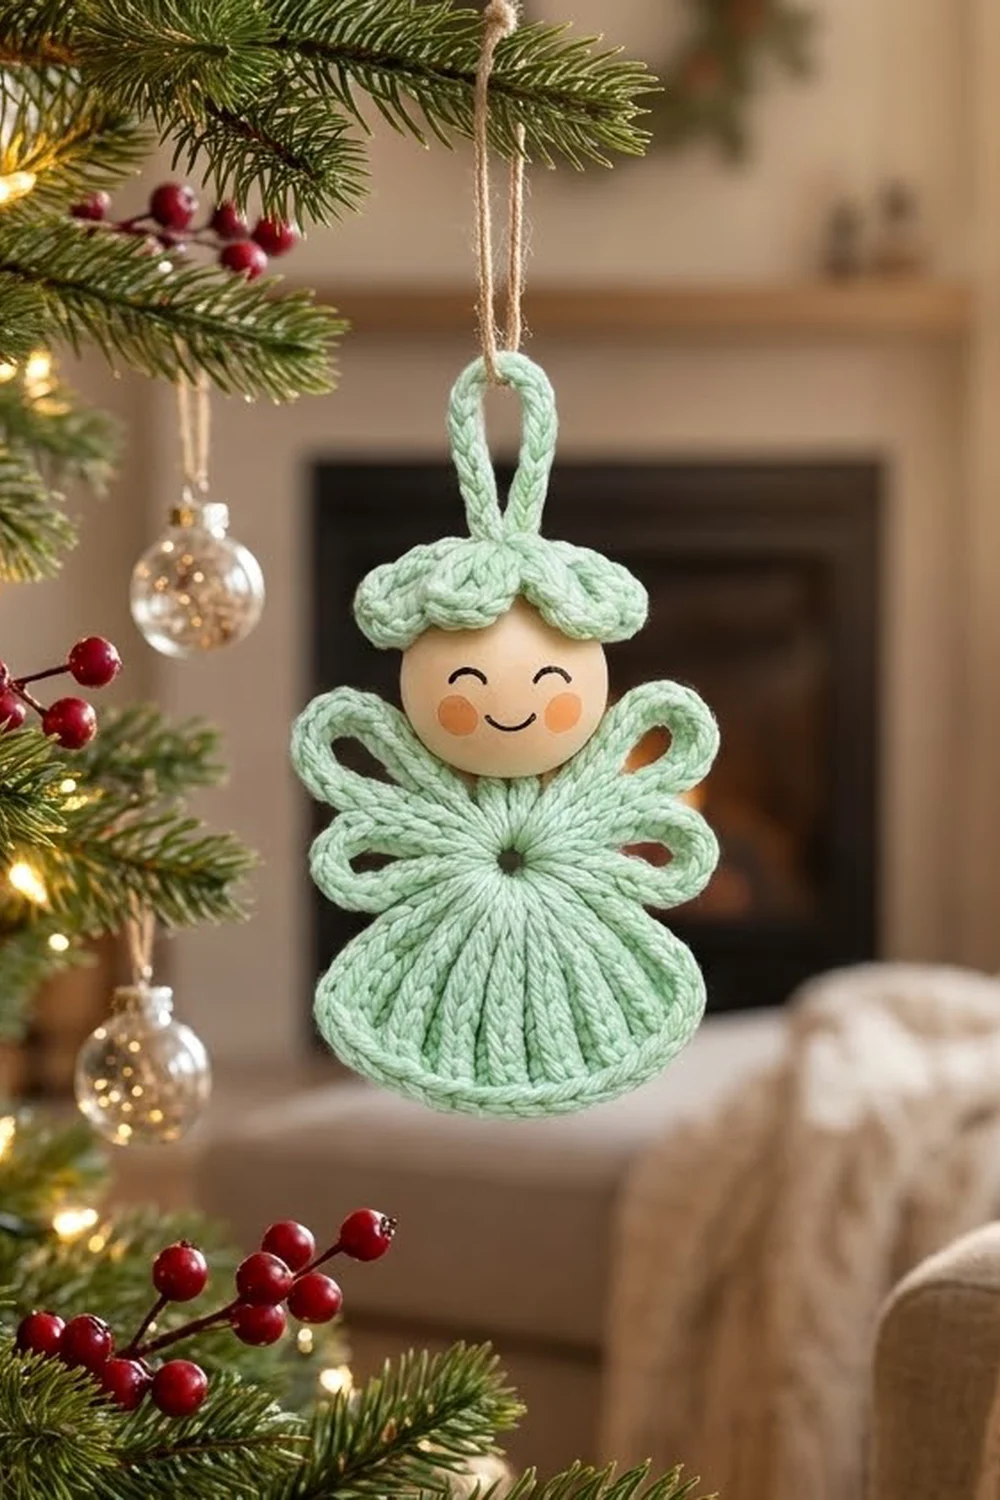
The Sweet Pea Angel is a small, cheerful ornament with a wooden bead head. She has a ribbed fan skirt, four rounded loop wings and a scalloped cap topped by a loop for hanging. The featured sample is soft mint green, and the design works just as well in pastel pink, butter yellow, lilac, sky blue, coral or cream.
The look is simple and modern: tall stitches with clear ridges, smooth covered loops and a painted face with closed, smiling eyes. Hang her on a tree, add her to a gift, or make a few for a mobile or a set of package toppers.
This pattern uses US crochet terms. The finished angel measures 3.2 in (8.1 cm) wide and 4 in (10.2 cm) tall including the hanging loop, or 3 in (7.6 cm) tall without it.
Construction is quick. You work the skirt in turned rows into the lower half of a chain ring, then add the border. Next, you work the four wings into the upper half of the same ring. A tiny cap with a hanging loop is made separately, and one strand of yarn ties the body, the bead and the cap together.
Finished Size and Construction
- Finished size: 3.2 in (8.1 cm) wide × 4 in (10.2 cm) tall with the loop; 3 in (7.6 cm) tall without it
- Skill level: Easy
- Terminology: US crochet terms
- Yarn weight: DK (light worsted, #3), cotton or cotton blend
- Hook: 3.5 mm (US E-4)
- Number of pieces: One ornament: a crocheted body, a crocheted cap and one wooden bead
- Layout: Skirt below the ring, wings to either side, head above, hanging loop on top
- Skirt size (main piece): 3.2 in (8.1 cm) wide × 1.6 in (4.1 cm) deep
- Skirt size before border: 2.8 in (7.1 cm) wide × 1.4 in (3.6 cm) deep
- Border depth: 0.2 in (0.5 cm)
Materials
Yarn: Use a smooth, mercerized or combed DK cotton with good stitch definition. The ridges and covered loops depend on crisp stitches, so avoid fuzzy or very splitty yarns.
- Mint green (main color): 8 g, about 19 m (21 yd)
To make other colors, swap the main color one for one. Each angel uses only one yarn color.
Tools and notions:
– 3.5 mm (US E-4) crochet hook
– One natural wooden bead, 20 mm (0.8 in / 2.0 cm), with a hole at least 4 mm wide
– Fine-tip black permanent marker
– Peach or pink acrylic paint, or a pink colored pencil
– Tapestry needle with a large eye
– Scissors
– Stitch marker
– Ruler or measuring tape
– Optional: a dot of clear craft glue
The yarn amount includes a safety margin of about 20% for your gauge swatch and the yarn tails.
Abbreviations (US Terms)
- ch – chain
- sl st – slip stitch
- sc – single crochet
- dc – double crochet
- MR – magic ring
- BLO – back loop only
- st(s) – stitch(es)
- sp – space
- ( ) × n – repeat the steps in parentheses n times
Special stitch: shell. Work 5 dc in the same stitch.
Special technique: covered loop. Chain the given number, then sl st into the ring to make a loop. Work the given number of sc into the chain-loop space, not into the chains themselves, so the chain is completely hidden inside a smooth, rope-like loop.
Gauge and Checkpoints
Gauge: 20 dc and 10 rows = 4 in (10.2 cm). 22 sc = 4 in (10.2 cm).
That gives 5 dc per inch, and each dc row is about 0.4 in (1.0 cm) tall.
Make the body first, before the cap or the bead. It is the best gauge test, and you can check it as you go:
- After Row 1: skirt 1.2 in (3.0 cm) wide, 0.6 in (1.5 cm) deep from the ring center
- After Row 2: 2 in (5.1 cm) wide, 1 in (2.5 cm) deep
- After Row 3: 2.8 in (7.1 cm) wide, 1.4 in (3.6 cm) deep
- After the border: 3.2 in (8.1 cm) wide, 1.6 in (4.1 cm) deep
If your skirt is too big (more than 0.2 in / 0.5 cm over at Row 3), go down to a 3.25 mm hook (US D-3). If it is too small or cups upward, go up to a 3.75 mm hook (US F-5). Keep a firm tension on the covered loops so they stay round and don’t sag.
Body: Skirt
The skirt is worked in turned rows. The first row goes into the lower half of the chain ring, and the upper half stays free for the wings. The open center of the ring is the small “heart” hole you can see in the finished angel.
Ring: Ch 6, sl st in the first ch to form a ring. Hold the ring with its upper half facing away from you. Work all of Row 1 into the lower half only.
Row 1: Ch 3 (does not count as a st). Work 8 dc into the ring, spreading them across the lower half only. (8 dc)
Row 2: Ch 3 (does not count), turn. Work 2 dc BLO in each st across. (16 dc)
Row 3: Ch 3 (does not count), turn. Work (dc BLO in next st, 2 dc BLO in next st) × 8. (24 dc)
Working in the back loops leaves the front loop of each stitch on the surface. That builds the raised ridges that fan out from the ring. Lay the piece flat: it should form a half circle that flares only slightly, like a little bell. Check the Row 3 measurement before you go on.
Don’t fasten off. The border continues straight from here.
Border
The border runs only along the curved hem. The two straight top edges of the skirt are three dc rows deep and are hidden under the wings, so they are left unbordered on purpose.
Border gauge: 22 sc = 4 in (10.2 cm), or 5.5 sc per inch.
Border Row 1: Ch 1, turn. Work (sc in next 5 sts, 2 sc in next st) × 4. This is a growth row: it works 24 sts one-for-one and adds 4 increases.
– Curved hem: 28 sc (24 worked one-for-one + 4 added)
– Straight sides: 0 sts (left unbordered)
Border Row 2: Ch 1, don’t turn. Loosely sl st in the BLO of each sc across.
– Curved hem: 28 sl st (one in each of the 28 sc, nothing added)
Fasten off and weave in the end.
Why the math works: After Border Row 1, the outer edge sits about 1.6 in (4.1 cm) from the ring center. Half a circle at that radius measures about 5 in along the curve. At 5.5 sc per inch, 28 sc cover 5.1 in, which is a near-perfect match. The hem lies flat, with just enough ease for the slip stitches in Row 2 to roll forward into a neat rim. The skirt is now 3.2 in (8.1 cm) wide and 1.6 in (4.1 cm) deep.
Body: Wings
All four wings are worked into the free upper half of the ring, from right to left. Each wing is a covered loop: the upper wings are 20 sc, and the lower wings are 16 sc.
Hold the skirt right side up, hem pointing down. Join the yarn with a sl st into the ring just above the right end of Row 1.
- Lower right wing: Ch 12, sl st in ring. Work 16 sc into the ch-12 space. Sl st in ring.
- Upper right wing: Ch 16, sl st in ring. Work 20 sc into the ch-16 space. Sl st in ring.
- Neck gap: Sl st twice in the ring, moving toward the left. Leave the very top of the ring clear.
- Upper left wing: Ch 16, sl st in ring. Work 20 sc into the ch-16 space. Sl st in ring.
- Lower left wing: Ch 12, sl st in ring. Work 16 sc into the ch-12 space. Sl st in ring just above the left end of Row 1.
Wing count: 16 + 20 + 20 + 16 = 72 sc
Fasten off and weave in the end.
Pack the sc in snugly so no chain shows through. Each lower wing should be about 1 in (2.5 cm) long, and each upper wing about 1.4 in (3.6 cm) long. Angle the upper wings up and out, and the lower wings out and slightly down. The wingspan should match the skirt width of 3.2 in (8.1 cm).
Cap and Hanging Loop
The cap is worked in the round, and you don’t join the rounds unless the pattern says so.
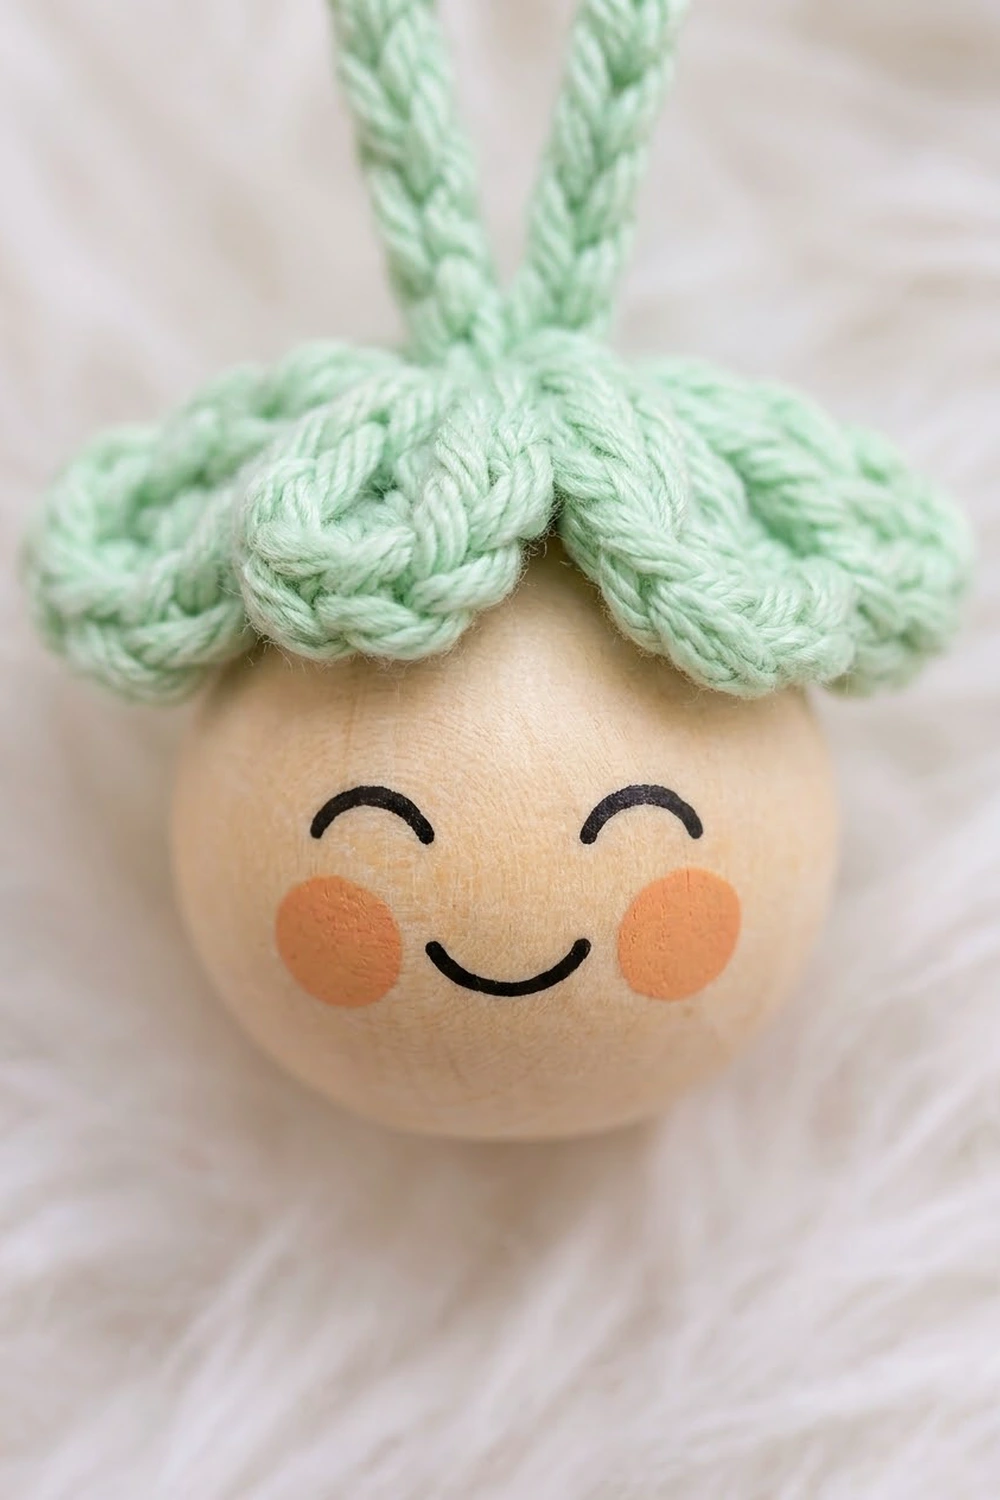
Rnd 1: In a MR, work 5 sc. Pull the ring closed, leaving a hole just big enough for a tapestry needle. (5 sc)
Rnd 2: Work 2 sc in each st. (10 sc)
Rnd 3: (Sl st in next st, shell in next st) × 5. This makes 5 scallops. (30 sts: 5 sl st + 25 dc)
Sl st in the first st and fasten off. The cap measures about 1 in (2.5 cm) across and cups gently over the bead.
Hanging loop: Insert the hook from the top through the center of Rnd 1 and join the yarn around one Rnd 1 sc. Ch 14, then sl st around the Rnd 1 sc directly opposite. Work 18 sc into the ch-14 space, then sl st to the base. (18 sc)
Fasten off and weave in the end. The loop stands about 1 in (2.5 cm) tall.
Head and Assembly
Paint the face: Hold the bead with its hole running vertically. With the marker, draw two small upward arcs for closed eyes and a wider arc for the smile. Dab a round peach cheek under each eye and let the paint dry completely.
Connect the parts:
- Cut a 12 in (30.5 cm) strand of the main color and thread both ends onto the tapestry needle.
- Pass the needle through the top of the ring, between the two upper wings, and pull through so the folded strand wraps the ring.
- Thread both ends up through the bead from the bottom. The face should look forward.
- Thread both ends up through the center hole of the cap, then under the base of the hanging loop.
- Pull the strand until the bead sits snugly on the ring, with no visible neck.
- Tie a firm square knot under the cap. Hide the ends inside the bead hole, adding a dot of glue if you like.
- Turn the cap so one scallop sits at the center front of the forehead.
Final Blocking
- Lightly mist the body with water. Don’t wet the painted bead.
- Lay the angel face up on a foam mat or folded towel.
- Pat the skirt into a smooth half circle 3.2 in (8.1 cm) wide and 1.6 in (4.1 cm) deep.
- Pin the hem every 0.5 in (1.3 cm) so the ridges run straight out from the ring.
- Shape each wing into a round, open loop. Pin the upper wings at 1.4 in (3.6 cm) and the lower wings at 1 in (2.5 cm).
- Shape the scallops of the cap with your fingertips and stand the hanging loop up straight.
- Let everything dry completely, about 2–4 hours, before unpinning.
Final Quality-Control Checklist
- Skirt rows: 8, 16 and 24 dc; border: 28 sc and 28 sl st
- Ridges run straight out from the center ring
- The rolled rim curls forward evenly along the whole hem
- Wings have 16, 20, 20 and 16 sc, and no chain shows through
- The left and right wings match in size and angle
- The bead sits snugly, with the face centered and level
- The cap is centered, with a scallop at the front
- Overall size is 3.2 in (8.1 cm) × 4 in (10.2 cm)
- All ends are woven in or hidden, and the knot is secure
Troubleshooting
The skirt ruffles. Your tension is loose. Go down a hook size, or check that you didn’t add extra dc in Row 3.
The skirt cups upward. Your tension is tight. Go up a hook size and keep your dc tall.
Ridges look muddy. Make sure Rows 2–3 are worked in the back loops only, and turn every row.
Wing loops show chain. Pack the sc tighter, or add one or two extra sc per loop. If you do, add the same number on the matching wing.
The wings droop. Use firmer tension on the covered sc, and block with pins.
The bead wobbles. Pull the assembly strand tighter before knotting it.
The cap slides off. Tighten the Rnd 1 magic ring, or add a tiny dot of glue under the cap.
Care
Spot clean with cool water and mild soap, then pat the angel back into shape and let it dry flat. Don’t soak the painted bead or put the ornament in a washing machine.
Final Notes
Everything in this angel builds from your gauge of 5 dc per inch and 10 dc rows per 4 in (10.2 cm). The three skirt rows grow from 8 to 16 to 24 dc. That makes the skirt 2.8 in (7.1 cm) wide, and the 28-stitch border brings it to 3.2 in (8.1 cm) by adding a 0.2 in (0.5 cm) rim. Four covered-loop wings (72 sc in total) match the skirt width. The 0.8 in (2.0 cm) bead, the 1 in (2.5 cm) cap and the 1 in (2.5 cm) hanging loop finish the angel at 4 in (10.2 cm) tall. Check your measurements at each stage and every angel will come out the same.
Happy crocheting!