

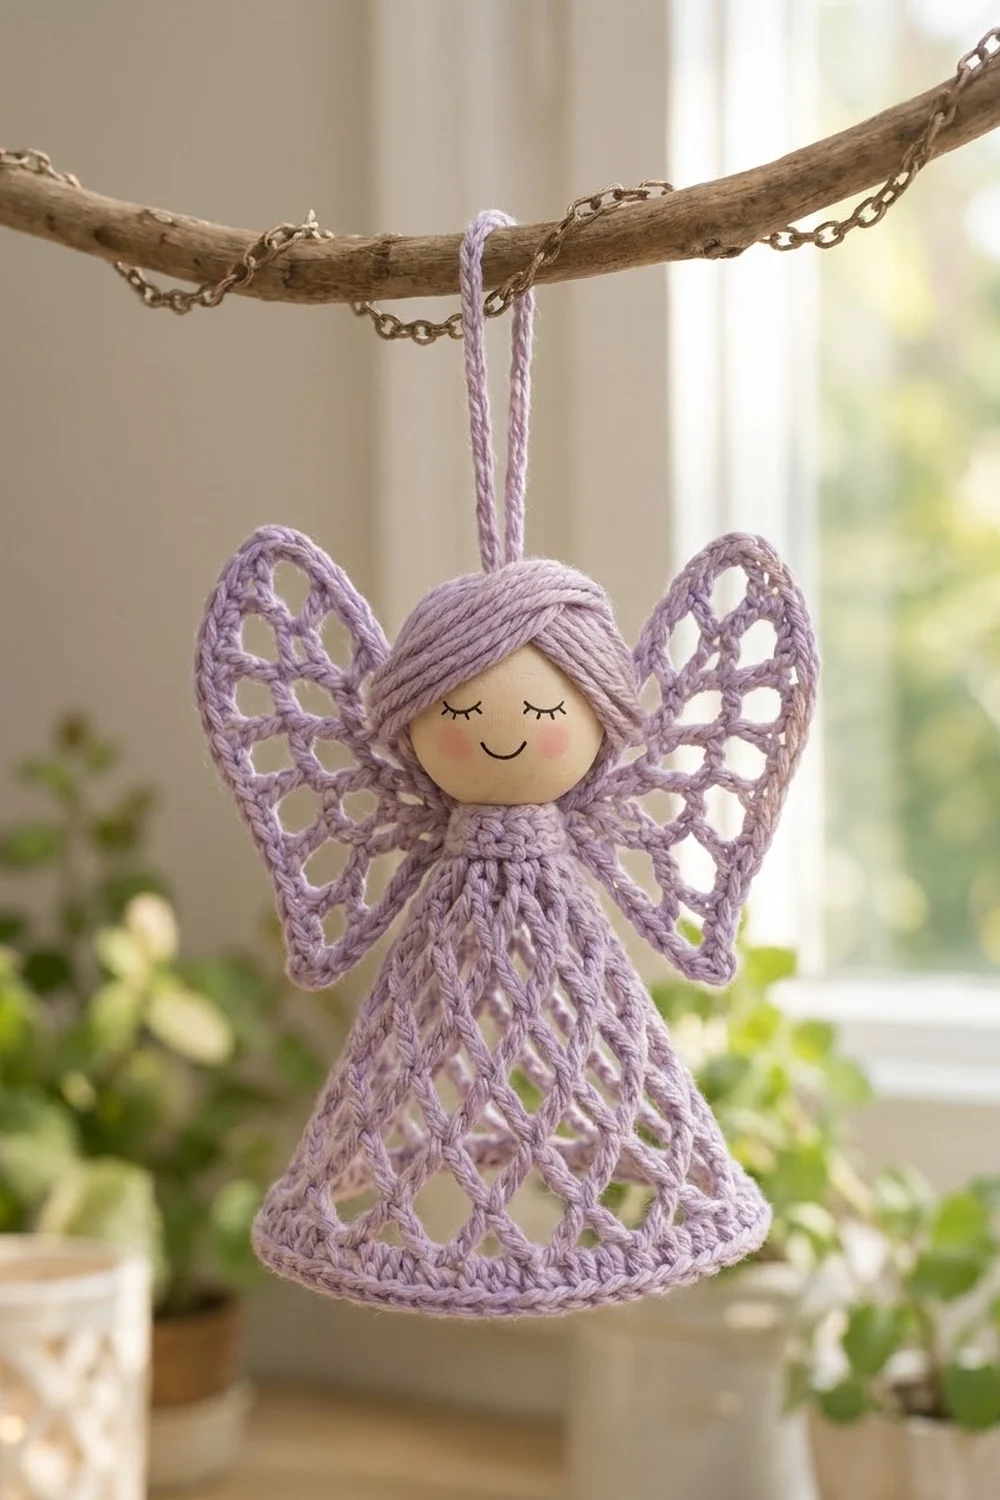
This little angel is one finished ornament. It has a lacy cone-shaped skirt, two openwork wings, a wooden bead head with yarn hair, and a chain hanging loop. The skirt is an open diamond mesh that ends in a firm, rope-edged hem. The wings are teardrop-shaped lattices with the same twisted edge.
The sample is worked in soft lavender cotton. The bead face has closed eyes drawn as two small curves, a tiny smile, and pink blush cheeks. The style is light and airy, so it looks lovely hanging on a tree, from a window latch, or tied to a gift.
All terms are US crochet terms. The finished angel is about 4.25 in (10.8 cm) tall from hem to top of hair, not counting the loop. The hem is 3.5 in (8.9 cm) wide and the wingspan is about 4.5 in (11.4 cm). The loop adds 1.5 in (3.8 cm).
Construction is simple. You work the body top-down in joined rounds: first a solid collar, then mesh rounds that grow into a cone. You make two wings in the round around a short foundation chain. A sc hem band and an edging finish both pieces. Then you add the bead head, hair, and loop, and sew the wings to the back.
Finished Size and Construction
- Finished size: 4.25 in (10.8 cm) tall without the loop; wingspan 4.5 in (11.4 cm)
- Skill level: Easy-intermediate (chain mesh, working into chain loops, reverse sc)
- Terminology: US
- Yarn weight: Fingering (super fine, #1) mercerized cotton
- Hook: 2.25 mm (US B-1)
- Number of pieces: 1 ornament made from 3 crocheted parts (1 body, 2 wings) plus a bead head, hair, and loop
- Layout: Wings sewn to the back of the collar, angled up and out
- Body size: 3.25 in (8.3 cm) tall, 3.5 in (8.9 cm) wide at the hem when laid flat
- Wing size: 2.5 in (6.4 cm) long × 1.5 in (3.8 cm) wide
- Size before border: body 2.75 in (7.0 cm) tall; each wing 2.25 in (5.7 cm) × 1.25 in (3.2 cm)
- Border depth: hem band 0.5 in (1.3 cm); wing edging about 0.125 in (0.3 cm)
Materials
Choose a smooth mercerized cotton in fingering weight, about 170 m per 50 g. Cotton keeps the mesh crisp and holds its shape after blocking. Fuzzy or very stretchy yarns will blur the diamond pattern.
- Lavender: 15 g (51 m) for the body, wings, hair, and loop
These quantities include a margin. The ornament itself uses about 11 g.
Tools
- 2.25 mm (US B-1) crochet hook
- One 20 mm (0.8 in / 2.0 cm) round natural wooden bead with a hole of at least 4 mm
- Fine-tip black permanent marker, plus pink acrylic paint or a pink pencil for the face
- Clear craft glue or tacky glue
- Tapestry needle
- Scissors
- Stitch marker
- Blocking mat, rustproof pins, and a spray bottle
Abbreviations (US Terms)
- ch – chain
- sc – single crochet
- sl st – slip stitch
- sk – skip
- st(s) – stitch(es)
- rnd – round
- ch-3 / ch-4 / ch-5 loop – the space made by that many chains
- (…) twice – work everything in parentheses twice into the same loop
- […] x times – repeat the bracketed steps the stated number of times
Special stitch – reverse sc (crab stitch): Right-handers work from left to right. Insert the hook in the next st to the right, yarn over and pull up a loop, then yarn over and pull through both loops. This makes the twisted, rope-like edge on the hem and wings.
Moving to the center of a loop: Many rnds start with “sl st to center of first loop.” For a ch-3 or ch-4 loop, sl st in the next 2 ch. For a ch-5 loop, sl st in the next 3 ch.
Gauge and Checkpoints
Gauge: 28 sc and 30 rnds = 4 in (10.2 cm), or 14 sc = 2 in (5.1 cm). That is 7 sc per inch.
Make one wing first. It is the smallest part and shows you right away whether your tension matches.
Checkpoints:
- Wing after Rnd 1: 2 in (5.1 cm) long × 0.6 in (1.5 cm) wide
- Wing after Rnd 3: 2.25 in (5.7 cm) × 1.25 in (3.2 cm)
- Wing finished: 2.5 in (6.4 cm) × 1.5 in (3.8 cm)
- Body after Rnd 3 (collar): 1.25 in (3.2 cm) wide flat, 0.4 in (1.0 cm) tall
- Body after Rnd 6: 2 in (5.1 cm) wide flat
- Body after Rnd 10: 3.25 in (8.3 cm) wide flat, 2.75 in (7.0 cm) tall
- Body finished: 3.5 in (8.9 cm) wide flat, 3.25 in (8.3 cm) tall
Too big? Go down to a 2.0 mm hook or make your chains a little snugger. Too small? Go up to a 2.5 mm hook. Change the hook, not the stitch counts, because the hem math depends on the loop count.

Body
The body is worked top-down in joined rnds with the right side facing. Do not turn.
Collar
Ch 12, sl st in first ch to form a ring.
Rnd 1: Ch 1, 18 sc in ring, sl st in first sc to join. (18 sc)
Rnd 2: Ch 1, sc in each st around, join. (18 sc)
Rnd 3: Ch 1, sc in each st around, join. (18 sc)
Checkpoint: the collar is a solid little tube, 1.25 in (3.2 cm) wide flat and 0.4 in (1.0 cm) tall.
Mesh skirt
Rnd 4 (conversion to mesh): Ch 1, sc in first st, ch 3, sk 1 st, [sc in next st, ch 3, sk 1 st] 8 times, join to first sc. (9 sc worked into every other st + 9 ch-3 loops = 9 mesh loops)
Rnd 5: Sl st to center of first loop, ch 1, sc in same loop, ch 4, [sc in next loop, ch 4] 8 times, join to first sc. (9 ch-4 loops)
Rnd 6 (growth): Sl st to center of first loop, ch 1, sc in same loop, ch 4, sc in next loop, ch 4, (sc, ch 4) twice in next loop, *[sc in next loop, ch 4] twice, (sc, ch 4) twice in next loop; repeat from * 2 more times, join. (12 ch-4 loops: 9 loops worked 1-per-loop + 3 extra)
Rnd 7: Sl st to center of first loop, ch 1, sc in same loop, ch 5, [sc in next loop, ch 5] 11 times, join. (12 ch-5 loops)
Rnd 8 (growth): Sl st to center of first loop, ch 1, sc in same loop, ch 5, sc in next loop, ch 5, (sc, ch 5) twice in next loop, *[sc in next loop, ch 5] twice, (sc, ch 5) twice in next loop; repeat from * 3 more times, join. (16 ch-5 loops: 12 loops worked 1-per-loop + 4 extra)
Rnds 9–10: Sl st to center of first loop, ch 1, sc in same loop, ch 5, [sc in next loop, ch 5] 15 times, join. (16 ch-5 loops each rnd)
Each sc sits in the middle of a loop from the rnd below, which creates the staggered diamond lattice. Checkpoint: 3.25 in (8.3 cm) wide flat and 2.75 in (7.0 cm) tall. Do not fasten off, because the hem band continues from here.
Wings (Make 2)
Each wing is worked in rnds around both sides of a foundation chain. The base end stays narrow and the tip widens into a rounded teardrop.
Ch 14.
Rnd 1: Sc in 2nd ch from hook, [ch 3, sk 2 ch, sc in next ch] 4 times; the last sc lands in the last ch. For the tip, [ch 3, sc] twice in that same last ch. Now work along the opposite side of the foundation: [ch 3, sk 2 ch, sc in next ch] 3 times, ch 3, sl st in first sc to join. (10 sc and 10 ch-3 loops: 4 along each side + 2 at the tip)
Rnd 2 (growth): Sl st to center of first loop, ch 1, sc in same loop, ch 4, [sc in next loop, ch 4] 3 times, [(sc, ch 4) twice in next loop] 2 times, [sc in next loop, ch 4] 4 times, join. (12 ch-4 loops: 10 loops worked 1-per-loop + 2 extra)
Rnd 3 (growth): Sl st to center of first loop, ch 1, sc in same loop, ch 5, [sc in next loop, ch 5] 3 times, [(sc, ch 5) twice in next loop] 4 times, [sc in next loop, ch 5] 4 times, join. (16 ch-5 loops: 12 loops worked 1-per-loop + 4 extra)
The 4 doubled loops are the ones over the tip, so the tip fans out while the base stays slim. Checkpoint: 2.25 in (5.7 cm) × 1.25 in (3.2 cm). Do not fasten off, because the edging follows.
Border
Border gauge: 7 sc per inch, the same as the main gauge. Work border sc firmly so the edges lie flat.
Body hem band
Rnd 11 (conversion to solid): Ch 1, 3 sc in each ch-5 loop around, join. (16 loops × 3 sc = 48 sc)
Rnd 12: Ch 1, sc in each st around, join. (48 sc)
Rnd 13: Ch 1, reverse sc in each st around, join. (48 reverse sc)
Fasten off and weave in. Laid flat, the hem has 24 sts across the front and 24 across the back.
Why the math works: 48 sc at 7 sc per inch is about 6.9 in (17.5 cm) around. Flattened, that is just under 3.5 in (8.9 cm) across, which matches the mesh width. Each ch-5 loop spans about 0.4 in (1.0 cm), the width of 3 sc, so the band neither ruffles nor pulls in.
Wing edging
Rnd 4: Ch 1, 3 sc in each ch-5 loop around, join. (16 loops × 3 sc = 48 sc)
Rnd 5: Ch 1, reverse sc in each st around, join. (48 reverse sc)
Fasten off. On one wing only, leave a 10 in (25.4 cm) tail for sewing. Weave in the other ends.
Why the math works: 48 sts at 7 per inch is about 6.9 in (17.5 cm). The outline of a 2.5 in × 1.5 in (6.4 cm × 3.8 cm) teardrop is a little shorter, and the small extra eases around the curved tip.
Head, Hair, and Loop
Face: Before assembly, use the black marker to draw two small downward curves for closed eyes and a small smile. Dab pink blush on each cheek and let it dry.
Hanging loop: Leave a 6 in (15.2 cm) tail, ch 24, then fasten off with another 6 in (15.2 cm) tail. The chain is about 3 in (7.6 cm) long. Fold it in half and thread both tails down through the bead hole and into the collar opening. Tie the tails firmly around the Rnd 1 sts inside the collar, then weave them in. The loop stands 1.5 in (3.8 cm) above the bead.
Attach head: Run a thin line of glue around the bead’s lower hole. Press the bead onto the top of the collar and hold for 1 minute.
Hair: Cut 10 strands of lavender, each 3 in (7.6 cm) long, and hold them together as one bundle. To make a side part, glue the center of the bundle across the crown, just to one side of the loop. Sweep one half across the forehead as a soft fringe and the other half over the opposite side. Twist the ends lightly and tuck them under at the back of the bead with a dot of glue. Trim any stray ends.
Attach wings: Lay the body face down. Place the narrow base ends of both wings at the center back of the collar so they touch, with the tips angled up and out. Using the long tail, sew each wing base through Rnds 2–3 of the collar with 4–5 small stitches. Check that the stitches don’t show on the front, then weave in.
Final Blocking
- Lightly mist the whole angel until damp but not dripping. Keep water off the painted face.
- Lay the angel face up on the blocking mat.
- Flatten the skirt so the hem measures 3.5 in (8.9 cm) across, and pin the hem at both side folds.
- Open each diamond with a fingertip so the diamonds line up in neat diagonal rows.
- Shape each wing to 2.5 in (6.4 cm) × 1.5 in (3.8 cm). Pin every 0.25 in (0.6 cm) around the curved tip.
- Straighten the hanging loop upward.
- Let the angel dry fully, at least 6 hours, before unpinning.
- For a stiffer ornament, brush on a light fabric stiffener, re-pin, and let it dry again.
Final Quality-Control Checklist
- Collar has 18 sc in each of Rnds 1–3
- Skirt mesh counts for Rnds 4–10 are 9, 9, 12, 12, 16, 16, 16 loops
- Hem band has 48 sts in each of Rnds 11–13
- Each wing has 10, 12, and 16 loops, then 48 edging sts
- Both wings measure 2.5 in (6.4 cm) × 1.5 in (3.8 cm)
- Hem lies flat at 3.5 in (8.9 cm) wide
- Bead is glued straight and doesn’t wobble
- Hair covers the crown evenly with no glue showing
- Wings are symmetrical and the sewing is hidden from the front
- Hanging loop is centered and tied securely
- All ends are woven in
Troubleshooting
Skirt flares like a ruffle: Your chains are loose. Use a smaller hook for the ch-5 loops, or ch 4 on Rnds 9–10.
Skirt pulls too narrow: Your chains are tight. Relax them or go up one hook size.
Hem band waves: Rework Rnd 11 more firmly, or with a hook one size smaller.
Hem cups inward: Work Rnd 12 with a hook one size larger.
Diamonds look crooked: Make sure every sc goes into the center of a loop, not next to the previous sc.
Wings are different sizes: Recount Rnd 3. On both wings, the 4 doubled loops must sit over the tip.
Reverse sc looks messy: Keep loops loose before the final yarn over, and work only into the next st to the right.
Bead tilts: Re-glue it with the loop tails pulled snug inside the collar.
Care
Spot clean with cool water and mild soap, keeping the painted face dry. Reshape, pin flat to dry, and store flat in tissue between seasons.
Final Notes
The measurement chain is short and easy to check. A gauge of 7 sc per inch gives a collar 1.25 in (3.2 cm) wide when flat. The mesh body reaches 3.25 in (8.3 cm) wide at Rnd 10, and the 48-st hem settles at 3.5 in (8.9 cm). Each wing grows from 10 to 16 loops and finishes at 2.5 in (6.4 cm) × 1.5 in (3.8 cm) with 48 edging sts. With the 20 mm bead and hair on top, the angel stands 4.25 in (10.8 cm) tall.
The same angel also looks lovely in soft blue, powder blue, or cream.
Happy crocheting!