

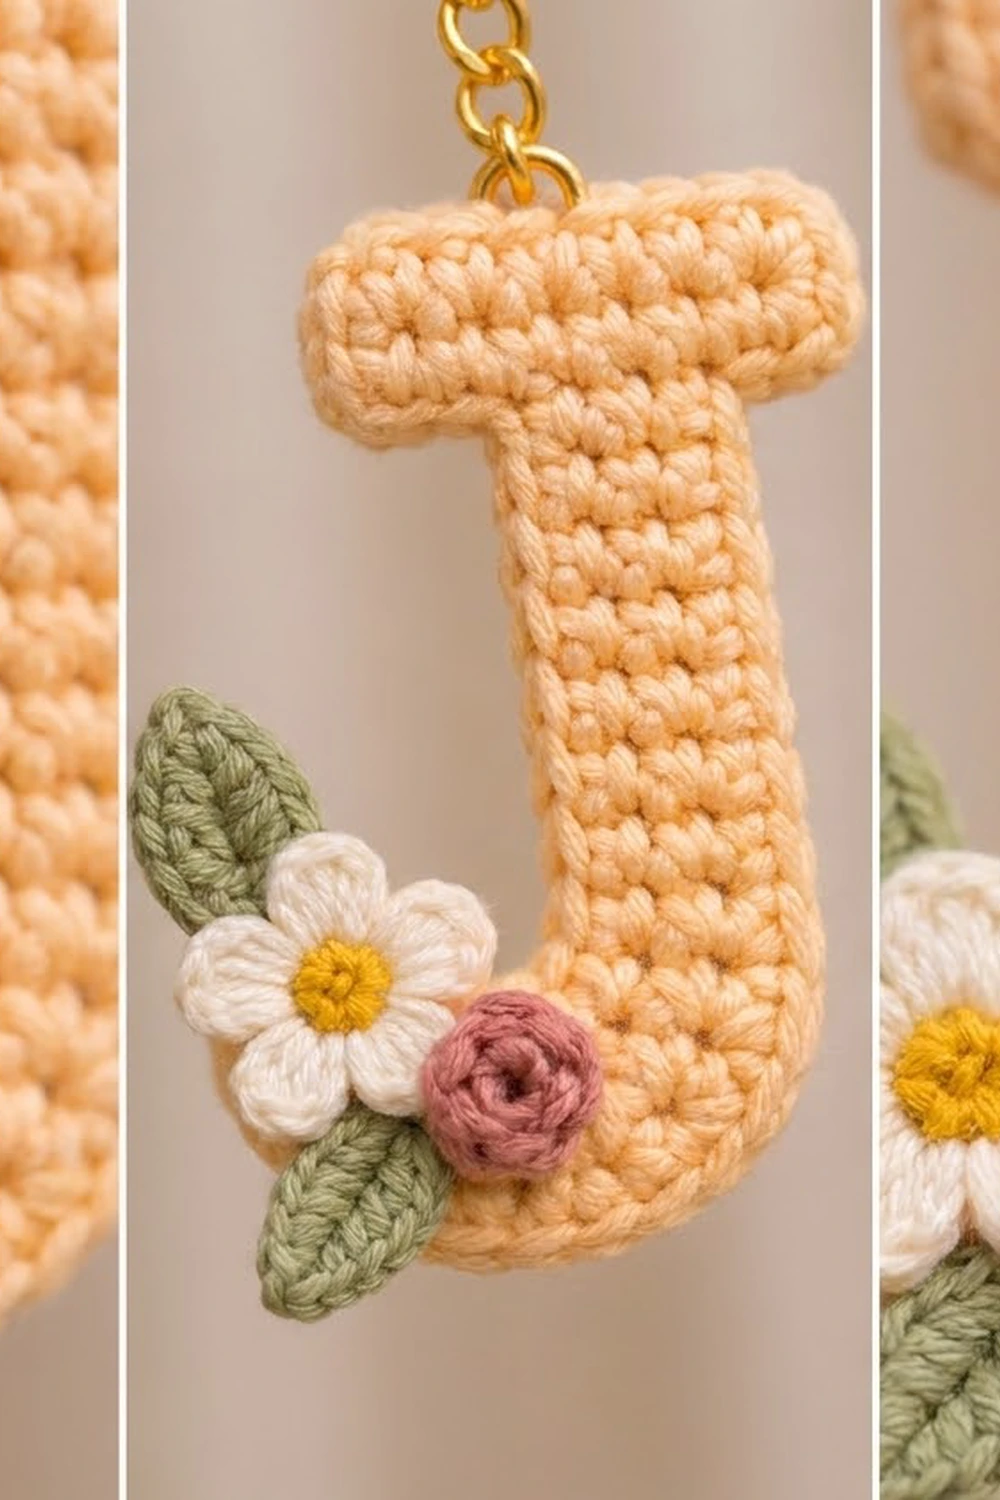
This little keychain is a crocheted letter J in soft peach, decorated with a tiny cluster of flowers. A white five-petal daisy with a yellow center sits at the lower left of the curve, next to a dusty rose rosette and two sage green leaves. A gold split ring on a short chain hangs from the top of the crossbar, so the letter can go on keys, a zipper pull, or a handbag strap.
The letter is worked flat in rows of single crochet, which gives a firm, even texture that holds its shape. One round of single crochet plus one round of slip stitches goes all the way around the outline. That border gives the J a smooth, slightly raised rim and rounds off the bottom curve and the hook tip.
The finished letter measures about 3.5 in (8.9 cm) tall and 2.4 in (6.1 cm) wide. With the ring and chain added, the keychain is about 5 in (12.7 cm) long. The pattern uses US crochet terms throughout.
Here is how it’s built: you work one letter panel from the bottom up. The bowl comes first, then the stem and the hook tip are worked separately, then the crossbar is added on top. After the border, you make four small appliqués (a flower, a rosette, and two leaves), sew them onto the lower left of the letter, and attach the hardware.
Finished Size and Construction
- Finished size: 3.5 in (8.9 cm) tall x 2.4 in (6.1 cm) wide
- Skill level: Easy / advanced beginner
- Terminology: US crochet terms
- Yarn weight: DK (weight 3) cotton or cotton blend
- Hook: 3.0 mm
- Number of pieces: 1 letter panel, plus 4 small appliqués sewn on top (1 flower, 1 rosette, 2 leaves)
- Layout: Single piece. No joining.
- Piece size before border: 3.1 in (7.9 cm) tall x 2.0 in (5.1 cm) wide
- Border depth: about 0.2 in (0.5 cm) on every side
- Stem width: 0.8 in (2.0 cm) before border
Materials
Use a smooth, mercerized or soft cotton in DK weight. Cotton shows every stitch clearly and keeps the letter firm. Avoid fuzzy or very splitty yarns, because the letter is small and the outline has to stay crisp.
- Peach (main color, letter): 8 g, about 20 m
- Sage green (leaves): 2 g, about 5 m
- White or cream (flower petals): 2 g, about 5 m
- Dusty rose (rosette): 1 g, about 3 m
- Yellow (flower center): 1 g, about 2 m
All quantities include a safety margin, so scraps from other projects are usually enough.
Tools:
- 3.0 mm crochet hook
- Tapestry needle
- Sewing needle and matching thread (optional, for securing appliqués)
- Gold split ring, 1 in (2.5 cm), with a short chain of about 0.75 in (1.9 cm)
- One 6 mm gold jump ring and two pairs of small pliers
- Stitch marker
- Blocking mat, rust-proof pins, and a spray bottle
- Scissors and a ruler
Abbreviations (US Terms)
- ch = chain
- sl st = slip stitch
- sc = single crochet
- hdc = half double crochet
- dc = double crochet
- sc2tog = single crochet 2 together
- st(s) = stitch(es)
- RS = right side
Special stitch – sc2tog across a corner: Insert hook in the first given place, yarn over and pull up a loop. Insert hook in the second given place, yarn over and pull up a loop. Yarn over and pull through all 3 loops on hook. In the border, this joins a row end to a stitch at an inside corner so the corner lies flat.
Gauge and Checkpoints
Gauge: 10 sc and 11 rows = 2 in (5.1 cm) in rows of sc. That works out to 5 sts and 5.5 rows per inch.
Treat the letter itself as your gauge swatch. It’s small, so measure after each section and fix the size early.
- After Row 3: 1.8 in (4.6 cm) wide and about 0.5 in (1.3 cm) tall
- After Row 14: about 2.5 in (6.4 cm) tall, with the stem 0.8 in (2.0 cm) wide
- After Row 17: 3.1 in (7.9 cm) tall and 2.0 in (5.1 cm) wide across the crossbar
- After the border: 3.5 in (8.9 cm) x 2.4 in (6.1 cm)
If your letter is too big: go down to a 2.75 mm hook, or crochet a little more firmly. If it’s too small: go up to a 3.25 mm hook. Being off by up to 0.2 in (0.5 cm) is fine for a keychain. What matters is that the stem and crossbar look in proportion and the fabric is dense enough that no gaps show.
Letter Panel
Use peach. Start every row with ch 1, which does not count as a stitch. Turn at the end of every row.
The bowl (bottom of the J)
Row 1: Ch 8, sc in 2nd ch from hook and in each ch across, turn. (7 sc)
Row 2: Ch 1, 2 sc in first st, sc in next 5 sts, 2 sc in last st, turn. (9 sc)
Row 3: Ch 1, sc in each st across, turn. (9 sc)
Checkpoint: the piece is 1.8 in (4.6 cm) wide. Rows 1 and 2 give the bowl its rounded lower corners.
The stem
Row 4: Ch 1, sc in first 4 sts, turn. Leave the remaining 5 sts unworked. (4 sc)
Rows 5–14: Ch 1, sc in each st across, turn. (4 sc per row)
At the end of Row 14 you’re at the inner edge of the stem, which faces the unworked sts of Row 3. Do not fasten off.
The crossbar
Row 15: Ch 6, turn. Sc in 2nd ch from hook and in next 4 ch (5 sc), sc in next 3 stem sts, 2 sc in last stem st, turn. (10 sc)
This row is a trim-and-extend row. It has 4 stem sts worked 1 per st, plus 5 new sts on the chain and 1 extra st from the final increase: 4 + 5 + 1 = 10 sc. The chain extension makes the long overhang on the left side of the crossbar. The single increase makes the short overhang on the right.
Rows 16–17: Ch 1, sc in each st across, turn. (10 sc per row)
Fasten off after Row 17.
Checkpoint: the letter is 3.1 in (7.9 cm) tall and 2.0 in (5.1 cm) wide across the crossbar.
The hook tip
Go back to the 5 unworked sts of Row 3. Count 3 sts in from the outer end, away from the stem.
Row 4 (tip): Join peach in the outermost st, ch 1, sc in same st and in next 2 sts, turn. (3 sc) This leaves 2 unworked sts between the tip and the stem, which form the inside of the hook.
Rows 5–6 (tip): Ch 1, sc in each st across, turn. (3 sc per row)
Fasten off. The tip rises about 0.5 in (1.3 cm) above Row 3.
Choosing the RS: Single crochet looks almost the same on both sides. Lay the panel so the crossbar is at the top and the hook tip points to the left, so the J reads correctly. The side facing you is now the RS. Weave in all tails on the back.
Border
Border gauge: 1 sc in each st, 1 sc in each row end. Add extra sts at outside corners and curves, and use sc2tog at inside corners.
Keep the RS facing. Join peach in the top left corner st (the first st of Row 17 on the left).
Round 1: Work around the letter as follows:
- Top edge: 3 sc in corner st, sc in next 8 sts, 3 sc in last st. (14 sc)
- Right end of crossbar: sc in row end of Row 16, 2 sc in row end of Row 15. (3 sc)
- Right inside corner: sc2tog over the underside of the crossbar overhang st and the row end of Row 14. (1 st)
- Stem, right side: sc in each row end of Rows 13 down to 4. (10 sc)
- Bowl, right side: sc in row ends of Rows 3 and 2, 2 sc in row end of Row 1. (4 sc)
- Bottom: sc in the underside of each foundation ch. (7 sc)
- Bowl, left side: 2 sc in row end of Row 1, sc in row ends of Rows 2 and 3. (4 sc)
- Tip, outer side: sc in row ends of tip Rows 4 and 5. (2 sc)
- Tip top: 2 sc in first st of tip Row 6, sc in next st, 2 sc in last st. (5 sc)
- Tip, inner side: sc in row end of tip Row 5. (1 sc)
- Inside of hook: sc2tog over the row end of tip Row 4 and the first unworked st of Row 3. Then sc2tog over the second unworked st of Row 3 and the row end of stem Row 4. (2 sts)
- Stem, left side: sc in each row end of Rows 5 through 13. (9 sc)
- Left inside corner: sc2tog over the row end of Row 14 and the underside of the nearest chain of Row 15. (1 st)
- Crossbar underside: sc in the underside of the next 3 ch, 2 sc in the underside of the last ch. (5 sc)
- Left end of crossbar: sc in row ends of Rows 15 and 16. (2 sc)
Join with a sl st to the first sc. Total: 70 sts.
Check: 14 + 3 + 1 + 10 + 4 + 7 + 4 + 2 + 5 + 1 + 2 + 9 + 1 + 5 + 2 = 70.
Round 2: Ch 1, sl st loosely in each st around. Join to the first sl st. (70 sl st) Fasten off and weave in.
Why the math works: At this gauge one sc is 0.2 in (0.5 cm) wide and one row is about 0.18 in (0.5 cm) tall. Because those are so close, 1 sc per row end lies flat along the stem without ruffling or pulling in. Every stitch, row end, and foundation chain on the outline gets exactly one stitch. Outside corners get 2 extra sts in total (3 sc in one place), and the gentle curves get 1 extra st (2 sc in one place). Inside corners lose 1 st to sc2tog so they don’t bulge. Round 1 adds about 0.2 in (0.5 cm) on every side. Round 2 adds a raised slip-stitch rim but almost no size. That takes the 3.1 x 2.0 in (7.9 x 5.1 cm) panel to 3.5 x 2.4 in (8.9 x 6.1 cm).
Appliqués
Flower (1): With yellow, make a magic ring and work 5 sc into it. Pull the ring tight and join with a sl st to the first sc. (5 sc) Fasten off.
Join white in any sc. (Sl st, ch 2, 2 dc, ch 2, sl st) all in the same st, then move to the next st. Repeat from * around. (5 petals) Fasten off. The flower measures about 1 in (2.5 cm) across.
Rosette (1): With dusty rose, ch 11. Work 2 sc in 2nd ch from hook and in each ch across. (20 sc) The strip will curl. Roll it into a tight spiral, starting from the first end, and sew through the base with the tail. The rosette measures about 0.6 in (1.5 cm) across.
Leaves (2): With sage green, ch 6. Work these stitches in the chs:
- sc in 2nd ch from hook, hdc in next ch, dc in next ch, hdc in next ch, 3 sc in last ch.
- Turn the piece and work along the other side of the chain: hdc in next ch, dc in next ch, hdc in next ch, sc in last ch.
- Sl st to the first sc. (11 sts)
Fasten off and leave a tail for sewing. The foundation chain forms a central vein. Each leaf is about 1 in (2.5 cm) long.
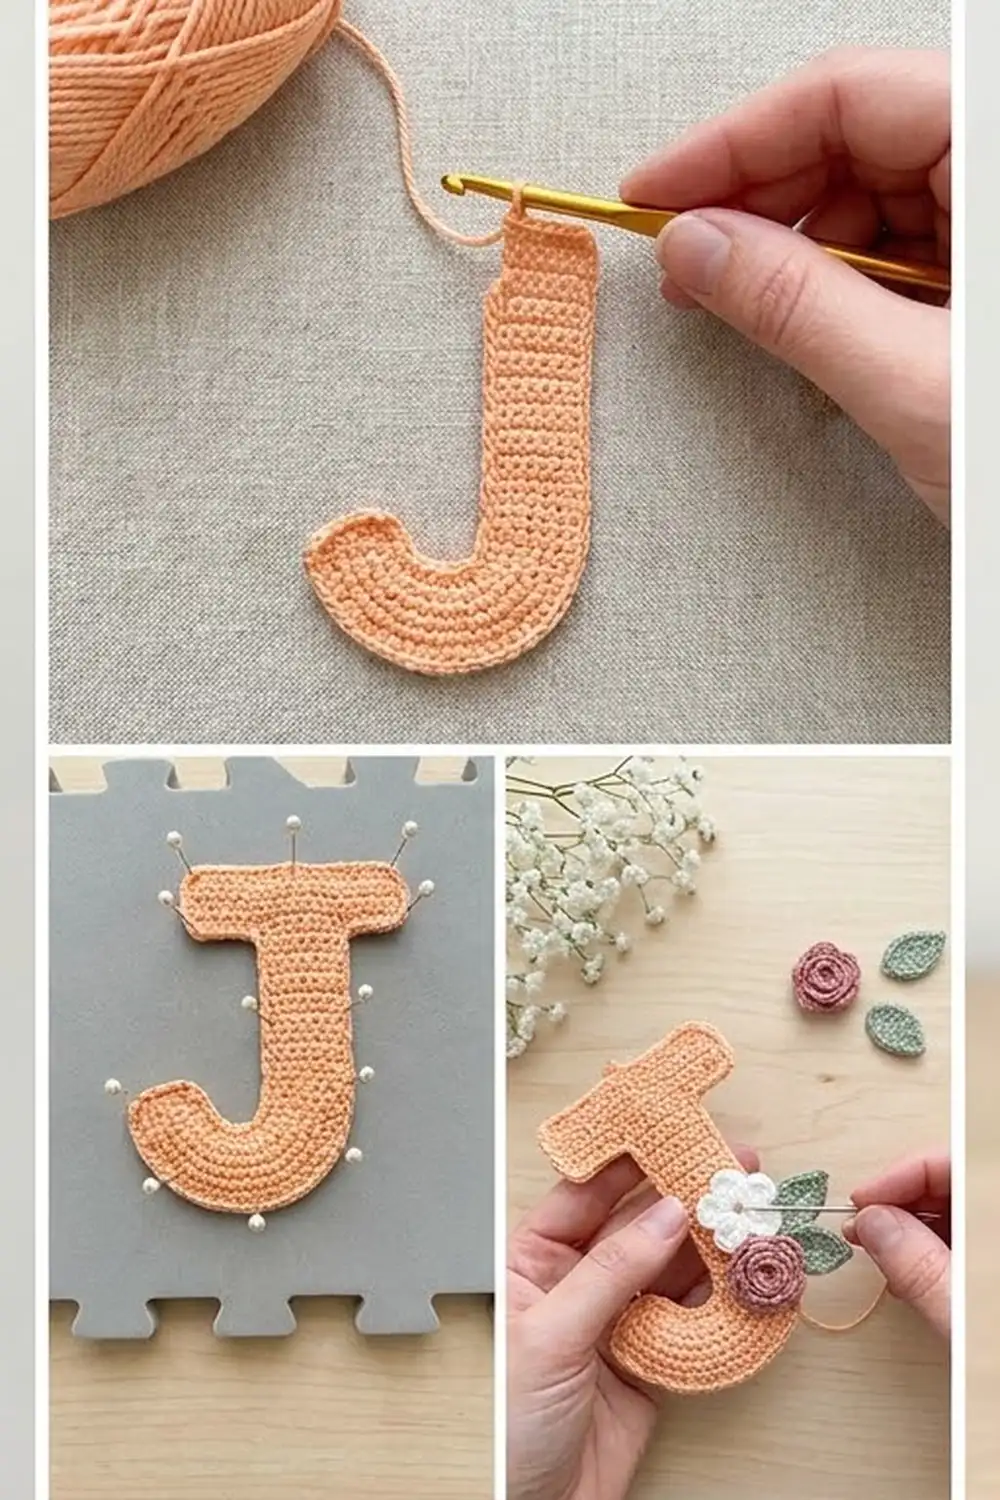
Placement: Lay the letter RS up. Place one leaf on the outside left of the bowl, pointing up and to the left. Place the second leaf just below it, pointing down and to the left. Set the flower over the base of both leaves, at the lower left of the curve. Tuck the rosette to the lower right of the flower, sitting on the bottom of the bowl. Sew each piece on with small stitches through the back of the letter only, so nothing shows on the RS.
Hardware: Open the jump ring sideways with the pliers. Pass it through the top edge of the crossbar between the 5th and 6th sts of Row 17, going under the border as well. Hook on the end link of the chain and close the ring fully.
Final Blocking
- Lightly spray the letter until it is damp. Don’t soak it.
- Lay it RS up on the blocking mat.
- Pin the four crossbar corners first, making the top edge straight and 2.4 in (6.1 cm) wide.
- Pin the bottom of the bowl and the top of the hook tip so the letter is 3.5 in (8.9 cm) tall.
- Gently shape the bowl curve and the inside of the hook with your fingers.
- Let it dry completely, then unpin.
- If you sew the appliqués on before blocking, keep the pins away from the petals and only mist the flowers lightly.
Final Quality-Control Checklist
- Letter measures 3.5 x 2.4 in (8.9 x 6.1 cm), give or take 0.2 in (0.5 cm)
- Border Round 1 has 70 sts and Round 2 has 70 sl st
- Stem is a consistent 4 sts wide, with no extra or missing stitches
- The hook tip points left and the J reads correctly from the RS
- Inside corners lie flat with no holes
- All appliqués are secure and no stitching shows on the RS
- The jump ring is fully closed and anchored through the border
Troubleshooting
The border ruffles: You’re crocheting the border more loosely than the panel. Go down half a hook size for the border only.
The stem pulls in or curves: You may have missed row ends. Count 1 sc per row end against the counts above.
There’s a hole at an inside corner: Make sure the sc2tog catches both the row end and the stitch.
The letter is mirrored: Flip it over. Both sides of sc look nearly the same.
The rosette unrolls: Add two or three more stitches through the base.
Care
Hand wash in cool water with mild soap and lay flat to dry. Keep the metal hardware dry where you can, so the gold finish doesn’t tarnish.
Final Notes
Here is the measurement chain for this J. The panel is 3.1 x 2.0 in (7.9 x 5.1 cm) at 5 sts and 5.5 rows per inch. A 70-stitch border adds 0.2 in (0.5 cm) on every side. Together they give a 3.5 x 2.4 in (8.9 x 6.1 cm) letter, and the ring and chain bring the keychain to about 5 in (12.7 cm). Check your gauge at each checkpoint and the rest falls into place.
Happy crocheting!