

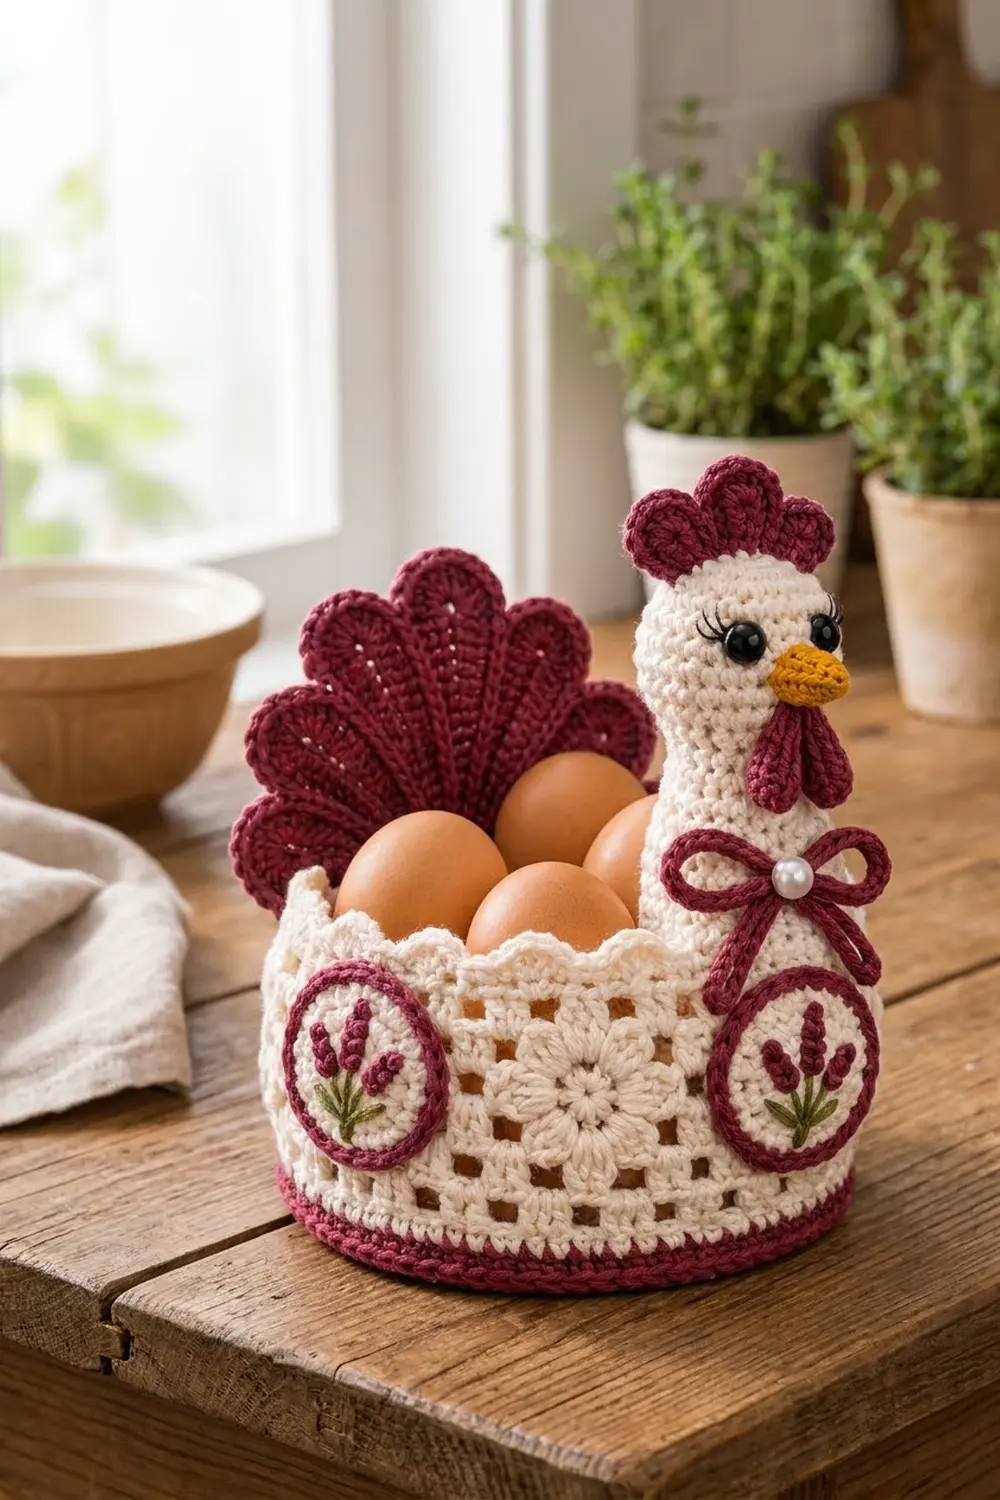
This hen-shaped egg basket makes a practical piece of farmhouse decor. A round burgundy base supports a cream wall of lacy flower squares with a scalloped top edge. A stuffed cream hen head rises at the front, and a ridged burgundy tail fans up at the back.
The colors are cream and deep burgundy, with a mustard beak. Each side has a round cream medallion with a burgundy rim and an embroidered lavender sprig. A burgundy bow with a pearl bead sits at the neck.
The pattern uses US terms. The basket measures 7 in (17.8 cm) across, about 4 in (10.2 cm) tall at the wall, and about 8 in (20.3 cm) tall to the comb.
You make a flat base in spiral rounds and eight flower squares. You join the squares into a ring, add a border to the ring, and join it to the base. The hen parts, tail, medallions, and bow are made separately and sewn on.
Finished Size and Construction
- Finished size: 7 in (17.8 cm) diameter; wall about 4 in (10.2 cm) tall; about 8 in (20.3 cm) tall to the comb
- Skill level: Intermediate
- Terminology: US
- Yarn weight: DK (light #3) cotton
- Hooks: 3.5 mm for the base, squares, borders, and medallions; 3.0 mm for the hen parts
- Number of pieces: 18 (1 base, 8 squares, 1 head and neck, 1 beak, 1 comb, 2 wattle lobes, 1 tail, 2 medallions, 1 bow)
- Layout: 8 squares joined side by side in a closed ring
- Square size: 2.75 in (7.0 cm), 15 stitches per side
- Wall size before border: 22 in (55.9 cm) around x 2.75 in (7.0 cm) tall
- Border depth: 0.6 in (1.5 cm) at the top, 0.2 in (0.5 cm) at the bottom
Materials
Choose a firm cotton DK so the wall stays crisp and the scallops hold their shape.
- Cream: 90 g, about 216 m
- Burgundy: 55 g, about 132 m
- Mustard yellow: 3 g, about 7 m
- Lavender purple: 3 g, about 7 m
- Leaf green: 2 g, about 5 m
These quantities include a margin of about 15 percent.
Tools:
– 3.5 mm and 3.0 mm hooks
– Two 8 mm black safety eyes
– Black embroidery floss
– One 10 mm pearl bead
– Fiberfill
– Tapestry needle and sewing needle
– Stitch markers
– Pins, blocking mat, and spray bottle
Abbreviations (US Terms)
- ch: chain
- sl st: slip stitch
- sc: single crochet
- hdc: half double crochet
- dc: double crochet
- inc: 2 sc in the same stitch
- sc2tog: single crochet 2 together
- BLO: back loop only
- rev sc: reverse single crochet (crab stitch)
- sp: space
- st(s): stitch(es)
3-dc cluster (cl): Work (yarn over, insert hook in st, pull up a loop, yarn over, pull through 2 loops) 3 times in the same st. Then yarn over and pull through all 4 loops.
Beginning cluster (beg cl): Ch 2, then work a 2-dc cluster in the same st.
Gauge and Checkpoints
- Square: 2.75 in (7.0 cm) per side with the 3.5 mm hook
- Base: 22 sc and 23 rounds = 4 in (10.2 cm), about 5.5 sc per inch
- Hen parts: 6 sc and 6 rounds = 1 in (2.5 cm) with the 3.0 mm hook
Make one square first and measure it at these points:
- After Round 1: about 1 in (2.5 cm) across
- After Round 2: about 1.75 in (4.4 cm) across
- After Round 4: about 2.6 in (6.6 cm) per side
- After Round 5: 2.75 in (7.0 cm) per side
If the square is too big, go down 0.25 mm in hook size. If it is too small, go up 0.25 mm. The squares and the base need the same gauge because each edge has 120 stitches.
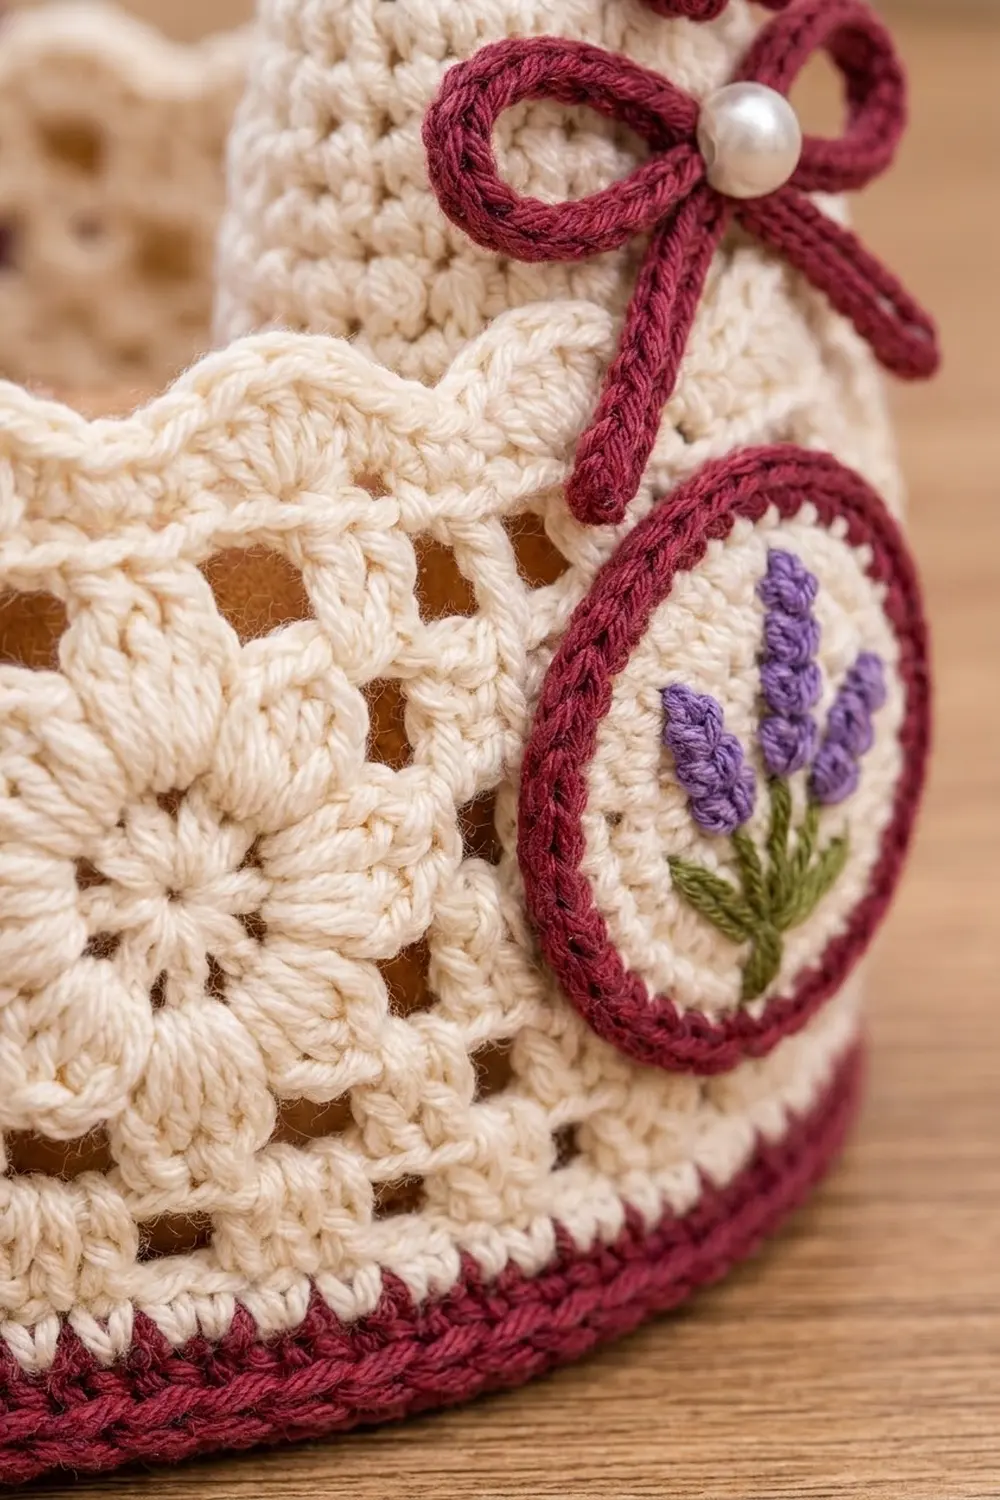
Flower Square (Make 8)
Use cream and the 3.5 mm hook.
Round 1: Magic ring, ch 3 (counts as dc), 15 dc in ring. Sl st to top of ch-3. (16 dc)
Round 2: Beg cl in same st, ch 3, skip next st. Cl in next st, ch 3, skip next st. Repeat from * 6 more times. Sl st to top of beg cl. (8 clusters, 8 ch-3 sps)
The eight clusters make the flower petals.
Round 3: Sl st into next ch-3 sp. Ch 3 (counts as dc), then (2 dc, ch 2, 3 dc) in the same sp for the first corner. Ch 1, 3 dc in next ch-3 sp, ch 1, (3 dc, ch 2, 3 dc) in next ch-3 sp. Repeat from * 2 more times. Ch 1, 3 dc in last ch-3 sp, ch 1. Sl st to top of beginning ch-3.
Each side has 11 sts between the corner ch-2 sps: 3 dc, ch 1, 3 dc, ch 1, 3 dc. (44 sts plus 4 corner ch-2 sps)
Round 4 (window mesh): Sl st in next 2 dc and into the corner ch-2 sp. Ch 3 (counts as dc), ch 2, dc in same sp. (Ch 1, skip next st, dc in next st) 5 times, ch 1, skip next st, (dc, ch 2, dc) in corner sp. Repeat from * around, leaving out the last corner. Sl st to 3rd ch of beginning ch-3.
Each side has 13 sts from corner dc to corner dc: 7 dc and 6 ch-1 sps. The ch-1 sps make the small windows around the flower. (52 sts plus 4 corner ch-2 sps)
Round 5: Ch 1. Sc in each dc and each ch-1 sp along the side, (sc, ch 2, sc) in corner sp. Repeat around. Sl st to first sc. Fasten off.
Each side has 15 sc, including the corner sc at each end. (60 sc plus 4 corner ch-2 sps)
Checkpoint: 2.75 in (7.0 cm) per side.
Make All Pieces
Make 8 cream squares. Each uses about 6 g, for 48 g total. They form one strip that closes into a ring:
[ 1 ][ 2 ][ 3 ][ 4 ][ 5 ][ 6 ][ 7 ][ 8 ] -> 8 joins back to 1
The seam between squares 8 and 1 is the front, where the neck goes. The seam between squares 4 and 5 is the back, where the tail goes. The medallions go on squares 2 and 7.
Joining
Use cream and a slip-stitch seam. Hold two squares with right sides together. Work through the back loops of both layers: sl st in the corner ch-2 sps, then in each of the 15 pairs of sc, then in the final corner ch-2 sps.
Join square 1 to 2, then 2 to 3, and so on up to 8. Then join 8 to 1 to close the ring, for 8 seams in total. Joining adds no stitches. The corner ch-2 sps disappear into the seams.
Tension: Keep your slip stitches as loose as the sc under them. Tight seams will make the ring pucker.
Checkpoint: The ring measures 22 in (55.9 cm) around. Laid flat, it measures 11 in (27.9 cm) wide x 2.75 in (7.0 cm) tall.
Base
Use burgundy and the 3.5 mm hook. Work in spiral rounds and mark the first stitch of each round.
Round 1: 6 sc in magic ring. (6 sc)
Round 2: Inc in each st. (12 sc)
Round 3: (Sc 1, inc) 6 times. (18 sc)
Rounds 4–20: Increase 6 sts per round, adding one more sc before each inc every round. For example:
– Round 4: (sc 2, inc) 6 times (24 sc)
– Round 10: (sc 8, inc) 6 times (60 sc)
– Round 20: (sc 18, inc) 6 times (120 sc)
Stagger the increases so the base stays round.
Checkpoint: The base measures 3.5 in (8.9 cm) across after Round 10 and 7 in (17.8 cm) across after Round 20.
Round 21: Sc BLO in each st. (120 sc) This turns the edge upward.
Rounds 22–23: Sc in each st. (120 sc) Don’t fasten off.
The band is about 0.5 in (1.3 cm) tall.
Border
Border gauge: same as the base, about 5.5 sc per inch.
Each square gives 15 sts to the top edge and 15 sts to the bottom edge. That makes 8 x 15 = 120 sts on each edge. Never work into the ch-2 sps at the seams.
Bottom Round 1 (cream): Join yarn at a seam. Ch 1, sc in each st around. Sl st to first sc and fasten off. (120 sc)
Base join (burgundy): Set the ring inside the base band with wrong sides together, lining up the band’s last round with Bottom Round 1. Using the live burgundy loop, sl st through both layers, one stitch to one stitch. Fasten off. (120 sl st) This makes the raised ridge at the bottom of the wall.
Top Round 1 (cream): Join yarn at a seam. Ch 1, sc in each st around. Sl st to first sc. (120 sc)
Top Round 2 (scallops): Ch 1, sc in same st. Skip 2 sts, 5 dc in next st, skip 2 sts, sc in next st. Repeat around. End with skip 2, 5 dc, skip 2, then sl st to first sc. (20 scallops)
Why the math works:
– The wall edge has 8 x 15 = 120 sts.
– The base gains 6 sts per round, so Round 20 has 6 x 20 = 120 sts. The two edges join one stitch to one stitch.
– Each scallop uses 6 sts, so 120 / 6 = 20 scallops, which is exactly 2.5 per square.
Checkpoint: About 4 in (10.2 cm) from the base ridge to the tips of the scallops.
Hen Head and Neck
Use cream and the 3.0 mm hook. Work in spiral rounds.
Round 1: 6 sc in magic ring. (6 sc)
Round 2: Inc in each st. (12 sc)
Round 3: (Sc 1, inc) 6 times. (18 sc)
Round 4: (Sc 2, inc) 6 times. (24 sc)
Rounds 5–9: Sc in each st. (24 sc)
Insert the safety eyes between Rounds 6 and 7, 7 sts apart. Embroider three black lashes above each eye.
Round 10: (Sc 2, sc2tog) 6 times. (18 sc) Stuff the head.
Rounds 11–22: Sc in each st. (18 sc)
Round 23: (Sc 5, inc) 3 times. (21 sc)
Round 24: (Sc 6, inc) 3 times. (24 sc)
Round 25: (Sc 7, inc) 3 times. (27 sc)
Round 26: (Sc 8, inc) 3 times. (30 sc)
Rounds 27–28: Sc in each st. (30 sc)
Fasten off and leave a long tail. Stuff the neck firmly, but leave the bottom 0.75 in (1.9 cm) soft so it can lie flat against the wall.
Checkpoint: The piece is about 4.75 in (12.1 cm) tall. The base of the neck flattens to about 2.5 in (6.4 cm) wide.
Attach: Sew the neck inside the front wall over the seam between squares 8 and 1, with its bottom 1.5 in (3.8 cm) below the rim. Stitch all the way around where the neck touches the wall.
Beak, Comb, and Wattle
Beak (mustard, 3.0 mm hook):
– Round 1: 4 sc in magic ring. (4 sc)
– Round 2: (sc 1, inc) twice. (6 sc)
– Round 3: (sc 2, inc) twice. (8 sc)
– Round 4: sc in each st. (8 sc)
Stuff lightly. Sew it on centered, just below the eyes.
Comb (burgundy, 3.0 mm hook): Ch 8. Sl st in 2nd ch from hook, then (6 dc in next ch, sl st in next ch) 3 times. (3 scallops) Sew the straight edge along the top of the head. The comb is about 1.5 in (3.8 cm) long.
Wattle lobe (burgundy, make 2): Ch 6. Sc in 2nd ch from hook, hdc in next ch, dc in next 2 chs, 6 dc in last ch. Turn to the other side of the chain and work dc in next 2 chs, hdc in next ch, sc in last ch. (14 sts) Each teardrop is about 1.25 in (3.2 cm) long. Sew both lobes side by side under the beak with the points down.
Tail Fan
Use burgundy and the 3.0 mm hook. Make 6 feathers.
Round 1: Ch 12. Sc in 2nd ch from hook, hdc in next ch, dc in next 8 chs, 7 dc in last ch. Turn to the other side of the chain and work dc in next 8 chs, hdc in next ch, sc in last ch. (27 sts)
Round 2 (outline): Sc BLO in each st, working 2 sc in each of the 7 tip sts. Sl st to first sc and fasten off. (27 sts worked 1-per-stitch + 7 extra = 34 sc)
The unworked front loops leave a ridge around each feather. Each feather is about 3.5 in (8.9 cm) long.
Overlap the narrow ends of the feathers by 0.5 in (1.3 cm) and sew them into a fan about 6 in (15.2 cm) wide. Sew the fan inside the back wall over the seam between squares 4 and 5, with its bottom 1 in (2.5 cm) below the rim.
Medallions (Make 2)
Use the 3.5 mm hook.
Rounds 1–5 (cream): 6 sc in magic ring, then increase 6 sts per round. (6, 12, 18, 24, 30 sc)
Round 6 (burgundy): (Sc 4, inc) 6 times. (36 sc)
Round 7 (burgundy): Rev sc in each st. (36 sts) Fasten off.
Checkpoint: about 2.25 in (5.7 cm) across.
Embroidery:
1. With green, stitch three stems 0.75 in (1.9 cm) long that fan out from one point.
2. Add a small leaf on each side.
3. With lavender, cover the upper part of the stems with lazy-daisy stitches.
Sew the medallions to the centers of squares 2 and 7.
Bow
With burgundy and the 3.0 mm hook, ch 50. Sl st in 2nd ch from hook and in each ch across. (49 sl st, about 9 in / 22.9 cm) Tie it in a bow and sew it to the front of the neck, 1 in (2.5 cm) above the rim. Sew the pearl bead to the knot.
Final Blocking
- Mist the wall until it is damp.
- Fill the basket with a towel, or with a 7 in (17.8 cm) bowl wrapped in plastic.
- Straighten each square and open up the windows with your fingertips.
- Pin the scallops so they stand up.
- Pin the tail flat in a fan shape.
- Let it dry completely, then remove the pins.
Final Quality-Control Checklist
- Each square is 2.75 in (7.0 cm) with 15 sc per side
- The ring is 22 in (55.9 cm) around with 8 flat seams
- The base has 120 sts and measures 7 in (17.8 cm) across
- There are 20 even scallops
- The neck stands upright and is sewn all the way around
- The eyes are level and the beak is centered
- The medallions sit at the same height
- All ends are woven in on the inside
Troubleshooting
The wall ruffles above the base: The squares are too big. Make them again with a smaller hook.
The wall pulls the base inward: The squares are too small. Go up a hook size.
The base cups too early: You missed an increase. Each round’s count should be a multiple of 6.
The scallops don’t come out even: You worked into a ch-2 sp at a seam. Recount to 120 and redo the round.
The head tips forward: Stuff the neck more firmly and add a second line of stitching.
The feathers curl: Steam them lightly and pin them flat to dry.
Care
Take the eggs out first. Hand wash in cold water and lay flat to dry, reshaping it over a bowl; never tumble dry.
Final Notes
Each measurement leads to the next. A 2.75 in (7.0 cm) square with 15 sts per side makes a 22 in (55.9 cm) ring of 120 sts. That ring matches a 120-st base that is 7 in (17.8 cm) across. A 0.6 in (1.5 cm) scalloped border brings the wall to about 4 in (10.2 cm). Check each stage as you go and the hen will come together neatly.
Happy crocheting!