

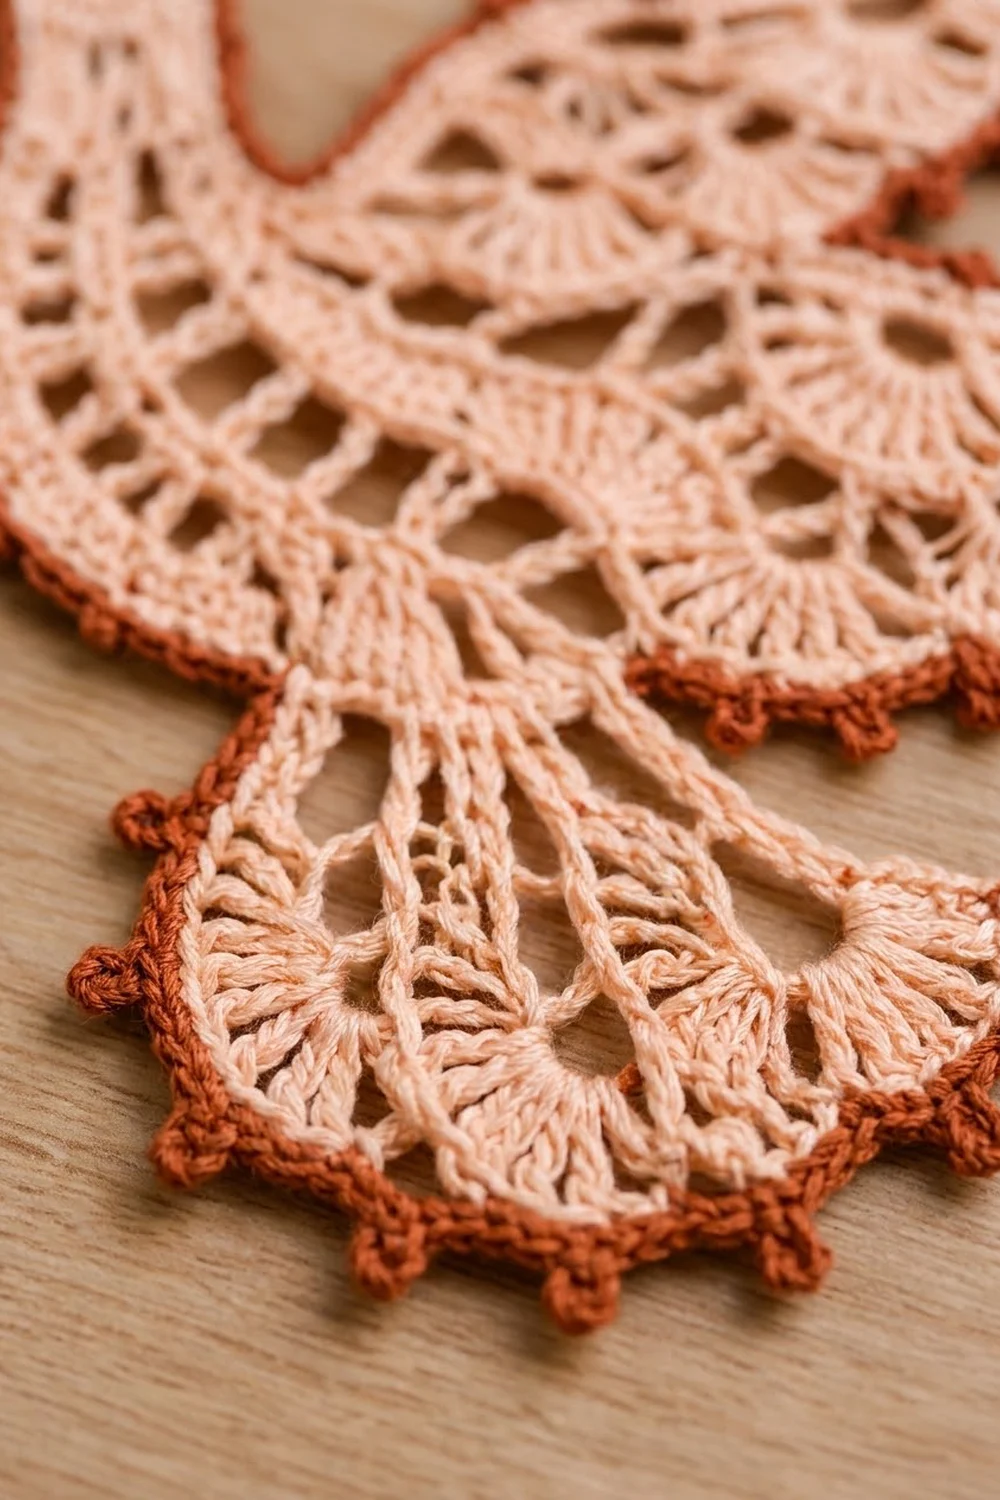
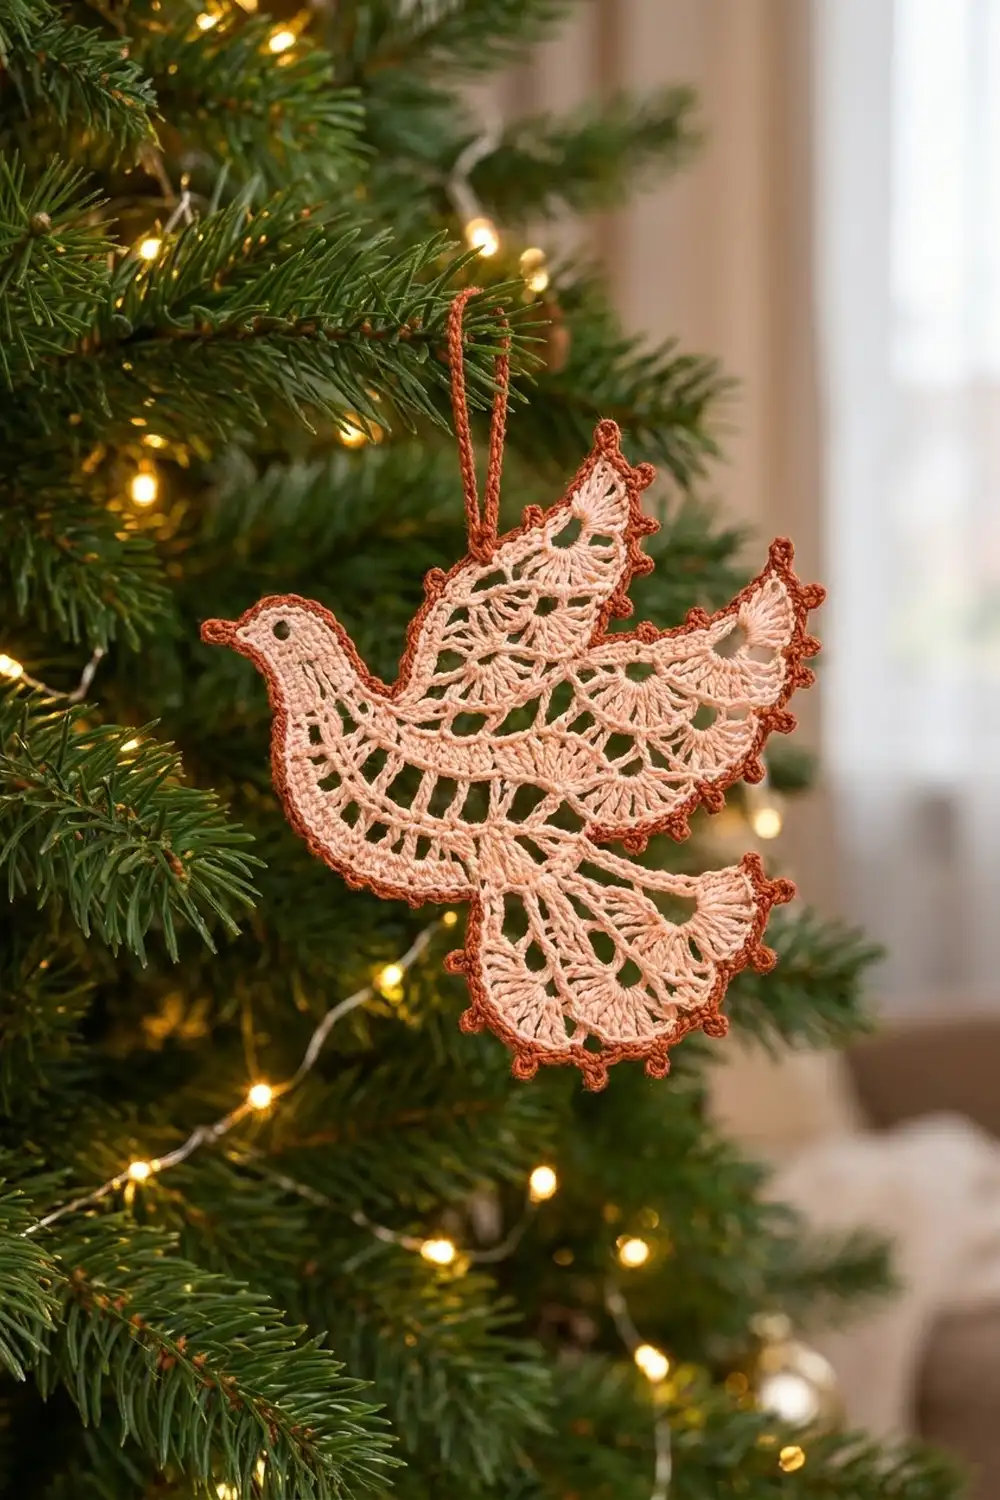
This lacy dove ornament is worked in fine cotton thread. It has a soft peach body, two raised wings and a fanned tail, and it’s finished with a rust-colored picot edge and a sturdy hanging loop.
The palette uses just two colors. Peach makes up the whole lace body, and a warm rust (terracotta) outlines the silhouette and forms the loop.
The pattern uses US crochet terms. The finished dove measures about 5.25 in (13.3 cm) wide by 4.25 in (10.8 cm) tall, not counting the loop. The loop adds about 1.5 in (3.8 cm) above the front wing tip.
The dove is one continuous piece. First you work an oval body in two rounds around a foundation chain, with an eye hole built into the head. Then two wings and a tail are worked in short rows straight off the body’s edge spaces, each ending in a row of graded fans. A two-round rust border with picots outlines everything, and a crocheted loop is added at the top.
Finished Size and Construction
- Finished size: 5.25 in x 4.25 in (13.3 cm x 10.8 cm), plus a 1.5 in (3.8 cm) loop
- Skill level: Intermediate (thread work, working into spaces and row ends)
- Terminology: US crochet terms
- Yarn weight: Size 10 crochet cotton thread (Lace / 0)
- Hook: 1.75 mm steel hook
- Number of pieces: 1 (body, wings and tail are worked as one piece)
- Layout: A single dove motif, head facing left, wings rising up and to the right, tail fanning down and to the right
- Piece size before border: 4.75 in x 3.75 in (12.1 cm x 9.5 cm)
- Border depth: about 0.25 in (0.6 cm) on every edge
Materials
Use a mercerized size 10 cotton thread. Mercerized cotton has a slight sheen, keeps the fans crisp, and takes starch well. Avoid fuzzy or slubby threads, because they hide the lattice.
- Color A (Peach): 8 g, about 32 m (35 yd)
- Color B (Rust / Terracotta): 4 g, about 16 m (17.5 yd)
The quantities include a margin for a test gauge swatch and for weaving in ends.
Tools:
- 1.75 mm steel crochet hook
- Fine tapestry needle or sewing needle with a large eye
- Small sharp scissors
- Rustproof pins and a foam blocking board
- Spray starch or a 1:1 mix of white craft glue and water
- Measuring tape or ruler
Abbreviations (US Terms)
- ch – chain
- sl st – slip stitch
- sc – single crochet
- hdc – half double crochet
- dc – double crochet
- tr – treble crochet
- sk – skip
- sp(s) – space(s)
- st(s) – stitch(es)
- RS – right side
Special stitch:
- Picot: ch 3, sl st in the 3rd ch from the hook (the first ch made).
Gauge and Checkpoints
Gauge: 10 dc = 1 in (2.5 cm), and 4 dc rows = 1 in (2.5 cm) with Color A and a 1.75 mm hook.
Make one dove as your test piece. Thread tension varies a lot, so the quick body is your gauge check.
Checkpoints:
- After Body Round 1: 3.25 in (8.3 cm) long x 0.75 in (1.9 cm) tall
- After Body Round 2: 3.75 in (9.5 cm) long x 1.25 in (3.2 cm) tall
- Each wing: 1.5 in (3.8 cm) from the body edge to the wing tip
- Tail: extends 1 in (2.5 cm) beyond the body
- Before border: 4.75 in x 3.75 in (12.1 cm x 9.5 cm)
- After border: 5.25 in x 4.25 in (13.3 cm x 10.8 cm)
If your body is too long, go down to a 1.5 mm hook. If it’s too short, go up to a 2.0 mm hook. Check the body before you start the wings, because every later section is sized from the body’s spaces.
Body
With Color A, ch 31.
Round 1 (RS): Sc in the 2nd ch from the hook and in the next 3 ch, hdc in the next 4 ch, dc in the next 21 ch, 5 dc in the last ch (tail end). Working along the opposite side of the foundation chain: dc in the next 21 ch, hdc in the next 4 ch, sc in the next 3 ch, 2 sc in the same ch as the first sc. Join with a sl st to the first sc. (64 sts)
Number the stitches for reference. Sts 1–4 are sc and sts 5–8 are hdc. Sts 9–29 are the belly dc, and sts 30–34 are the 5 tail-end dc. Sts 35–55 are the back dc, sts 56–59 are hdc and sts 60–64 are sc. St 64 is the beak point.
Round 2 (lattice and eye): Ch 1, sc in sts 1–4, hdc in sts 5–8. Belly: (dc in the next st, ch 1, sk the next st) 10 times, dc in st 29, ch 1. Tail end: (dc in the next st, ch 1) 5 times over sts 30–34. Back: (dc in the next st, ch 1, sk the next st) 10 times, dc in st 55. Head: hdc in sts 56–59, sc in st 60, ch 2, sk st 61 (eye), sc in sts 62 and 63, 3 sc in st 64 (beak). Join with a sl st to the first sc. Fasten off.
Round 2 count: 10 sc + 8 hdc + 27 dc = 45 sts, plus 26 ch-1 sps and 1 ch-2 eye sp. The ch-1 sps are 11 belly sps, 5 tail sps and 10 back sps.
Name the spaces for the next sections. The 5 tail sps are T1–T5, from belly side to back side. The 10 back sps are B1–B10, from tail side to head side.
Rear Wing
The wing is worked in rows into back spaces B1–B5. Row 1 is RS.
Row 1: Join Color A in B1, ch 3 (counts as dc), 2 dc in the same sp, 3 dc in each of B2–B5. Turn. (15 dc)
Row 2: Ch 4 (counts as dc and ch 1), sk the next st, dc in the next st, (ch 1, sk the next st, dc in the next st) 6 times. Turn. (8 dc, 7 ch-1 sps)
Row 3: Ch 3 (counts as dc), 2 dc in each ch-1 sp, dc in the 3rd ch of the turning ch. Turn. (16 dc)
Row 4: Ch 5 (counts as dc and ch 2), sk the next 2 sts, dc in the next st, (ch 2, sk the next 2 sts, dc in the next st) 4 times. Turn. (6 dc, 5 ch-2 sps)
Row 5 (graded fans): Sl st in the first dc and into the first ch-2 sp. Ch 4 (counts as tr) and work 8 tr in the same sp for the 9-tr tip fan. Sc in the next dc, 7 dc in the next sp, sc in the next dc, 6 dc in the next sp, sc in the next dc, 5 dc in the next sp, sc in the next dc, 4 dc in the last sp, sc in the 3rd ch of the turning ch. Fasten off. (9 tr + 22 dc + 5 sc = 36 sts)
Row 5 starts on the tail side, so the largest fan forms a pointed tip that sweeps back toward the tail.
Front Wing
Work exactly as for the Rear Wing, but join in B6 and work Row 1 into B6–B10. You’ll have the same counts: 15, 8 + 7 sps, 16, 6 + 5 sps, and 36 sts.
There is one exposed body dc between B5 and B6. It forms a small valley between the two wings.
Tail
Row 1: Join Color A in T1, ch 3 (counts as dc), 2 dc in the same sp, 3 dc in each of T2–T5. Turn. (15 dc)
Row 2: Work as for Wing Row 2. Turn. (8 dc, 7 ch-1 sps)
Row 3 (tail fans): Sl st in the first dc and into the first ch-1 sp, ch 3 (counts as dc), 4 dc in the same sp. (Sc in the next ch-1 sp, 5 dc in the next ch-1 sp) 3 times. Fasten off. (4 fans x 5 dc = 20 dc, plus 3 sc = 23 sts)
Checkpoint: The piece should now measure 4.75 in x 3.75 in (12.1 cm x 9.5 cm). Pin it flat and check before you start the border.
Border
Border gauge: 10 sc = 1 in (2.5 cm) along the edge.
The border uses these placement rules:
- 1 sc in each stitch.
- 1 sc in each ch-1 sp.
- 1 sc in each chain of the eye, so the hole stays open.
- 2 sc around the post of each row end.
Round 1: With RS facing, join Color B in the center sc of the beak. Work around in this order:
- Beak: 3 sc in the center beak sc (3)
- Belly: sc in the last beak sc, the 4 sc, the 4 hdc, then 1 sc in each of the 11 belly dc and in each of the 11 belly ch-1 sps (31)
- Tail, belly side: 2 sc in each of the 2 row ends (4)
- Tail fans: sc in each of the 23 sts (23)
- Tail, back side: 2 sc in each of the 2 row ends (4)
- Body dc (st 35 position): 1 sc (1)
- Rear wing, tail side: 2 sc in each of the 4 row ends (8)
- Rear wing fans: sc in each of the 36 sts (36)
- Rear wing, head side: 2 sc in each of the 4 row ends (8)
- Valley dc: 1 sc (1)
- Front wing, tail side: 8 sc
- Front wing fans: 36 sc
- Front wing, head side: 8 sc
- Head: sc in the last back dc, the 4 hdc and the sc, 1 sc in each of the 2 eye chains, then sc in the 2 sc and the first beak sc (11)
Join with a sl st to the first sc. (182 sc)
Round 2 (picots): Ch 1. Work 1 sc in each sc around, adding picots on the fan edges only:
- Tail fans: (sc in the next 3 sc, picot) 7 times, sc in the next 2 sc (23 sc, 7 picots)
- Rear wing fans: (sc in the next 3 sc, picot) 12 times (36 sc, 12 picots)
- Front wing fans: (sc in the next 3 sc, picot) 12 times (36 sc, 12 picots)
Every other section gets plain sc. Join with a sl st to the first sc and fasten off. (182 sc, 31 picots)
Why the math works: A dc row end is about 0.25 in (0.6 cm) tall, and 2 sc cover about 0.2 in (0.5 cm). That keeps the side edges flat without ruffling. Working 1 sc per stitch and per ch-1 sp matches the 10-per-inch gauge of the body. The 3 sc at the beak turn the sharp point without cupping. The fan sections take exactly one sc per fan stitch, so the scallop shapes carry straight through to the border. Round 2 changes no stitch counts, and the picots sit on top.
Hanging Loop
With Color B, join with a sl st in the 5th sc of the front wing fan section. This is the center of the 9-tr tip fan. Ch 30, then sl st in the same sc to form a loop. Work 36 sc over the ch-30 loop and sl st in the base. Fasten off.
The finished loop hangs about 1.5 in (3.8 cm) above the wing tip.
Final Blocking
- Weave in all ends along same-color stitches, then trim them closely.
- Soak the dove in cool water for 5 minutes, then press it gently in a towel.
- Pin it to the board RS up at 5.25 in x 4.25 in (13.3 cm x 10.8 cm).
- Pin the beak point, both wing tips and the tail tip first.
- Pin each picot outward, then open every lattice space and fan.
- Make sure the eye hole is round, opening it with a hook tip if needed.
- Spray with starch or brush on the glue mix, and let it dry completely for 12–24 hours.
- Unpin the dove and check the measurements again.
Final Quality-Control Checklist
- Body Round 1 = 64 sts and Round 2 = 45 sts + 26 ch-1 sps + eye
- Each wing ends with 36 sts and the tail ends with 23 sts
- Border Round 1 = 182 sc and Round 2 = 31 picots
- The eye hole is open and sits on the back side of the head
- Both wing tips point back toward the tail
- Size before border is 4.75 in x 3.75 in (12.1 cm x 9.5 cm)
- Finished size is 5.25 in x 4.25 in (13.3 cm x 10.8 cm)
- The loop is secure and centered on the front wing tip
Troubleshooting
- Body curls: Your Round 1 tension is too tight. Go up a hook size for the foundation chain only.
- Border ruffles: You may have too many sc on the row ends. Use exactly 2 per row end.
- Border pulls in: Check that the beak has 3 sc and that each ch-1 sp has 1 sc.
- Wings overlap too much: Pin them apart while blocking. A 0.1 in (0.3 cm) gap at the valley is normal.
- Fans look flat: Make sure the sc between fans goes into the dc, not into a space.
- Eye hole closed up: You worked the border into the ch-2 sp instead of into each chain. Rip back and work 1 sc into each chain.
Care
Hand wash in cool water with mild soap, press it dry in a towel, and re-block with starch. Store the ornament flat in tissue paper so the wings and picots stay crisp.
Final Notes
The measurement chain is short and reliable. A gauge of 10 dc per 1 in (2.5 cm) gives a 3.75 in (9.5 cm) body. The wings add 1.5 in (3.8 cm) and the tail adds 1 in (2.5 cm), for 4.75 in x 3.75 in (12.1 cm x 9.5 cm). The border adds 0.25 in (0.6 cm) on every side, for a finished 5.25 in x 4.25 in (13.3 cm x 10.8 cm). Check each stage and your dove will come out the right size and lie flat.
Happy crocheting!