

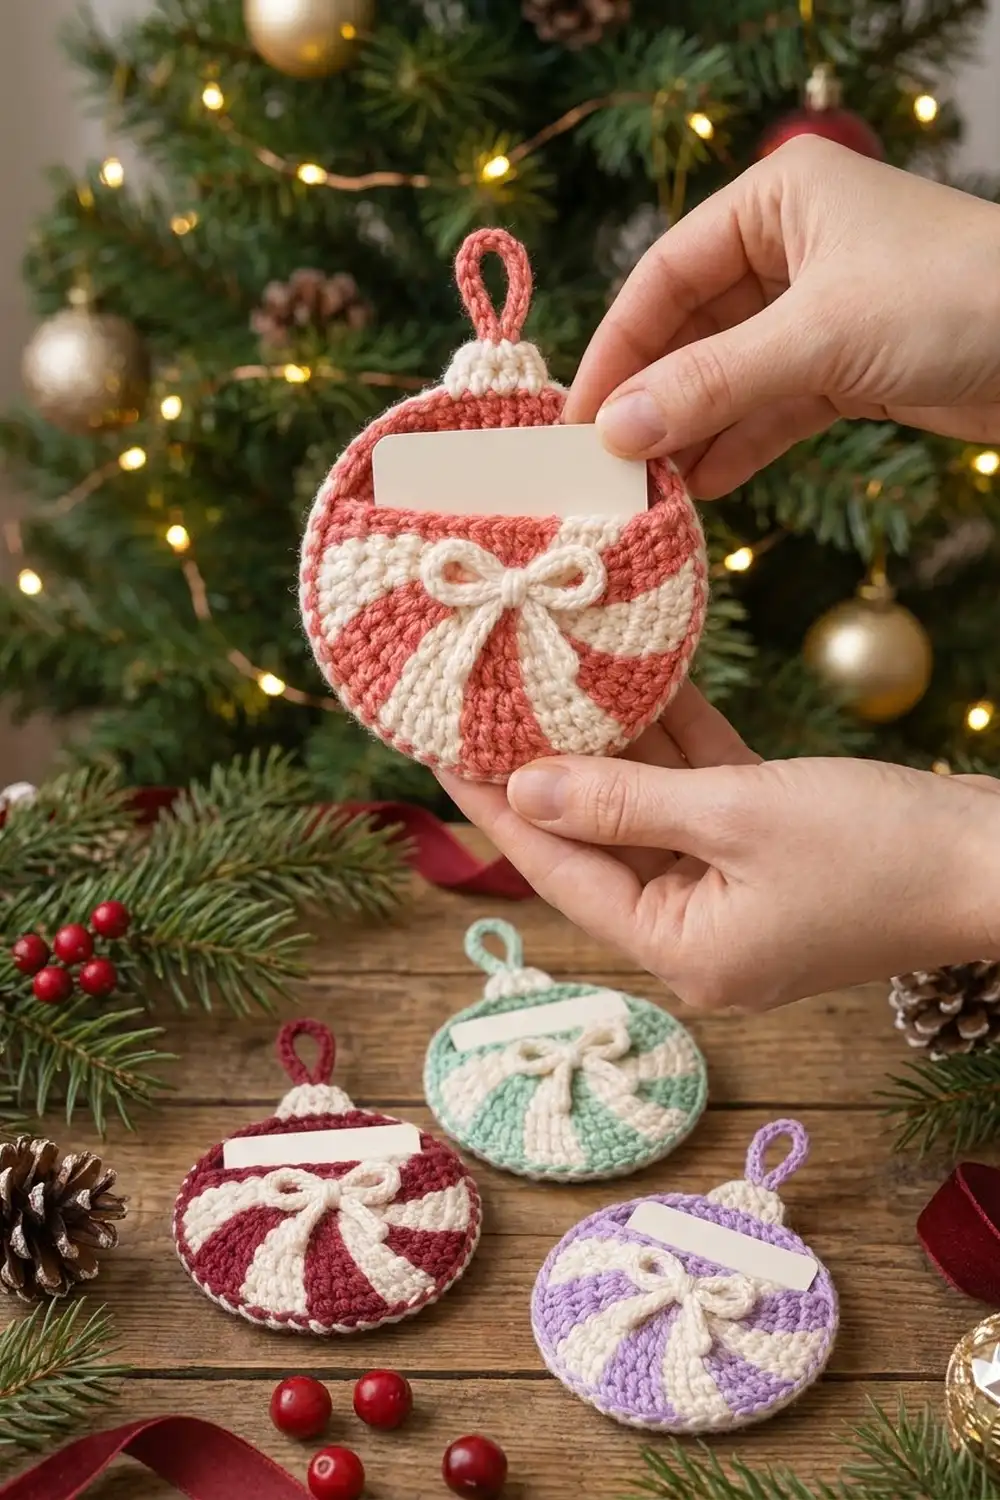
This little ornament has a secret job. From the front it looks like a classic round Christmas bauble with a peppermint swirl, a cream bow, and a coral hanging loop. A gift card slides into the swirl pocket, so it works as a gift tag and a gift wrap in one.
The palette is warm coral and soft cream. The swirl is tapestry single crochet, so the fabric is dense and firm, and a card stays put once it’s tucked in. The cap is ribbed, and the bow is a slip-stitch cord tied into a real bow.
This pattern uses US crochet terms. The round body finishes at 5 in (12.7 cm) across. With the cap and loop, the ornament is about 7 in (17.8 cm) tall.
Construction is simple. You make two flat discs (coral and cream) and a half-circle swirl pocket worked in turned rows. You add a coral band across the pocket’s straight edge. One cream border round joins all three layers. Last, you sew on the cap, loop, and bow.
Finished Size and Construction
- Finished size: 5 in (12.7 cm) diameter body; about 7 in (17.8 cm) tall with the loop
- Skill level: Easy-intermediate (simple color changes)
- Terminology: US
- Yarn weight: #4 worsted, cotton or cotton blend
- Hook: 4.0 mm (G-6)
- Number of pieces: 1 finished ornament, assembled from 6 parts (2 discs, pocket, cap, loop, bow)
- Layout: Layered stack: cream lining at the back, coral disc in the middle, pocket on the front
- Disc size: 4.5 in (11.4 cm) diameter after Round 10
- Size before border: 4.5 in (11.4 cm)
- Border depth: 0.25 in (0.6 cm), 1 round
Materials
Choose a smooth, mercerized or matte cotton in worsted weight. Cotton keeps the stitches crisp and the swirl lines sharp. It also stays stiff enough to hold a card. Acrylic works, but the pocket will be a little softer.
- Coral (Color A): 15 g, about 26 m (coral disc, pocket wedges, band, loop)
- Cream (Color B): 20 g, about 34 m (lining disc, pocket wedges, border, cap, bow)
These quantities include a safety margin of roughly 25%.
Tools:
– 4.0 mm (G-6) crochet hook
– Tapestry needle
– 2 stitch markers
– Scissors
– Pins and a blocking mat or folded towel
– A standard gift card, 3.375 x 2.125 in (8.6 x 5.4 cm), for test-fitting
Abbreviations (US Terms)
- ch – chain
- sc – single crochet
- sl st – slip stitch
- BLO – back loop only
- st(s) – stitch(es)
- RS / WS – right side / wrong side
- inc – 2 sc in the same stitch
Special technique: tapestry sc. Carry the unused color along the top of the previous row and work over it. To change colors, work the last sc of the old color until 2 loops remain on the hook. Yarn over with the new color and pull through. Keep the carried strand relaxed.
Gauge and Checkpoints
Gauge: 16 sc and 18 rows = 4 in (10.2 cm) in sc.
Make the coral disc first. It is your gauge swatch.
- After Round 4: 1.75 in (4.4 cm) across, 24 sts
- After Round 7: 3.25 in (8.3 cm) across, 42 sts
- After Round 10: 4.5 in (11.4 cm) across, 60 sts
If the disc is bigger than 4.5 in (11.4 cm), go down one hook size. If it is smaller, go up one hook size. If the disc cups, your tension is tight, so go up a size. If it ruffles, go down a size. The pocket must match the disc, so don’t change hooks after the coral disc is right.

Coral Disc (Make 1 in Color A)
Work in continuous rounds. Mark the first stitch of each round.
Round 1: Magic ring, 6 sc in ring. (6)
Round 2: Inc in each st around. (12)
Round 3: (Sc 1, inc) 6 times. (18)
Round 4: (Sc 2, inc) 6 times. (24)
Round 5: (Sc 3, inc) 6 times. (30)
Round 6: (Sc 4, inc) 6 times. (36)
Round 7: (Sc 5, inc) 6 times. (42)
Round 8: (Sc 6, inc) 6 times. (48)
Round 9: (Sc 7, inc) 6 times. (54)
Round 10: (Sc 8, inc) 6 times. (60)
Sl st in the next st to smooth the step. Fasten off and weave in the ends. The disc measures 4.5 in (11.4 cm).
Cream Lining Disc (Make 1 in Color B)
Repeat Rounds 1–10 of the coral disc in Color B. (60)
Fasten off and weave in the ends. Check that both discs match in size.
Peppermint Swirl Pocket
The pocket is a half circle worked in turned rows from the center of its straight edge. The center of that straight edge will be the swirl’s center point. There are 6 wedges, alternating coral and cream. The row count grows by 3 each row. Odd rows add 1 st to each coral wedge, and even rows add 1 st to each cream wedge.
Swirl rule: Always place a wedge’s increase at the end of the wedge closest to the right-hand edge of the pocket as you look at the RS. On RS rows, that is the first stitch of the wedge. On WS rows, it is the last stitch. Because the extra stitch always lands on the same side, the wedge lines lean into a swirl.
Rows 1, 3, 5, 7, and 9 are RS rows.
Row 1 (RS): With Color B, magic ring, ch 1, 3 sc in ring, turn. (3)
Row 2 (WS): Join Color A. Ch 1, (inc worked as 1 sc A then 1 sc B) in each st, turn. (6: 3 coral wedges and 3 cream wedges, 1 st each)
Row 3: Ch 1. Work 1 sc B in each cream wedge and inc A in each coral wedge, turn. (9: coral 2, cream 1)
Row 4: Ch 1. Sc A in each coral st, and work 1 inc B in each cream wedge, turn. (12: 2 sts per wedge)
Row 5: Increase each coral wedge by 1. (15: coral 3, cream 2)
Row 6: Increase each cream wedge by 1. (18: 3 sts per wedge)
Row 7: Increase each coral wedge by 1. (21: coral 4, cream 3)
Row 8: Increase each cream wedge by 1. (24: 4 sts per wedge)
Row 9: Increase each coral wedge by 1. (27: coral 5, cream 4)
Row 10: Increase each cream wedge by 1. (30: 5 sts per wedge)
Check the pocket now. The curved edge should match the curve of half a disc, with a straight edge of 4.5 in (11.4 cm). Cut Color B, leaving a 6 in (15.2 cm) tail.
Coral Band
Turn the pocket so the straight edge is at the top and the RS faces you. The row ends make up the straight edge. There are 10 row ends on each side of the ring.
Row 11 (RS): With Color A, join in the end of Row 10 at the right. Ch 1. Work 9 sc evenly across the 10 row ends down to the ring, skipping the end of Row 1. Then work 9 sc across the 10 row ends on the other side, again skipping the Row 1 end, turn. (18)
Row 12: Ch 1, sc in each st across. (18)
Fasten off. The band is 0.5 in (1.3 cm) deep and 4.5 in (11.4 cm) wide, at 4 sts per inch. The pocket is now about 2.75 in (7.0 cm) tall. Weave in all ends on the WS, running each tail through stitches of its own color.
Make All Pieces
Make one of each part per ornament:
- Coral disc: 1 (Color A)
- Cream lining disc: 1 (Color B)
- Swirl pocket with band: 1 (Colors A and B)
- Cap: 1 (Color B)
- Hanging loop: 1 (Color A)
- Bow: 1 (Color B)
Layer layout (side view, front to back):
[ Pocket - lower half, RS out ]
[ Coral disc - full circle    ]
[ Cream lining - full circle  ]
Front view:
        (loop)
        [cap]
     coral disc
   ==== band ====
   \ swirl pocket /
     \_________/
Cap (Color B)
Row 1: Ch 4, sc in 2nd ch from hook and in each ch across, turn. (3)
Rows 2–6: Ch 1, sc BLO in each st across, turn. (3)
Fasten off and leave a 10 in (25.4 cm) tail. Turned sideways, the rows become vertical ribs. The cap is 1.25 in (3.2 cm) wide and 0.75 in (1.9 cm) tall.
Hanging Loop (Color A)
Ch 16. Sl st in the back bump of the 2nd ch from the hook and in each ch across. (15 sl st)
Fasten off and leave a 6 in (15.2 cm) tail. The finished cord is about 3.75 in (9.5 cm) long. Folded in half, it makes a loop about 1.5 in (3.8 cm) tall.
Bow (Color B)
Ch 36. Sl st in the back bump of the 2nd ch from the hook and in each ch across. (35 sl st)
Fasten off. Tie the cord into a bow with loops about 1 in (2.5 cm) long and tails about 1.25 in (3.2 cm) long. The finished bow is about 2 in (5.1 cm) wide. Weave the cord ends into the back of the tails and trim.
Joining
Stack the layers in this order: the cream lining with its WS facing forward, then the coral disc with its RS facing forward, then the pocket with its RS facing forward. Line up the pocket’s curved Row 10 with the lower half of the disc edge. The pocket’s edge has 34 stitches: 2 band row ends, then 30 sts of Row 10, then 2 band row ends. Those 34 stitches sit over 34 stitches of Round 10 on both discs.
Pin the three layers at the band corners and at the bottom point. Each pocket edge stitch now lies over one stitch of each disc, so the join goes stitch to stitch with nothing to ease in.
Keep your tension even and slightly relaxed. Going through three layers tightens stitches, and tight stitches will cup the edge.
The joining round is also the border, worked below.
Size checkpoint: Before joining, lay the stack flat. All edges should line up within 0.125 in (0.3 cm). If the pocket is wider than the discs, block it to size before you join.
Border
Border gauge: Same as the body, 16 sc = 4 in (10.2 cm).
Round 11 (Color B): With the pocket facing you, join Color B at the top left corner of the band. Work through all layers where the pocket is present and through both discs elsewhere. (Sc 9, inc) 6 times. (66)
Stitches 1–34 of Round 10 lie under the pocket. In that stretch, the increases fall on stitches 10, 20, and 30, so the pocket section gets 34 + 3 = 37 border sts. Stitches 35–60 lie above the pocket. In that stretch, the increases fall on stitches 40, 50, and 60, so the upper section gets 26 + 3 = 29 border sts. That gives 37 + 29 = 66.
Sl st to the first sc. Fasten off and weave in the ends between the layers.
Why the math works: A flat sc circle adds 6 sts per round. Round 10 had 60 sts, so Round 11 needs 66. That keeps the edge flat while it adds 0.25 in (0.6 cm) all around. The body goes from 4.5 in (11.4 cm) to 5 in (12.7 cm).
Finishing
- Fold the loop in half. Lay the cut ends on the WS of the cap’s top edge and sew them in place.
- Center the cap over the border at the top of the ornament, opposite the pocket’s bottom point. Let it overlap the border by 0.25 in (0.6 cm), then sew it to the front and back layers.
- Sew the bow’s knot to the center of the band, directly above the swirl center. Tack each loop lightly so the bow stays shaped. Don’t stitch through to the lining, or you’ll close off the pocket.
Final Blocking
- Lightly mist the ornament with water, or hold a steam iron 1 in (2.5 cm) above it. Never press.
- Lay it RS up on a blocking mat.
- Pin the border into a 5 in (12.7 cm) circle at 8 evenly spaced points.
- Smooth the band so it lies straight across the pocket.
- Shape the bow loops with your fingers.
- Slide a gift card wrapped in plastic into the pocket to set its shape.
- Let it dry completely, then remove the pins and the card.
Final Quality-Control Checklist
- Body measures 5 in (12.7 cm) across and lies flat
- Border has 66 sts with no gaps between layers
- Pocket edge is caught all the way from one band corner to the other
- Pocket opening is fully open between the band and the coral disc
- Swirl wedges all lean the same way
- Cap is centered and the loop stands upright
- Bow is centered over the swirl point
- A 3.375 in (8.6 cm) wide card slides in easily
- All ends are woven in, and no carried strands show on the RS
Troubleshooting
- Disc cups: Tension is too tight. Go up a hook size or loosen your increases.
- Disc ruffles: Tension is too loose. Go down a hook size.
- Swirl looks straight instead of curved: The increase wasn’t kept on the same side. Recheck the swirl rule for RS and WS rows.
- Carried yarn shows through: Hold the unused color lower against the work, and tighten your stitches slightly.
- Pocket is wider than the discs: Block it smaller, or rework Row 11 with 8 sc per side.
- Card won’t fit: The band is pulling tight. Rework Rows 11–12 more loosely.
- Border puckers at the pocket: Increases were missed under the pocket. Count to 37 for that section.
Care
Hand wash in cool water and lay flat to dry, reshaping the circle. Remove the card before washing.
Final Notes
The measurement chain is short. Your gauge of 16 sc = 4 in (10.2 cm) gives a 60-st disc of 4.5 in (11.4 cm). The 30-st pocket curve matches half of the disc, and the 18-st band matches its 4.5 in (11.4 cm) width. Then the 66-st border round brings everything to a flat 5 in (12.7 cm) ornament. As long as the coral disc measures right, every other part will line up.
To make the other colorways, swap coral for burgundy, mint, or lilac and keep cream for the swirl, cap, and bow.
Happy crocheting!