

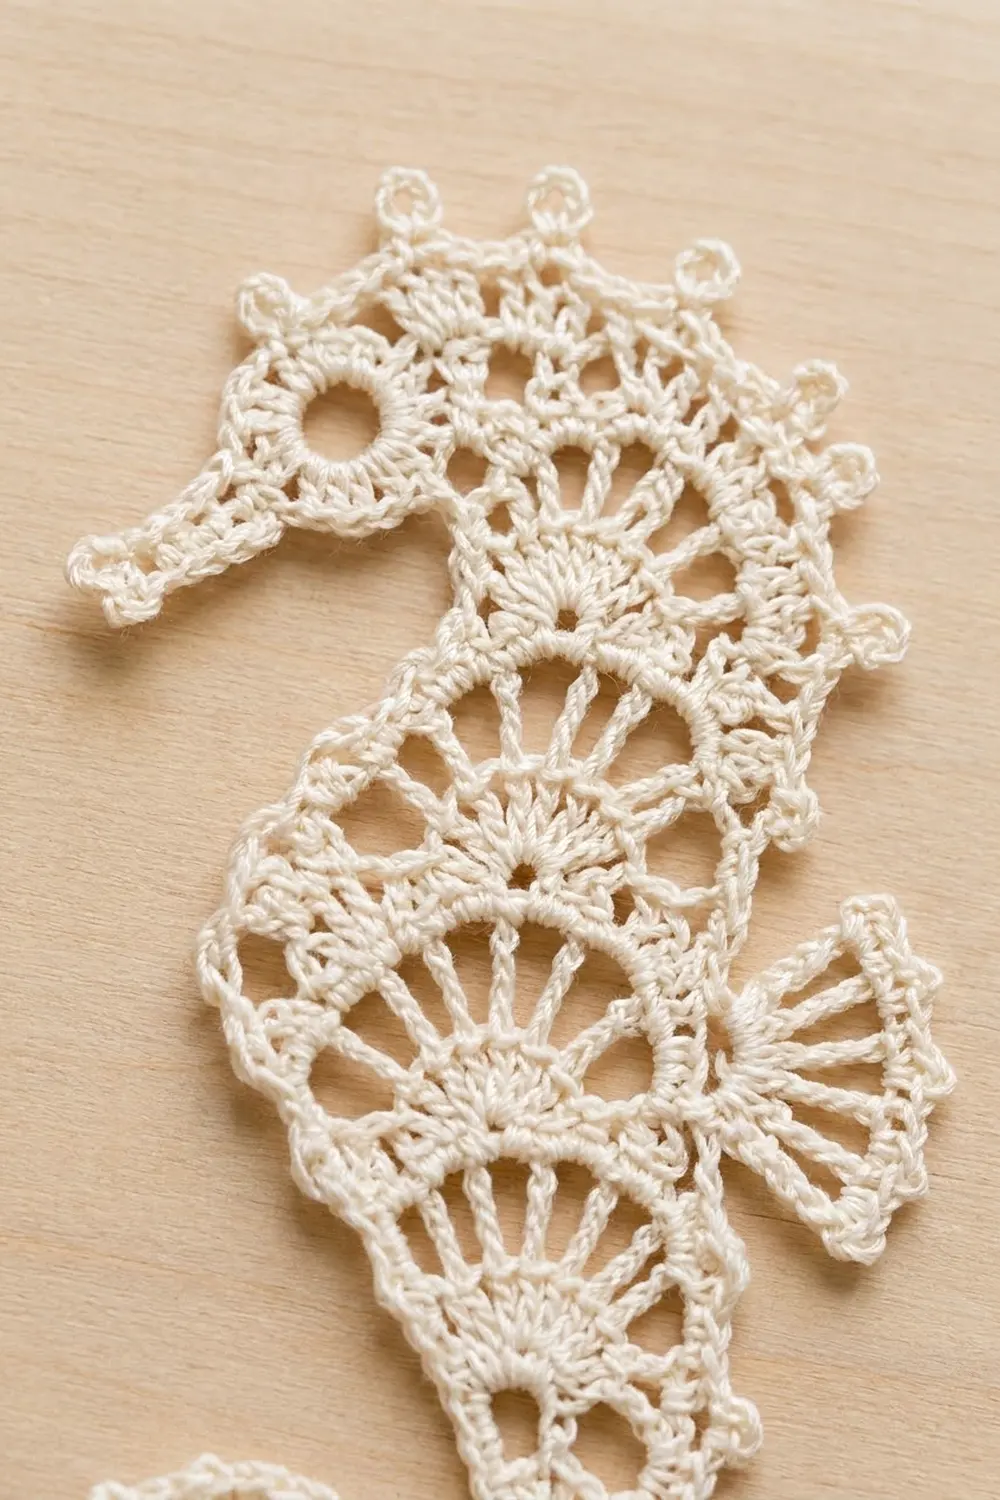
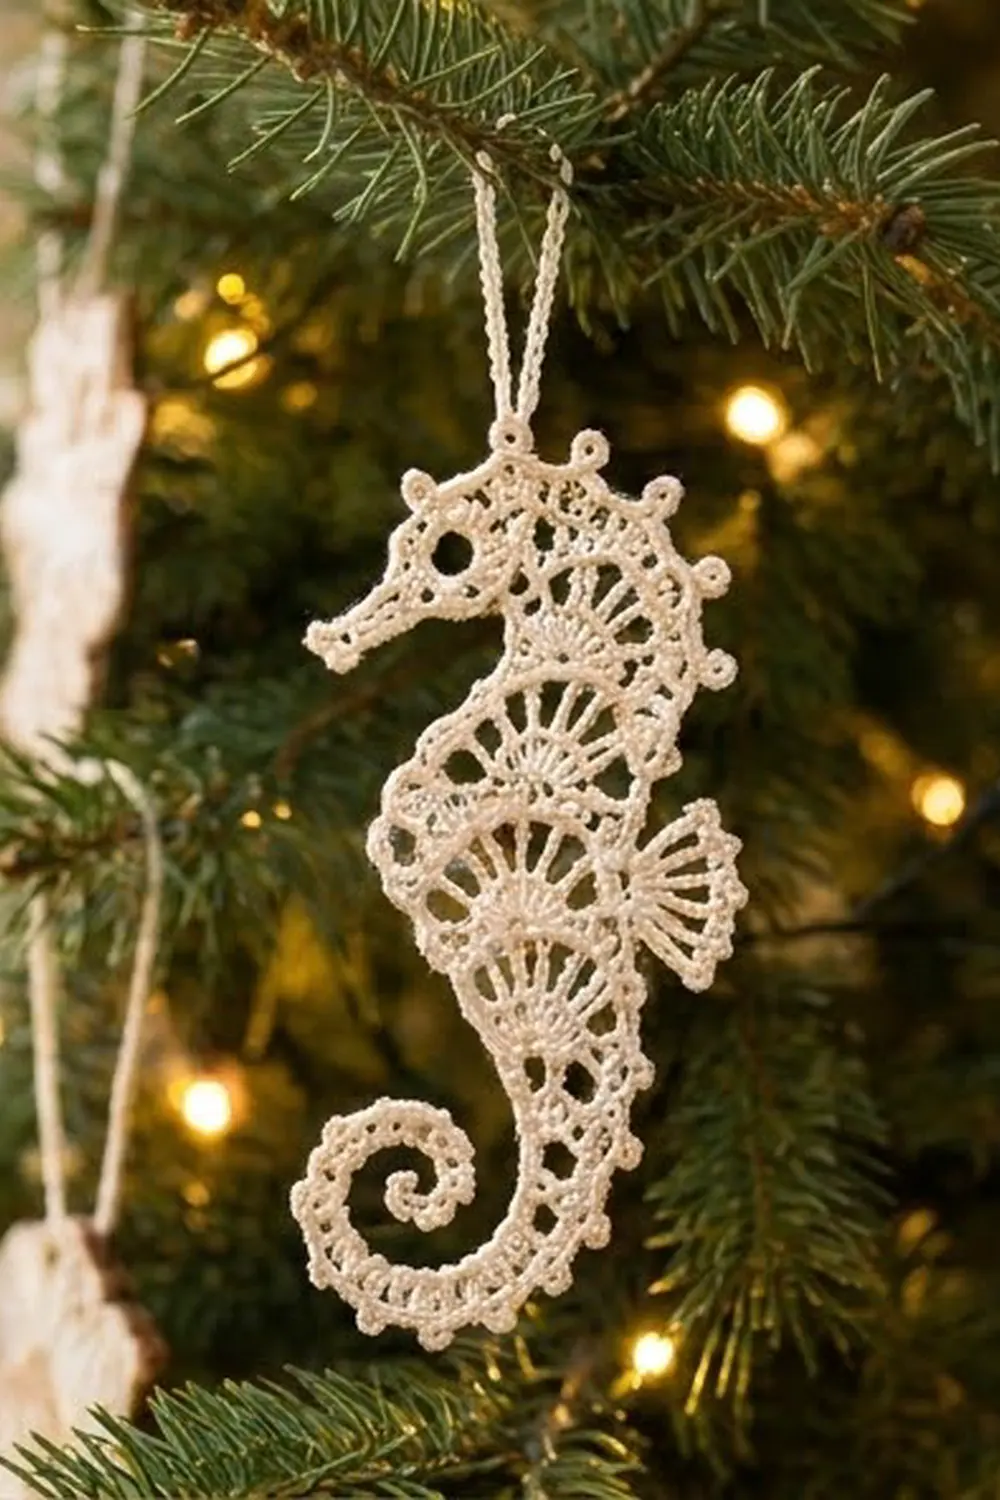
This lacy seahorse ornament is made in ivory cotton thread. Five fan-shaped tiers are stacked to form the body, a curled tail spirals underneath, and a crown of picots runs over the head. A small ray fin on the back and a thin chain loop finish it, ready to hang on a tree or in a window.
The design is all one color, so the light and shadow in the open lace are what shape the seahorse. Ivory or cream gives a soft vintage look. White looks crisp and wintry.
This pattern uses US crochet terms. The finished ornament measures about 6.5 in (16.5 cm) tall and 3 in (7.6 cm) wide, not counting the hanging loop.
Construction is simple. You make the body tiers from the neck down, with each fan joined to the one above it as you go, and then you crochet the tail straight off the last tier. Next you make the head and join it to the top tier while you work. Finally, you add the fin, a picot border and the hanging loop.
Finished Size and Construction
- Finished size: 6.5 in (16.5 cm) tall x 3 in (7.6 cm) wide
- Skill level: Intermediate (thread crochet, working into rings, joining as you go)
- Terminology: US crochet terms
- Yarn weight: Lace (0), size 10 crochet cotton thread
- Hook: 1.5 mm steel hook (US steel size 8)
- Number of pieces: 1 (one continuous motif)
- Layout: Single standalone ornament, no joining of separate pieces
- Piece size before border: 6 in (15.2 cm) tall x 2.5 in (6.4 cm) wide
- Border depth: about 0.25 in (0.6 cm) on every edge
- Hanging loop: about 2 in (5.1 cm) tall
Materials
Thread: Size 10 mercerized cotton crochet thread in ivory or cream. Mercerized cotton holds a crisp shape after blocking and keeps its sheen. Avoid soft, fuzzy threads, because the fan rays will blur.
- Ivory (main and only color): 8 g, about 45 m (49 yd)
These amounts include a margin of about 25% for your gauge swatch and any ripped-back tiers.
Tools:
– 1.5 mm steel crochet hook
– Fine tapestry needle (size 24 or 26)
– Small sharp scissors
– 1 removable stitch marker
– Foam blocking board and rust-proof pins
– Spray starch or fabric stiffener
– Ruler or tape measure
Abbreviations (US Terms)
- ch – chain
- sl st – slip stitch
- sc – single crochet
- hdc – half double crochet
- dc – double crochet
- tr – treble crochet (yarn over twice)
- sp(s) – space(s)
- st(s) – stitch(es)
- rep – repeat
Special stitch, picot: Ch 3, sl st into the 3rd ch from hook.
Special technique, fan: A group of tr worked into one ring, with ch 2 between them, so the tr spread out like rays.
Gauge and Checkpoints
Gauge: 11 sc = 1 in (2.5 cm) in size 10 thread on a 1.5 mm hook.
Make Tier 1 as your test piece before going further. If it matches the checkpoint below, you can keep it as the top of your seahorse.
Checkpoints:
– Eye ring (Head Rnd 1): about 0.5 in (1.3 cm) across.
– Tier 1 complete: the fan’s curved edge spans about 1 in (2.5 cm) from end to end.
– After Tier 3: the body is about 1.75 in (4.4 cm) wide at its widest point and about 2 in (5.1 cm) long.
– After Tier 5: the body is about 3.5 in (8.9 cm) long.
– Tail curled: the spiral is about 1.25 in (3.2 cm) across.
– Before border: 6 in (15.2 cm) x 2.5 in (6.4 cm).
If your piece is too big, switch to a 1.25 mm hook (US steel size 10). If it’s too small, switch to a 1.75 mm hook (US steel size 6). Small differences are fine for an ornament, but large ones change how the tiers stack. A fan that’s too tight curls up, and a fan that’s too loose ripples.
Body Tiers
Each tier has two rows. In Row 1 you work a fan into a small anchor ring on the belly side. In Row 2 you work a sc edging along the fan’s outer curve, which ends at the belly side.
Edge count formula: one sc in each tr plus 2 sc in each ch-2 sp. For a fan of D tr, that gives D + 2(D − 1) = 3D − 2 sc.
Tier 1 (neck)
Ch 6, sl st in the first ch to form the anchor ring.
Row 1: Ch 6 (counts as tr + ch 2), (tr, ch 2) 5 times in the ring, tr in the ring. (7 tr, 6 ch-2 sps)
Row 2: Ch 1, turn, sc in the first tr, (2 sc in the next ch-2 sp, sc in the next tr) 6 times. (19 sc)
You finish on the belly side of the fan. Place a marker in the first sc of this row. It sits on the back side, and Tier 2 joins there.
Tier 2
Ch 9, sl st in the 6th ch from the hook to form the new anchor ring. The 3 remaining ch form a short stem along the belly.
Row 1: Ch 6 (counts as tr + ch 2), (tr, ch 2) 7 times in the ring, tr in the ring. Sl st in the marked first sc of Tier 1 Row 2 to join the fans along the back. (9 tr, 8 ch-2 sps)
Row 2: Ch 1, turn, sc in the first tr, (2 sc in the next ch-2 sp, sc in the next tr) 8 times. (25 sc)
Move the marker to the first sc of this row.
Tier 3
Ch 9, sl st in the 6th ch from the hook to form the anchor ring.
Row 1: Ch 6, (tr, ch 2) 9 times in the ring, tr in the ring. Sl st in the marked sc of Tier 2. (11 tr, 10 ch-2 sps)
Row 2: Ch 1, turn, sc in the first tr, (2 sc in the next ch-2 sp, sc in the next tr) 10 times. (31 sc)
Move the marker to the first sc of this row.
Tier 4
Work exactly like Tier 3, joining to the marked sc of Tier 3. (Row 1: 11 tr, 10 ch-2 sps. Row 2: 31 sc.)
Move the marker.
Tier 5
Ch 9, sl st in the 6th ch from the hook to form the anchor ring.
Row 1: Ch 6, (tr, ch 2) 7 times in the ring, tr in the ring. Sl st in the marked sc of Tier 4. (9 tr, 8 ch-2 sps)
Row 2: Ch 1, turn, sc in the first tr, (2 sc in the next ch-2 sp, sc in the next tr) 8 times. (25 sc)
Back-edge total: 19 + 25 + 31 + 31 + 25 = 131 sc.
Check the body against the “After Tier 5” checkpoint: about 3.5 in (8.9 cm) long.
Tail
Keep working from the belly side of Tier 5.
Tail row: Ch 31, sc in the 2nd ch from the hook and in the next 9 ch, hdc in the next 10 ch, dc in the next 10 ch, then sl st in the Tier 5 anchor ring. (10 sc + 10 hdc + 10 dc = 30 sts)
The short sc at the tip and the taller dc near the body make the strip taper, which helps it curl. Fasten off and weave in the end. The tail is fully shaped during the border and blocking steps.
Head
Rnd 1 (eye): Ch 6, sl st in the first ch to form a ring. Ch 1, 18 sc in the ring, sl st in the first sc. (18 sc)
Rnd 2: Work this round in order:
– Face: ch 1, sc in the same st and in the next 2 sts. (3 sc)
– Snout: ch 11, sc in the 2nd ch from the hook and in the next 9 ch. (10 sc)
– Chin: sc in the next 3 ring sts. (3 sc)
– Neck and crown: 2 dc in each of the remaining 12 ring sts. (24 dc)
Join the head to the body while you work the first 4 of these dc (the neck dc). After each of them, sl st into the next Tier 1 Row 2 sc, starting at the marked first sc and moving along sts 1–4. The other 20 dc stay free and form the crown.
Sl st in the first sc of the round to close it. Round total: 3 + 10 + 3 + 24 = 40 sts, plus 10 free loops along the underside of the snout. Fasten off.
Dorsal Fin
The fin sits on Tier 3. Count from the back-side end of the Tier 3 edge, where the Tier 4 join is, and join the thread in st 13.
Row 1: Ch 1, sc in st 13, skip 2 sts, then in st 16 work (dc, ch 2) 5 times and 1 more dc. Skip 2 sts, sc in st 19. (2 sc, 6 dc, 5 ch-2 sps, on a 7-st base)
Row 2: Ch 1, turn, sc in the first sc. Then (sc in the next dc, picot, 2 sc in the next ch-2 sp) 5 times. Finish with sc in the last dc, picot, sc in the last sc. (18 sc, 6 picots)
Fasten off. You now have 6 rays, each with a picot tip.
Border
Border gauge: each repeat of (sc in the next 3 sts, picot) covers about 0.25 in (0.6 cm) of edge and adds about 0.25 in (0.6 cm) of depth.
Join the thread in crown dc 5, the first free dc after the neck join. Work the edges in this order:
| Edge | Base sts | Instructions | Picots |
|---|---|---|---|
| Crown | 20 dc | (sc in the next 3, picot) 6 times, sc in the next 2 | 6 |
| Face | 3 sc | sc in each | 0 |
| Snout top | 10 sc | sc in each, then picot at the tip | 1 |
| Snout underside | 10 free loops | sc in each | 0 |
| Chin | 3 sc | sc in each | 0 |
| Belly | 5 tier fronts | 6 sc over each anchor ring and its stem, picot after each group of 6 | 5 |
| Tail inner edge | 30 sts | sl st in each, working firmly | 0 |
| Tail tip | 1 | 3 sc around the tip | 0 |
| Tail outer edge | 30 free loops | (sc in the next 3, picot) 10 times | 10 |
| Back edge | 120 sc | (sc in the next 3, picot) 40 times; at the fin, sl st in each of its 18 Row 2 sc instead (skip the picots) | 40 |
Sl st in the first sc to close the border. Border total: 62 picots, plus the 6 already on the fin.
Why the back-edge count works: the tier edges total 131 sc. The neck join uses 4 of them and the fin base uses 7, which leaves 131 − 4 − 7 = 120. That divides exactly into 40 repeats of 3, so the picots end evenly at the top.
The other picot edges also come out exactly: the crown is 6 × 3 + 2 = 20 and the tail is 10 × 3 = 30.
The firm sl sts along the tail’s inner edge shorten that side, which pulls the tail into its curl.
Hanging loop: Join the thread to the 3rd crown picot. Ch 50, sl st into the same picot, and fasten off. The folded loop hangs about 2 in (5.1 cm) tall.
Weave in all the ends along solid sc edges.
Final Blocking
- Soak the ornament in cool water for 5 minutes, then press out the water in a towel. Don’t wring it.
- Lay it face up on the blocking board, with the head facing left.
- Pin the head first: one pin through the eye ring, one at the snout tip and one in each crown picot.
- Pin each fan tier so its rays spread evenly from the anchor ring, with a pin in every ray tip along the back edge.
- Fan out the fin and pin each of its 6 picots.
- Roll the tail toward the belly into a spiral about 1.25 in (3.2 cm) across, and pin the outer picots in a circle.
- Check the overall size: 6.5 in (16.5 cm) x 3 in (7.6 cm).
- Spray it with starch or brush on stiffener, then let it dry completely, at least 12 hours.
Final Quality-Control Checklist
- [ ] The eye ring is open and round.
- [ ] Every tier has the right tr count: 7, 9, 11, 11, 9.
- [ ] The tier edge counts are 19, 25, 31, 31, 25.
- [ ] Each tier is joined to the one above it along the back.
- [ ] The tail has 30 sts and curls toward the belly.
- [ ] There are 62 border picots, plus 6 on the fin.
- [ ] The finished size is 6.5 in (16.5 cm) x 3 in (7.6 cm).
- [ ] The hanging loop is centered on the crown.
- [ ] All ends are hidden and trimmed.
Troubleshooting
The fans cup or curl up: Your tension is too tight. Loosen up or go up a hook size, and make sure each ch-2 is a full 2 ch.
The fans ripple: Your tension is too loose. Go down a hook size, or make sure the edge row has exactly 2 sc per ch-2 sp.
The tiers gap along the back: You missed the sl st join at the end of Row 1. Pick it up with a needle and a tail of thread.
The tail won’t curl: Rework the inner-edge sl sts more firmly, then block it again with extra stiffener.
The picots don’t line up evenly: Recount your base sts against the border table.
The snout droops: Pin it straight and use extra stiffener on it.
Care
Hand wash in cool water, then reshape and re-starch while damp. Store it flat or hanging, away from crushing weight.
Final Notes
Here is the measurement chain:
– The eye ring is about 0.5 in (1.3 cm) across.
– Tier 1 spans about 1 in (2.5 cm).
– The body is about 1.75 in (4.4 cm) wide by Tier 3 and about 3.5 in (8.9 cm) long after Tier 5.
– The curled tail is about 1.25 in (3.2 cm) across.
– The piece measures 6 in (15.2 cm) x 2.5 in (6.4 cm) before the border.
– The border adds about 0.25 in (0.6 cm) on each edge, for a finished size of 6.5 in (16.5 cm) x 3 in (7.6 cm).
If you check each of these as you go, your seahorse will come out the right size.
Happy crocheting!