

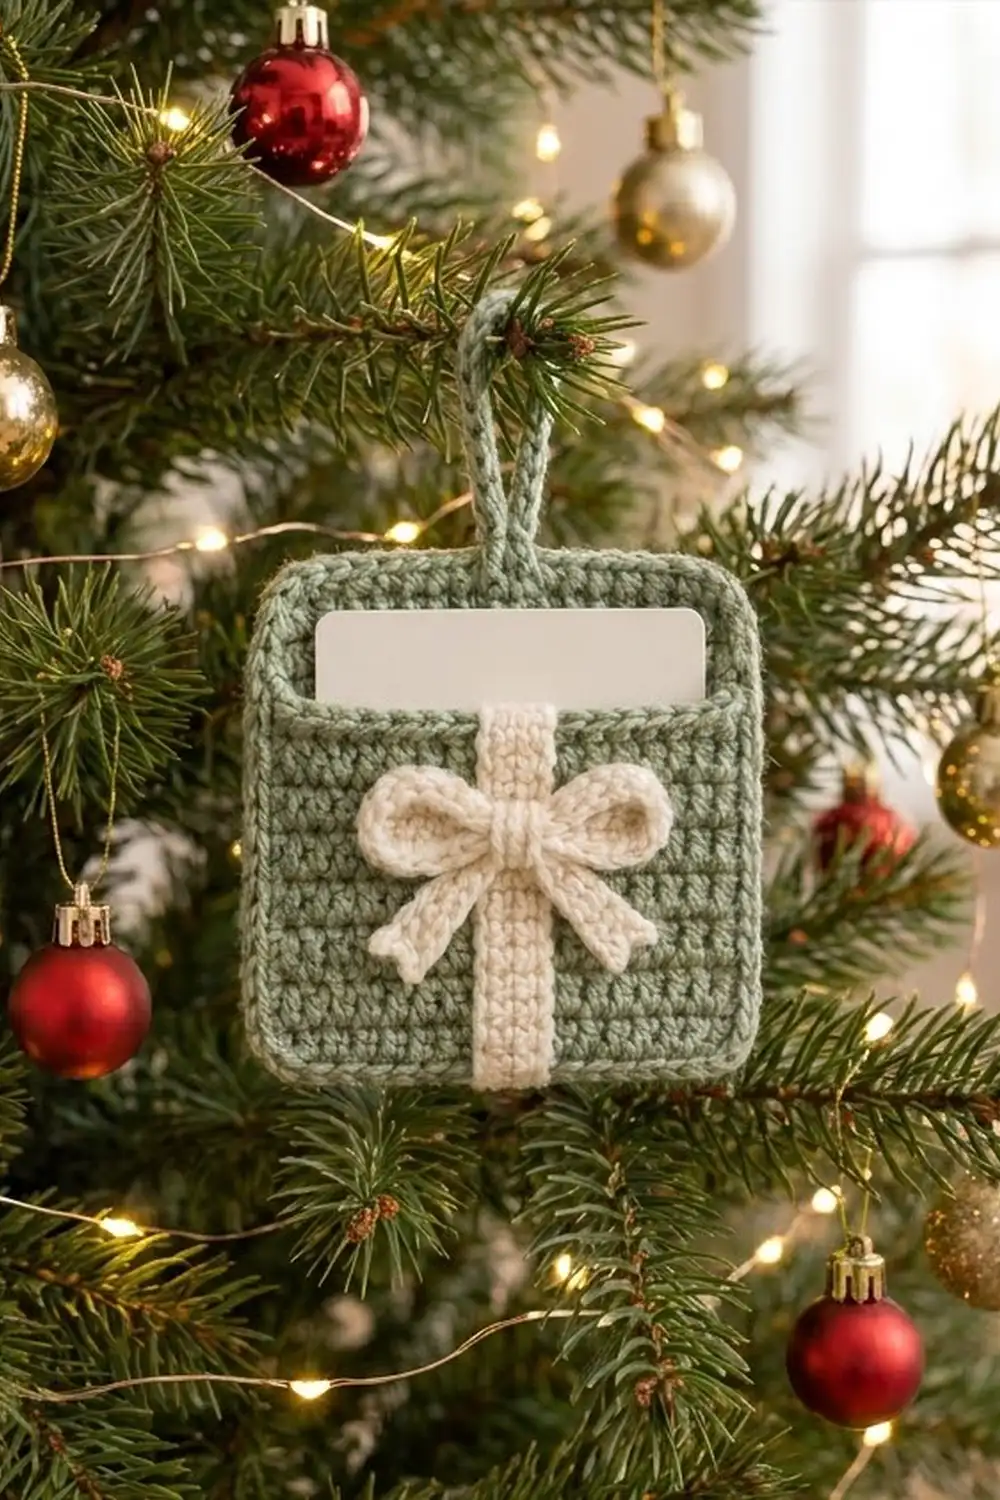
This little sage-green pouch holds a gift card and looks like a wrapped present. A cream ribbon strip runs down the center front, and a cord bow sits on top of it. A small loop at the back lets you hang it on a tree branch, a door knob or a gift bag handle.
The body is worked in single crochet, which makes a firm fabric so the card doesn’t show through. The ribbon, bow and loop are small separate pieces that you sew on. Sage and cream look soft and natural, and the pattern works just as well in deep red, navy or lilac with a cream bow.
The pattern uses US crochet terms. The finished pouch is 4.4 in wide x 3.6 in tall (11.2 x 9.1 cm). The loop adds about 1.25 in (3.2 cm) at the top.
Construction overview: crochet two identical panels, sew the ribbon strip and bow onto one of them (the front), and sew the loop onto the other (the back). Then crochet one edging round through both layers along the sides and bottom, which joins the pouch, and finish with a second round around the opening.
Finished Size and Construction
- Finished size: 4.4 x 3.6 in (11.2 x 9.1 cm), plus a 1.25 in (3.2 cm) loop
- Skill level: Easy
- Terminology: US
- Yarn weight: Worsted (#4), cotton or cotton blend
- Hook: 4.0 mm (G-6)
- Number of pieces: 2 panels + 1 ribbon strip + 3 bow parts + 1 loop
- Layout: front panel stacked on back panel, wrong sides together
- Panel size: 18 sts x 16 rows = 4.0 x 3.2 in (10.2 x 8.1 cm)
- Size before border: 4.0 x 3.2 in (10.2 x 8.1 cm)
- Border depth: 1 sc round = 0.2 in (0.5 cm) per edge
Materials
Use a smooth worsted cotton or cotton blend. Cotton keeps the stitches crisp and the bow loops in shape. Soft acrylic will also work, but the pouch will be floppier.
- Color A, sage green: 15 g / 30 m (33 yd)
- Color B, cream: 5 g / 10 m (11 yd)
These amounts include a margin for your gauge swatch and sewing tails.
Tools:
– 4.0 mm (G-6) crochet hook
– Tapestry needle
– 4 locking stitch markers
– Scissors
– Pins
– Ruler or tape measure
– A standard gift card, 3.375 x 2.125 in (8.6 x 5.4 cm), for testing the fit
Abbreviations (US Terms)
- ch – chain
- sc – single crochet
- sl st – slip stitch
- st(s) – stitch(es)
- RS / WS – right side / wrong side
- picot tip – ch 2, sl st in the stitch at the base of the ch-2. This gives each bow tail its small notched point.
Gauge and Checkpoints
Gauge: 18 sc x 20 rows = 4 in (10.2 cm) in single crochet.
The pouch is small, so your first panel can be your gauge test. Measure it at these points:
- After Row 1: 18 sts = 4.0 in (10.2 cm)
- After Row 8: height = 1.6 in (4.1 cm)
- After Row 16: 4.0 x 3.2 in (10.2 x 8.1 cm)
If Row 1 measures more than 4.1 in (10.4 cm), go down to a 3.75 mm hook. If it measures less than 3.9 in (9.9 cm), go up to a 4.5 mm hook. Don’t add or remove stitches, because every count below depends on 18 sts and 16 rows.
The card needs about 3.8 in (9.7 cm) of inside width. If you crochet tightly, test-fit the card after Row 1.

Panels (Make 2)
With Color A, ch 19.
Row 1: Sc in 2nd ch from hook and in each ch across, turn. (18 sc)
Rows 2–16: Ch 1 (does not count as a stitch), sc in each st across, turn. (18 sc per row)
Fasten off after Row 16 and leave a short tail. Each panel measures 4.0 x 3.2 in (10.2 x 8.1 cm).
Choose the panel with the neatest RS as the front. Turn the other panel so Row 16 is at the top. That one is the back.
Ribbon Strip (Make 1)
With Color B, ch 4.
Row 1: Sc in 2nd ch from hook and in next 2 ch, turn. (3 sc)
Rows 2–16: Ch 1, sc in each st across, turn. (3 sc per row)
Fasten off and leave a 12 in (30.5 cm) tail. The strip is 0.7 x 3.2 in (1.8 x 8.1 cm), the same height as the panel.
Bow Loops (Make 1)
With Color B, ch 25.
Row 1: Sc in 2nd ch from hook and in each ch across. (24 sc)
Fasten off and leave a 10 in (25.4 cm) tail. The cord is about 5.3 in (13.5 cm) long.
Bow Tails (Make 1)
With Color B, ch 13.
Row 1: Sc in 2nd ch from hook and in each ch across. (12 sc) Work a picot tip in the last sc.
Rotate the cord, then sl st into the free loop of the first foundation ch and work a picot tip there.
Fasten off. The cord is about 2.7 in (6.9 cm) long, with a notched point at each end.
Bow Knot (Make 1)
With Color B, ch 6.
Row 1: Sc in 2nd ch from hook and in each ch across. (5 sc)
Fasten off and leave an 8 in (20.3 cm) tail. The knot strip is about 1.1 in (2.8 cm) long.
Hanging Loop (Make 1)
With Color A, ch 14.
Row 1: Sc in 2nd ch from hook and in each ch across. (13 sc)
Fasten off and leave an 8 in (20.3 cm) tail. The cord is about 2.9 in (7.4 cm) long.
Assemble the Bow and Decorate the Panels
Do all of this sewing before joining. Once the pouch is closed, you can’t reach inside with a needle.
- Ribbon strip: The center of the panel falls between sts 9 and 10. Center the strip over that line on the RS of the front panel, with its ends level with Row 1 and Row 16. Whipstitch both long edges in place with the Color B tail.
- Bow loops: Fold both ends of the 24-sc cord to the middle so you get two equal rounded loops, each about 1.2 in (3.0 cm) long. Overlap the ends by 1 st and tack them together.
- Tails: Fold the 12-sc cord in half into an upside-down V. Put the fold behind the center of the bow loops so the tails point down and outward.
- Knot: Wrap the 5-sc strip around the center of the bow loops and tails. Sew its ends together at the back.
- Placement: Pin the bow so the knot sits on the strip at Row 11, about 2.2 in (5.6 cm) above the bottom of the panel. The loops should reach about 0.9 in (2.3 cm) to each side of the strip. Sew the knot, the outer curve of each loop and each tail down to the panel. Leave the inner part of each loop open so the green shows through.
- Hanging loop: Fold the green cord in half into a teardrop. On the WS of the back panel, sew both ends to the center stitches of Rows 15–16, and leave about 1.25 in (3.2 cm) of loop standing above the top edge.
Weave in all tails except the panel tails, which can be hidden inside the border later.
Make All Pieces
Color A (sage): 2 panels, 1 hanging loop
Color B (cream): 1 ribbon strip, 1 bow-loop cord, 1 tail cord, 1 knot strip
Layout (front view, panels stacked):
        [ loop ]  <- sewn to back panel
+---------------------------+
|  Back panel (behind)      |
|  +---------------------+  |
|  | Front panel  | strip|  |
|  |   (bow at Row 11)   |  |
|  +---------------------+  |
+---------------------------+
   Top (Row 16) = opening
Joining
The pouch is joined by Border Round A, which you work through both layers along the sides and the bottom. The top stays open.
- Place the panels WS together, front panel facing you. Both panels should have Row 16 at the top.
- Line up the edges exactly: each row end of the front matches the same row end of the back, and each foundation ch matches the foundation ch behind it.
- Clip a marker at each bottom corner and at the end of Row 8 on each side.
- In Round A, put your hook through both matching stitches or row ends every time. That’s 1 sc for each pair, with nothing extra at the seam.
Tension: Keep your sc the same height as in the panels. If you pull too tightly, the sides will curl inward and the card won’t fit. Working too loosely leaves gaps between the layers.
Size checkpoint: After Round A, the pouch should be 4.4 in (11.2 cm) wide. Slide the card in to make sure it goes all the way to the bottom.
Border
Border gauge: One sc round adds 0.2 in (0.5 cm) to each edge it’s worked on. That matches the panel’s row height, 20 rows = 4 in (10.2 cm).
Round A (joining edge, through both layers)
With the front facing you, join Color A at the top left corner with a standing sc in the Row 16 row end, working through both layers.
- Left side: Sc in each row end from Row 16 down to Row 2. (15 sc)
- Bottom-left corner: 3 sc in the Row 1 corner. (3 sc)
- Bottom: Sc in each of the next 16 foundation chs. (16 sc)
- Bottom-right corner: 3 sc in the corner. (3 sc)
- Right side: Sc in each row end from Row 2 up to Row 16. (15 sc)
Round A total: 52 sc. That is 48 sts worked one per existing position (15 + 1 corner + 16 + 1 corner + 15), plus 4 extra sts (2 at each bottom corner).
Per-side counts: The bottom has 18 sts including both corner center sts (1 + 16 + 1), which matches the panel’s 18 sts. Each side has 16 sts including its corner center st (15 + 1), which matches the panel’s 16 rows.
Don’t fasten off. Go straight on to Round B.
Round B (opening edge)
You are now at the top right of the pouch. Work around the opening as a ring:
- Front top: Sc in each of the 18 sts of the front panel’s Row 16. (18 sc)
- Left seam: 1 sc in the top of the first sc of Round A. (1 sc)
- Back top: Sc in each of the 18 sts of the back panel’s Row 16. (18 sc)
- Right seam: 1 sc in the top of the last sc of Round A. (1 sc)
Sl st to the first sc of Round B. Round B total: 38 sc. That is 36 sts worked one per existing stitch (18 front + 18 back), plus 2 extra sts (one at the top of each side seam).
Fasten off and weave in the ends between the layers.
Why the math works: Each edge gets exactly one sc per stitch or row, so the border lies flat without ruffling or pulling in. Width is 4.0 in (10.2 cm) of panel plus 0.2 in (0.5 cm) on each side, for 4.4 in (11.2 cm). Height is 3.2 in (8.1 cm) of panel plus 0.2 in (0.5 cm) at the bottom and 0.2 in (0.5 cm) at the opening, for 3.6 in (9.1 cm). The 3-sc corners turn neatly and block into the soft round curve shown in the photo.
Final Blocking
- Spritz the pouch lightly with water. Don’t soak it.
- Slide a piece of card stock cut to 3.8 x 3.2 in (9.7 x 8.1 cm) inside to hold the shape.
- Pin it flat at 4.4 x 3.6 in (11.2 x 9.1 cm).
- Shape the two bow loops into even rounds with your fingers, and point the tails out at matching angles.
- Shape the hanging loop into a teardrop and pin it upright.
- Leave it to dry completely, then take out the card stock.
Final Quality-Control Checklist
- Each panel has 18 sts and 16 rows.
- The ribbon strip is centered and level with the panel edges.
- The bow knot sits at Row 11, and the loops are the same size.
- Both tails end in a picot tip.
- The hanging loop is centered at the back and stands about 1.25 in (3.2 cm) tall.
- Round A has 52 sc, and Round B has 38 sc.
- The pouch measures 4.4 x 3.6 in (11.2 x 9.1 cm).
- A standard card slides in easily.
- All ends are hidden.
Troubleshooting
- Card is too tight: Your gauge is tight. Remake the panels with a 4.5 mm hook.
- Sides curl inward: Round A was worked too tightly. Undo it and work it again more loosely.
- Edges ruffle: You’ve added stitches. Recount against 15 / 3 / 16 / 3 / 15.
- Bow loops collapse: Tack the outer curve of each loop to the panel in two or three places.
- Strip shows a gap at the edges: Whipstitch it every row, not every other row.
- Loop leans to one side: Re-sew both cord ends at the same height.
Care
Hand wash in cool water and lay flat to dry, reshaping the bow while it’s damp. Don’t tumble dry, because heat can distort the cord loops.
Final Notes
The measurements build on each other: the gauge (18 sc x 20 rows = 4 in / 10.2 cm) gives a 4.0 x 3.2 in (10.2 x 8.1 cm) panel. One border round of 0.2 in (0.5 cm) on each edge brings the pouch to 4.4 x 3.6 in (11.2 x 9.1 cm). Check each stage and the finished pouch will hold a gift card neatly.
Display tip: The inside of the pouch is about 3.4 in (8.6 cm) deep. To make the card stick out of the top like in the photo, tuck a folded strip of card stock about 1.75 in (4.4 cm) tall into the bottom first.
Happy crocheting!