

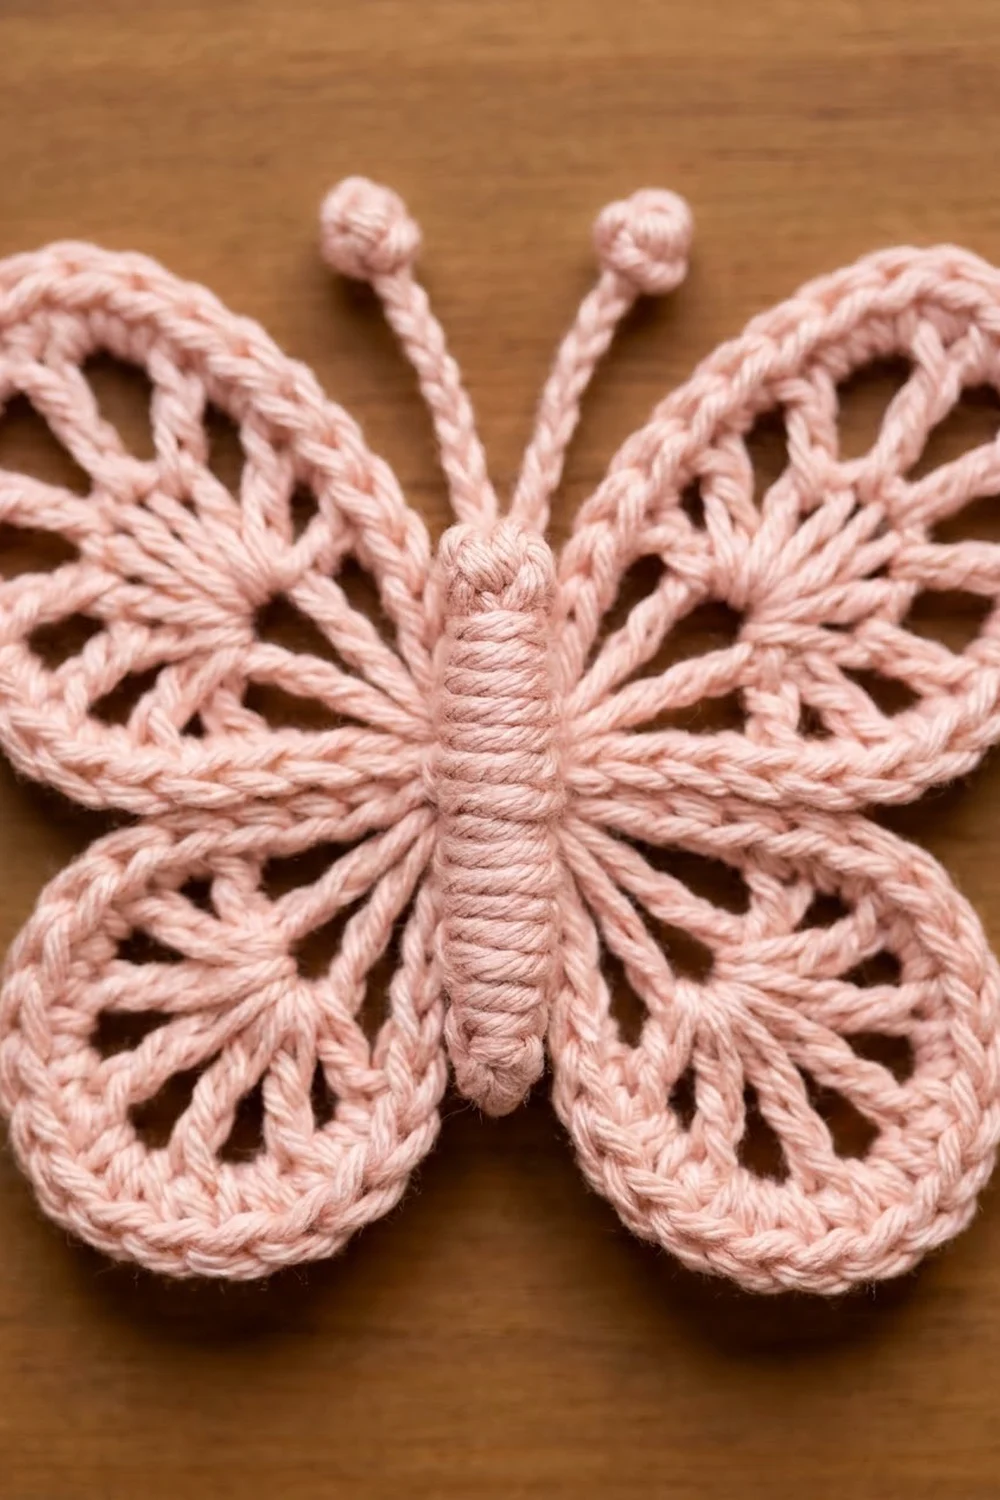
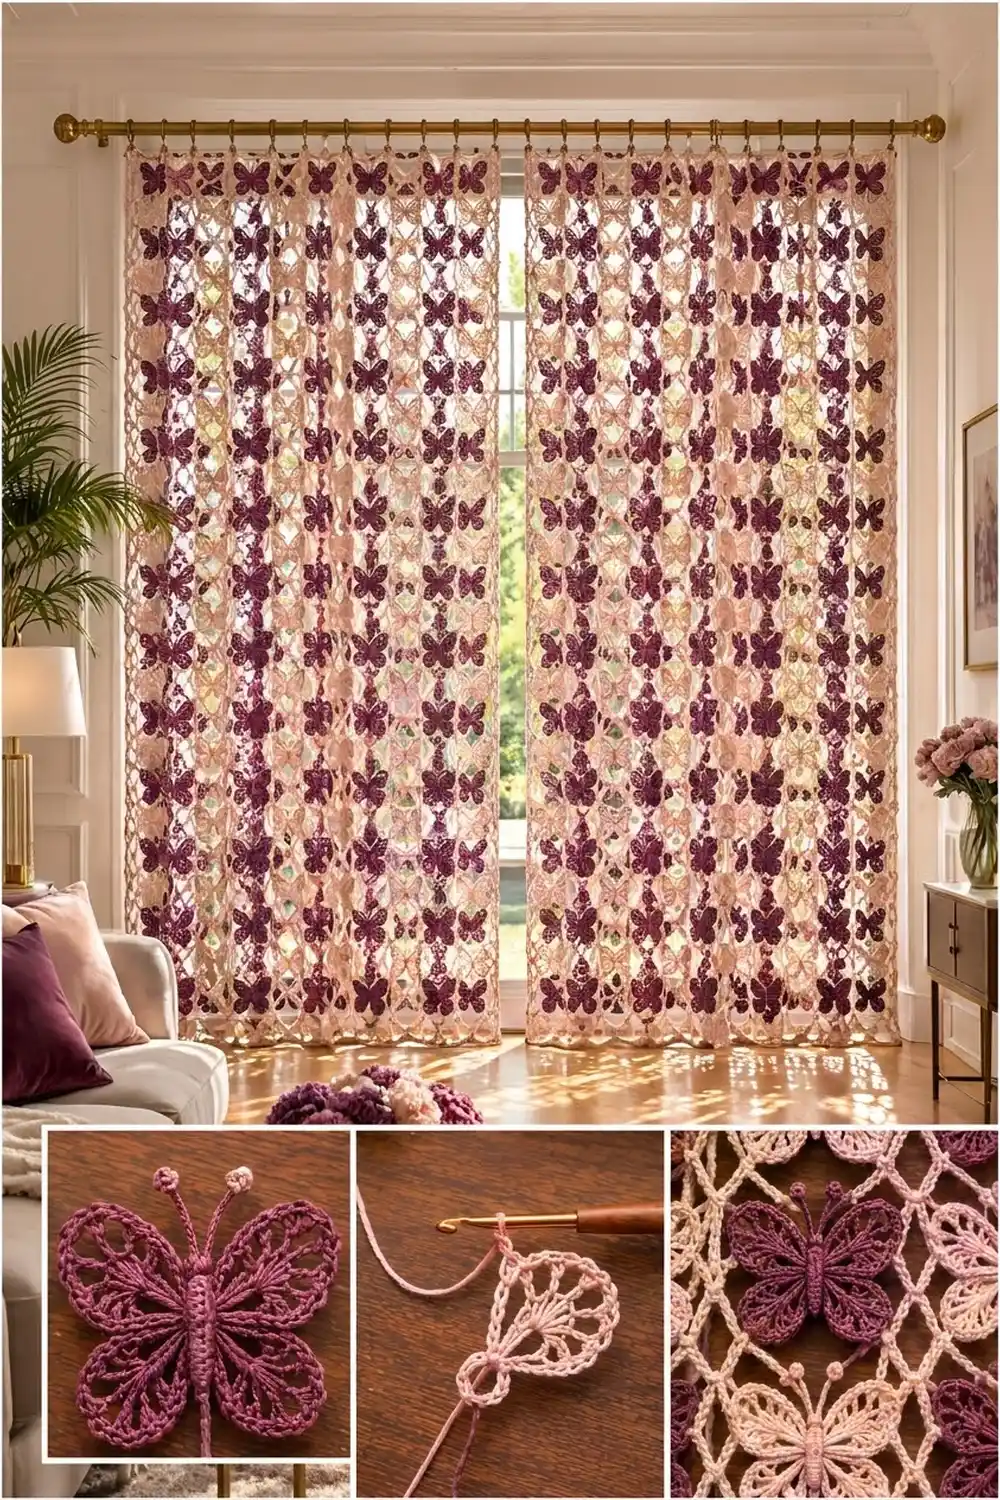
This curtain is a field of lacy butterflies caught in a soft pink lattice. Each butterfly has open, fan-spoked wings, a raised rolled body, and two antennae with round knob tips. The butterflies alternate between deep plum and light blush pink. Every one is framed by the same pale pink chain mesh, so the panel reads as a diamond net full of wings.
The style is romantic and airy, and the wing outlines stay crisp against window light. The pattern uses US crochet terms throughout.
One finished panel measures 31.5 x 85.5 in (80.0 x 217.2 cm) after blocking and border. The photo shows a pair of panels on a brass rod with clip rings, so quantities are given for two panels.
Construction is simple and repetitive. You crochet a butterfly in one color and sew on its body. Then you work three rounds of pink chain mesh around it to make a 6 in (15.2 cm) square block. Blocks are joined as you go on the last frame round, and a three-round single crochet border finishes the panel.
Finished Size and Construction
- Finished panel size: 31.5 x 85.5 in (80.0 x 217.2 cm)
- Skill level: Intermediate
- Terminology: US crochet terms
- Yarn weight: DK (light #3) cotton
- Hook: 3.5 mm (E-4)
- Number of pieces: 70 blocks per panel, 140 blocks for the pair
- Layout: 5 blocks wide x 14 blocks tall per panel
- Butterfly size: 4 x 3.5 in (10.2 x 8.9 cm)
- Block size: 6 x 6 in (15.2 x 15.2 cm)
- Size before border: 30 x 84 in (76.2 x 213.4 cm)
- Border depth: 0.75 in (1.9 cm) per edge
Materials
Choose a smooth mercerized or combed cotton in DK weight. Cotton shows the stitches clearly, holds the wing spokes open, and stretches less than acrylic when it hangs. The amounts below assume about 115 m per 50 g ball (2.3 m per gram).
Yarn (for two panels):
- Color A, deep plum: 300 g, about 690 m (70 butterflies)
- Color B, light blush pink: 850 g, about 1955 m (70 butterflies, all 140 mesh frames, and both borders)
These amounts include about 10 percent extra for gauge differences and swatching. Buy all of each color from a single dye lot.
Tools:
- 3.5 mm (E-4) crochet hook
- Tapestry needle
- Stitch markers
- Scissors
- Measuring tape
- Blocking mats, rust-proof pins, and a spray bottle
- 20 curtain clip rings (10 per panel)
Abbreviations (US Terms)
- ch: chain
- sl st: slip stitch
- sc: single crochet
- hdc: half double crochet
- dc: double crochet
- sk: skip
- sp: space
- BLO: back loop only
- st(s): stitch(es)
- CC: contrast color (Color B for frames and border)
Special stitch, 3-dc bobble: [Yo, insert hook in st, yo, pull up a loop, yo, draw through 2 loops] 3 times in the same st, yo, draw through all 4 loops on hook.
Gauge and Checkpoints
Make one complete block before anything else. Pin it flat and measure it. This single block tells you whether the whole curtain will come out right.
Border gauge: 20 sc and 22 rows = 4 in (10.2 cm) with the 3.5 mm hook.
Checkpoints:
- After Butterfly Rnd 3: 4 in (10.2 cm) across the upper wings, 3.5 in (8.9 cm) from top to bottom
- After Frame Rnd 1: about 4.5 in (11.4 cm) square
- After Frame Rnd 2: about 5.25 in (13.3 cm) square
- After Frame Rnd 3 and blocking: 6 in (15.2 cm) square
If your block is larger than 6 in (15.2 cm), go down to a 3.25 mm hook. If it is smaller, go up to a 3.75 mm hook. Small errors add up fast: being off by 0.25 in (0.6 cm) per block changes the panel by 1.25 in (3.2 cm) across and 3.5 in (8.9 cm) down.
Butterfly
For each panel, make 35 butterflies in Color A and 35 in Color B.
Rnd 1: Make a magic ring. Ch 1, then in the ring work: sc, ch 10, sc, ch 7, sc, ch 7, sc, ch 10. Sl st to first sc and pull the ring tight. (4 sc, 2 ch-10 loops, 2 ch-7 loops)
The loops, in order, are: upper right wing (ch-10), lower right wing (ch-7), lower left wing (ch-7), upper left wing (ch-10).
Rnd 2 (wing spokes): Sl st into the first ch-10 loop.
- Upper right wing: Ch 3 (counts as dc), [ch 2, dc] 6 times in the same loop. (7 dc, 6 ch-2 sps)
- Sl st in next sc.
- Lower right wing: In the ch-7 loop, work dc, [ch 2, dc] 4 times. (5 dc, 4 ch-2 sps)
- Sl st in next sc.
- Lower left wing: Work as for the lower right wing. Sl st in next sc.
- Upper left wing: In the ch-10 loop, work dc, [ch 2, dc] 6 times. Sl st in first sc of Rnd 1.
Round total: 24 dc and 20 ch-2 sps. The dc spokes fan out from the center and give the wings their open, veined look.
Rnd 3 (scalloped wing outline): Sl st into the top of the beginning ch-3.
- Each upper wing: Sc in first dc, (sc, hdc, sc) in next ch-2 sp, sc in next dc; repeat from * 5 more times. (25 sts)
- Each lower wing: Sc in first dc, (sc, hdc, sc) in next ch-2 sp, sc in next dc; repeat from * 3 more times. (17 sts)
- Each time you move to the next wing, sl st in the sl st between the wings.
Round total: 25 + 17 + 17 + 25 = 84 sts, plus 4 sl sts between wings. The hdc in the middle of each group makes the softly bumped wing edge. Fasten off and weave in ends.
Mark the wing tips: the 13th st of each upper wing and the 9th st of each lower wing.
Body: With the wing color, ch 11.
- Row 1: Sc in 2nd ch from hook and in each ch across. (10 sc)
- Row 2: Ch 1, turn, sc in BLO of each st across. (10 sc)
Fasten off, leaving a 12 in (30.5 cm) tail. Roll the strip lengthwise with the BLO ridges facing out, then sew the long edge closed. Place the body vertically over the center ring and sew it down. The ridges make the body look segmented.
Antennae (make 2): Join the wing color at the top of the body. Ch 7, work a 3-dc bobble in the 3rd ch from hook, then sl st in each of the next 4 ch. Sl st into the body. Repeat for the second antenna, angling it to the other side. Weave in ends.
Mesh Frame
Work all three frame rounds in Color B on every block.
Frame Rnd 1: Join CC with sc in the upper right wing tip. Ch 11, sc in lower right wing tip, ch 13, sc in lower left wing tip, ch 11, sc in upper left wing tip, ch 13 (passing behind the antennae), sl st to first sc. (4 sc, 48 ch)
Frame Rnd 2: Ch 1, then work (sc, ch 5, sc) in the first sc to make a corner loop.
- Short sides (ch-11): Ch 5, sk 3 ch, sc in next ch, ch 5, sk 3 ch, sc in next ch, ch 5, (sc, ch 5, sc) in next sc.
- Long sides (ch-13): Ch 5, sk 4 ch, sc in next ch, ch 5, sk 3 ch, sc in next ch, ch 5, (sc, ch 5, sc) in next sc.
Work the right, bottom, left, and top sides this way, leaving out the last corner, and sl st to first sc. Round total: 4 corner loops + 12 side loops = 16 ch-5 loops. Each side has 5 loops, counting its 2 corner loops.
Frame Rnd 3: Sl st in the first 3 ch of the corner loop. Ch 1, (sc, ch 5, sc) in corner loop, [ch 5, sc in next ch-5 loop] 3 times, ch 5, (sc, ch 5, sc) in next corner loop; repeat from * around, leaving out the last corner. Sl st to first sc.
Round total: 4 corner loops + 16 side loops = 20 ch-5 loops. Each side has 6 loops, counting its 2 corner loops. Each corner loop belongs to two sides. Because the Rnd 3 loops sit offset from the Rnd 2 loops, the mesh forms a diamond lattice.
Make All Pieces
Each panel needs 70 blocks: 35 with Color A butterflies and 35 with Color B butterflies. The pair needs 140 blocks, 70 of each.
Lay the blocks out in a checkerboard (A = plum, B = pink), 5 across and 14 down:
Row 1:  A B A B A
Row 2:  B A B A B
Row 3:  A B A B A
Row 4:  B A B A B
...
Row 13: A B A B A
Row 14: B A B A B
Odd rows have 3 A and 2 B, and even rows have 2 A and 3 B. With 7 rows of each kind, you get 35 A and 35 B.
Joining
Join blocks as you go on Frame Rnd 3. Work the first block completely. On each later block, work Frame Rnd 3 as usual until you reach a side that touches a finished block.
Joining a side loop: Instead of ch 5, work ch 2, sl st into the matching loop of the neighbor block, ch 2.
Joining a corner loop: Work sc, ch 2, sl st into the neighbor’s corner loop, ch 2, sc. Where four blocks meet, sl st into the sl st of the earlier corner join so all four corners share one point.
Stitch-to-stitch logic: Each joined side has 6 loops, and each loop meets exactly one loop on the neighbor: corner to corner, side loop to side loop. No loops are added or lost, and every block keeps its own 6 loops per side.
Tension: Keep the ch 2 on each side of a join at the same tension as a regular ch 5. Tight joins pucker the lattice, and loose joins make the mesh sag.
Size checkpoint: After joining the first row of 5 blocks, pin it flat. It should measure 30 in (76.2 cm) wide. Before the border, the full panel measures 30 x 84 in (76.2 x 213.4 cm).
Border
Work the border in Color B. Border gauge is 5 sc per inch (20 sc per 4 in, or 10.2 cm).
Starting count: The top and bottom edges each have 5 blocks x 6 loops = 30 loops. The side edges each have 14 blocks x 6 loops = 84 loops. At every seam, the two joined corner loops stay separate, and you work into each one. Each of the four panel corner loops belongs to two edges, so the perimeter has 2 x 30 + 2 x 84 − 4 = 224 loops.
Rnd 1: Join CC in the top left panel corner loop. Work 7 sc in each of the 4 panel corner loops, marking the 4th sc as the corner st. Work 5 sc in every other loop. Sl st to first sc.
- Top and bottom: (28 loops x 5) + 3 + 3 + 2 corner sts = 148 sts per side
- Sides: (82 loops x 5) + 3 + 3 + 2 corner sts = 418 sts per side
- Total: 220 x 5 + 4 x 7 = 1128 sts
Rnd 2: Ch 1, sc in each st around, working 3 sc in each corner st. Sl st to first sc.
- Top and bottom: 150 sts per side; sides: 420 sts per side; total: 1136 sts
Rnd 3: Repeat Rnd 2. Fasten off.
- Top and bottom: 152 sts per side; sides: 422 sts per side; total: 1144 sts
Why the math works: Each 6 in (15.2 cm) block side has 6 loops. With 5 sc per loop and the panel corner loops shared, the top edge gets 148 sts. At gauge that is 29.6 in (75.2 cm) along a 30 in (76.2 cm) edge. Each side gets 418 sts, or 83.6 in (212.3 cm) along 84 in (213.4 cm). This small difference keeps the mesh gently taut instead of ruffled. The 3-sc corners add 2 sts per side every round.
Final Blocking
- Weave in all remaining ends along the frame chains, never across open spaces.
- Spray one section of the panel until it is evenly damp.
- Pin each block corner to a 6 in (15.2 cm) grid.
- Pin each wing tip outward and open the wings so the spokes fan evenly.
- Shape the antennae upward and round the knob tips.
- Straighten the border so the panel measures 31.5 in (80.0 cm) wide.
- Let the section dry completely, then move on to the next one.
Final Quality-Control Checklist
- Every butterfly has 84 outline sts and 4 wing tips.
- Every block has 20 frame loops, 6 per side counting corners.
- Each block measures 6 in (15.2 cm) square after blocking.
- Plum and pink butterflies alternate in a true checkerboard.
- At every four-way corner, all four corners share one sl st point.
- Border counts end at 152 sts on the top and bottom and 422 sts on each side.
- The panel measures 31.5 x 85.5 in (80.0 x 217.2 cm).
Troubleshooting
Wings cup instead of lying flat: The ch-2 spaces are too tight. Loosen your chains or go up a hook size for Rnd 2.
Gap at the butterfly center: Pull the magic ring tighter before Rnd 2.
Block looks rectangular: This is normal before blocking. Pin it square. The longer chains on two sides of Frame Rnd 1 are there to even out the shape.
Mesh puckers at joins: The join chains are tighter than your ch 5. Redo the join with a looser chain.
Border ruffles or pulls in: Recount 5 sc per loop and check that you worked both loops at each seam. Then change hook size by 0.25 mm if needed.
Care
Hand wash in cool water with a mild detergent. Roll the panel in a towel and dry it flat, reshaping the blocks. Never hang it wet.
Final Notes
Here is the full measurement chain. A 4 x 3.5 in (10.2 x 8.9 cm) butterfly becomes a 6 in (15.2 cm) block. Then 5 x 14 blocks make a 30 x 84 in (76.2 x 213.4 cm) panel. Finally, a 0.75 in (1.9 cm) border brings it to 31.5 x 85.5 in (80.0 x 217.2 cm). If your first block measures right and your loop tension stays even, the rest of the curtain will follow.
Happy crocheting!