

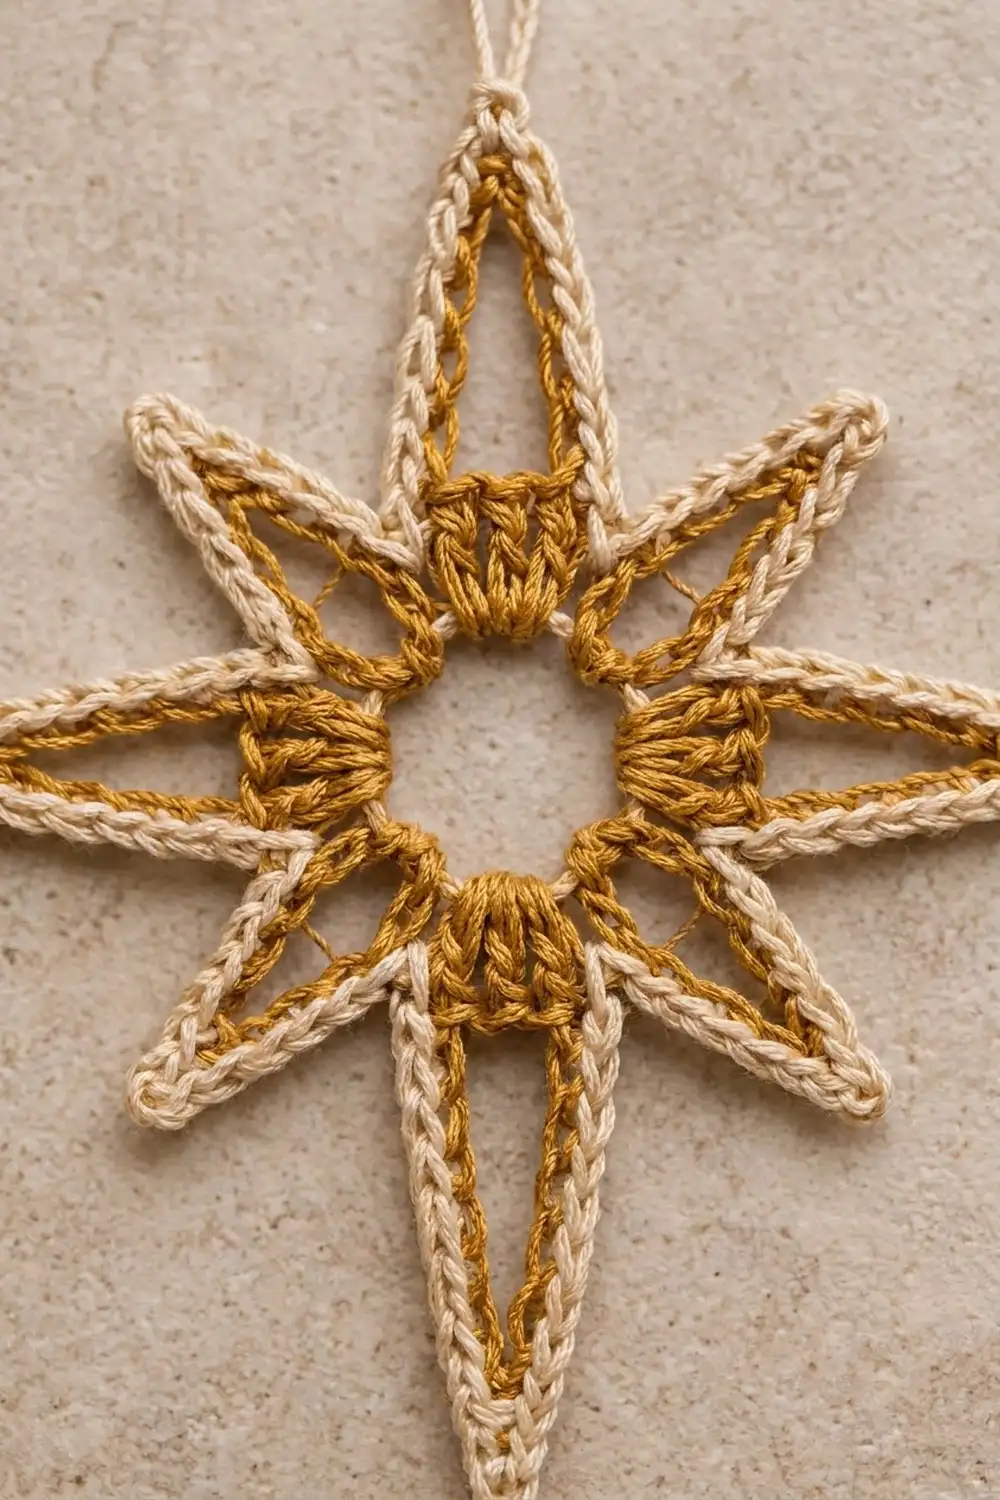
The Gilded Compass Star is a light, airy ornament with eight open points. A mustard-gold center gives it its warm glow, and a crisp cream outline traces every edge. The top and bottom points are longest and the side points slightly shorter, with four short diagonal points between them, so the star looks like a compass rose or a classic Star of Bethlehem.
Only two colors are used: gold for the ring, the double crochet blocks and the chain frames, and cream for the outline and hanging loop. The design is minimal and a little vintage. It looks good on a tree, tied to a gift or hung in a window where light can pass through the open points.
This pattern uses US crochet terms. The finished star measures about 5 in (12.7 cm) tall and 4.5 in (11.4 cm) wide, not counting the hanging loop.
Construction is simple. You work a center ring in gold. Then you work one round of double crochet blocks, each topped with a long chain loop that becomes a point frame. Finally, a single cream round outlines every loop and adds the hanging loop at the top tip. It’s one piece, with no sewing and no joining.
Finished Size and Construction
- Finished size: 5 in (12.7 cm) tall x 4.5 in (11.4 cm) wide; diagonal tip to tip 3.75 in (9.5 cm)
- Skill level: Easy
- Terminology: US crochet terms
- Yarn weight: Fingering / #1 super fine mercerized cotton
- Hook: 2.25 mm (US B-1)
- Number of pieces: 1
- Layout: Single standalone motif
- Piece size: 5 in x 4.5 in (12.7 cm x 11.4 cm)
- Size before border: 4.75 in x 4.25 in (12.1 cm x 10.8 cm)
- Border depth: 1/8 in (0.3 cm) on every edge
- Hanging loop: hangs about 2.25 in (5.7 cm) above the top tip
Materials
Yarn advice: Use a smooth, tightly plied mercerized cotton in fingering weight (about 170 m per 50 g). Mercerized cotton holds the long chain points straight and takes starch well. Avoid fuzzy or very soft yarns, because the points will droop.
- Color A, mustard gold: 5 g, about 17 m
- Color B, cream/ivory: 4 g, about 14 m
These quantities include a margin of about 30% for your gauge swatch and tails. One 50 g ball of each color will make many stars.
Tools:
– 2.25 mm (US B-1) crochet hook
– Tapestry needle
– Scissors
– Rustproof pins and a foam blocking mat
– Fabric stiffener or spray starch (optional but recommended)
– Ruler or tape measure
Abbreviations (US Terms)
- ch – chain
- sl st – slip stitch
- sc – single crochet
- dc – double crochet
- st(s) – stitch(es)
- rnd – round
- sp – space
Special technique – Point loop: After a dc block, chain the stated number of chains, then sl st into the top of the first dc of the same block. This folds the chain into a long, narrow, open loop whose two legs rest on the two outer edges of the block. Then sl st across the tops of the remaining 2 dc of the block to bring the yarn back to the far edge.
Gauge and Checkpoints
Gauge: 8 ch = 1 in (2.5 cm) with Color A and a 2.25 mm hook. Along the edge, 8 sc worked one per chain also measure 1 in (2.5 cm).
Make a full test star before committing to a batch. A star takes well under an hour, and the chain length controls every point.
Checkpoints:
– After Rnd 1: The ring measures 1.25 in (3.2 cm) across, with a center hole about 5/8 in (1.6 cm) wide.
– After Rnd 2, blocks only: Measured across the tops of opposite dc blocks, the piece is about 2 in (5.1 cm).
– After Rnd 2, complete: Top tip to bottom tip measures 4.75 in (12.1 cm). Left tip to right tip measures 4.25 in (10.8 cm).
– After Rnd 3: 5 in (12.7 cm) tall x 4.5 in (11.4 cm) wide.
If your star is too big: Go down to a 2.0 mm hook, or tighten your chains. Loose chains are the most common cause of oversized points.
If your star is too small: Go up to a 2.5 mm hook. Don’t add chains to the loops, because that changes the edging counts.
Pattern
Round 1 – Center Ring (Color A)
With Color A, ch 16 and sl st into the first ch to form a ring.
Rnd 1: Ch 1 (does not count as a st). Work 32 sc into the ring, then sl st into the first sc to join. (32 sc)
Spread the sts evenly around the ring. Think of the round as 8 sections of 4 sc. Each section will hold one point.
Round 2 – Blocks and Point Loops (Color A)
Points are worked in this order, starting at the top and moving around: top (long), diagonal, side, diagonal, bottom (long), diagonal, side, diagonal.
Chain lengths per point:
– Top and bottom points: ch 22
– Left and right side points: ch 18
– Diagonal points: ch 12
Rnd 2:
Top point: Ch 3 (counts as first dc), dc in each of the next 2 sc (3-dc block made). Ch 22, sl st in the top of the beginning ch-3. Sl st in the top of each of the next 2 dc. Sc in the next sc of Rnd 1.
Diagonal point: Dc in each of the next 3 sc. Ch 12, sl st in the top of the first dc of this block. Sl st in the top of each of the next 2 dc. Sc in the next sc.
Side point: Dc in each of the next 3 sc. Ch 18, sl st in the top of the first dc of this block. Sl st in the top of each of the next 2 dc. Sc in the next sc.
Diagonal point: Repeat the diagonal point.
Bottom point: Dc in each of the next 3 sc. Ch 22, sl st in the top of the first dc of this block. Sl st in the top of each of the next 2 dc. Sc in the next sc.
Diagonal point, side point, diagonal point: Repeat these as written above. The last sc lands in the final sc of Rnd 1.
Sl st into the top of the beginning ch-3 to join. Fasten off and weave in the ends.
Stitch count for Rnd 2:
– 8 blocks x 3 dc = 24 dc (including the beginning ch-3)
– 8 sc, one between each pair of blocks
– 8 point loops: (2 x 22) + (2 x 18) + (4 x 12) = 44 + 36 + 48 = 128 ch
Every section used exactly 4 sts of Rnd 1 (3 dc + 1 sc), and 8 x 4 = 32, which matches Rnd 1.
Shape check: Lay the star flat. Each chain loop should fold into a narrow point with its two legs at the outer edges of its dc block, so you can see a hollow, elongated opening above every block. Top and bottom should be the longest points and the diagonals clearly the shortest.
Border – Cream Outline (Round 3)
Border gauge: One sc per chain, so 8 sc = 1 in (2.5 cm), the same as the chain gauge. A ch-2 at each tip lets the edging turn the point without cupping or flaring.
Work only into the chains on the outer side of each loop. Insert the hook under the top loop and back bump of each ch. The hollow center of each point stays open.
Rnd 3: Join Color B with a sc in the sc between the top point and the first diagonal point. Then work:
First diagonal point (12 ch): Sc in each of the first 6 ch of the loop, ch 2, sc in each of the remaining 6 ch. Sc in the next sc between blocks.
Side point (18 ch): Sc in each of the first 9 ch, ch 2, sc in each of the remaining 9 ch. Sc in the next sc.
Diagonal point: Repeat the 12-ch diagonal instructions. Sc in the next sc.
Bottom point (22 ch): Sc in each of the first 11 ch, ch 2, sc in each of the remaining 11 ch. Sc in the next sc.
Diagonal point, side point, diagonal point: Repeat as above, working a sc in the sc between blocks after each one.
Top point (22 ch) with hanging loop: Sc in each of the first 11 ch, ch 36 (hanging loop), sc in each of the remaining 11 ch.
Sl st into the first sc of the round to join. Fasten off and weave in the ends, hiding the cream tails inside the cream sts.
Exact counts per point:
– Top: 11 + 11 = 22 sc, plus the ch-36 hanging loop
– Bottom: 11 + 11 = 22 sc, plus a ch-2 tip
– Each side: 9 + 9 = 18 sc, plus a ch-2 tip
– Each diagonal: 6 + 6 = 12 sc, plus a ch-2 tip
– Valleys: 8 sc, one in each Rnd 2 sc
Round total: 128 sc on the points + 8 sc in the valleys = 136 sc, plus 7 ch-2 tips and 1 ch-36 hanging loop.
Why the math works: Each point gets exactly one sc per chain, so its edging is the same length as the chain it covers. The point lies flat instead of ruffling or pulling in. The ch-2 at each tip adds the extra length the outer curve of the turn needs. The single valley sc sits lower than the dc blocks, so the cream line dips into a clean V between neighboring points. The edging adds about 1/8 in (0.3 cm) on every side, which turns the 4.75 in x 4.25 in (12.1 cm x 10.8 cm) frame into a 5 in x 4.5 in (12.7 cm x 11.4 cm) star.
Final Blocking
- Wet the star. Soak it in cool water for a few minutes, then press out the water in a towel. Don’t wring it.
- Pin the center. Lay the star on the blocking mat and pin the center ring into a circle about 1.25 in (3.2 cm) across.
- Pin the long points. Pin the top and bottom tips so the star measures 5 in (12.7 cm) from tip to tip, in a straight vertical line.
- Pin the side points. Pin the left and right tips 4.5 in (11.4 cm) apart, at right angles to the long axis.
- Pin the diagonals. Pin each diagonal tip halfway between its neighbors, 3.75 in (9.5 cm) from the opposite diagonal tip.
- Open the points. Use a pin or a toothpick to spread each loop so its hollow center is open and symmetrical.
- Stiffen (optional). Brush on fabric stiffener or spray with starch and let it dry completely, at least 6 hours.
- Unpin and shape the loop. Remove the pins and smooth the hanging loop. It should hang about 2.25 in (5.7 cm) above the top tip.
Final Quality-Control Checklist
- Rnd 1 has 32 sc, evenly spaced around the ring.
- There are 8 blocks of 3 dc, each separated by 1 sc.
- The chain loops are 22, 12, 18, 12, 22, 12, 18 and 12 ch, in order around the star.
- Each loop’s legs sit at the two outer edges of its block.
- Rnd 3 has 136 sc in total, with a ch-2 at 7 tips and the ch-36 loop at the top.
- The finished star is 5 in (12.7 cm) tall and 4.5 in (11.4 cm) wide.
- All ends are woven in, the gold ends in gold sts and the cream ends in cream sts.
- The star hangs straight from its loop without tilting.
Troubleshooting
Points curl or twist: The chain probably twisted before the sl st. Undo the loop, straighten the chain, and sl st into the first dc of the block again.
Points ruffle after the edging: You worked more than one sc into some chains. Recount to 6, 9 or 11 sc per leg.
Points pucker or bend inward: Your edging tension is too tight, or you skipped chains. Loosen up slightly and recount.
Star hangs crooked: The ch-36 loop is off-center. Make sure it sits exactly between the 11th and 12th chains of the top point.
Center ring looks gappy: Push the 32 sc together around the ring before joining. A tighter starting ch-16 also helps.
Valleys look rounded instead of V-shaped: Make sure you work the valley sc into the Rnd 2 sc and not into the side of a dc.
Care
Hand wash in cool water with a mild soap, press dry in a towel, and re-block if needed. Store the ornament flat or hanging, away from damp, so the stiffener keeps its shape.

Final Notes
The whole star comes from one measurement chain. The 32 sc ring measures 1.25 in (3.2 cm). The dc blocks bring it to 2 in (5.1 cm). The chain loops extend the frame to 4.75 in x 4.25 in (12.1 cm x 10.8 cm). The one-sc-per-chain edging finishes it at 5 in x 4.5 in (12.7 cm x 11.4 cm). If your gauge matches 8 ch = 1 in (2.5 cm), every point lands where it should. Make one in gold and cream, then try other color pairs for a whole tree full of stars.
Happy crocheting!