

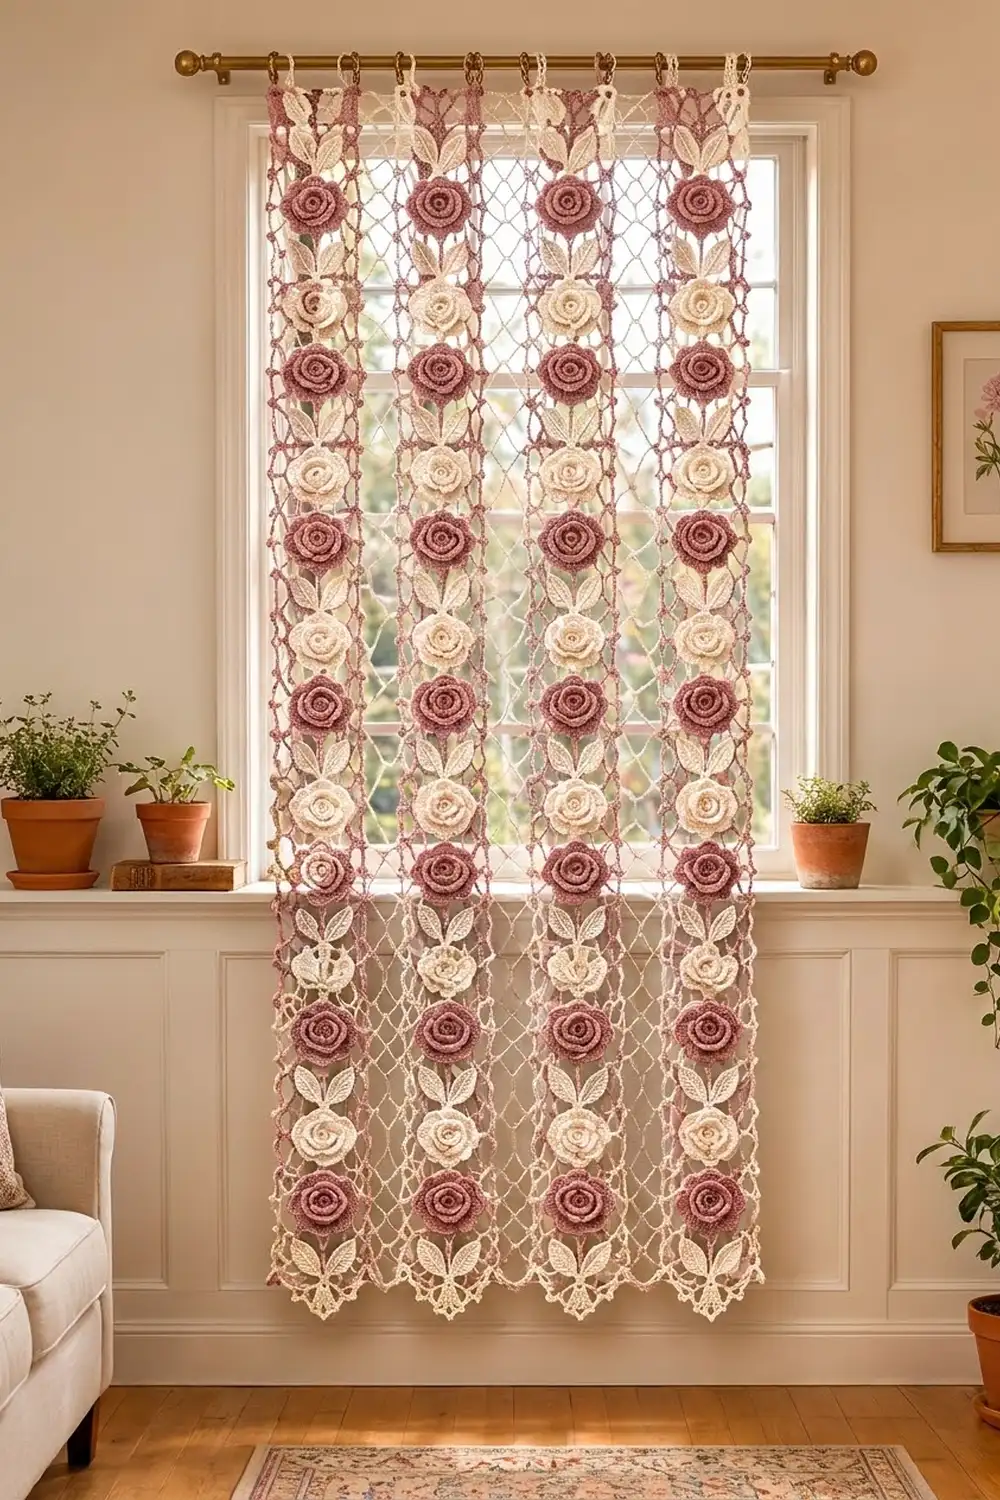
The Rambling Rose Lace Curtain is a light, romantic window panel. It’s made of open diamond netting with 3D roses climbing down every strip. Dusty rose and cream roses alternate down each strip and across the panel in a checkerboard. Pairs of cream leaves sit between the blooms, and four V-shaped points finish the hem.
The style is vintage cottage with an Irish-lace feel. Cream netting keeps the panel airy, and dusty rose outlines the seams and the outer edge. The pattern uses US crochet terms throughout.
The finished panel measures 33 in (83.8 cm) wide by 61 in (154.9 cm) long to the point tips. That length doesn’t include the hanging loops, which add about 2 in (5.1 cm).
Here’s how it’s built. You crochet four mesh strips from the top down and shape a point at the bottom of each. Then you make the roses and leaves separately, slip stitch the strips together, work a two-round border with rod loops and picots, and sew on the appliqués after blocking.
Finished Size and Construction
- Finished size: 33 in × 61 in (83.8 cm × 154.9 cm), plus 2 in (5.1 cm) hanging loops
- Skill level: Intermediate
- Terminology: US
- Yarn weight: DK / light worsted cotton (weight 3)
- Hook: 3.5 mm (E-4)
- Number of pieces: 4 mesh strips, 32 roses (16 dusty rose, 16 cream), 56 leaves
- Layout: 4 strips side by side, 8 roses per strip
- Strip size: 8 in × 60 in (20.3 cm × 152.4 cm), including a 3.5 in (8.9 cm) point
- Size before border: 32 in × 60 in (81.3 cm × 152.4 cm)
- Border depth: 0.5 in (1.3 cm)
Materials
Choose a smooth mercerized cotton or a cotton blend in DK weight, about 120 m per 50 g. Cotton holds the petals crisp and hangs straight in a window. Avoid fuzzy yarns, because they blur the netting.
- Cream: 400 g / 960 m (mesh strips, 16 roses, 56 leaves)
- Dusty rose: 150 g / 360 m (16 roses, seams, border)
These amounts include a margin of about 15% for swatching and for differences in tension.
Tools:
– 3.5 mm (E-4) crochet hook
– Tapestry needle
– Locking stitch markers
– Rust-proof pins and blocking mats (or a clean carpet covered with towels)
– Measuring tape
– Spray bottle
Abbreviations (US Terms)
- ch – chain
- sl st – slip stitch
- sc – single crochet
- hdc – half double crochet
- dc – double crochet
- tr – treble crochet
- sk – skip
- sp – space
- rep – repeat
- st(s) – stitch(es)
Special stitches:
– Sc around post: Insert the hook from back to front to back around the post of the stitch you’re told to use, then complete a sc. This anchors each new petal layer behind the one before it.
– Picot: Ch 3, sl st in the 3rd ch from the hook.
Gauge and Checkpoints
- Mesh gauge: 8 ch-5 loops = 8 in (20.3 cm) wide, and 10 rows = 5 in (12.7 cm) tall
- Border gauge: 16 sc = 4 in (10.2 cm)
Work the first 10 rows of one strip before you commit to the whole project. Lay the swatch flat, open the diamonds gently with your fingers, and measure. It should be 8 in (20.3 cm) wide and 5 in (12.7 cm) tall.
Checkpoints:
– After Row 10: 5 in (12.7 cm) long
– After Row 113: 56.5 in (143.5 cm) long
– After the point (Row 120): 60 in (152.4 cm) to the tip
– Rose after Rnd 3: 2 in (5.1 cm); after Rnd 5: 3.25 in (8.3 cm); after Rnd 7: 4.5 in (11.4 cm)
– Leaf: 2.5 in (6.4 cm) long and 1.25 in (3.2 cm) wide
If the strip is too big, go down to a 3.25 mm hook or chain more tightly. If it’s too small, go up to a 3.75 mm hook. Row height matters as much as width: 113 rows that come out 0.25 in (0.6 cm) too short in every 5 in would make the panel almost 3 in (7.6 cm) short.
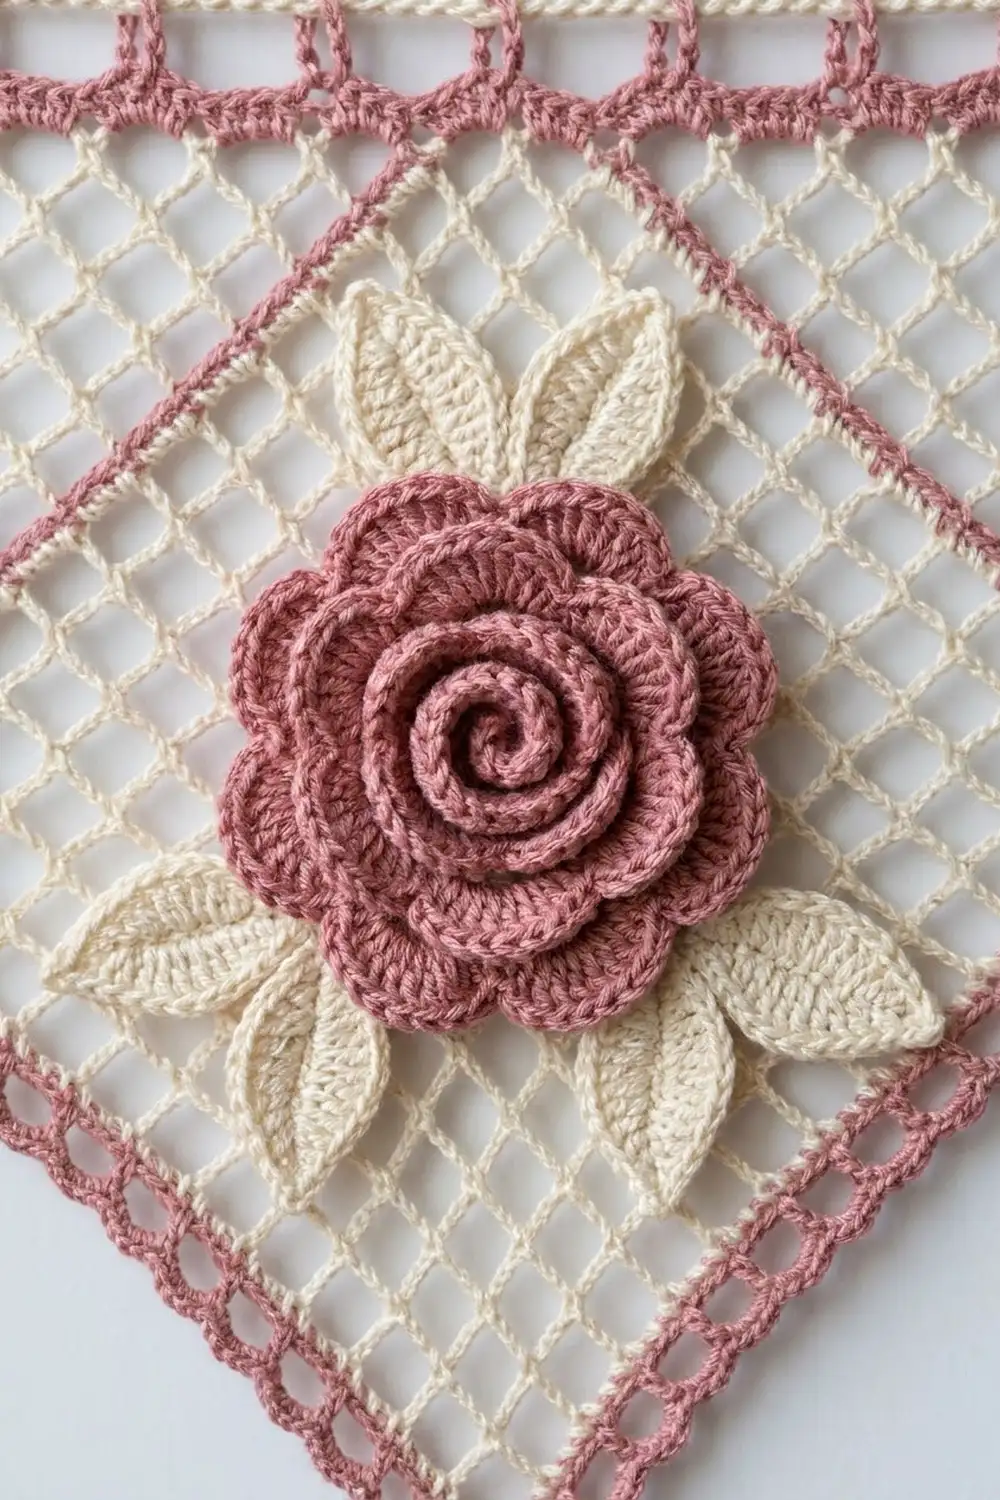
Mesh Strip (Make 4, Cream)
The strip is worked from the top edge down. The odd rows are “A” rows, which have 8 full loops. The even rows are “B” rows, which have 7 full loops plus a half loop at each end.
Foundation: Ch 34.
Row 1 (A): Sc in the 2nd ch from the hook, ch 5, sk 3 ch, sc in next ch; rep from * across. Turn. (9 sc, 8 ch-5 loops)*
Row 2 (B): Ch 5 (this counts as a dc plus ch 2). Sc in the first ch-5 loop, ch 5, sc in next ch-5 loop; rep from * across. Ch 2, dc in the last sc. Turn. (8 sc, 7 full loops, 2 half loops)*
Row 3 (A): Ch 1, sc in the dc. Sk the ch-2 sp, ch 5, sc in next ch-5 loop; rep from * 6 more times. Ch 5, sc in the 3rd ch of the turning ch. Turn. (9 sc, 8 ch-5 loops)*
Rows 4–113: Repeat Rows 2–3 alternately, ending with an A row (Row 113). Don’t fasten off.
The strip now measures 8 in × 56.5 in (20.3 cm × 143.5 cm).
Pointed Hem
Each point row moves in by half a loop at each end, so every row has 1 loop fewer than the row before.
Row 114: Turn. Sl st in each of the first 3 ch of the first loop. Ch 1, sc in the same loop, ch 5, sc in next loop; rep from * across, ending with a sc in the last loop. Turn. (8 sc, 7 loops)*
Rows 115–120: Repeat Row 114. The rows have 6, 5, 4, 3, 2, and then 1 loop. Row 120 has 2 sc and 1 loop, which forms the tip. Fasten off.
Total strip size: 8 in × 60 in (20.3 cm × 152.4 cm). Weave in the ends along a sc column so they don’t show through the netting.
Rose (Make 16 Dusty Rose, 16 Cream)
Petal Base
Rnd 1: Make a magic ring. Ch 1, work 10 sc in the ring, sl st to the first sc. (10 sc)
Rnd 2: Ch 1, sc in next sc, ch 3, sk 1 sc; rep from * 4 more times, sl st to the first sc. (5 sc, 5 ch-3 sps)*
Rnd 3: In each ch-3 sp work (sc, hdc, 4 dc, hdc, sc), sl st to the first sc. (5 petals, 40 sts)
Rnd 4: Working behind the petals, sc around the post of the next Rnd 2 sc, ch 5; rep from * 4 more times, sl st to the first sc. (5 sc, 5 ch-5 loops)*
Rnd 5: In each ch-5 loop work (sc, hdc, 6 dc, hdc, sc), sl st to the first sc. (5 petals, 50 sts)
Rnd 6: Working behind the petals, sc around the post of the next Rnd 4 sc, ch 7; rep from * 4 more times, sl st to the first sc. (5 sc, 5 ch-7 loops)*
Rnd 7: In each ch-7 loop work (sc, hdc, 2 dc, 5 tr, 2 dc, hdc, sc), sl st to the first sc. (5 petals, 65 sts) Fasten off, leaving a 12 in (30.5 cm) tail.
Rolled Center
Ch 21. Hdc in the 3rd ch from the hook and in each ch across. (19 hdc) Fasten off.
Roll the strip into a tight spiral with the hdc edge on top. Stitch through all the layers at the base, then sew the spiral over the magic ring. The rose measures 4.5 in (11.4 cm) across.
Leaf (Make 56, Cream)
Foundation: Ch 12.
Rnd 1: Sc in the 2nd ch from the hook, hdc in next ch, dc in next 2 ch, tr in next 3 ch, dc in next 2 ch, hdc in next ch, 3 sc in the last ch. Rotate the work and continue along the other side of the chain: hdc in next ch, dc in next 2 ch, tr in next 3 ch, dc in next 2 ch, hdc in next ch, sc in the last ch. Sl st to the first sc. (23 sts)
Rnd 2: Ch 1. Sc in each st around, working (sc, ch 2, sc) in the middle sc of the 3-sc tip. Sl st to the first sc. (23 worked 1 per st + 1 extra = 24 sc, 1 ch-2 tip)
Vein: With the same yarn, surface sl st up the center from the base to the tip. Fasten off, leaving a tail for sewing.
The leaf measures 2.5 in × 1.25 in (6.4 cm × 3.2 cm).
Make All Pieces
- Cream: 4 mesh strips, 16 roses, 56 leaves
- Dusty rose: 16 roses
Each strip has 8 roses. Center them on Rows 8, 22, 36, 50, 64, 78, 92, and 106, which puts them 14 rows (7 in / 17.8 cm) apart. Leaf pairs go on Rows 15, 29, 43, 57, 71, 85, and 99, which gives 7 pairs (14 leaves) per strip. Strips 1 and 3 start with a dusty rose, and Strips 2 and 4 start with a cream rose.
In the grid below, D = dusty rose rose, C = cream rose, and the columns are the strips from left to right.
Row    S1  S2  S3  S4
  8     D   C   D   C
 22     C   D   C   D
 36     D   C   D   C
 50     C   D   C   D
 64     D   C   D   C
 78     C   D   C   D
 92     D   C   D   C
106     C   D   C   D
Joining
Method: Slip stitch seam in dusty rose, worked row-end to row-end.
- Place Strips 1 and 2 wrong sides together, with the foundation edges aligned at the top.
- Join dusty rose through both Row 1 row-ends at once and sl st. Ch 1, sl st through the next pair of row-ends; rep from * to Row 113. (113 sl sts, 112 ch-1)*
- Fasten off at Row 113. Leave the point rows unjoined so the points hang free.
- Join Strip 3 to Strip 2, then Strip 4 to Strip 3, in the same way.
Stitch-to-stitch logic: Each row-end on one strip meets the same row-end on the next strip. Because of this, the A rows line up with A rows and the B rows with B rows, so the diamonds continue straight across each seam.
Tension: Keep the sl sts as loose as the mesh. A tight seam will pucker the panel lengthwise. Stretch the seam gently every 10 rows to check it.
Size checkpoint: The joined panel should be 32 in (81.3 cm) wide, because the seam adds no measurable width. It should be 56.5 in (143.5 cm) from the top to the bottom of the seams and 60 in (152.4 cm) to the tips.
Border
Border gauge: 16 sc = 4 in (10.2 cm). Work with dusty rose.
Rnd 1: Join at the top-left corner. Ch 1.
– Top: Sc in the underside of each of the 33 foundation ch of each strip (sk the unused turning ch), which gives 4 × 33 = 132 sc. Add no stitches at the seams.
– Corner: Ch 2.
– Right side: 2 sc in each row-end from Row 1 to Row 113 = 226 sc.
– Each point: 3 sc around each of the 7 stepped row-ends going down (21 sc). Work (2 sc, ch 3, 2 sc) in the tip loop. Then work 3 sc around each of the 7 row-ends going up (21 sc). That’s 46 sc + 1 ch-3 per point, so 184 sc for all 4 points.
– Left side: 226 sc, worked the same way as the right side.
– Corner: Ch 2. Sl st to the first sc.
Rnd 1 total: 132 + 226 + 184 + 226 = 768 sc, plus 2 ch-2 corners and 4 ch-3 tips.
Rnd 2: Ch 1.
– Top: On each strip, sc in the next 8 sc, (sc, ch 20, sc) in the next sc, sc in the next 15 sc, (sc, ch 20, sc) in the next sc, then sc in the next 8 sc. That’s 35 sc and 2 loops per strip. Top total: 132 worked 1 per st + 8 extra = 140 sc, 8 ch-20 loops.
– Corners: (Sc, ch 2, sc) in each ch-2 sp, which adds 2 extra sc per corner.
– Sides: Sc in each sc = 226 sc per side.
– Each point: Sc in the next 3 sc, picot; rep from * 6 more times. Sc in the next 2 sc, (sc, ch 3, sc) in the tip sp, sc in the next 2 sc. Sc in the next 3 sc, picot; rep from * 6 more times. That’s 48 sc, 14 picots, and 1 ch-3 per point (46 worked 1 per st + 2 extra).
Sl st to the first sc and fasten off.
Rnd 2 total: 768 worked 1 per st + 8 (loops) + 8 (tips) + 4 (corners) = 788 sc.
Why the math works:
– Top: 132 sc over 32 in is about 4.1 sc per in, which keeps the edge firm under the rod.
– Sides: 226 sc over 56.5 in is exactly 4 sc per in, matching the border gauge.
– Points: Each slope is about 5.3 in (13.5 cm) long, measured diagonally across 3.5 in of height and 4 in of width. 21 sc across it is about 4 sc per in.
Final Blocking
- Soak the panel in cool water for 15 minutes, then press out the water. Don’t wring it.
- Roll it in towels to remove more moisture.
- Lay it flat and pin it to 33 in × 61 in (83.8 cm × 154.9 cm).
- Pin each top corner square, then pin the sides straight every 4 in (10.2 cm).
- Pin each point tip and each valley so the V shapes are even.
- Open the diamonds with your fingertips so the netting is uniform.
- Block the roses cupped and the leaves flat, then let everything dry fully.
- Sew on the roses with a few tacks behind the outer petals. Sew on the leaves at the base and tip, angled outward in a V, tips up.
Final Quality-Control Checklist
- Each strip has 113 main rows plus 7 point rows
- Each A row has 8 full loops
- The seams are flat and the diamonds line up across them
- Panel width: 33 in (83.8 cm); length to tips: 61 in (154.9 cm)
- 8 hanging loops, evenly spaced
- 32 roses in a checkerboard; 56 leaves in V pairs
- All ends woven in and secure
Troubleshooting
- Strip slants or twists: You probably missed the half loop on a B row. Count 7 full loops on every B row.
- Panel puckers at the seams: The seam is too tight. Redo it with a looser sl st or a 4 mm hook.
- Points curl: Pin them firmly when blocking. In Rnd 1, make sure you work exactly 3 sc per step.
- Roses flop: Your tension is too loose. Use a 3.25 mm hook for the roses.
- Top edge ripples: Check that you have exactly 33 sc per strip along the top.
- Leaves twist: Re-block them flat and tack them at both the tip and the base.
Care
Hand wash in cool water with mild soap, and dry flat while you reshape and pin the points. Don’t tumble dry. Iron the netting lightly on low heat if needed, avoiding the roses.
Final Notes
Everything depends on the mesh gauge. 8 loops = 8 in (20.3 cm), and 113 rows plus a 7-row point = 60 in (152.4 cm). Four joined strips make 32 in (81.3 cm). The border sits on 132 sc across the top and 226 sc down each side, and adds 0.5 in (1.3 cm) all around, for a finished panel of 33 in × 61 in (83.8 cm × 154.9 cm). Check each number as you reach it and the roses will climb straight down every strip.
Happy crocheting!