

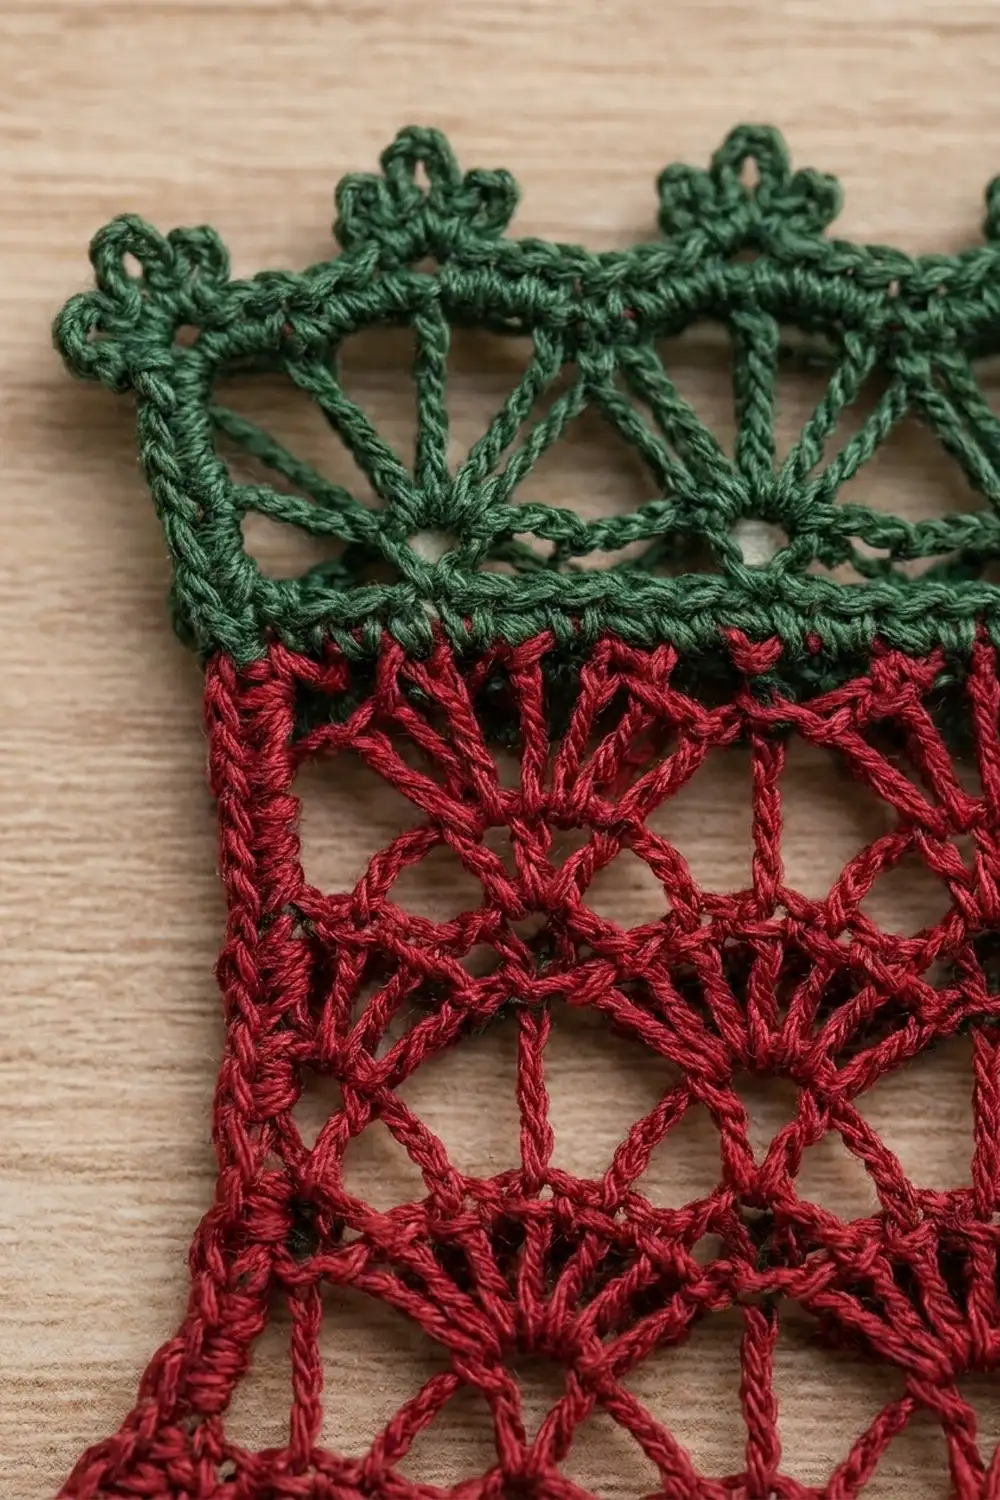
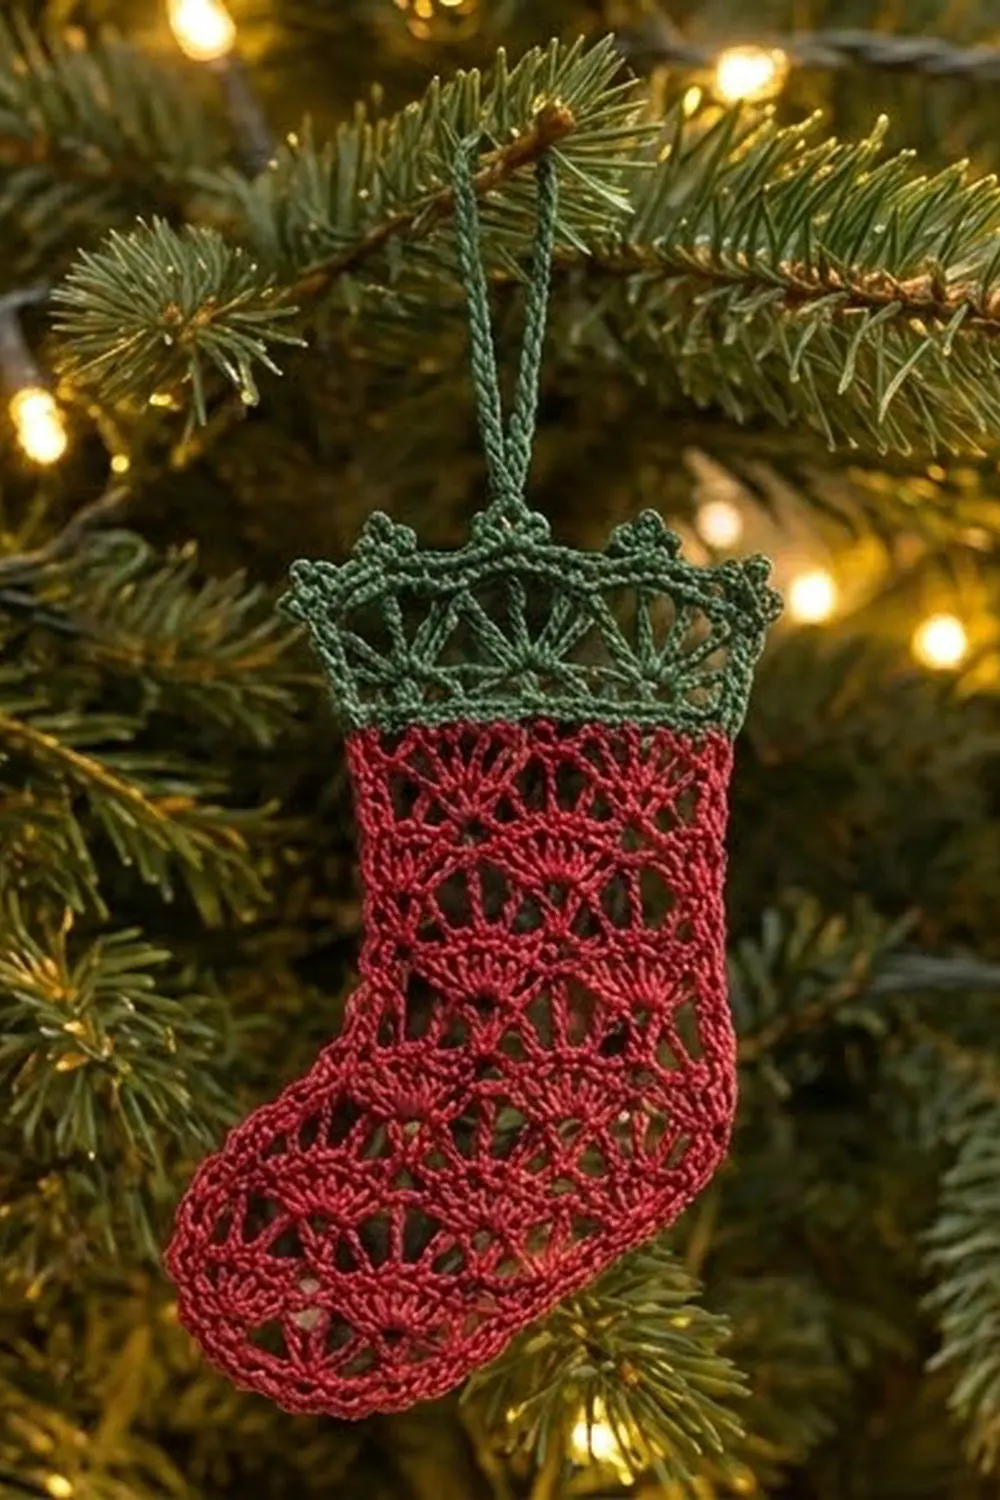
This little stocking is a lace ornament with a festive look: cranberry-red fan lattice, a crisp outline and a forest-green cuff with a crown edge. A green corded loop hangs it from a branch, a gift tag or a window hook.
The body is an open lattice of small fans, with each row of fans offset from the row below. The cuff is a single fan row topped with four pointed peaks. Each peak has a three-loop trefoil picot, and small picots sit in the valleys. It is a light, heirloom-style design that looks especially good once it is starched.
The pattern uses US crochet terms. The finished ornament measures about 3.1 in (7.9 cm) wide at the foot and 4.7 in (11.9 cm) tall without the loop. With the loop it is about 6.2 in (15.7 cm) tall.
You will work the body flat in rows. Start at the sole, work six rows across the full foot, then continue over the heel side only to form the leg. A single-crochet outline goes around the sides and bottom. The green cuff is worked across the top of the leg, and the hanging loop comes last.
Finished Size and Construction
- Finished size: 3.1 in (7.9 cm) wide at the foot × 4.7 in (11.9 cm) tall, not counting the loop
- Skill level: Intermediate
- Terminology: US
- Yarn weight: Lace (0), size 10 crochet thread
- Hook: 1.75 mm (US steel 6)
- Number of pieces: 1
- Layout: One flat stocking: foot and leg in one piece, with the cuff worked directly onto it
- Leg width: 2.1 in (5.3 cm) after the outline
- Size before border: 3 in (7.6 cm) wide at the foot × 3.6 in (9.1 cm) tall
- Border depth: one round of sc, about 0.05 in (0.1 cm) per edge
- Cuff depth: 1 in (2.5 cm), including the picot tips
Materials
Use a mercerized cotton thread in size 10. It gives clear stitch definition and holds starch well. Avoid fuzzy or very soft thread, because the fans will blur.
- Red (body and outline): 10 g, about 40 m
- Green (cuff and loop): 5 g, about 20 m
Both quantities include a margin for a gauge swatch and weaving in ends.
Tools:
– 1.75 mm (US steel 6) crochet hook
– Fine tapestry needle
– Small scissors
– 2 stitch markers
– Rustproof pins and a blocking mat or foam board
– Spray starch or a diluted fabric stiffener (optional)
Abbreviations (US Terms)
- ch – chain
- sl st – slip stitch
- sc – single crochet
- hdc – half double crochet
- dc – double crochet
- tr – treble crochet
- sk – skip
- sp – space
- st(s) – stitch(es)
- fan – 7 dc worked into the same space or stitch
- half fan – 4 dc at a row edge (3 dc in a space plus 1 dc, or a ch-3 counting as dc plus 3 dc)
Special stitches:
- Picot: ch 3, sl st in 3rd ch from hook.
- Trefoil picot (tp): ch 3, sl st in 3rd ch from hook; ch 4, sl st in 4th ch from hook; ch 3, sl st in 3rd ch from hook. This makes three small loops in a cluster.
Gauge and Checkpoints
Gauge: 1 fan repeat (6 foundation ch) = 0.5 in (1.3 cm) wide. One 4-row repeat (Rows 2–5) = 1 in (2.5 cm) tall. For the outline, 16 sc = 1 in (2.5 cm).
Test swatch: Ch 26 and work Rows 1–5 as written below, using 4 repeats instead of 6. Then work Row 2 once more. Pin the swatch flat. It should measure 2 in (5.1 cm) wide, and Rows 2–5 should measure 1 in (2.5 cm) tall.
Checkpoints:
– After Row 6: the foot measures 3 in (7.6 cm) wide × 1.5 in (3.8 cm) tall.
– After Row 14: the body measures 3.5 in (8.9 cm) tall from the foundation chain, and the leg measures 2 in (5.1 cm) wide.
– After Row 15: the body measures 3.6 in (9.1 cm) tall.
– After the outline: the foot measures 3.1 in (7.9 cm) wide, the leg 2.1 in (5.3 cm), and the body 3.7 in (9.4 cm) tall.
– After the cuff: the ornament measures 4.7 in (11.9 cm) tall.
If the swatch is too big, go down to a 1.5 mm hook. If it is too small, go up to a 2 mm hook. Small fans that look cramped usually mean your chain arches are too tight, so loosen your chains first.
Body (Red)
The slip-knot end of the foundation chain is the toe. The hook end is the heel.
Foundation: With red, ch 38.
Row 1 (arch row): Sc in 2nd ch from hook, ch 5, sk 5 ch, sc in next ch; rep from * 5 more times. Turn.
(7 sc, 6 ch-5 arches)*
Row 2 (fan row): Ch 1, sc in first sc, 7 dc in next ch-5 sp, sc in next sc; rep from * 5 more times. Turn.
(6 fans, 7 sc = 49 sts)*
Row 3 (offset arch row): Ch 5 (counts as dc + ch 2), sc in center (4th) dc of first fan, ch 5, sc in center dc of next fan; rep from * 4 more times, ch 2, dc in last sc. Turn.
(6 sc, 5 ch-5 arches, 2 edge ch-2 sps)*
Row 4 (offset fan row): Ch 3 (counts as dc), 3 dc in first ch-2 sp, sc in next sc, 7 dc in next ch-5 sp, sc in next sc; rep from * 4 more times. Work 3 dc in the turning-ch sp, then dc in 3rd ch of the turning ch. Turn.
(half fan + 5 fans + half fan: 4 + 1 + 40 + 4 = 49 sts)*
Row 5 (arch row): Ch 1, sc in first dc, ch 5, sc in center dc of next full fan; rep from * 4 more times, ch 5, sc in top of the turning ch. Turn.
(7 sc, 6 ch-5 arches)*
Row 6: Repeat Row 2. Do not turn yet.
(6 fans, 7 sc = 49 sts)
Row 6 ends at the heel. Turn now. The leg is worked over the 4 fans on the heel side only.
Row 7 (leg begins): Ch 5 (counts as dc + ch 2), sc in center dc of first fan, ch 5, sc in center dc of next fan; rep from * 2 more times, ch 2, dc in next sc (the sc between fans 4 and 5). Turn. Leave fans 5 and 6 unworked; this is the top of the toe.
(4 sc, 3 ch-5 arches, 2 edge ch-2 sps)*
Row 8: Ch 3 (counts as dc), 3 dc in first ch-2 sp, sc in next sc, 7 dc in next ch-5 sp, sc in next sc; rep from * 2 more times. Work 3 dc in the turning-ch sp, then dc in 3rd ch of the turning ch. Turn.
(4 + 1 + 24 + 4 = 33 sts)*
Row 9: Ch 1, sc in first dc, ch 5, sc in center dc of next full fan; rep from * 2 more times, ch 5, sc in top of turning ch. Turn.
(5 sc, 4 ch-5 arches)*
Row 10: Ch 1, sc in first sc, 7 dc in next ch-5 sp, sc in next sc; rep from * 3 more times. Turn.
(4 fans, 5 sc = 33 sts)*
Row 11: Ch 5 (counts as dc + ch 2), sc in center dc of first fan, ch 5, sc in center dc of next fan; rep from * 2 more times, ch 2, dc in last sc. Turn.
(4 sc, 3 ch-5 arches, 2 edge ch-2 sps)*
Rows 12–14: Repeat Rows 8–10.
(Row 14: 4 fans, 5 sc = 33 sts)
Row 15 (leveling row): Ch 4 (counts as tr), dc in next dc, hdc in next dc, sc in each of next 3 dc, hdc in next dc, dc in next dc, tr in next sc; rep from * 3 more times. Do not turn.
(1 + 4 × 8 = 33 sts)*
The taller stitches fill the dips between fans, so the top edge comes out straight for the cuff. Row 15 ends at the front (toe-side) corner of the leg.
Border: Red Outline
Border gauge: 16 sc = 1 in (2.5 cm). Row ends get a fixed count by row type: 3 sc per arch-row end and 4 sc per fan-row or leveling-row end.
Do not fasten off. Ch 1 and rotate to work down the front edge of the leg.
Outline round:
1. Front leg edge: Work along the row ends of Rows 15–7. That is 4 sc for Row 15, 4 sc for each fan row (14, 12, 10, 8) and 3 sc for each arch row (13, 11, 9, 7).
(4 + 16 + 12 = 32 sc)
2. Instep: Sc in each of the 7 dc of fan 5, sc in the next sc, and sc in each of the 7 dc of fan 6. Then work 2 sc in the edge sc at the toe corner.
(15 + 2 = 17 sc)
3. Toe edge: Work along the row ends of Rows 6–1: 4 sc for each fan row and 3 sc for each arch row.
(12 + 9 = 21 sc)
4. Sole: Work into the free loops of the foundation chain. Work 2 sc in the toe-end ch, 1 sc in each of the next 36 ch, then 2 sc in the heel-end ch.
(2 + 36 + 2 = 40 sc)
5. Heel and back leg edge: Work along the row ends of Rows 1–15: 3 sc for each of the 7 arch rows, 4 sc for each of the 7 fan rows, and 4 sc for Row 15.
(21 + 28 + 4 = 53 sc)
Sl st in the top of the beginning ch-4 of Row 15. Fasten off.
(Round total: 32 + 17 + 21 + 40 + 53 = 163 sc)
Why the math works: One arch row is about 0.2 in (0.5 cm) tall and one fan row about 0.3 in (0.8 cm). At 3 and 4 sc, the outline lands just under the 16-per-inch sc gauge. That slight reduction keeps the lace edge from rippling. The sole gets one sc per foundation chain, so it matches the chain length exactly. Working only 2 sc at the toe and heel corners, instead of 3, lets them curve instead of forming sharp points.
Cuff (Green)
The cuff is worked into the 33 sts of Row 15 only, not into the outline stitches.
Row C1: Join green with sc in the last st of Row 15 at the front corner. Sc in each st across to the heel side. Turn.
(33 sc)
Row C2 (fan row): Ch 1, sc in first sc, sk 3 sc, 7 dc in next sc, sk 3 sc, sc in next sc; rep from * 3 more times. Turn.
(4 fans, 5 sc = 33 sts)*
Row C3 (crown row): Ch 1, sc in first sc.
– Ch 2, sk 1 dc, dc in each of next 2 dc, (2 dc, tp, 2 dc) in center dc, dc in each of next 2 dc, ch 2, sk 1 dc.
– In the next sc: if it is a middle sc, work (sc, picot, sc); if it is the last sc, work just sc.
– Repeat across, 4 peaks total. Row C3 ends at the heel-side corner.
(4 peaks of 8 dc, each with 1 trefoil picot; 3 valley picots; 2 edge sc)
Each peak has 8 dc where the fan below had 7, so the crown flares slightly.
Hanging Loop (Green)
Do not fasten off. Ch 36, then sl st in the last sc of Row C3 to form a loop. Work 44 sc into the ch-36 loop to cover it, then sl st in the same sc. Fasten off.
The covered loop stands about 1.5 in (3.8 cm) above the cuff.
Final Blocking
- Weave in all ends along the outline or inside the fans. Never weave across open lace.
- Soak the ornament in cool water for 5 minutes, then press it gently in a towel.
- Pin the outline to the blocking surface. Check that the foot is 3.1 in (7.9 cm) wide, the leg is 2.1 in (5.3 cm) wide, and the body is 3.7 in (9.4 cm) tall.
- Pin each fan open so the arches form even curves.
- Pin each cuff peak upward, with one pin through the center loop of each trefoil picot. Then pin each valley picot.
- Spray with starch, or brush on diluted stiffener, and let the ornament dry fully.
- Unpin and check that the total height is 4.7 in (11.9 cm).
Final Quality-Control Checklist
- Foot: 6 fans across in Rows 2 and 6
- Leg: 4 fans across in Rows 10 and 14
- Row 15 is level, with 33 sts
- Outline total is 163 sc, with rounded corners at the toe and heel
- Cuff has 4 even peaks, each with a trefoil picot
- 3 valley picots
- Loop is firmly anchored at the heel-side corner
- No ends are visible on the front
- Finished size: 3.1 in (7.9 cm) × 4.7 in (11.9 cm)
Troubleshooting
The fans cup or ruffle. Your arches are too long or your dc are too loose. Tighten your chains slightly, or go down a hook size.
The fans don’t line up. Make sure each arch row places its sc in the 4th dc of each fan, the true center.
The leg leans to one side. Check that Row 7 has exactly 4 sc and ends in the sc between fans 4 and 5.
The outline waves. Use 3 sc per arch-row end instead of 4. Count each section against the totals above.
The toe or heel is pointed. Work only 2 sc into the corner chain, then block the corner around a curved pin line.
The crown peaks droop. Use more starch, and pin through the trefoil picot until it is completely dry.
Care
Hand wash in cool water and lay flat to dry, then re-starch and re-pin the cuff peaks if needed. Store flat or hang the ornament by its loop, away from direct sun.
Final Notes
The measurement chain is simple. Each fan repeat is 0.5 in (1.3 cm) wide and each 4-row repeat is 1 in (2.5 cm) tall. Six repeats give a 3 in (7.6 cm) foot and four give a 2 in (5.1 cm) leg. Rows 1–15 reach 3.6 in (9.1 cm). The outline brings the stocking to 3.1 in (7.9 cm) × 3.7 in (9.4 cm), and the 1 in (2.5 cm) cuff finishes it at 4.7 in (11.9 cm). Check your gauge first, count at each checkpoint, and block it well for crisp lace.
Happy crocheting!