

The Bluebell Bubble Strip Curtain is made of slim hanging strips that look like strings of lanterns. Each strip alternates firm single crochet bands with airy sections of long loops, and the loops bow outward into soft bubbles. The result filters light without blocking it, so it suits a window, a doorway, or a room divider.
This version uses two colors, dusty blue and cream, in an alternating layout. Nine strips hang from one rod: five blue and four cream. Each strip ends in a matching tassel. The look is relaxed, boho, and a little coastal.
The pattern is written in US crochet terms. Each strip is 1.25 in (3.2 cm) wide at the bands and 2 in (5.1 cm) wide at the bubbles. It hangs 38 in (96.5 cm) from the top of the rod, or 42 in (106.7 cm) including the tassel. Spaced as written, the nine strips cover about 34 in (86.4 cm) of rod.
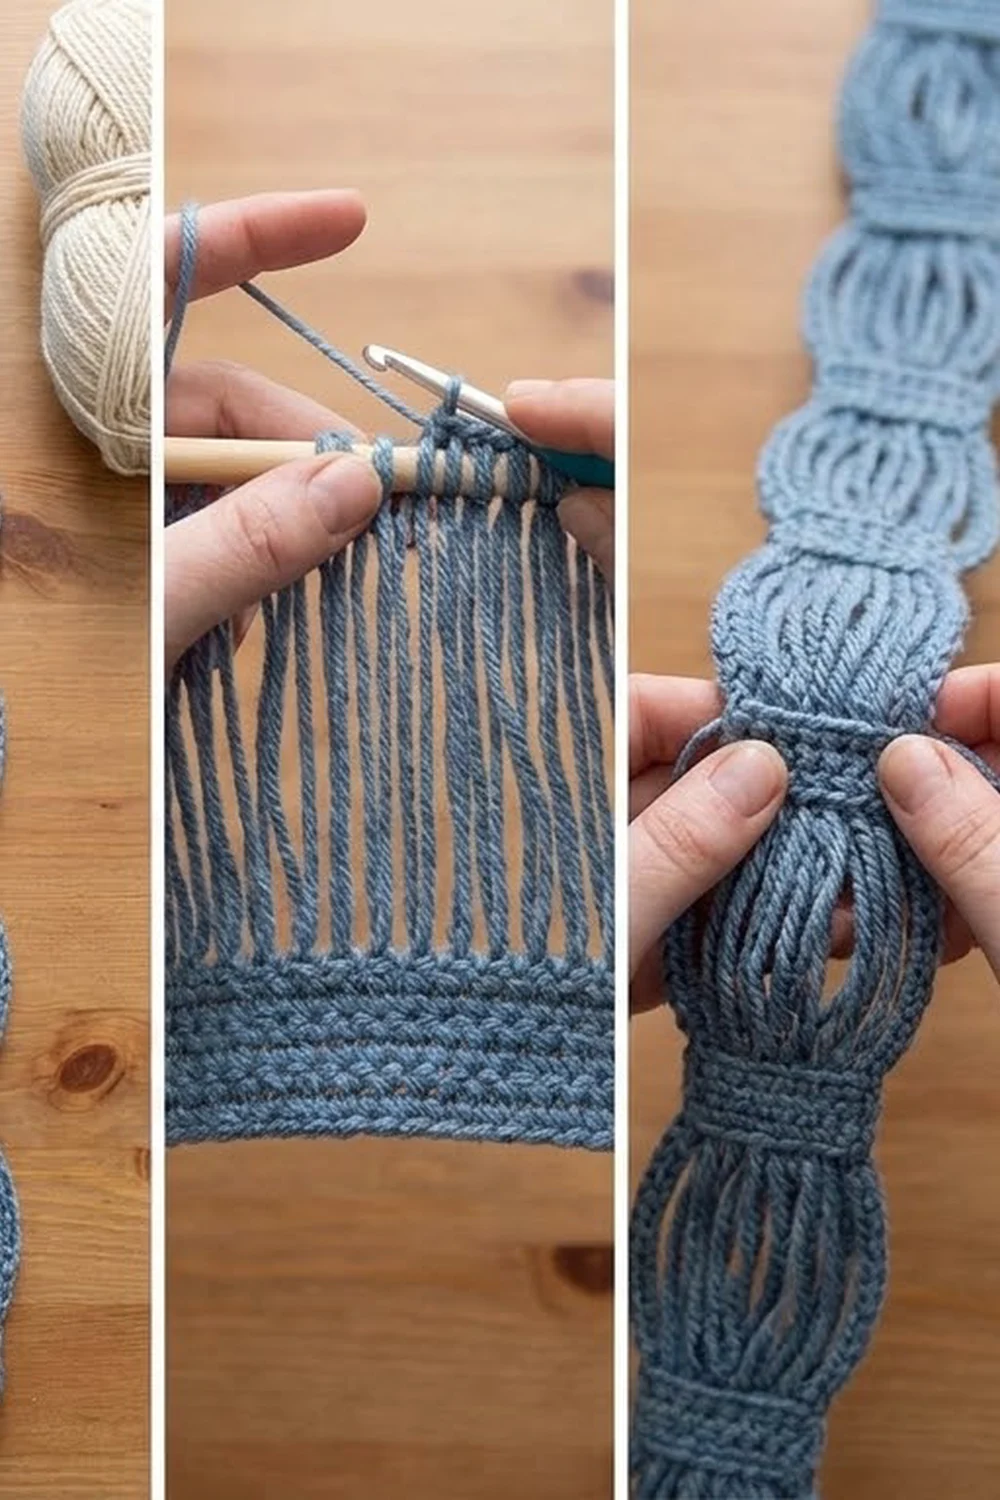
Each strip is worked in one piece from the top down. You start with a solid tab that folds into a rod sleeve. Then you repeat a simple broomstick-style unit: one loop row held on a dowel, followed by a four-row single crochet band. The strips are not joined to each other. They hang separately, and you finish each one with a tassel.
Finished Size and Construction
- Strip width: 1.25 in (3.2 cm) at the bands; 2 in (5.1 cm) at the bubbles
- Strip length: 38 in (96.5 cm) from the rod top; 42 in (106.7 cm) with the tassel
- Skill level: Easy to intermediate (you need to be comfortable with broomstick-style loops)
- Terminology: US
- Yarn weight: Worsted (#4) cotton or cotton blend
- Hook: 5.0 mm (US H-8)
- Loop dowel: 1.5 in (3.8 cm) diameter wooden dowel
- Number of pieces: 9 strips (5 blue, 4 cream)
- Layout: One row of strips hung side by side, alternating colors, centers 4 in (10.2 cm) apart
- Piece size: 1.25 in × 38 in (3.2 cm × 96.5 cm) before the tassel
- Size before border: Not applicable. The strips are left unedged to keep them light.
- Border depth: The finishing is a 4 in (10.2 cm) tassel at the bottom and a 2 in (5.1 cm) folded rod sleeve at the top
Materials
Choose a smooth, matte cotton or cotton-blend worsted yarn. Cotton holds the loop shape and hangs straight. Avoid very fuzzy or stretchy yarns, because they blur the bubbles and the strips may lengthen over time.
- Color A, dusty blue: 140 g / 250 m (for 5 strips and 5 tassels)
- Color B, cream: 110 g / 200 m (for 4 strips and 4 tassels)
One strip with its tassel uses about 40 m (about 22 g). The quantities above include a margin of roughly 20% for gauge swatching and tension differences.
Tools:
– 5.0 mm (US H-8) crochet hook
– 1.5 in (3.8 cm) diameter wooden dowel, at least 6 in (15.2 cm) long
– 4 in (10.2 cm) piece of stiff cardboard for tassels
– Tapestry needle
– Scissors
– Measuring tape
– Curtain rod up to 1.25 in (3.2 cm) in diameter
– Rust-proof pins and a blocking surface
Abbreviations (US Terms)
- ch – chain
- sc – single crochet
- st(s) – stitch(es)
- RS – right side
- rep – repeat
Special stitch: Loop Row (LR)
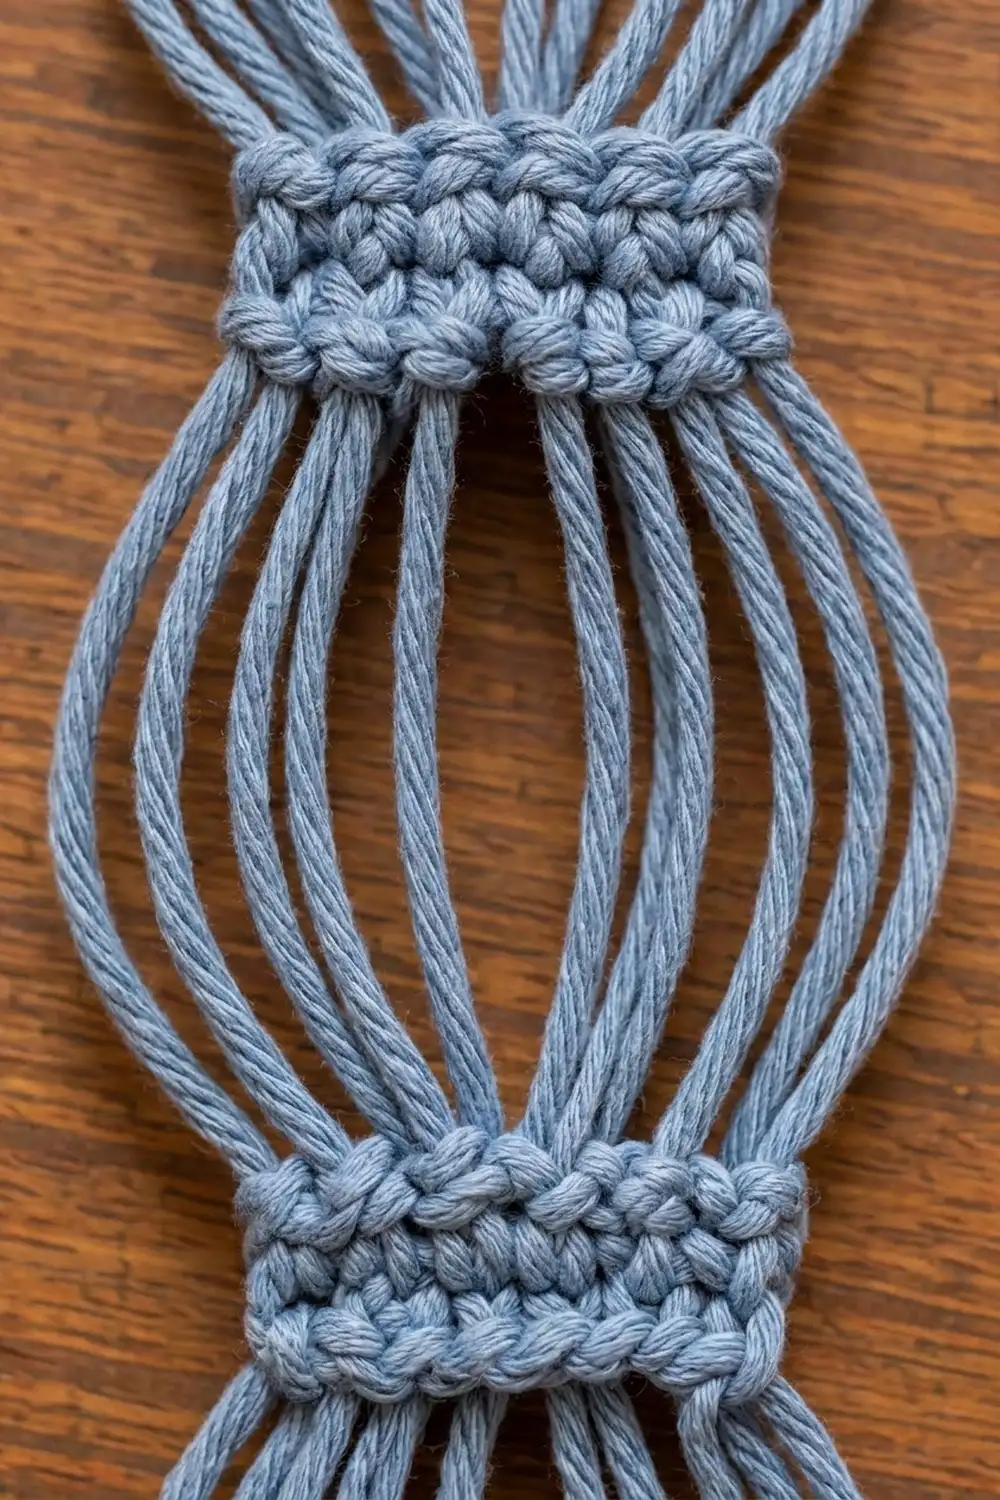
Do not turn. Extend the loop on your hook and slip it onto the dowel. This is loop 1, sitting over the last sc you worked. Insert your hook into the same sc, pull up a loop, and slip it onto the dowel (loop 2). Insert your hook into the next sc, pull up a loop and slip it onto the dowel. Insert your hook into the same sc, pull up a loop and slip it onto the dowel. Rep from * to * across the remaining 4 sc. You now have 10 loops on the dowel.
Special stitch: Gathering Row (GR)
Slide all 10 loops off the dowel. Insert your hook through the first 2 loops together (the pair that includes loop 1), yo, pull through, and ch 1. Sc through the same 2 loops. Sc through the next 2 loops together. Rep from * to * 3 more times. You now have 5 sc.
Because 10 loops are gathered into only 5 stitches, the extra yarn bows outward. That is what creates the bubble shape.
Gauge and Checkpoints
Gauge: 16 sc and 16 rows = 4 in (10.2 cm) in sc worked flat.
Test one strip first. Make the top tab and two full bubble units, then measure:
- Checkpoint 1: The tab after Row 20 measures 1.25 in (3.2 cm) wide and 5 in (12.7 cm) long.
- Checkpoint 2: Each band of 4 rows (GR plus 3 sc rows) measures 1 in (2.5 cm) tall.
- Checkpoint 3: Each relaxed loop section measures 2.5 in (6.4 cm) tall from band to band.
- Checkpoint 4: Each full bubble unit measures 3.5 in (8.9 cm) tall.
- Checkpoint 5: The bubble bulges to about 2 in (5.1 cm) wide at its widest point.
If the bands are too wide or tall, go down one hook size. If they are too narrow or short, go up one hook size.
If the loops are too long, switch to a 1.25 in (3.2 cm) dowel. If they are too short or tight, use a 1.75 in (4.4 cm) dowel. Keep the loops snug against the dowel without stretching it.
Pattern: One Strip
Make all strips the same way, changing only the color.
Top Tab and First Band
Leave a 12 in (30.5 cm) starting tail for sewing the sleeve later.
Row 1 (RS): Ch 6, sc in 2nd ch from hook and in each ch across, turn. (5 sc)
Rows 2–20: Ch 1 (does not count as a st), sc in each st across, turn. (5 sc in each row)
Rows 1–16 form the rod sleeve, 4 in (10.2 cm) long. Rows 17–20 form the first band, 1 in (2.5 cm) long. At the end of Row 20, do not turn.
Checkpoint: 5 in (12.7 cm) long × 1.25 in (3.2 cm) wide.
Bubble Unit (worked 10 times)
Row A: Work the Loop Row across the 5 sc. (10 loops on the dowel)
Row B: Work the Gathering Row. (5 sc) Turn.
Rows C–E: Ch 1, sc in each st across, turn. (5 sc in each row) At the end of Row E, do not turn.
Rows B–E make one band, 4 rows and 1 in (2.5 cm) tall. Each unit adds 2.5 in (6.4 cm) of loops plus 1 in (2.5 cm) of band, for 3.5 in (8.9 cm) in total.
Repeat Rows A–E 9 more times, for 10 bubble units in all. After the last Row E, fasten off and leave an 8 in (20.3 cm) tail for attaching the tassel.
Row count check: 20 tab rows + (10 units × 5 rows) = 70 rows. Every sc row has 5 sts, and every Loop Row has 10 loops.
Strip check: The finished strip has 11 bands (the first band plus 10) and 10 bubbles.
Tip: Keep the dowel parallel to the band and close to it while you pull up loops. Tilting the dowel makes the loops uneven in length.
Fold the Rod Sleeve
Fold Row 1 down to the wrong side so it lies against the back of Row 16. Use the starting tail to whipstitch the 5 foundation stitches to the 5 stitches of Row 16.
This makes a tube 2 in (5.1 cm) tall with a 4 in (10.2 cm) circumference. It slides onto a rod up to 1.25 in (3.2 cm) in diameter, because 1.25 × 3.14 = 3.93 in, which is just under the 4 in circumference. Weave in the end.
Make All Pieces
- Color A (dusty blue): 5 strips + 5 tassels
- Color B (cream): 4 strips + 4 tassels
Layout grid (left to right on the rod):
| A | B | A | B | A | B | A | B | A |
  1   2   3   4   5   6   7   8   9
Blue strips take the outer positions, so the curtain looks the same from both sides of the window.
Joining (Hanging the Strips)
The strips are not stitched to each other. Each strip hangs on its own sleeve, so you don’t need to match stitches between strips. The rod does the “joining.”
Method: Thread the strips onto the rod in the grid order, with the RS facing into the room.
Spacing logic: Place the strip centers 4 in (10.2 cm) apart. This leaves a 2.75 in (7.0 cm) gap between bands (4 in − 1.25 in) and a 2 in (5.1 cm) gap between bubbles (4 in − 2 in), so neighboring bubbles never touch or tangle.
Tension advice: Let each strip hang freely for a few minutes before adjusting. Don’t pull the strips downward to straighten them, because cotton stretches when wet or tugged and will lengthen unevenly.
Size checkpoint: There are 8 gaps between 9 centers, so the spread is 8 × 4 in = 32 in, plus one bubble width of 2 in, for 34 in (86.4 cm) across. For a wider window, increase the spacing slightly or add strips in pairs (one A, one B) to keep the alternating pattern.
Border (Sleeve and Tassel Finish)
This design has no edging along the long sides. A side border would stiffen the strips and flatten the bubbles. The finishing happens at the two ends.
Border gauge: The same 16 sc = 4 in (10.2 cm) sc gauge used throughout the strip.
Top edge: The sleeve has 5 sts across, matching the 5 sts of every band, so the strip hangs straight from the rod. The sleeve’s 16 rows equal 4 in (10.2 cm), which fixes the sleeve circumference. That is why the rod limit of 1.25 in (3.2 cm) holds.
Bottom edge: tassel
1. Wrap matching yarn 30 times around the 4 in (10.2 cm) cardboard.
2. Slip a 10 in (25.4 cm) strand under the wraps at the top and tie it tightly.
3. Cut the wraps at the bottom edge. You’ll have 60 strand ends, each 4 in (10.2 cm) long.
4. Wrap a separate strand 6 times around the bundle, 0.5 in (1.3 cm) below the top, to form the neck. Knot it and bury the ends inside the tassel.
5. Use the fastening-off tail of the strip to sew the tassel’s tie strand to the center sc (stitch 3 of 5) of the last band. This keeps the tassel centered.
6. Trim the tassel ends evenly to 4 in (10.2 cm).
Why the math works: The strip measures 2 in (sleeve) + 1 in (first band) + 10 × 3.5 in (units) = 38 in (96.5 cm). Adding the 4 in (10.2 cm) tassel gives 42 in (106.7 cm).
Final Blocking
- Lightly mist each strip with water until it is damp, not soaked.
- Lay the strip flat on a blocking surface with the RS up.
- Pin each band square at 1.25 in (3.2 cm) wide and 1 in (2.5 cm) tall.
- Gently ease each loop section to 2.5 in (6.4 cm) between bands. Don’t stretch it beyond that.
- With your fingers, spread the loops of each bubble into an even oval about 2 in (5.1 cm) wide, so the loops on both sides curve symmetrically.
- Steam or mist the tassels and comb the strands straight.
- Let everything dry completely before hanging, about 6–12 hours.
Final Quality-Control Checklist
- [ ] Every band has exactly 5 sc.
- [ ] Every Loop Row had exactly 10 loops.
- [ ] Each strip has 11 bands and 10 bubbles.
- [ ] All loops in a bubble are the same length, with no loose or short loops.
- [ ] The sleeve is whipstitched securely across all 5 sts and slides easily onto the rod.
- [ ] Each strip measures 38 in (96.5 cm) before the tassel.
- [ ] Each tassel is 4 in (10.2 cm) long and centered on the last band.
- [ ] All ends are woven in and invisible.
- [ ] There are 5 blue and 4 cream strips, in the grid order.
Troubleshooting
Bubbles look flat instead of rounded. You probably gathered loops one at a time. Make sure each sc in the Gathering Row goes through 2 loops together.
One loop is noticeably longer. The loop slipped on the dowel while you were working. Keep your thumb on the loops already placed, and slide them gently toward the dowel’s far end as you go.
Strips have different lengths. Measure each finished bubble unit against the 3.5 in (8.9 cm) checkpoint. Tension changes between work sessions, so check after every few units.
A strip twists when hung. All strips must face RS out. Unthread the strip, turn it, and rehang it. If it still twists, mist it and let it hang straight while it dries.
Sleeve is too tight for the rod. Add 2 sc rows to the tab (Rows 1–18 become the sleeve). This adds 0.5 in (1.3 cm) of circumference.
Tassel splays or looks thin. Wrap 35 times instead of 30 and tighten the neck wrap.
Care
Hand wash in cool water with mild soap, press out the water in a towel, and lay flat to dry, reshaping the bubbles while damp. Don’t hang wet strips, because their own weight will stretch them.
Final Notes
The measurement chain is simple. The sc gauge of 16 sts = 4 in (10.2 cm) gives a 5-stitch band 1.25 in (3.2 cm) wide and a 4-row band 1 in (2.5 cm) tall. The 1.5 in (3.8 cm) dowel gives 2.5 in (6.4 cm) loops, so each unit is 3.5 in (8.9 cm). The 2 in (5.1 cm) sleeve, the first band, and 10 units make a 38 in (96.5 cm) strip, and the tassel brings it to 42 in (106.7 cm). Nine strips on 4 in (10.2 cm) centers span 34 in (86.4 cm).
If you check your measurements at each stage, all nine strips will match.
Happy crocheting!