

This lace mitten is one single crocheted piece, made to hang from a tree branch. The hand is worked in open fan stitch in deep royal blue. The fans shift half a fan each row, so they overlap like fish scales, and the openwork lets the tree lights show through.
A pale ice-blue cuff sits across the top, with a row of small V-stitch openings between two rows of single crochet. A small picot edging runs around the hand and thumb and makes the outline look beaded. A royal blue chain loop at the center of the cuff is used for hanging.
All instructions use US crochet terms. The finished ornament measures 3.5 in (8.9 cm) wide including the thumb and 4.375 in (11.1 cm) tall from fingertip to cuff top. The hanging loop adds 1.5 in (3.8 cm).
You start at the fingertips with a single fan and work flat rows upward, adding one fan per row until the hand is four fans wide. Then you work straight rows, add the thumb on the right side edge, work the cuff in ice blue, and finish with the picot edging and the loop.
Finished Size and Construction
- Finished size: 3.5 in (8.9 cm) wide x 4.375 in (11.1 cm) tall, plus a 1.5 in (3.8 cm) loop
- Skill level: Intermediate (lace fans, working into row-ends)
- Terminology: US
- Yarn weight: Size 3 crochet thread (CYC Lace/Super Fine, 0–1)
- Hook: 2.25 mm (US B-1)
- Number of pieces: 1 (no joining)
- Layout: single mitten, thumb on the right, cuff at the top
- Hand body: 2.5 in (6.4 cm) wide x 3.75 in (9.5 cm) tall
- Size before edging (with thumb and cuff): 3.25 in (8.3 cm) x 4.25 in (10.8 cm)
- Edging depth: 0.125 in (0.3 cm)
Materials
Choose a mercerized cotton crochet thread in size 3 (about 260 m per 100 g). Mercerized cotton makes crisp fans and blocks firmly, which a lace ornament needs to hold its shape.
- Royal blue: 8 g (about 21 m) for the hand, thumb, edging and loop
- Ice blue: 2 g (about 5 m) for the cuff
These amounts include extra for a gauge test and for weaving in ends.
Tools:
- 2.25 mm (US B-1) crochet hook
- Tapestry needle with a small eye
- Scissors
- Rustproof pins and a foam blocking mat
- Spray bottle with water
- Optional: liquid fabric stiffener or spray starch
Abbreviations (US Terms)
- ch – chain
- sl st – slip stitch
- sc – single crochet
- dc – double crochet
- sp – space
- st(s) – stitch(es)
- tch – turning chain
- RS / WS – right side / wrong side
Special stitches:
- Fan: (dc, ch 1) 4 times, then dc, all in the same st or sp. Each Fan has 5 dc and 4 ch-1 sps. The center dc is the 3rd dc.
- Edge Fan (start of row): ch 3 (counts as dc), then (ch 1, dc) 4 times in the first st. This makes the same 5 dc and 4 ch-1 sps.
- Half Fan (start of row): ch 4 (counts as dc + ch 1), dc in first st, ch 1, dc in same st. This makes 3 dc and 2 ch-1 sps.
- Half Fan (end of row): (dc, ch 1) twice, then dc, all in the last st. This makes 3 dc and 2 ch-1 sps.
- V-st: (dc, ch 1, dc) in the same st.
- Picot: ch 3, sl st in 3rd ch from hook.
Gauge and Checkpoints
The cuff and edging counts are fixed, so your gauge needs to match. Work Rows 1–4 as a test before you continue.
- Fan gauge: 1 Fan = 0.625 in (1.6 cm) wide; 1 Fan row = 0.375 in (1.0 cm) tall
- Single crochet gauge: 8 sc = 1 in (2.5 cm)
Checkpoints:
- After Row 4: 4 Fans, 2.5 in (6.4 cm) wide, 1.5 in (3.8 cm) tall.
- After Row 10: body 2.5 in (6.4 cm) wide, 3.75 in (9.5 cm) tall.
- After the thumb: piece 3.25 in (8.3 cm) wide.
- After the cuff: 21 sc span 2.5 in (6.4 cm); piece 4.25 in (10.8 cm) tall.
- After the edging: 3.5 in (8.9 cm) x 4.375 in (11.1 cm).
If your test piece is too big, switch to a 2.0 mm hook. If it is too small, switch to a 2.5 mm hook. Change only the hook, never the stitch counts.
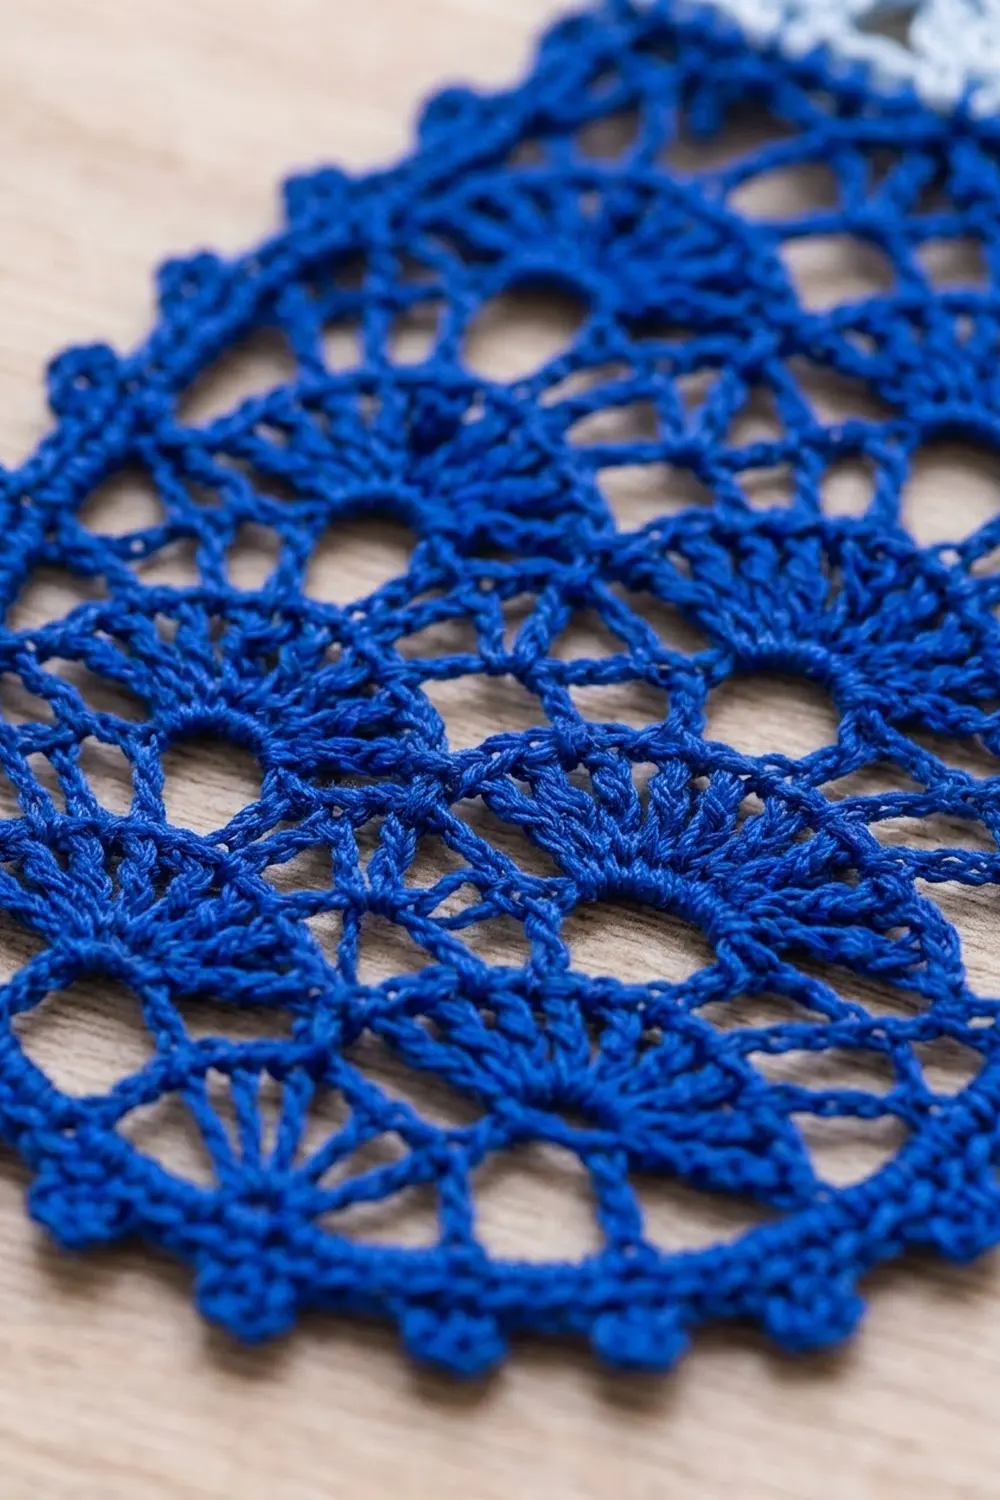
Hand Body
Use royal blue. Work in turned rows. The turning chain at the start of each dc row counts as a stitch.
Row 1 (RS): Ch 4 (counts as dc), (ch 1, dc) 4 times in 4th ch from hook. Turn. (1 Fan: 5 dc, 4 ch-1 sps)
This single Fan is the fingertip. Its base chain becomes the lowest point of the curve.
Increase Rows
Row 2 (WS): Edge Fan in first dc, sc in center dc, Fan in top of tch. Turn. (2 Fans, 1 sc)
Row 3 (RS): Edge Fan in first dc, sc in center dc of this same Fan, Fan in next sc, sc in center dc of next Fan, Fan in top of tch. Turn. (3 Fans, 2 sc)
Row 4 (WS): Edge Fan in first dc, sc in center dc of this same Fan, Fan in next sc, sc in center dc of next Fan twice, Fan in top of tch. Turn. (4 Fans, 3 sc)
Each increase row adds a full Fan at both outer edges, and the inner Fans sit over the sc of the row below. This widens the piece quickly and forms the rounded fingertip curve. Check Checkpoint 1 now.
Straight Rows
Row 5 (RS): Half Fan in first dc, sc in center dc of this same Fan, Fan in next sc, sc in center dc of next Fan 3 times, Half Fan in top of tch. Turn. (3 Fans + 2 Half Fans, 4 sc)
Row 6 (WS): Ch 1, sc in first dc, Fan in next sc, sc in center dc of next Fan 3 times, Fan in next sc, sc in 3rd ch of tch. Turn. (4 Fans, 5 sc)
Row 7 (RS): Half Fan in first sc, sc in center dc of next Fan, Fan in next sc, sc in center dc of next Fan 3 times, Half Fan in last sc. Turn. (3 Fans + 2 Half Fans, 4 sc)
Rows 8–10: Repeat Rows 6, 7 and 6. (Row 10: 4 Fans, 5 sc)
Fasten off. The body measures 2.5 in (6.4 cm) wide and 3.75 in (9.5 cm) tall. Row 10 leaves a straight top edge of 4 Fans and 5 sc for the cuff.
Thumb
The thumb is worked directly onto the right side edge (RS facing, Row 1 at the bottom), across the row-ends of Rows 6 and 7.
Row T1 (RS): With RS facing, join royal blue with a sl st at the lower end of the Row 6 row-end. Ch 1, work 3 sc evenly in the Row 6 row-end, then 4 sc evenly in the Row 7 row-end. Turn. (7 sc)
Row T2 (WS): Ch 4 (counts as dc + ch 1), skip next sc, dc in next sc, (ch 1, skip next sc, dc in next sc) twice. Turn. (4 dc, 3 ch-1 sps)
Row T3 (RS): Ch 1, sc in first dc, skip next ch-1 sp and next dc, Fan in center ch-1 sp, skip next dc and next ch-1 sp, sc in 3rd ch of tch. (1 Fan, 2 sc)
Fasten off. Before edging, the thumb sticks out 0.75 in (1.9 cm), which makes the piece 3.25 in (8.3 cm) wide.
Cuff
Use ice blue. The cuff is worked across the top of Row 10.
Row C1 (RS): With RS facing, join ice blue in the first sc of Row 10. Ch 1, sc in same sc, sc in each of the 4 ch-1 sps of next Fan, sc in next sc 4 times. Turn. (1 + (4 x 5) = 21 sc)
Because you skip the dc of each Fan, the lacy top pulls in to a firm band 2.5 in (6.4 cm) wide.
Row C2 (WS): Ch 3 (counts as dc), skip next sc, V-st in next sc 9 times, skip next sc, dc in last sc. Turn. (2 edge dc + 9 V-sts)
To check: 1 st under the tch + 9 repeats of 2 sts + 1 skipped st + 1 last st = 21 sts used.
Row C3 (RS): Ch 1, sc in first dc, sc in sp before first V-st, sc in ch-1 sp of V-st, sc in sp between V-sts 8 times, sc in ch-1 sp of last V-st, sc in sp before tch, sc in top of tch. (1 + 1 + 16 + 1 + 1 + 1 = 21 sc)
Fasten off. The cuff is 0.5 in (1.3 cm) deep, and the piece is now 4.25 in (10.8 cm) tall.
Picot Edging
The edging goes around the hand and thumb only, from the left cuff corner to the right cuff corner. The cuff edges stay plain.
Edging gauge: 3 sc per straight row-end, which is 3 sc per 0.375 in (1.0 cm), or 8 sc per inch.
Edging Row (RS): With RS facing, join royal blue at the top of the left edge, just below the cuff. Work sc evenly in the order below, with a picot after every 3rd sc:
- Left side, Rows 10–5: 3 sc in each row-end. (6 x 3 = 18 sc, 6 picots)
- Bottom curve: 4 sc in each row-end of Rows 4–1 on the left, 1 sc in the underside of the base ch, then 4 sc in each row-end of Rows 1–4 on the right. (16 + 1 + 16 = 33 sc, 11 picots)
- Right side, Row 5: 3 sc in the row-end. (3 sc, 1 picot)
- Thumb: Lower edge: 1 sc in T1 row-end, 2 sc in T2 row-end, 1 sc in T3 sc (4 sc). Tip: sc in each dc and each ch-1 sp of the Fan, working 2 sc in the center dc (10 sc). Upper edge: 1 sc in T3 sc, 2 sc in T2 row-end, 1 sc in T1 row-end (4 sc). (4 + 10 + 4 = 18 sc, 6 picots)
- Right side, Rows 8–10: 3 sc in each row-end. (9 sc, 3 picots)
Fasten off. Total: 18 + 33 + 3 + 18 + 9 = 81 sc and 27 picots.
Why the math works: Every section is a multiple of 3, so a picot after every 3rd sc spaces evenly all the way around with nothing left over. The straight sides use 3 sc per 0.375 in (1.0 cm) row, which matches the 8 sc per inch gauge, so they lie flat. The curved rows get 4 sc each because the outside of a curve is longer than the row height.
Hanging Loop
With RS facing, join royal blue in the 11th (center) sc of Row C3. Ch 24, sl st in same sc. Turn, sl st in each of the 24 ch around the loop, then sl st in the base sc. Fasten off.
The chain folds into a loop 1.5 in (3.8 cm) tall. The slip stitches firm it up so it won’t stretch.
Final Blocking
- Weave in ends through the solid sc of the cuff and edging, not through the open fans.
- Soak the mitten in cool water for 5 minutes. Press the water out in a towel without wringing.
- Lay it flat on the blocking mat, RS up.
- Pin the cuff straight at 2.5 in (6.4 cm) wide.
- Pin Rows 5–10 to 2.5 in (6.4 cm) wide, then pin the fingertip into a smooth curve.
- Angle the thumb slightly upward and pin the tip.
- Pin each picot outward so it sits like a small bead.
- Check the size: 3.5 in (8.9 cm) x 4.375 in (11.1 cm).
- For a stiffer ornament, brush on fabric stiffener or spray with starch.
- Let it dry completely, at least 12 hours, before you unpin it.
Final Quality-Control Checklist
- Rows 1–4 have 1, 2, 3 and 4 Fans.
- Rows 5–10 alternate between 3 Fans plus 2 Half Fans and 4 full Fans.
- The thumb has 7 sc at the base and one Fan at the tip.
- Cuff Rows C1 and C3 each have 21 sc, with 9 V-sts between them.
- The edging has 81 sc and 27 evenly spaced picots.
- The loop is centered on the cuff.
- The final size is 3.5 in (8.9 cm) x 4.375 in (11.1 cm), plus a 1.5 in (3.8 cm) loop.
Troubleshooting
Fans ruffle or cup: Your dc are too loose. Go down one hook size.
Cuff flares: You worked into the Fan dc in Row C1. Work only into the ch-1 sps and the sc.
Cuff pinches the hand: Your sc are too tight. Work Row C1 with a hook one size larger.
Sides wave: You have too many sc per row-end. Keep it to 3 on the straight rows.
Fingertip looks pointed: Check that you worked 4 sc per curved row-end and 1 sc at the base chain, then round the curve when you block.
Thumb droops: Stiffen the thumb and pin it angled upward while it dries.
Care
Hand wash in cool water with mild soap, then dry flat and re-pin if needed. Between seasons, store the mitten flat in tissue paper.

Final Notes
Each Fan is 0.625 in (1.6 cm) wide, so 4 Fans make a 2.5 in (6.4 cm) hand. Ten rows at 0.375 in (1.0 cm) each give 3.75 in (9.5 cm) of body. The thumb adds 0.75 in (1.9 cm) of width and the cuff adds 0.5 in (1.3 cm) of height, for 3.25 in (8.3 cm) x 4.25 in (10.8 cm). The 0.125 in (0.3 cm) picot edging brings the mitten to 3.5 in (8.9 cm) x 4.375 in (11.1 cm), with a 1.5 in (3.8 cm) loop on top.
Make one as a gift tag, or a matching pair for your tree.
Happy crocheting!