

Plastic bags tend to multiply under the sink. The Terracotta Bloom Bag Holder gives them a home: you push bags in at the top and pull them out one at a time through an arched opening at the bottom front.
The design is made of joined hexagons. Each one has a soft cream flower center, two rounds of warm rust/terracotta, and a crisp cream outline. Once the motifs are joined, the outlines form a honeycomb that wraps all the way around the tube. A solid cream band finishes the top, a slim strap hangs it from a hook, and a rounded cream base closes the bottom. It also works well in blue and cream or any two-color pair you like.
The pattern uses US crochet terms. The finished holder measures about 9 in (22.9 cm) wide when flat, 18 in (45.7 cm) around, and about 18 in (45.7 cm) long without the strap. The strap loop adds about 5.5 in (14.0 cm).
Construction is simple. You make 10 full hexagons and 3 half-hexagons, join them into four offset columns, and close them into a tube. Then you work a top band, a strap, a decreasing base, and an edging around the dispensing opening.
Finished Size and Construction
- Finished size: 9 in (22.9 cm) wide flat; 18 in (45.7 cm) circumference; about 18 in (45.7 cm) long without the strap
- Skill level: Intermediate
- Terminology: US
- Yarn weight: Worsted (#4), cotton or cotton blend
- Hook: US H-8 (5.0 mm)
- Number of pieces: 10 full hexagons + 3 half-hexagons
- Layout: 4 columns around the tube, alternating 3-hexagon columns (A) and offset 2-hexagon columns (B)
- Piece size: each hexagon is 6 in (15.2 cm) point to point and 5.2 in (13.2 cm) flat side to flat side, with 3 in (7.6 cm) sides
- Size before border: 18 in (45.7 cm) around × 15.6 in (39.6 cm) tall
- Border depth: 1.5 in (3.8 cm) top band; the base adds about 1 in (2.5 cm) of hanging length
Materials
Use a smooth worsted-weight cotton (about 170 m per 100 g). Cotton holds the hexagon shape, doesn’t stretch much under the weight of bags, and washes well. Acrylic also works, but it will sag a little more.
- Rust/terracotta: 100 g, about 170 m (186 yd)
- Cream: 150 g, about 255 m (279 yd)
Both quantities include a margin of about 10%.
Tools:
– US H-8 (5.0 mm) hook
– Tapestry needle
– 4 stitch markers
– Scissors
– Measuring tape
– Blocking mat and pins
Abbreviations (US Terms)
- ch – chain
- sl st – slip stitch
- sc – single crochet
- sc2tog – single crochet 2 together
- dc – double crochet
- sk – skip
- sp – space
- st(s) – stitch(es)
- RS / WS – right side / wrong side
Special stitches:
– Beginning cluster (beg-cl): Ch 2, then work 2 dc in the same st, leaving the last loop of each on the hook. Yarn over and pull through all 3 loops.
– 3-dc cluster (cl): Work 3 dc in the same st, leaving the last loop of each on the hook. Yarn over and pull through all 4 loops.
Gauge and Checkpoints
Gauge: 16 sc and 16 rows = 4 in (10.2 cm).
Make one full hexagon before you start the rest, block it lightly, and check these measurements:
- After Round 2 (flower): about 2.5 in (6.4 cm) across
- After Round 4: about 5 in (12.7 cm) point to point
- After Round 5: 6 in (15.2 cm) point to point and 5.2 in (13.2 cm) flat to flat, with 3 in (7.6 cm) per side
If your hexagon is too big by more than 1/4 in (0.6 cm), go down one hook size. If it is too small, go up one size. Getting the side length right matters most, because every side is matched 12 sts to 12 sts during joining and the top band count depends on it.
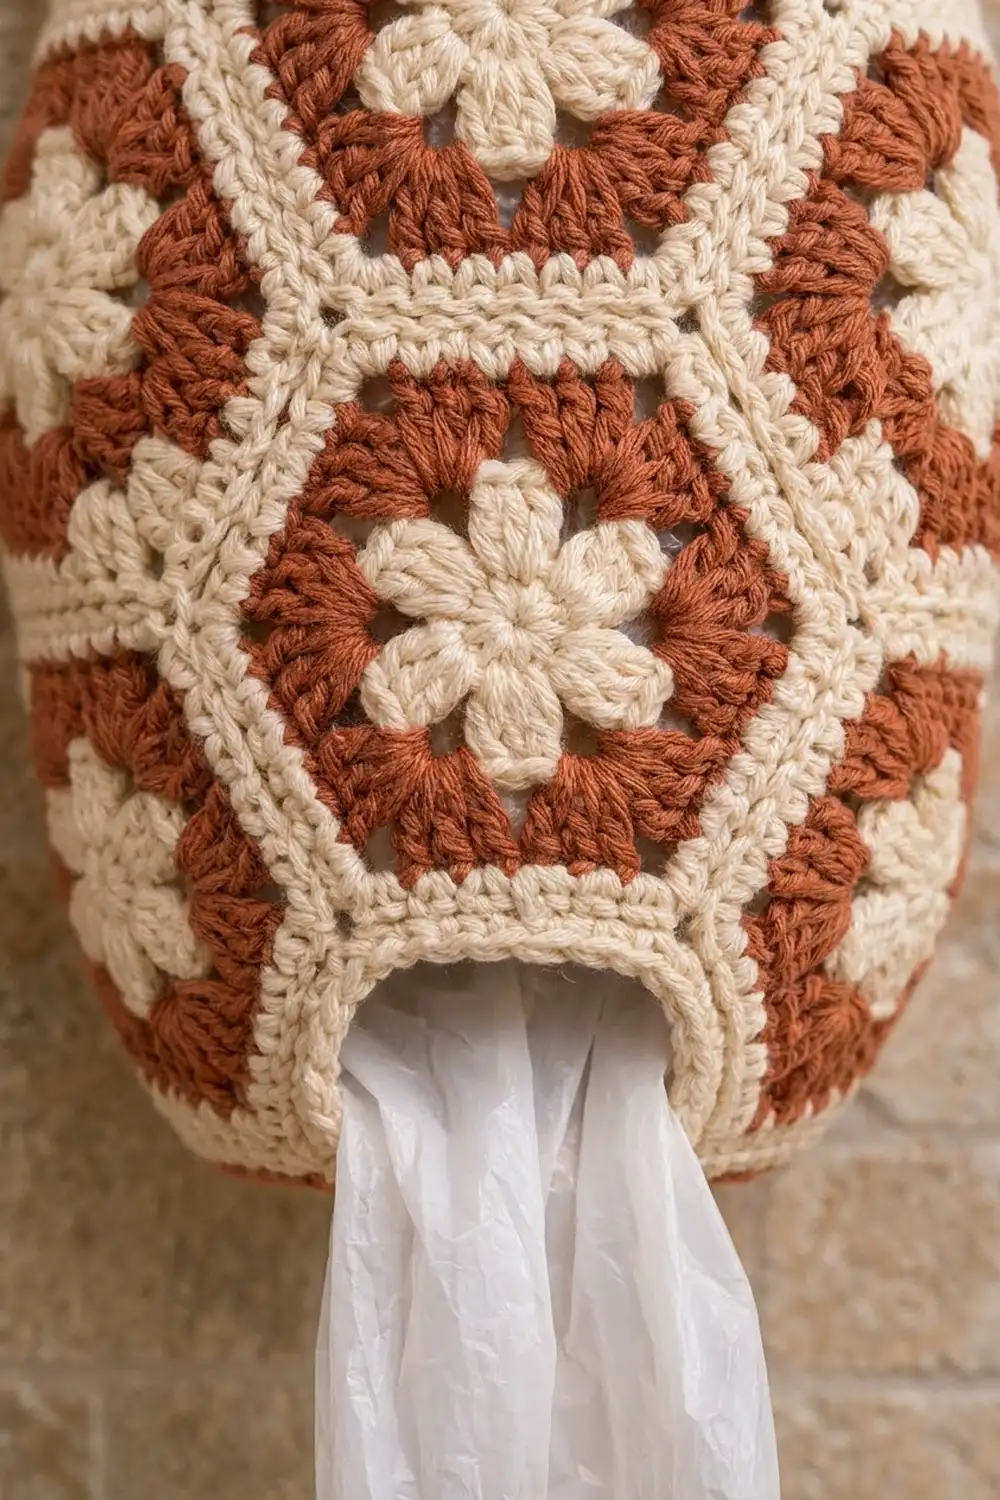
Full Hexagon (Make 10)
Round 1 (cream): Make a magic ring. Ch 1, work 12 sc in the ring, then sl st to the first sc. Pull the ring closed. (12 sc)
Round 2 (cream): Work a beg-cl in the same st, then ch 3 and sk the next sc. Work a cl in the next sc, ch 3, sk the next sc; repeat from * 4 more times. Sl st to the top of the beg-cl and fasten off. (6 clusters, 6 ch-3 sps)*
Round 3 (rust): Join rust in any ch-3 sp. Ch 3 (counts as dc), then work (2 dc, ch 2, 3 dc) in the same sp. Work (3 dc, ch 2, 3 dc) in each of the remaining 5 ch-3 sps. Sl st to the top of the ch-3. (36 dc; 6 dc per side; 6 corner ch-2 sps)
The petals now sit at the center of each side, and the corners fall between the petals.
Round 4 (rust): Sl st in the next 2 dc and into the ch-2 sp. Ch 3 (counts as dc), then work (dc, ch 2, 2 dc) in the same sp. Dc in each of the next 6 dc, then (2 dc, ch 2, 2 dc) in the next ch-2 sp; repeat from * 4 more times. Dc in the last 6 dc and sl st to the top of the ch-3. Fasten off. (60 dc; 10 dc per side)*
Round 5 (cream): Join cream in any corner ch-2 sp. Ch 1, then work (sc, ch 2, sc) in the same sp. Sc in each of the next 10 dc, then (sc, ch 2, sc) in the next corner sp; repeat from * 4 more times. Sc in the last 10 dc and sl st to the first sc. Fasten off and leave a 6 in (15.2 cm) tail. (72 sc; 12 sc per side, including both corner sc; 6 corner ch-2 sps)*
Half-Hexagon (Make 3)
The half-hexagon is a hexagon cut in half through two opposite corners. It has 3 full sides and one long, straight edge.
Row 1 (cream, RS): Make a magic ring. Ch 1, work 7 sc in the ring, and do not join. Pull the ring closed. (7 sc)
Row 2 (cream): Turn. Ch 3 (counts as dc), ch 1, cl in the 2nd sc, ch 3, cl in the 4th sc, ch 3, cl in the 6th sc, ch 1, dc in the 7th sc. Fasten off. (3 clusters, 2 ch-3 sps, 2 edge dc)
Row 3 (rust): With the RS facing, join rust in the top of the last dc. Ch 3 (counts as dc), then work 2 dc in the ch-1 sp. Work (3 dc, ch 2, 3 dc) in each of the 2 ch-3 sps. Work 2 dc in the last ch-1 sp, then dc in the top of the turning ch. (18 dc; 6 dc per side)
Row 4 (rust): Turn. Ch 3 (counts as dc), work 2 dc in the first st, then dc in the next 5 dc. Work (2 dc, ch 2, 2 dc) in the ch-2 sp, dc in the next 6 dc, and (2 dc, ch 2, 2 dc) in the next ch-2 sp. Dc in the next 5 dc, then 3 dc in the top of the turning ch. Fasten off. (30 dc; 10 dc per side)
Row 5 (cream): With the RS facing, join cream in the first st of Row 4. Ch 1 and work 2 sc in the same st, then sc in the next 9 dc. Work (sc, ch 2, sc) in the ch-2 sp, sc in the next 10 dc, and (sc, ch 2, sc) in the next ch-2 sp. Sc in the next 9 dc, then 2 sc in the last st. (36 sc; 12 sc per side)
Straight edge (same yarn, continue): Ch 1 and rotate to work along the row ends. Work 3 sc in each dc row end (Rows 4, 3, 2), 6 sc across Row 1, then 3 sc in each dc row end (Rows 2, 3, 4). Sl st to the first sc of Row 5 and fasten off. (24 sc on the straight edge)
Checkpoint: The straight edge measures 6 in (15.2 cm), and each side measures 3 in (7.6 cm).
Make All Pieces
- Full hexagons: 10 (each uses about 6 g rust and 6 g cream)
- Half-hexagons: 3 (each uses about 3 g rust and 3 g cream)
The tube has 4 columns: A1, B1 (front), A2, and B2 (back). Each column is 4.5 in (11.4 cm) wide, so 4 columns make 18 in (45.7 cm) around.
        A1      B1      A2      B2
top    [ H ]   [1/2]   [ H ]   [1/2]
         |     [ H ]     |     [ H ]
       [ H ]     |     [ H ]     |
         |     [ H ]     |     [ H ]
bottom [ H ]   (open)  [ H ]   [1/2]
- H = full hexagon; 1/2 = half-hexagon with its straight edge facing out (top or bottom)
- A columns: 3 hexagons each
- B columns: half + 2 hexagons + half. In B1, the bottom half is left out to create the opening.
Joining
Method: Whipstitch with cream through the back loops only, with both pieces RS up and side by side. Work one stitch per pair of matching sc and one stitch through the paired corner ch-2 sps at each end.
Stitch-to-stitch logic: Every shared edge is one 12-sc side matched to another 12-sc side. Because no stitches are added or skipped, the seams lie flat and the front loops form a neat cream ridge.
Order:
1. Build the columns. In A1 and A2, join the hexagons flat side to flat side. In B2, join half + H + H + half, with each half’s straight edge facing out. In B1, join half + H + H.
2. Join the columns side by side, in the order A1–B1, B1–A2, A2–B2. Each A hexagon’s slanted sides meet the B pieces next to it in a zigzag.
3. Close the tube by joining B2 to A1.
Tension: Pull each stitch just snug. If you pull too tightly, the seams pucker and the tube shrinks. If you leave them loose, the ridges gap.
Size checkpoint: The tube should measure 18 in (45.7 cm) around and 15.6 in (39.6 cm) tall, or 3 hexagons × 5.2 in (13.2 cm). The top and bottom edges should be straight, apart from the gap at the bottom of B1.
Border: Top Band, Strap, Base, and Opening
Border gauge: 16 sc = 4 in (10.2 cm), and 4 rounds = 1 in (2.5 cm), the same as the main gauge.
Top Band
Round 1 (cream): Join cream at the top of A1. Ch 1 and work these stitches in order:
– 12 sc across the top side of A1
– 24 sc across the straight edge of the B1 half
– 12 sc across A2
– 24 sc across B2
Skip the corner ch-2 sps where the pieces meet. Sl st to the first sc. (72 sc)
Rounds 2–6: Ch 1, sc in each st around, and sl st to the first sc. (72 sc each round)
Why the math works: The band starts with (2 A sides × 12) + (2 half-hexagon edges × 24) = 72 sc. At 4 sc per inch, 72 sc is exactly 18 in (45.7 cm), which matches the tube, so the band neither ruffles nor pulls in. Six rounds make 1.5 in (3.8 cm). Fasten off.
Strap
Place markers in 2 band stitches 7 sts apart, centered on the top of B2.
- Row 1: Join cream in the first marked st. Ch 45, then sl st in the second marked st.
- Row 2: Sl st in the next band st and turn. Sc in each ch, then sl st into the band beside the start of the strap. (45 sc)
- Row 3: Sl st in the next band st and turn. Sc in each sc, then sl st into the band. (45 sc)
Fasten off. The strap is 11.25 in (28.6 cm) long and about 0.75 in (1.9 cm) wide, and it forms a loop about 5.5 in (14.0 cm) tall.
Base
Round 1 (cream): Join cream at the bottom of A1. Ch 1 and work these stitches in order:
– 12 sc across the bottom side of A1
– ch 24 across the B1 gap
– 12 sc across A2
– 24 sc across the straight edge of the B2 half
Sl st to the first sc. (48 sc + 24 ch = 72 sts)
Round 2: Ch 1, then sc in the next 10 sts, sc2tog; repeat from * around. (66 sc)*
Rounds 3–12: Keep decreasing 6 sts per round, with one fewer sc between decreases each time:
| Round | Repeat (work 6 times) | Total |
|---|---|---|
| 3 | sc 9, sc2tog | 60 |
| 4 | sc 8, sc2tog | 54 |
| 5 | sc 7, sc2tog | 48 |
| 6 | sc 6, sc2tog | 42 |
| 7 | sc 5, sc2tog | 36 |
| 8 | sc 4, sc2tog | 30 |
| 9 | sc 3, sc2tog | 24 |
| 10 | sc 2, sc2tog | 18 |
| 11 | sc 1, sc2tog | 12 |
| 12 | sc2tog | 6 |
Fasten off, thread the tail through the last 6 sts, and pull them closed. Laid flat, the base is about 5.7 in (14.5 cm) across. Eleven decrease rounds give a radius of 2.75 in (7.0 cm), which matches the tube’s 18 in (45.7 cm) circumference.
Opening Edging
Round 1 (cream): Join cream at the top-left corner of the gap. Ch 1 and work these stitches in order:
– 12 sc down the side of A1
– 24 sc in the free loops of the base chain
– 12 sc up the side of A2
– 12 sc across the bottom of the B1 hexagon
Skip the corner sps. Sl st to the first sc. (60 sc)
Round 2: Ch 1, then sc in each st, working sc2tog at each of the 4 corners. Sl st to the first sc. (56 sc)
The decreases round off the corners into a soft arch. The opening is about 6 in (15.2 cm) wide and 2.6 in (6.6 cm) tall. Fasten off.
Final Blocking
- Weave in all ends along the cream seams.
- Spray the holder evenly until it is damp, not soaked.
- Fill it with a rolled towel to shape the tube.
- Lay it on its side and pin the top band straight.
- Check that it measures 9 in (22.9 cm) flat width and 15.6 in (39.6 cm) of hexagon body.
- Let it dry completely, then remove the towel.
- Hang it once and let the base settle into its rounded shape.
Final Quality-Control Checklist
- [ ] 10 full hexagons and 3 half-hexagons, each with 12 sc per side
- [ ] All seams join 12 sts to 12 sts with no puckers
- [ ] Top band: 72 sc in every round; 1.5 in (3.8 cm) deep
- [ ] Strap is centered on the back and attached securely at both ends
- [ ] Base closes cleanly at 6 sts with no hole
- [ ] Opening edging: 60 then 56 sc, and the arch lies smooth
- [ ] Overall size is 9 in (22.9 cm) wide and about 18 in (45.7 cm) long
Troubleshooting
- Hexagons cup: Your Round 4 is too tight. Go up a hook size for the dc rounds only.
- Hexagons ruffle: You may have extra dc at the corners. Recount for 10 dc per side.
- Half-hexagon edge is wavy: Check that the straight edge has exactly 24 sc, 3 sc per dc row end.
- Top band flares: You probably worked into the corner sps. Rework Round 1 to exactly 72 sc.
- Base pokes out like a cone: Your rounds are too tight. Loosen your tension or skip one decrease round.
- Opening stretches out of shape: Add a third edging round of sl sts to firm it up.
Care
Hand wash or machine wash on cold in a laundry bag, then reshape and dry flat. Don’t put the holder in the dryer, because heat can distort the hexagons.
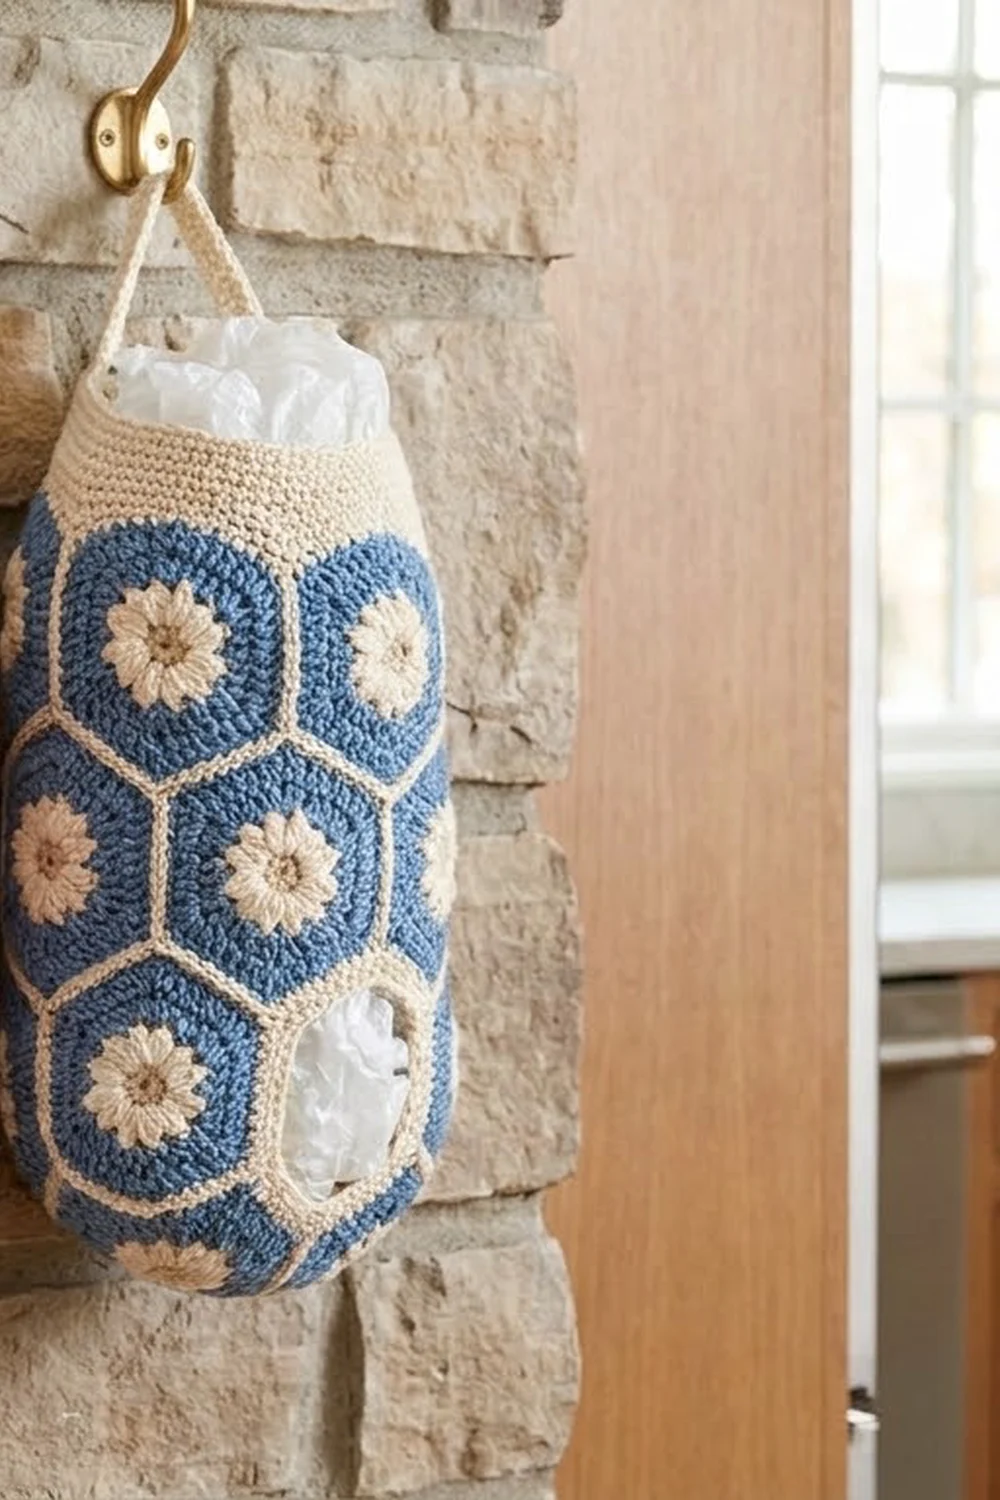
Final Notes
The measurement chain is simple:
– Each hexagon side is 12 sc = 3 in (7.6 cm), so every hexagon is 6 in (15.2 cm) point to point and 5.2 in (13.2 cm) flat to flat.
– Four offset columns make an 18 in (45.7 cm) tube, and the 72-sc band and base start match it exactly.
– Three hexagons stacked make 15.6 in (39.6 cm). The 1.5 in (3.8 cm) band and the rounded base bring the bag to about 18 in (45.7 cm).
If you check one hexagon carefully, the rest of the holder will fall into place. Happy crocheting!