

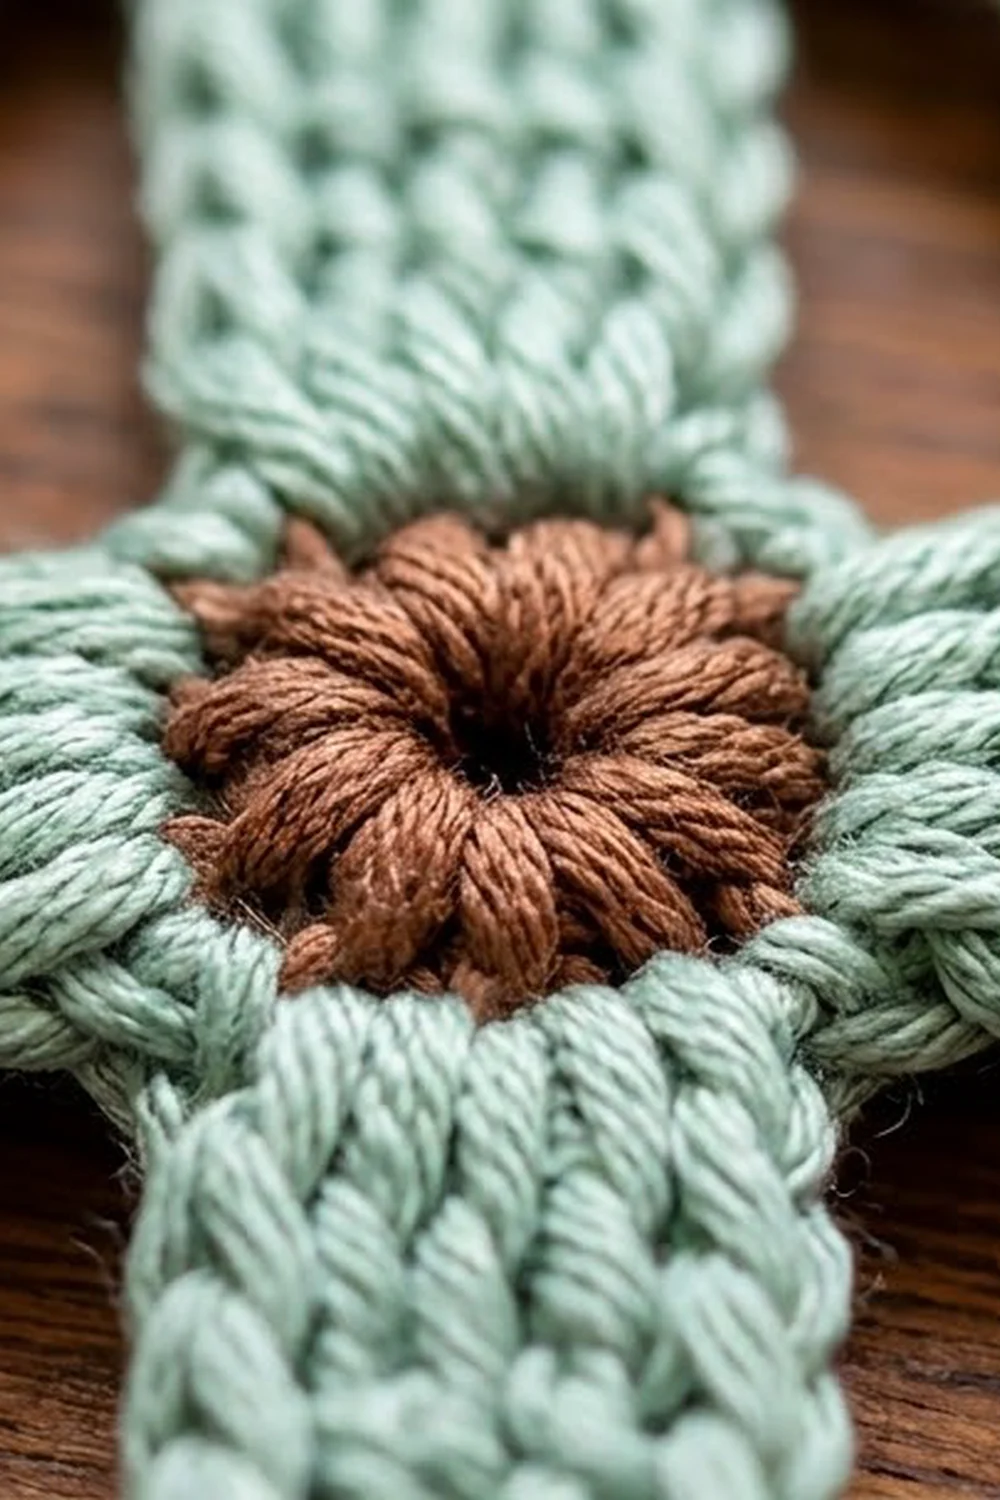
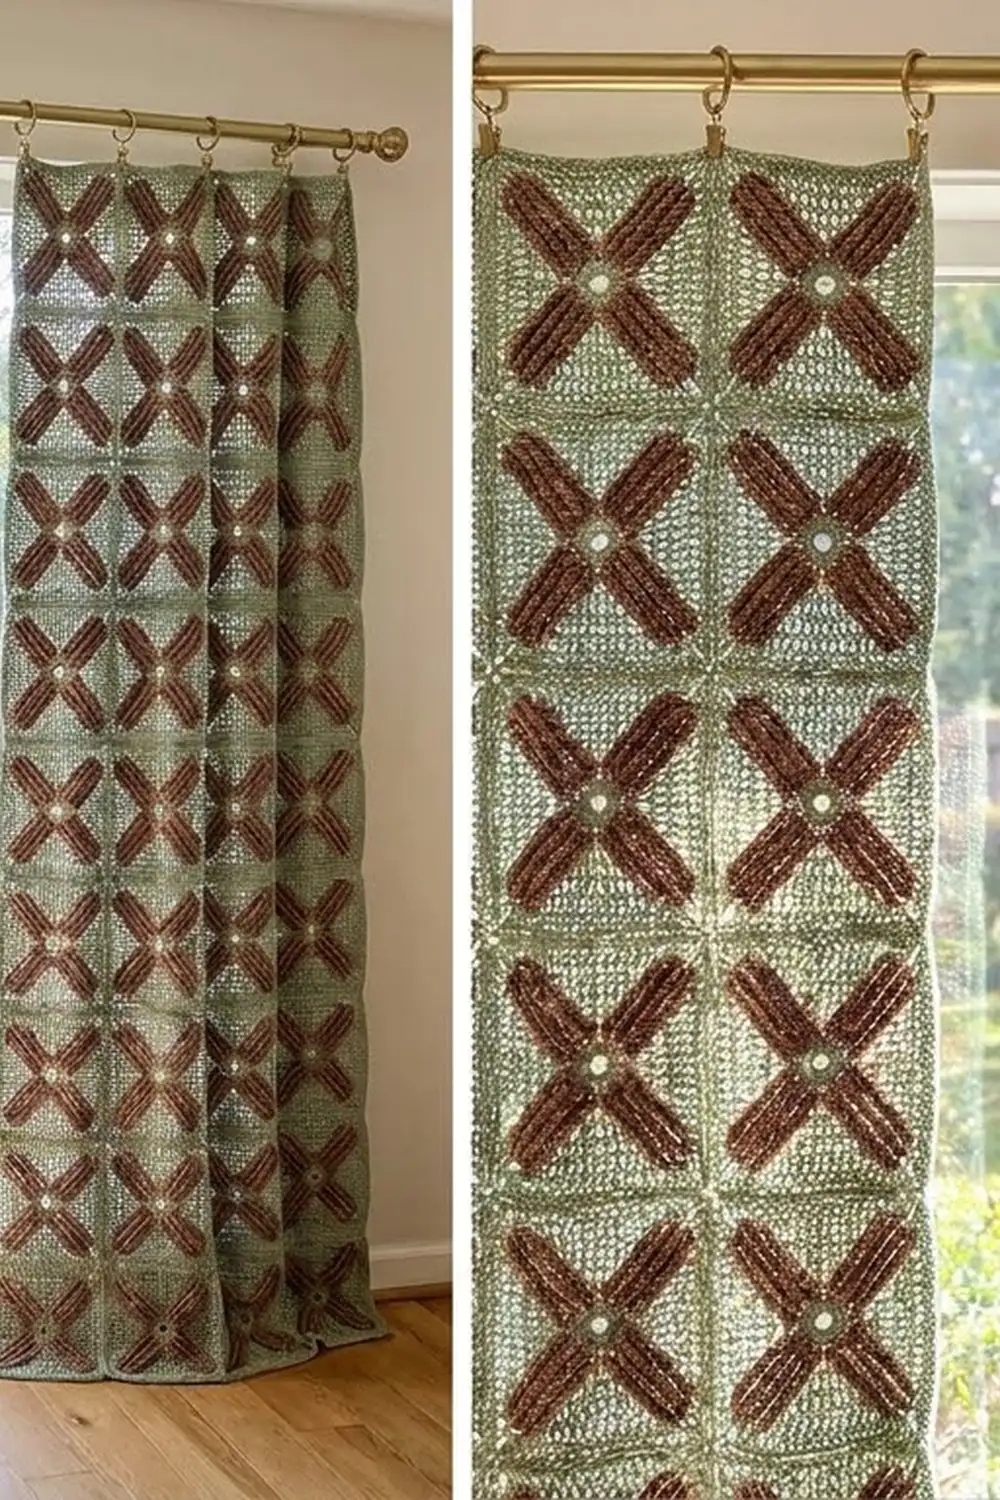
This curtain is made from open square motifs, each with a bold X through the middle. Four ribbed arms run from a small round center out to the corners of a thin square frame. That leaves four triangular windows of light in every square. When dozens of squares are joined, the panel becomes an airy lattice that filters daylight without blocking it.
The colors are a soft sage green and a warm cocoa brown, set in a checkerboard. Every motif has a cocoa center ring. On the sage squares it shows as a small brown “button,” and on the cocoa squares it blends in. The style is cottage-meets-vintage and suits a bright window or a doorway.
The pattern uses US crochet terms. One finished panel measures 21 in (53.3 cm) wide by 86 in (218.4 cm) long after the border and blocking. The photo shows a pair of panels on one rod, so make two panels for the matching set.
The construction is simple. You make 68 motifs per panel in the round and join them flat with slip stitches into a grid 4 motifs wide and 17 motifs tall. Then you add a two-round single crochet border and hang the panel from standard curtain clip rings.
Finished Size and Construction
- Finished panel size: 21 in x 86 in (53.3 cm x 218.4 cm)
- Skill level: Intermediate
- Terminology: US crochet terms
- Yarn weight: DK (#3), cotton or cotton blend
- Hook: 4.0 mm (G-6)
- Number of pieces: 68 square motifs per panel (136 for the pair)
- Layout: 4 motifs wide x 17 motifs tall, checkerboard
- Motif size: 5 in x 5 in (12.7 cm x 12.7 cm), 23 sc per side
- Size before border: 20 in x 85 in (50.8 cm x 215.9 cm)
- Border depth: ½ in (1.3 cm) on each side, 2 rounds
Materials
Choose a smooth cotton in DK weight, either mercerized or matte. Cotton keeps the frame lines straight and the long ribbed arms crisp, and it stretches very little on a hanging piece. Avoid fuzzy or very stretchy acrylics, which make a long curtain sag over time.
The yarn amounts below assume about 115 m per 50 g ball.
For one panel:
- Color A, Sage: 250 g (575 m) for 34 motifs, all of the joining, and the border
- Color B, Cocoa: 250 g (575 m) for 34 motifs and all 68 center rings
For the pair shown:
- Color A, Sage: 500 g (1,150 m)
- Color B, Cocoa: 500 g (1,150 m)
These quantities include a margin of about 15 percent for swatching, differences in tension, and weaving in ends.
Tools:
- 4.0 mm (G-6) crochet hook
- Tapestry needle
- Stitch markers
- Measuring tape
- Rust-proof pins and blocking mats, or a clean carpet covered with towels
- Spray bottle
- 9 curtain clip rings per panel (18 for the pair)
Abbreviations (US Terms)
- ch – chain
- sl st – slip stitch
- sc – single crochet
- tr – treble crochet
- trtr – triple treble crochet (see below)
- sp(s) – space(s)
- st(s) – stitch(es)
- MR – magic ring
- RS / WS – right side / wrong side
Special stitch: triple treble (trtr). Yarn over 4 times and insert the hook in the stitch. Yarn over and pull up a loop (6 loops on hook). Then [yarn over and pull through 2 loops] 5 times. In DK cotton, one trtr stands about 1½ in (3.8 cm) tall. These tall stitches form the long ribbed arms of the X.
Gauge and Checkpoints
Gauge matters here because small errors multiply over 17 motifs. Make one complete motif, block it lightly, and measure it before you go further.
Motif gauge: One motif measures 5 in (12.7 cm) square, with 23 sc along each side of Round 5.
Checkpoints while making the test motif:
- After Round 1: the center ring is 1 in (2.5 cm) across.
- After Round 2: about 2½ in (6.4 cm) from tip to tip across the short arms.
- After Round 3: about 5½ in (14.0 cm) from tip to tip across two opposite arms.
- After Round 5: 5 in (12.7 cm) per side, with straight sides and sharp corners.
If your motif is too big (more than 5¼ in / 13.3 cm), go down one hook size. If it is too small (less than 4¾ in / 12.1 cm), go up one hook size. Even a ¼ in (0.6 cm) error per motif adds up to 4¼ in (10.8 cm) over the 17-motif length, so the swatch is worth making.
If the arms measure correctly but the sides look slack, tighten your chains in Round 4 instead of changing hooks.
Motif Pattern
Make 34 motifs with Sage as the main color and 34 motifs with Cocoa as the main color. Round 1 is always worked in Cocoa.
Round 1 – Center Ring (Cocoa)
With Cocoa, make a MR, ch 1, and work 12 sc in the ring. Pull the ring closed and sl st to the first sc. (12 sc)
For Sage motifs, fasten off Cocoa and join Sage in any sc. For Cocoa motifs, keep going with the same yarn.
Round 2 – Arm Bases
Ch 4 (counts as first tr), tr in next 2 sc, ch 1, tr in next 3 sc, ch 1; repeat from * 2 more times, sl st to top of beginning ch-4. (12 tr, 4 ch-1 sps)*
You now have four groups of 3 tr, and each group is the base of one arm. The ch-1 spaces keep the arms apart at the center.
Round 3 – Long Arms
Ch 6 (counts as first trtr), trtr in same st, trtr in next tr, 2 trtr in next tr, ch 1, skip ch-1 sp, 2 trtr in next tr, trtr in next tr, 2 trtr in next tr, ch 1, skip ch-1 sp; repeat from * 2 more times, sl st to top of beginning ch-6. (20 trtr, 4 ch-1 sps)*
Each arm is now a fanned group of 5 trtr. The tall posts sit side by side and make the ribbed texture. Only a ch-1 sits between the arms at the base, so the large triangular windows stay open.
Round 4 – Corners and Frame Chains
Ch 1, sc in same st and in next trtr, (sc, ch 2, sc) in next trtr (center of arm), sc in next 2 trtr, ch 15, skip ch-1 sp, sc in next 2 trtr, (sc, ch 2, sc) in next trtr, sc in next 2 trtr, ch 15, skip ch-1 sp; repeat from * 2 more times, sl st to first sc. (24 sc, 4 ch-2 corner sps, 4 ch-15 frame chains)*
The tip of each arm becomes a corner of the square. Each ch-15 runs straight from one arm tip to the next and becomes one side of the frame. Keep these chains even. They should lie flat without pulling the arms inward.
Round 5 – Frame
Ch 1, sc in same st and in next 2 sc, (sc, ch 2, sc) in ch-2 corner sp, sc in next 21 sts (3 sc, 15 ch, 3 sc); repeat from * 2 more times, (sc, ch 2, sc) in last ch-2 corner sp, sc in next 18 sts (3 sc, 15 ch), sl st to first sc. Fasten off, leaving a 6 in (15.2 cm) tail. (92 sc, 4 ch-2 corner sps)*
Side count: Each side has 23 sc: 1 corner sc + 21 sc + 1 corner sc. On the last side, the 3 sc from the start of the round and the 18 sc from the end together make the 21 middle stitches. Every side count in this pattern includes those two corner sc.
Weave in the tails along the back of the arms, where the ribbing hides them.
Make All Pieces
For one panel:
- Sage motifs (A): 34
- Cocoa motifs (B): 34
- Total: 68
For the pair, double these numbers: 68 Sage and 68 Cocoa.
Layout (one panel, top to bottom, 17 rows):
Row 1:  A B A B
Row 2:  B A B A
Row 3:  A B A B
Row 4:  B A B A
Row 5:  A B A B
Row 6:  B A B A
Row 7:  A B A B
Row 8:  B A B A
Row 9:  A B A B
Row 10: B A B A
Row 11: A B A B
Row 12: B A B A
Row 13: A B A B
Row 14: B A B A
Row 15: A B A B
Row 16: B A B A
Row 17: A B A B
Each row has 2 Sage and 2 Cocoa motifs, so the 17 rows use 34 of each.
Block every motif lightly to 5 in (12.7 cm) square before joining. Matching the sizes now saves you from fighting uneven seams later.
Joining
Method: Flat slip stitch join with Sage, worked through the back loops.
Lay two motifs side by side, RS up, with their edges touching. Join Sage with a sl st through both ch-2 corner sps at the start of the seam. Then work a sl st through the back loop of each sc on the first motif and the matching back loop on the second motif. With 23 sc per side, you work 23 sl sts, matching stitch to stitch: corner sc to corner sc, the 21 middle sc to each other, and the far corner sc to corner sc. Finish with a sl st through the next pair of corner sps.
Order of work:
- Join the horizontal seams first. Work the seam between Row 1 and Row 2 as one long seam across all 4 motifs, moving from one pair to the next without fastening off. Repeat for all 16 horizontal seams.
- Join the 3 vertical seams the same way, each running the full length of 17 motifs. Where seams cross, work one sl st over the crossing to keep it flat.
Tension: Keep your slip stitches as loose as the sc they join. Tight joins pucker the frame and shorten the panel. If you need to, use a 4.5 mm (7) hook just for joining.
Size checkpoint: After you join the first 4 rows, the piece should measure 20 in (50.8 cm) wide and 20 in (50.8 cm) tall. After 10 rows, it should be 50 in (127.0 cm) tall. The fully joined panel measures 20 in x 85 in (50.8 cm x 215.9 cm). The flat slip stitch join adds no measurable width.
Border
Border gauge: The border uses the same gauge as Round 5 of the motif: 23 sc = 5 in (12.7 cm).
Border Round 1 (Sage)
Join Sage in the top right corner sc of the panel and ch 1. Along each side, work 1 sc in each of the 23 sc of every motif edge. At each seam, go straight from the last corner sc of one motif to the first corner sc of the next, skipping the two joined ch-2 sps. At each of the 4 panel corners, ch 2 over the motif’s ch-2 corner sp without working into it. Sl st to the first sc.
- Top edge: 4 motifs x 23 = 92 sc
- Bottom edge: 4 motifs x 23 = 92 sc
- Each long side: 17 motifs x 23 = 391 sc
- Total: 966 sc + 4 ch-2 corner sps
Border Round 2 (Sage)
Ch 1, sc in each sc along every side, and work (sc, ch 2, sc) in each ch-2 corner sp. Sl st to the first sc and fasten off.
- Top and bottom edges: 92 + 2 corner sc = 94 sc each
- Each long side: 391 + 2 corner sc = 393 sc each
- Total: 974 sc + 4 ch-2 corner sps
Why the math works: Each motif side holds 23 sc over 5 in (12.7 cm). The border puts exactly one sc on each of those stitches, so 92 sc span 20 in (50.8 cm) and 391 sc span 85 in (215.9 cm). Nothing is added at the seams, so the border cannot ruffle. Round 2 adds stitches only at the corners, where the extra length is needed to turn. The two rounds add ½ in (1.3 cm) per side, for a finished size of 21 in x 86 in (53.3 cm x 218.4 cm).
Final Blocking
- Weave in any remaining ends along the back of the frame or arms.
- Lay the panel flat on blocking mats or towels, RS up. If you are short on space, block it in sections.
- Pin the outer corners first, to 21 in (53.3 cm) wide.
- Pin along the long sides to 86 in (218.4 cm), measuring every 10 in (25.4 cm).
- Pin the points where seams cross so every motif sits at 5 in (12.7 cm) square.
- Spray evenly with water until the panel is damp but not soaked.
- Press the arms flat gently and straighten each frame chain with your fingers.
- Leave it pinned until it is completely dry, usually 24 hours.
- Clip on 9 rings along the top edge: one at each top corner, one at each of the 3 vertical seams, and one at the center of each motif’s top edge. That puts a ring about every 2½ in (6.4 cm).
Final Quality-Control Checklist
- Every motif has 23 sc per side and sharp ch-2 corners.
- Every arm has 5 trtr and reaches fully into its corner.
- The frame chains lie straight, with no slack loops.
- The checkerboard matches the layout, and no two motifs of the same color sit side by side.
- All seams are flat, with no puckering.
- Border Round 2 has 94 sc on the top and bottom and 393 sc on each long side.
- The panel measures 21 in x 86 in (53.3 cm x 218.4 cm).
- All ends are woven in and trimmed.
Troubleshooting
Motif corners curl inward. Your ch-15 frame chains are too tight. Chain more loosely, or use a hook one size larger for the chains only.
Sides bow outward. Your chains are too loose. Tighten your chain tension, or use a hook one size smaller for the ch-15 only. Keep the count at 15.
Arms twist or lean. Make sure the 2-trtr increases go in the first and last tr of each arm, not in the center one.
Panel is shorter than expected. Your joins are too tight. Redo them with a larger hook.
Border ripples. You have added stitches at the seams. Take them out so each side has exactly 23 sc per motif.
Cocoa tail shows through the Sage stitches. Weave the Cocoa tail into the back of the center ring only.
Care
Hand wash in cool water with mild soap. Press out the extra water in a towel and dry the panel flat, pinned to size. Do not hang it while wet, because the weight can stretch it.
Final Notes
The whole curtain rests on one chain of measurements. The 12-stitch center grows into four arms of 5 trtr each, and the arm tips anchor the four corners. The frame then gives 23 sc per side over 5 in (12.7 cm). Four motifs across make 20 in (50.8 cm), and seventeen down make 85 in (215.9 cm). The two-round border brings the panel to 21 in x 86 in (53.3 cm x 218.4 cm). If your test motif is the right size, the rest will fall into place.
Happy crocheting!