

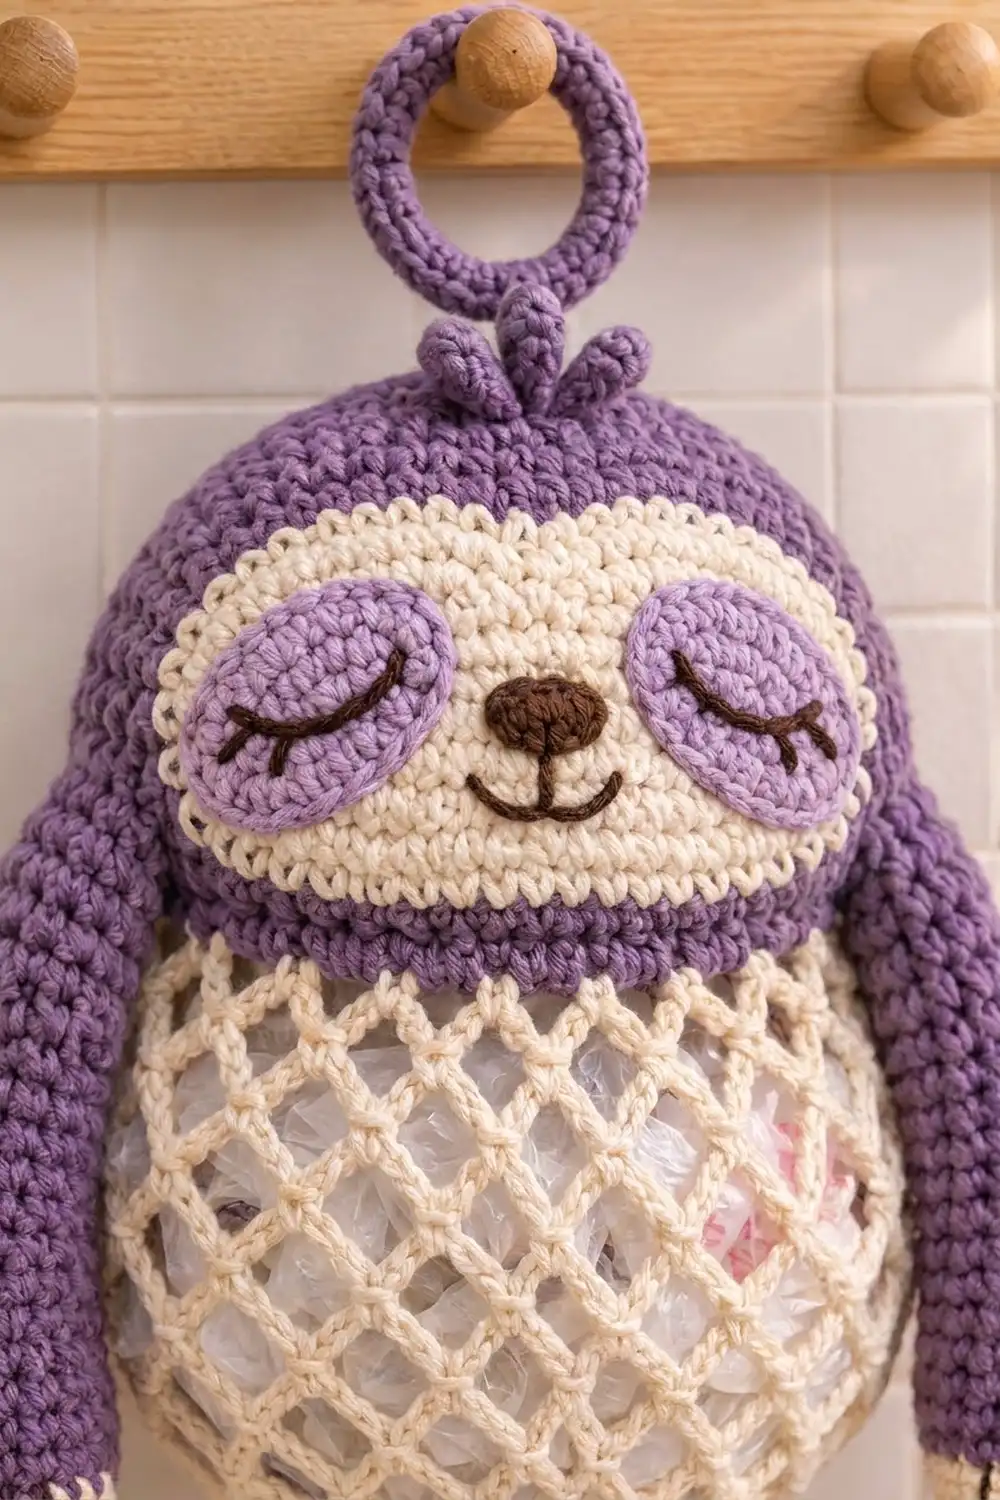
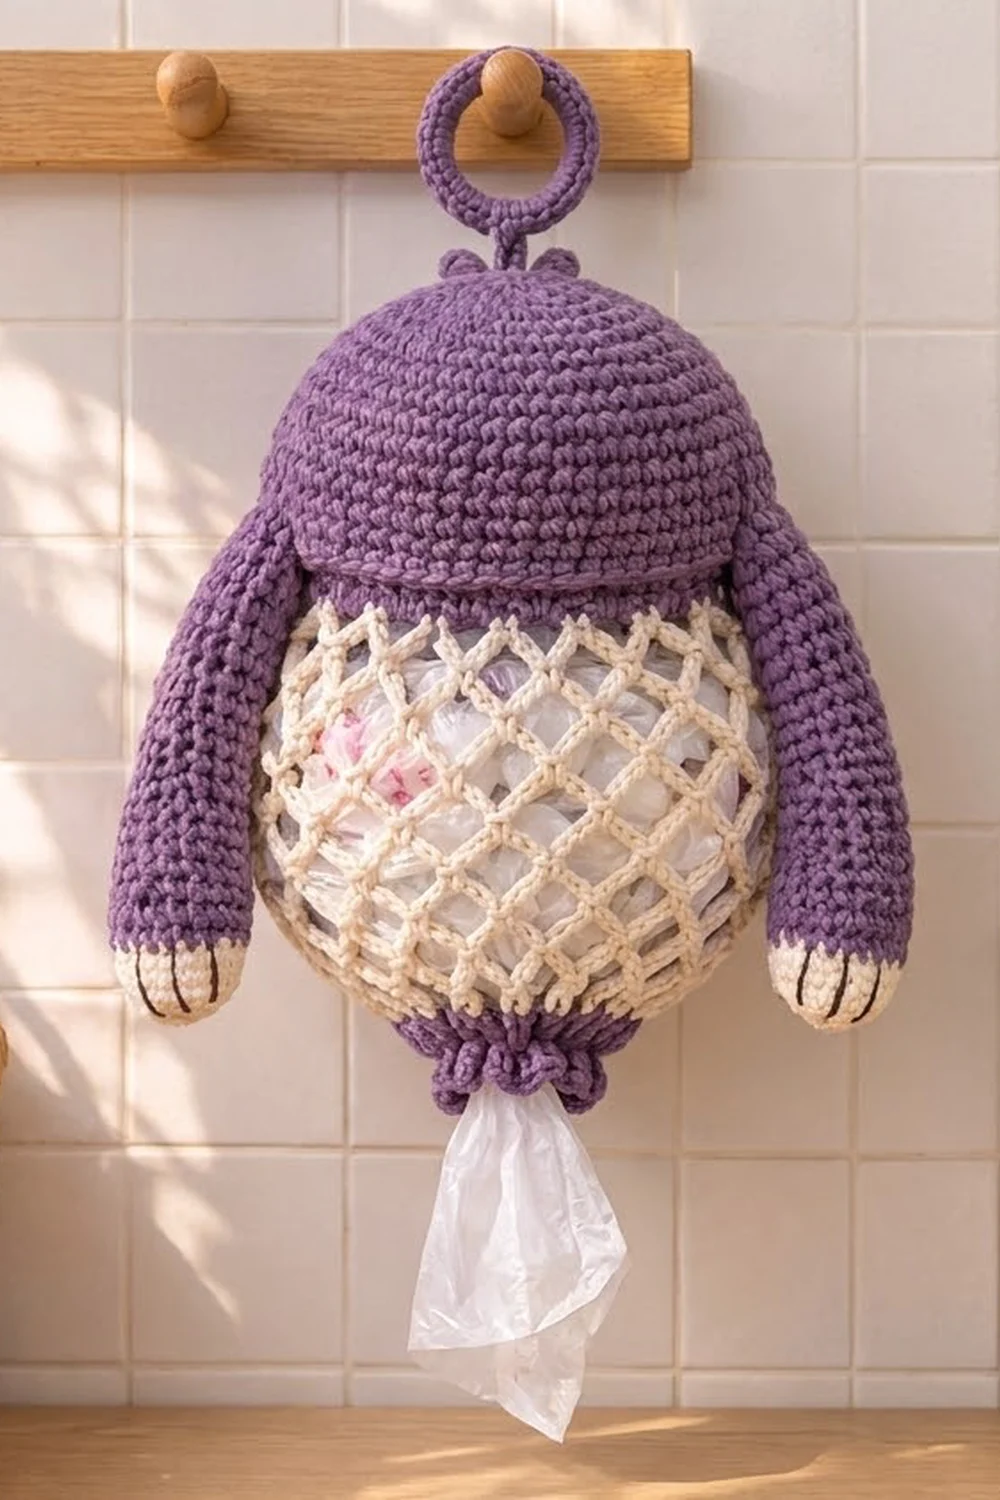
This sleepy sloth keeps your plastic bags tidy. Push bags in under the hinged head and pull them out, one at a time, through the gathered hole at the bottom. Through the open cream mesh body you can always see how many bags are left.
The palette is deep violet purple with a cream face and mesh, lavender eye patches and dark brown details. The look is cute but practical, and it works in a kitchen, laundry room or entryway. It also works in pink or any soft color, since only the purple parts change.
All terms are US crochet terms. The finished holder is about 15 in (38.1 cm) tall from head to bottom and 18 in (45.7 cm) including the hanging ring. The belly measures about 9 in (22.9 cm) wide laid flat.
The body is worked top down in one continuous piece: purple collar, cream mesh, then the purple bottom cuff and scalloped frill. The head is a separate dome lid, hinged to the back of the collar. You also make two arms, the face pieces, two tufts and a ring hanger, then sew everything on.
Finished Size and Construction
- Finished size: 15 in (38.1 cm) tall, 18 in (45.7 cm) with ring; belly 9 in (22.9 cm) wide flat
- Skill level: Intermediate
- Terminology: US
- Yarn weight: Worsted (#4), cotton or cotton blend
- Hook: 4.0 mm (G-6)
- Number of pieces: One finished holder, assembled from a body, lid, 2 arms, face mask, 2 eye patches, nose, 2 tufts and a ring hanger
- Layout: Lid hinged on top of the body; arms on the sides; ring at the crown
- Collar size: 15 in (38.1 cm) around, 1.25 in (3.2 cm) deep
- Size before bottom cuff: about 10.5 in (26.7 cm) from collar top to the last mesh round
- Bottom cuff depth: about 2.5 in (6.4 cm) including the frill
Materials
Use a smooth worsted cotton or cotton blend. Cotton holds its shape when filled with bags and does not stretch out over time.
- Purple: 110 g, about 200 m
- Cream: 50 g, about 90 m
- Lavender: 10 g, about 18 m
- Dark brown: 5 g, about 9 m
Tools:
– 4.0 mm (G-6) hook
– 2 in (5.1 cm) plastic or wooden ring to cover for the hanger
– Small amount of fiberfill
– Stitch markers
– Tapestry needle
– Scissors
– Pins
The quantities above include a safety margin of about 20 percent.
Abbreviations (US Terms)
- ch: chain
- sl st: slip stitch
- sc: single crochet
- dc: double crochet
- inc: 2 sc in the same stitch
- sc2tog: single crochet 2 together
- MR: magic ring
- sk: skip
- st(s): stitch(es)
Special stitch – mesh loop: a chain of the stated length, followed by a sc into the next chain loop of the previous round.
Gauge and Checkpoints
Gauge: 16 sc x 18 rounds = 4 in (10.2 cm) in sc worked in the round. One sc is 0.25 in (0.6 cm) wide and one round is about 0.22 in (0.6 cm) tall.
Make one arm first as your test piece. It has 18 stitches around, so the flattened arm should measure 2.25 in (5.7 cm) wide.
Checkpoints:
– Arm flattened: 2.25 in (5.7 cm) wide, 8.5 in (21.6 cm) long
– Collar: 15 in (38.1 cm) around, 7.5 in (19.1 cm) flat
– Lid crown after Rnd 10: 4.5 in (11.4 cm) across
– Mesh at Rnd 10: 9 in (22.9 cm) wide flat
– Face mask: 4.25 x 2.25 in (10.8 x 5.7 cm)
If your arm is too wide, go down half a hook size. If it is too narrow, go up half a hook size. Make the change before you start the collar. The lid’s edge has to match the collar stitch for stitch, so both need to be worked at the same gauge.
Body
Collar (Purple)
Ch 60 and join with a sl st to the first ch, taking care not to twist.
Rnd 1: Ch 1, sc in each ch around, join. (60 sts)
Rnds 2–6: Ch 1, sc in each st around, join. (60 sts)
The collar is 1.25 in (3.2 cm) deep. Place a marker in the center-back stitch. Fasten off purple.
Mesh (Cream)
Rnd 1: Join cream with a sc in any st of Rnd 6. Ch 4, sk 2, sc in next st; repeat from * 18 more times. Ch 4, sk 2, join with a sl st to the first sc. (20 ch-4 loops, 20 sc)
Check: 20 sc + 40 skipped = 60 collar sts.
Rnd 2: Sl st into the next loop. Ch 1, sc in the same loop, ch 5, sc in next loop; repeat from * 18 more times. Ch 5, join to the first sc. (20 ch-5 loops)
Rnd 3: Repeat Rnd 2. (20 ch-5 loops)
Rnds 4–10: Work as Rnd 2, but with ch 6. (20 ch-6 loops per round)
The longer chains make the belly bulge. At Rnd 10 the mesh should measure about 9 in (22.9 cm) wide flat.
Rnds 11–12: Work as Rnd 2 with ch 5. (20 ch-5 loops per round)
Rnds 13–14: Work as Rnd 2 with ch 4. (20 ch-4 loops per round)
Each sc sits at the center of a loop below, which forms the diamonds. The mesh is about 9.25 in (23.5 cm) tall, so the body measures about 10.5 in (26.7 cm) to this point. Fasten off cream.
Lid (Purple)
Rnd 1: 6 sc in MR. (6 sts)
Rnd 2: Inc in each st. (12 sts)
Rnd 3: Sc, inc 6 times. (18 sts)
Rnd 4: Sc 2, inc 6 times. (24 sts)
Rnd 5: Sc 3, inc 6 times. (30 sts)
Rnd 6: Sc 4, inc 6 times. (36 sts)
Rnd 7: Sc 5, inc 6 times. (42 sts)
Rnd 8: Sc 6, inc 6 times. (48 sts)
Rnd 9: Sc 7, inc 6 times. (54 sts)
Rnd 10: Sc 8, inc 6 times. (60 sts)
The crown should measure 4.5 in (11.4 cm) across.
Rnds 11–15: Sc in each st around. (60 sts)
These rounds form 1.1 in (2.8 cm) of straight sides. The lid edge has 60 sts, the same as the collar, so the two match one to one. Fasten off, leaving a 20 in (50.8 cm) tail.
Face Pieces
Face Mask (Cream)
Ch 9.
Rnd 1: Sc in 2nd ch from hook, sc in next 6 ch, 3 sc in last ch. Working along the other side of the chain: sc in next 6 ch, 2 sc in the last ch. (18 sts)
Rnd 2: Inc, sc 6, inc 3 times, sc 6, inc 2 times. (24 sts)
Rnd 3: (Sc, inc), sc 6, (sc, inc) 3 times, sc 6, (sc, inc) 2 times. (30 sts)
Rnd 4: (Sc 2, inc), sc 6, (sc 2, inc) 3 times, sc 6, (sc 2, inc) 2 times. (36 sts)
Rnd 5: (Sc 3, inc), sc 6, (sc 3, inc) 3 times, sc 6, (sc 3, inc) 2 times. (42 sts)
The mask is an oval, 4.25 x 2.25 in (10.8 x 5.7 cm). Join and fasten off, leaving a long tail.
Eye Patches (Lavender, make 2)
Ch 5.
Rnd 1: Sc in 2nd ch from hook, sc 2, 3 sc in last ch. Along the other side: sc 2, 2 sc in the last ch. (10 sts)
Rnd 2: Inc, sc 2, inc 3 times, sc 2, inc 2 times. (16 sts)
Rnd 3: (Sc, inc), sc 2, (sc, inc) 3 times, sc 2, (sc, inc) 2 times. (22 sts)
Each patch is an oval, 2.25 x 1.25 in (5.7 x 3.2 cm). Fasten off with a tail.
Nose (Brown)
Rnd 1: 6 sc in MR. (6 sts)
Rnd 2: Inc in each st. (12 sts)
Fasten off. Squeeze the circle into an oval about 1 x 0.75 in (2.5 x 1.9 cm).
Arms (Make 2)
Rnd 1: With cream, 6 sc in MR. (6 sts)
Rnd 2: Inc in each st. (12 sts)
Rnd 3: Sc, inc 6 times. (18 sts)
Rnds 4–6: Sc around. (18 sts)
This makes a paw 1.25 in (3.2 cm) long. Change to purple.
Rnds 7–38: Sc around. (18 sts)
Stuff the paw firmly and the arm lightly. Flatten the top and sc 9 through both layers to close it. The arm is 8.5 in (21.6 cm) long. With brown, embroider three straight claw lines over the paw, each 4 rounds long.
Tufts and Ring Hanger
Tufts (purple, make 2): Ch 8 and sl st into the first ch to form a loop. Work 12 sc into the loop, join and fasten off. Each petal-shaped loop is 1.25 in (3.2 cm) tall.
Ring: Join purple to the 2 in (5.1 cm) ring. Sc around the ring until it is completely covered, about 50 sc. Join and fasten off.
Strap: Ch 7.
- Row 1: Sc in 2nd ch from hook and in each ch across. (6 sts)
- Rows 2–16: Ch 1, turn, sc 6. (6 sts)
The strap is 3.5 in (8.9 cm) long.
Assembly
- Face: Pin the mask to the lower front of the lid with its lower edge on Rnd 13. Pin each eye patch at a slant, overlapping the upper outer edges of the mask. Sew everything on. With brown, backstitch a curved closed eye on each patch with three short lashes. Sew on the nose and stitch a small smile below it.
- Hinge: Lay the lid on the collar with the face centered at the front. Whipstitch the back 20 sts of lid Rnd 15 to the back 20 sts of collar Rnd 6, one stitch to one stitch, centered on the marker. The front 40 sts stay free so the lid can lift.
- Hanger: Fold 1 in (2.5 cm) of the strap over the ring and sew it down. Sew the rest of the strap down the back center of the lid to the hinge, and stitch it through the collar as well. That way the body carries the weight, not the lid.
- Tufts: Pinch the bases and sew them side by side in front of the strap.
- Arms: Sew the closed top of each arm to the side of the collar over Rnds 2–6, directly opposite each other.
Border: Bottom Cuff and Scallop Frill
The cuff is worked in sc at the same gauge as the collar: 4 sts per 1 in (2.5 cm). Hold the body flat with the hinge at the back. Each half (front or back) has 10 mesh loops.
Rnd 1 (conversion): Join purple in any sc of mesh Rnd 14. Ch 1. Work 1 sc in each sc, plus 2 sc in each ch-4 loop. Join. 20 sc worked 1 per existing sc + 40 added in the loops = 60 sts (30 per half).
Rnd 2: Sc 3, sc2tog 12 times. (48 sts, 24 per half)
Rnd 3: Sc 2, sc2tog 12 times. (36 sts, 18 per half)
Rnd 4: Sc, sc2tog 12 times. (24 sts, 12 per half)
Rnd 5: Sc around. (24 sts)
Rnd 6: Sc2tog 12 times. (12 sts, 6 per half)
Rnds 7–8: Sc around. (12 sts)
These rounds form the dispensing hole, about 1 in (2.5 cm) across and stretchy.
Rnd 9 (flare): Inc in each st. (24 sts, 12 per half)
Rnd 10 (scallops): Sc in next st, sk 1, 5 dc in next st, sk 1. Repeat 6 times total and join. (6 shells; 6 sc + 30 dc = 36 sts)
Why the math works: Rnd 1 goes back to exactly 60 sts, the same count as the collar, so the cuff starts at the same width as the top of the body. Rnds 2–4 each remove 12 sts in even repeats, so the cuff narrows smoothly. Rnd 9’s 24 sts divide evenly by the 4-stitch shell repeat, which gives 6 shells with no partial repeat. Fasten off and weave in the ends.
Final Blocking
- Lightly mist the lid, collar and cuff with water.
- Stuff the mesh body with a towel to shape the belly.
- Pat the lid into a round dome and press the face flat with your fingers.
- Pin the arms straight down the sides.
- Let the holder dry completely before you fill it.
- Do not steam the mesh, because it can lose its spring.
Final Quality-Control Checklist
- Collar and lid both have exactly 60 sts
- Mesh has 20 loops in every round
- Belly measures 9 in (22.9 cm) wide flat
- Hinge covers 20 matched stitches
- Lid lifts freely at the front
- Strap is sewn into the collar, not only into the lid
- Arms are level and the same length
- Bottom hole stretches to let one bag through
- All ends are woven in securely
Troubleshooting
- Mesh looks twisted: Make sure each sc goes into the center of the loop below, not around the stitch next to it.
- Belly is too flat: Add one more ch-6 round between Rnds 4 and 10.
- Lid gapes at the front: Your lid is looser than the collar. Rework Rnds 11–15 with a smaller hook.
- Bags fall out of the bottom: Work one extra round of 12 sc before the flare.
- Arms twist: Line up the end-of-round markers before closing the tops.
Care
Hand wash in cool water and lay flat to dry. Reshape the lid while it is still damp.
Final Notes
The whole design rests on one chain of measurements. A gauge of 16 sc per 4 in (10.2 cm) gives a 60-stitch collar that is 15 in (38.1 cm) around. The lid edge also has 60 stitches, so it sits flush on the collar. The mesh starts from those same 60 stitches and opens to a 9 in (22.9 cm) belly. The cuff converts back to 60 stitches and then narrows to a 12-stitch hole. If your arm checkpoint matches, every other piece will fall into place.
Happy crocheting!