

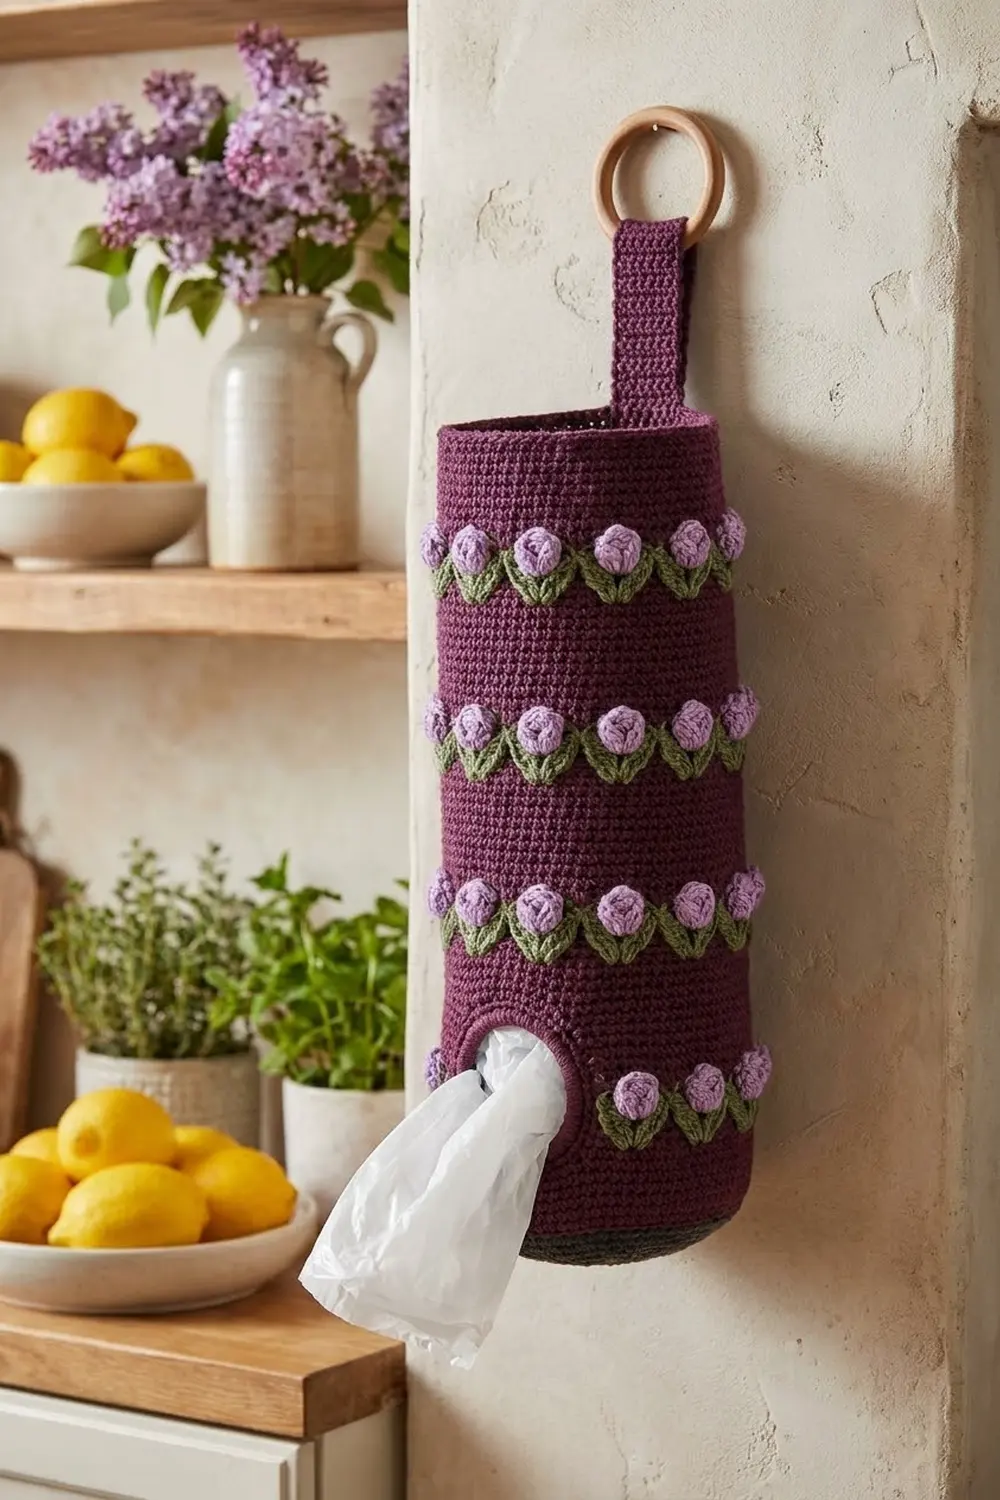
This Lilac Rosebud Bag Holder is a tall, tidy tube that hangs on a wall and keeps loose shopping bags in one place. You push bags in at the top and pull them out through a round opening low on the front.
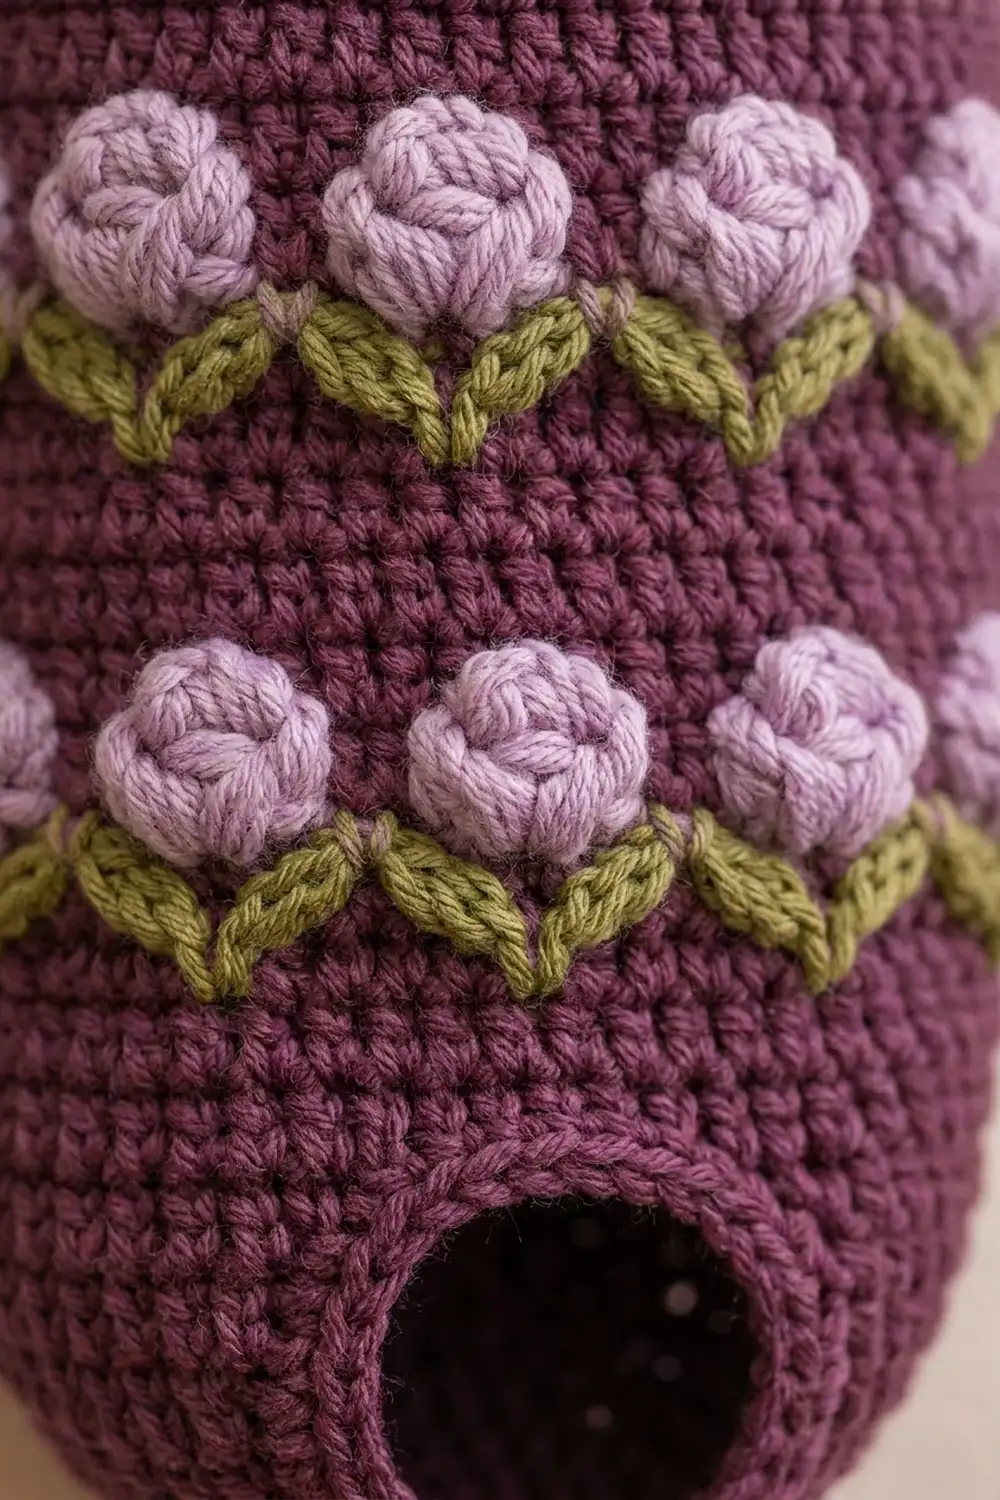
The design uses three colors. The body is deep plum. Raised lavender puff stitches look like small rosebuds, and moss-green spike stitches form a V-shaped pair of leaves under each bud. Four bands of ten rosebuds wrap all the way around the tube, so it looks finished from every side. The style is cottage-kitchen: soft, simple and practical.
The pattern uses US crochet terms. The finished holder is 5 in (12.7 cm) wide when flat and 12 in (30.5 cm) tall, plus a strap of about 2.7 in (6.9 cm) wrapped around a 2 in (5.1 cm) wooden ring.
You work it in one piece from the bottom up. Start with a flat oval base, turn up the sides with a back-loop round, make the bag opening with a chain, and add the rosebud bands as you go. The strap is worked straight off the back of the rim, so there is nothing to sew together except the strap loop.
Finished Size and Construction
- Finished size: 5 in (12.7 cm) wide flat × 12 in (30.5 cm) tall, plus strap
- Skill level: Intermediate (simple colorwork, puffs, spike stitches)
- Terminology: US
- Yarn weight: Worsted (#4)
- Hook: 5.0 mm (H-8)
- Number of pieces: 1 (base, body and strap worked continuously)
- Layout: Oval base, tube body, front bag opening, back strap
- Circumference: 40 sts = 10 in (25.4 cm)
- Size before border: 12 in (30.5 cm) tall after Rnd 58
- Border depth: a slip-stitch rim that adds almost no height, plus one round of trim around the opening
Materials
Use a smooth worsted yarn with good stitch definition. Cotton or a cotton blend gives a crisp, sturdy tube. Acrylic is lighter and softer. Avoid fuzzy yarns, because they hide the spike-stitch leaves.
- Plum (main color): 70 g, about 128 m (140 yd)
- Lavender (rosebuds): 15 g, about 27.4 m (30 yd)
- Moss green (leaves): 10 g, about 18.3 m (20 yd)
These amounts include a margin of about 20% for your gauge swatch and tails.
Tools:
– 5.0 mm (H-8) crochet hook
– Wooden ring, 2 in (5.1 cm) outer diameter
– Tapestry needle
– 2 stitch markers
– Measuring tape
– Scissors
Abbreviations (US Terms)
- ch: chain
- sc: single crochet
- sl st: slip stitch
- st(s): stitch(es)
- sk: skip
- BLO: back loop only
- Rnd: round
- RS / WS: right side / wrong side
Special stitches
- Puff (rosebud): Work (yo, insert hook in st, yo, pull up a loop to about 0.5 in / 1.3 cm) 4 times, leaving 9 loops on the hook. Yo and pull through all 9 loops, then ch 1 to close. The closing ch is not counted as a stitch, so one puff counts as 1 st.
- Spike sc (leaf): Insert the hook into the stated stitch 2 rounds below, yo, and pull up a long loop to the height of the current round. Yo and pull through both loops. This counts as 1 st. Skip the stitch behind it in the current round.
Color changes: Change color on the last yo of the stitch before. Carry the color you are not using along the top of the round and work over it so it stays hidden inside the stitches.
Gauge and Checkpoints
Gauge: 16 sc × 18 rnds = 4 in (10.2 cm) in sc worked in joined rounds.
Treat the base and the first body rounds as your gauge test. Work Rnds 1–13, then check these measurements:
- After Rnd 4: the oval is about 4 in × 1.75 in (10.2 × 4.4 cm), and its outer edge measures 10 in (25.4 cm).
- After Rnd 13: the tube is 5 in (12.7 cm) wide flat and 2 in (5.1 cm) tall from the base fold.
- After Rnd 22: height is 4 in (10.2 cm).
- After Rnd 40: height is 8 in (20.3 cm).
- After Rnd 58: height is 12 in (30.5 cm).
If the tube is wider than 5 in (12.7 cm), go down half a hook size. If it is narrower, go up half a size. If the width is right but the height is off by more than 0.25 in (0.6 cm) at a checkpoint, add or remove one plain round in the next plain section.
Pattern
All rounds are joined. At the end of each round, sl st to the first sc. Start each new round with ch 1, which does not count as a stitch.
Oval Base (Plum)
Rnd 1: Ch 11. Sc in 2nd ch from hook, sc in next 8 ch, 3 sc in last ch. Turn to work along the other side of the chain: sc in next 8 ch, 2 sc in the last ch (the same ch as the first sc). Join. (22 sts)
Rnd 2: 2 sc in first st, sc in next 8, 2 sc in each of next 3, sc in next 8, 2 sc in each of last 2. Join. (28 sts)
Rnd 3: 2 sc in first st, sc in next, sc in next 8, [2 sc in next, sc in next] 3 times, sc in next 8, [2 sc in next, sc in next] 2 times. Join. (34 sts)
Rnd 4: 2 sc in first st, sc in next 2, sc in next 8, [2 sc in next, sc in next 2] 3 times, sc in next 8, [2 sc in next, sc in next 2] 2 times. Join. (40 sts)
Each round adds 6 stitches, 3 at each curved end. In Rnd 4, sts 5–12 are the straight front edge and sts 25–32 are the straight back edge. Mark st 8 (front) and st 28 (back).
Body and Bag Opening (Plum)
Rnd 5: Sc in BLO of each st around. Join. (40 sts) This turns the work up into a tube.
Rnds 6–7: Sc in each st around. Join. (40 sts)
Rnd 8 (opening): Sc in next 4 sts, ch 8, sk next 8 sts, sc in next 28 sts. Join. (32 sc + 8 ch = 40 sts)
Rnd 9: Sc in next 4 sc, sc in each of the 8 ch, sc in next 28 sc. Join. (40 sts)
Rnds 10–13: Sc in each st around. Join. (40 sts) Check the Rnd 13 measurements now.
Rosebud Band (worked 4 times)
Each band is two rounds: a leaf round and then a rosebud round. The spike stitches in the leaf round go into the round 2 below it. In Band 1, that means the leaf round is Rnd 14 and the spikes go into Rnd 12.
Leaf round: Join green and carry it along with plum. With plum, sc in next st (this is the center of the V). With green, spike sc into the stitch directly below that center sc, 2 rounds down. With plum, sc in next st. With green, spike sc into the stitch 2 rounds below the next repeat’s center st. Repeat from * to * 10 times. Join with plum. (20 plum sc + 20 green spikes = 40 sts)
The two spikes on either side of each center stitch start from the same point below and lean outward, which makes a green V. Cut green, leaving a 6 in (15.2 cm) tail.
Rosebud round: Join lavender and carry it with plum. With lavender, puff in the plum center sc of the V. With plum, sc in next 3 sts. Repeat 10 times. Join with plum. (10 puffs + 30 sc = 40 sts)
Each puff sits right inside its V of leaves. Cut lavender, leaving a 6 in (15.2 cm) tail.
Full Body Sequence
- Rnds 14–15: Band 1
- Rnds 16–23: Plum sc (8 rnds), 40 sts each. Check height after Rnd 22.
- Rnds 24–25: Band 2
- Rnds 26–33: Plum sc (8 rnds)
- Rnds 34–35: Band 3
- Rnds 36–43: Plum sc (8 rnds). Check height after Rnd 40.
- Rnds 44–45: Band 4
- Rnds 46–58: Plum sc (13 rnds)
That gives 54 body rounds (Rnds 5–58) at 4.5 rounds per inch, which equals 12 in (30.5 cm). Do not fasten off after Rnd 58.
Border
The border has two parts: a slip-stitch rim around the top and a round of sc around the bag opening. The slip stitches match the sc gauge of 4 sts per inch, so the border keeps the measurements of the body.
Rnd 59 (top rim): Sl st loosely in each st around. Join. (40 sl sts: 20 on the front half, 20 on the back half when flat) Do not fasten off yet.
The rim works 1 stitch into each of the 40 stitches. Because it adds nothing, the 10 in (25.4 cm) top edge does not ruffle. Because it skips nothing, the edge does not pull in.
Strap
Fasten off after Rnd 59. Join plum with a sc into the sl st above st 26 of the back edge (one stitch before the marked st 28).
Row 1: Sc in the same st, then sc in next 5 sts (sts 27–31). (6 sc) The strap is now centered on the straight back section, sts 25–32.
Rows 2–18: Ch 1, turn, sc in each st. (6 sc each row)
The strap is 1.5 in (3.8 cm) wide and 4 in (10.2 cm) long. Fold Rows 13–18 through the wooden ring and to the back. Whipstitch Row 18 across the WS of Row 12. The fold uses 1.3 in (3.3 cm) of strap to wrap the ring, leaving about 2.7 in (6.9 cm) of strap visible above the rim.
Opening Trim
Join plum at the right-hand corner of the opening.
Trim round: Sc in the corner, then 8 sc along the bottom edge (into the Rnd 7 stitches). Sc in the left corner, then 8 sc along the top edge (into the Rnd 9 stitches that sit over the chain). Join. (1 + 8 + 1 + 8 = 18 sc)
There are 8 stitches on each long edge, 1 for each skipped stitch and 1 for each chain. That matches the 2 in (5.1 cm) width. The single sc at each corner seals the corner without stretching it. Fasten off and weave in all ends.
Final Blocking
- Weave in all tails on the WS, following the color of the stitches around each tail.
- Lightly mist the holder with water, or steam it gently if it is acrylic. Hold the iron above the fabric and do not press it.
- Roll a towel into a tube about 5 in (12.7 cm) wide when flat and slide it inside.
- Smooth the rosebud bands so they sit level and the puffs stand up.
- Shape the opening into a round and pinch the oval base flat.
- Leave it to dry completely, then remove the towel.
Final Quality-Control Checklist
- The tube is 5 in (12.7 cm) wide flat and 12 in (30.5 cm) tall.
- Every round has 40 sts, and every band has 10 rosebuds.
- Each puff sits in the center of a green V.
- The bands are evenly spaced, with 8 plain rounds between them.
- The opening is centered on the front straight section and about 2 in (5.1 cm) wide.
- The strap is centered on the back, and the ring is sewn in securely.
- No carried strands show on the RS.
- The rim lies flat with no ruffles.
Troubleshooting
The puffs sink or lean. Pull each loop up to the same height, and keep the closing ch 1 snug.
The leaves look like dashes, not Vs. Both spikes must go into the same base stitch 2 rounds down.
Floats show through the fabric. Work over the carried strand on every stitch and keep it slightly loose.
The tube spirals. Joined rounds can lean a little. Gentle blocking straightens it. If it is severe, turn the work and alternate the direction of each round in the plain sections.
The opening stretches out of shape. Add a second round of trim using the same 18 sc.
The top flares. Work the sl st rim with a hook half a size smaller.
Care
Hand wash in cool water and lay flat to dry, reshaping it over a rolled towel. Cotton versions can be machine washed on a gentle cycle inside a laundry bag.
Final Notes
The measurement chain is simple. The oval base reaches 40 sts, which is 10 in (25.4 cm) around and 5 in (12.7 cm) flat. Every body round keeps those 40 sts. 54 body rounds at 4.5 rounds per inch give 12 in (30.5 cm) of height. The border works 1 stitch into each stitch, so it adds nothing and loses nothing. The 6-stitch strap is 1.5 in (3.8 cm) wide, and once folded around a 2 in (5.1 cm) ring it leaves about 2.7 in (6.9 cm) showing. If you check the base, the plain sections and the rim, your holder will hang straight. For another look, use olive green for the main color and cream for the rosebuds.
Happy crocheting!