

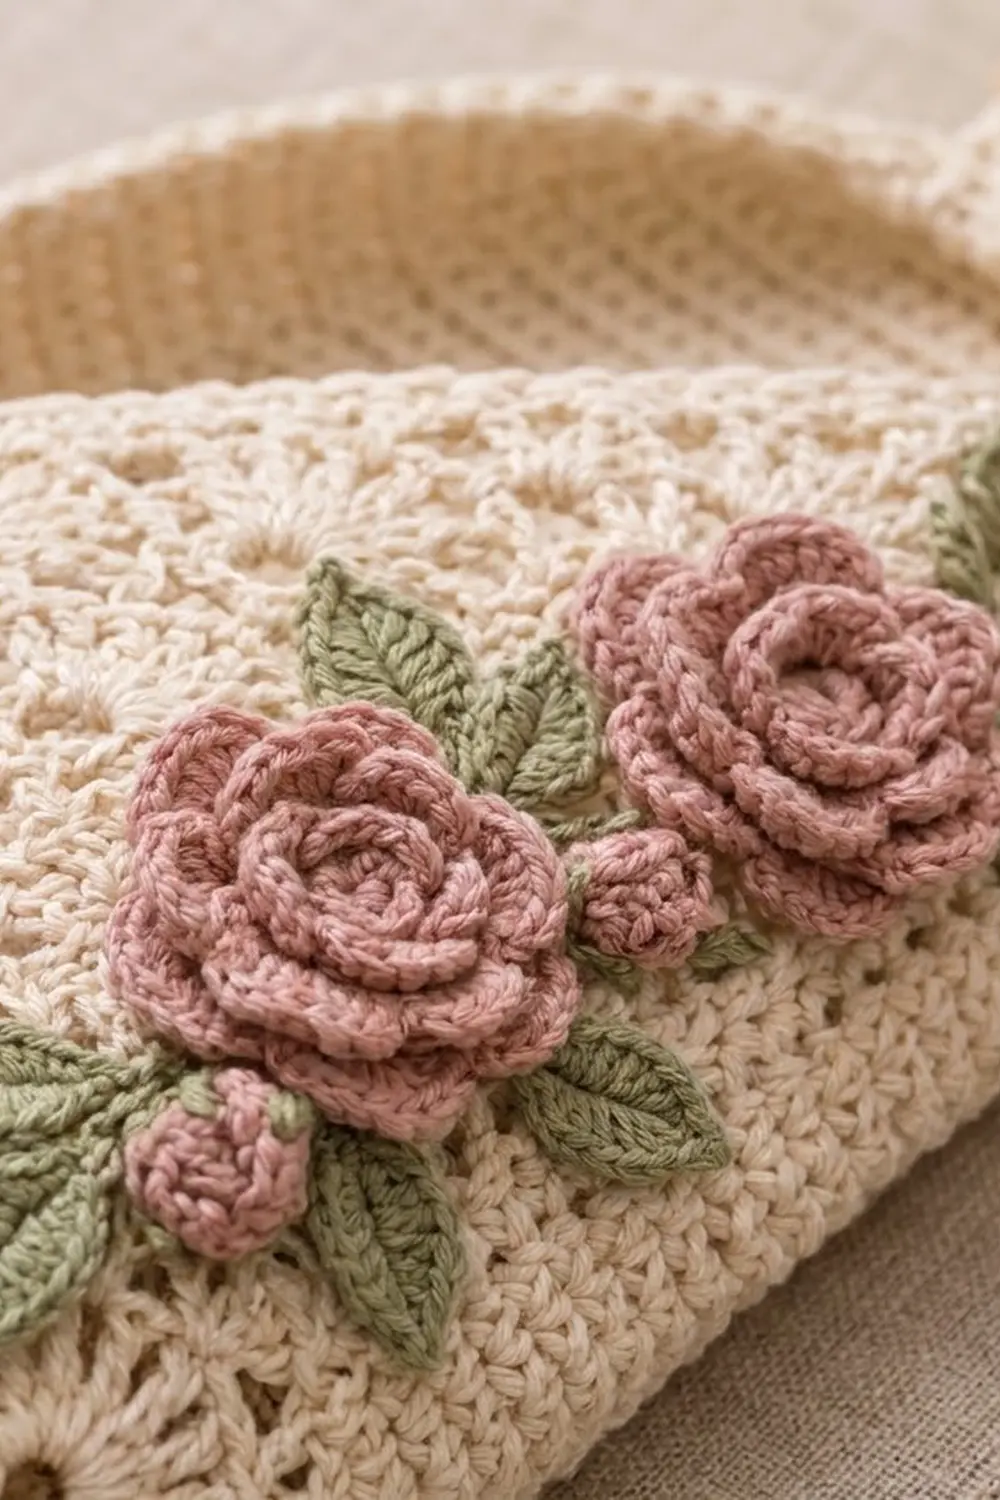
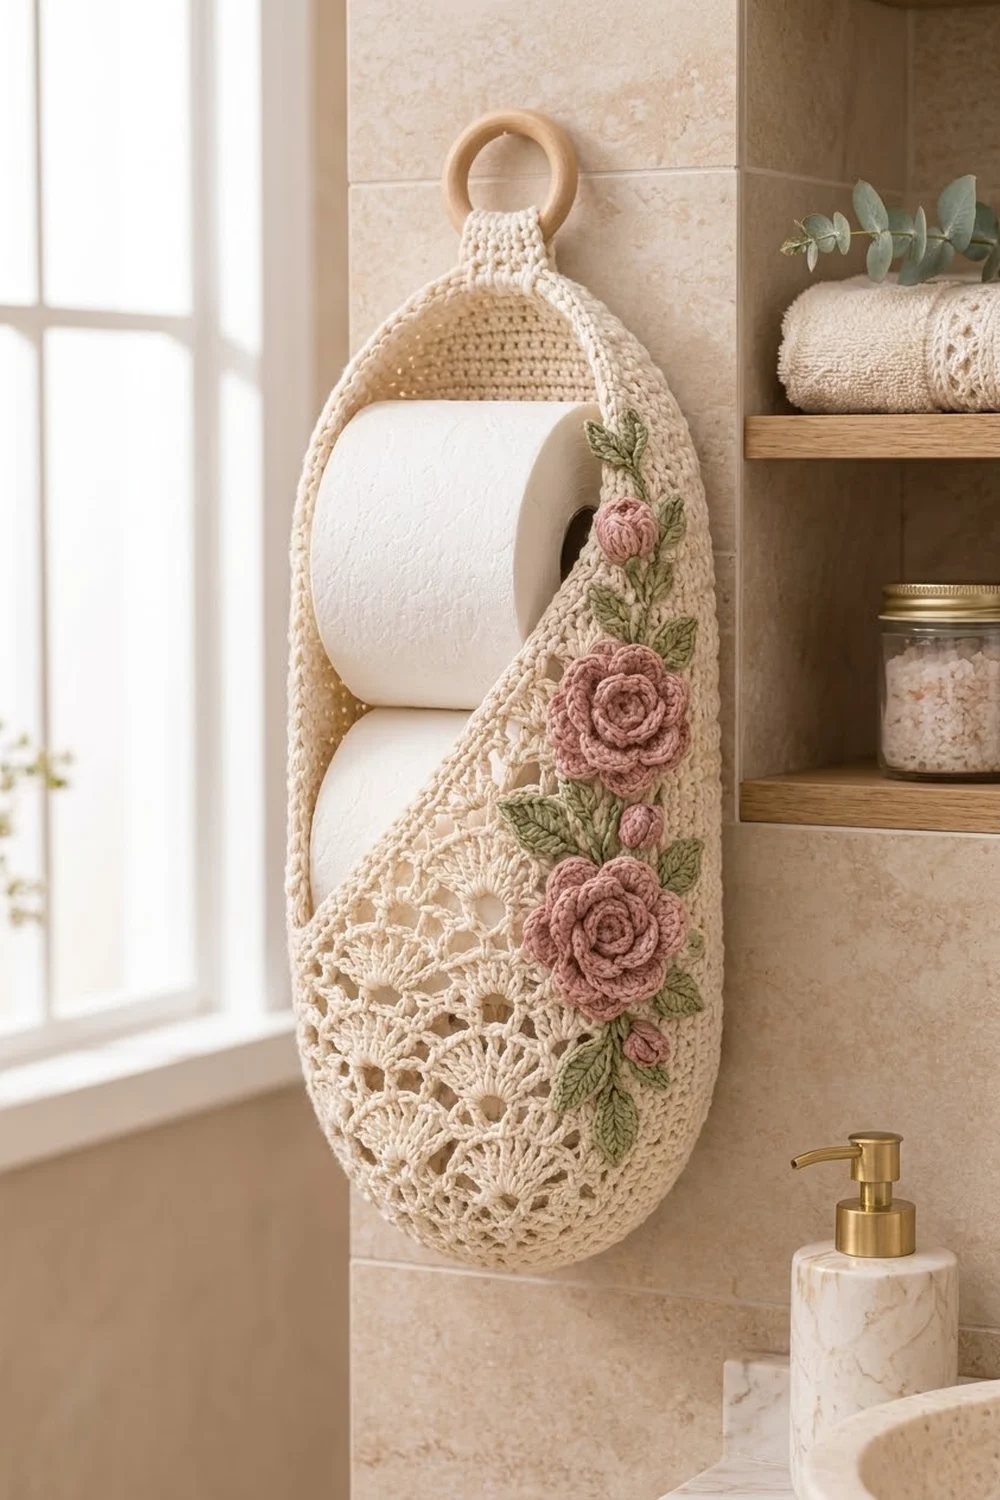
This wall-hung holder has a solid cream back panel with a raised rim, and a shell-lace pocket in front that holds two rolls stacked one above the other. The pocket’s top edge runs on a diagonal, so the top roll stays easy to reach. A vine of dusty-pink roses, small buds and sage-green leaves runs down the tall side of the pocket.
The style is soft and vintage, in three colors: cream, dusty rose and sage. The pattern uses US crochet terms.
The finished back panel measures 7 in (17.8 cm) wide by 20 in (50.8 cm) tall, and the rim is 2.25 in (5.7 cm) deep. Including the tab and the wooden ring, the holder hangs about 23 in (58.4 cm) long.
Construction in brief: work the oval back in rounds around a foundation chain, then work the rim up from it. Make the pocket separately: start with a lace half-circle, then work shell rows upward and shape the diagonal top. A single crochet round joins the pocket to the rim stitch by stitch, and a reverse single crochet round finishes the edge. Last, sew on the tab, the ring and the flowers.
Finished Size and Construction
- Finished size: back panel 7 × 20 in (17.8 × 50.8 cm), rim 2.25 in (5.7 cm) deep, about 23 in (58.4 cm) overall with the ring
- Skill level: Intermediate
- Terminology: US
- Yarn weight: worsted (#4) cotton
- Hook: 4.5 mm (US 7)
- Number of pieces: one holder, made from 1 back with rim, 1 pocket, 1 tab and 17 appliqués
- Layout: the pocket covers the lower back; its short side is 10.25 in (26.0 cm) tall and its tall side is 14.75 in (37.5 cm) tall
- Pocket size: 7 in (17.8 cm) wide
- Size before border: 7 × 20 in (17.8 × 50.8 cm), with a 2.25 in (5.7 cm) rim
- Border depth: about 0.25 in (0.6 cm), added to the rim edge
Materials
Use a smooth, mercerized or combed cotton that runs about 170 m per 100 g. Cotton keeps its shape when loaded with rolls and copes with bathroom humidity.
- Cream: 200 g (about 340 m)
- Dusty rose: 25 g (about 43 m)
- Sage green: 15 g (about 26 m)
These quantities include a margin of roughly 15%.
Tools:
– 4.5 mm (US 7) hook
– Tapestry needle
– 6 stitch markers
– Rustproof pins
– 2 in (5.1 cm) wooden ring
– Scissors
Abbreviations (US Terms)
- ch: chain
- sl st: slip stitch
- sc: single crochet
- hdc: half double crochet
- dc: double crochet
- BLO: back loop only
- inc: 2 sts in the same st
- sp: space
- st(s): stitch(es)
- RS: right side
- rev sc: reverse single crochet (crab stitch)
Shell: 5 dc in the same st.
Half shell: 3 dc in the same st. At the start of a row, a half shell is ch 3 (counts as dc) plus 2 dc in the same st.
Rev sc: work left to right (right-handers). Insert the hook in the next st to the right, pull up a loop, yarn over and pull through both loops.
Gauge and Checkpoints
- Hdc: 16 sts × 12 rows = 4 in (10.2 cm)
- Sc: 16 sts × 18 rows = 4 in (10.2 cm)
- Shell pattern: 31 sts (5 shells) = 7 in (17.8 cm), and 8 rows = 4 in (10.2 cm)
Make the pocket half-circle (Rows 1–7) first and use it as your test piece. It should measure 7 in (17.8 cm) across the straight edge.
Checkpoints:
– Back, after Rnd 5: about 3.5 × 16.5 in (8.9 × 41.9 cm)
– Back, after Rnd 10: 7 × 20 in (17.8 × 50.8 cm)
– Rim: 2.25 in (5.7 cm) tall
– Pocket, after Row 4: the half-circle is about 4 in (10.2 cm) across
– Pocket, after Row 20: the short side measures 9.75 in (24.8 cm) from the bottom of the curve
If your pieces are too big, go down 0.5 mm. If they are too small, go up 0.5 mm. Then re-measure. Stitch counts never change, because the pocket joins the rim stitch to stitch.
Back Panel with Rim
Use cream.
Ch 56.
Rnd 1: 4 hdc in 3rd ch from hook (the skipped ch do not count), hdc in next 52 ch, 8 hdc in last ch. Working along the opposite side of the chain, hdc in next 52 ch, 4 hdc in the same ch as the first 4 hdc. Join with sl st to the first hdc. (120 hdc)
Rnd 2: Ch 2 (does not count, here and throughout). [Inc, hdc in next st] 2 times, hdc in next 52 sts, [inc, hdc in next st] 4 times, hdc in next 52 sts, [inc, hdc in next st] 2 times. Join. (128)
Rnds 3–10: For round number n: ch 2, [inc, hdc in next (n−1) sts] 2 times, hdc in next 52 sts, [inc, hdc in next (n−1) sts] 4 times, hdc in next 52 sts, [inc, hdc in next (n−1) sts] 2 times. Join.
Each round adds 8 sts, 4 at each rounded end. Round totals:
| Rnd | 3 | 4 | 5 | 6 | 7 | 8 | 9 | 10 |
|---|---|---|---|---|---|---|---|---|
| Sts | 136 | 144 | 152 | 160 | 168 | 176 | 184 | 192 |
Stitch map after Rnd 10 (192 sts):
– Sts 1–22 and 171–192: bottom curve (44 sts)
– Sts 23–74: Side 1 (52 sts)
– Sts 75–118: top curve (44 sts)
– Sts 119–170: Side 2 (52 sts)
Mark st 1, st 96 (top center), st 67 and st 144.
Rnd 11: Ch 1, sc in BLO of each st around. Join. (192 sc) The unworked front loops make a fold line, and the rim turns up from here.
Rnds 12–20: Ch 1, sc in each st around. Join. (192 sc)
The rim should be 2.25 in (5.7 cm) tall. Fasten off.
Lace Pocket
Use cream.
Half-Circle Bottom
Row 1: In a magic ring, ch 3 (counts as dc), 6 dc. Turn. (7 dc)
Row 2: Ch 3 (counts as dc), dc in first st, 2 dc in each st across. Turn. (14 dc)
Row 3: Ch 4 (counts as dc + ch 1), [dc in next 2 sts, ch 1] 6 times, dc in top of the turning ch. Turn. (14 dc, 7 ch-1 sps)
Row 4: Ch 3 (counts as dc), [(2 dc, ch 2, 2 dc) in next ch-1 sp] 7 times, dc in 3rd ch of the turning ch. Turn. (7 shells, 30 dc)
Row 5: Ch 4 (counts as dc + ch 1), [(2 dc, ch 2, 2 dc) in next ch-2 sp, ch 1] 7 times, dc in top of the turning ch. Turn. (7 shells, 30 dc, 8 ch-1 sps)
Row 6: Ch 3 (counts as dc), dc in next ch-1 sp, [(2 dc, ch 2, 2 dc) in next ch-2 sp, dc in next ch-1 sp] 7 times, dc in 3rd ch of the turning ch. Turn. (7 shells, 38 dc)
Row 7: Ch 1, sc in first 2 sts, [6 dc in next ch-2 sp, sc in next single dc] 7 times, sc in top of the turning ch. (7 fans of 6 dc = 42 dc, plus 10 sc)
Do not turn. The straight edge should measure 7 in (17.8 cm).
Straight Section
Row 8 (pick-up, RS): Rotate to work along the straight edge. Work 2 sc in each of the 7 row ends, 3 sc in the magic ring, and 2 sc in each of the 7 row ends on the other side. Turn. (14 + 3 + 14 = 31 sc)
The edge where Row 8 ends becomes the pocket’s short side.
Row 9 (A): Ch 1, sc in first st, [skip 2, shell in next st, skip 2, sc in next st] 5 times. Turn. (5 shells, 6 sc)
Row 10 (B): Ch 3 (counts as dc), 2 dc in first sc, [sc in center dc of next shell, shell in next sc] 4 times, sc in center dc of last shell, 3 dc in last sc. Turn. (4 shells, 2 half shells, 5 sc)
Rows 11–20: Repeat Rows 9 and 10 five more times.
Diagonal Top
Each row is half a shell shorter at the short side.
Odd rows (start at the short side): Sl st in first 3 dc and in next sc. Ch 3 (counts as dc), 2 dc in the same sc, [sc in center dc of next shell, shell in next sc] k times, sc in top of the turning ch. Turn.
Even rows (start at the tall side): Ch 3 (counts as dc), 2 dc in first sc, [sc in center dc of next shell, shell in next sc] k times, sc in center dc of next shell, 3 dc in next sc. Turn, leaving the rest unworked.
| Row | k | Result |
|---|---|---|
| 21 | 4 | 1 half shell + 4 shells, 5 sc |
| 22 | 3 | 2 half shells + 3 shells, 4 sc |
| 23 | 3 | 1 half shell + 3 shells, 4 sc |
| 24 | 2 | 2 half shells + 2 shells, 3 sc |
| 25 | 2 | 1 half shell + 2 shells, 3 sc |
| 26 | 1 | 2 half shells + 1 shell, 2 sc |
| 27 | 1 | 1 half shell + 1 shell, 2 sc |
| 28 | 0 | 2 half shells, 1 sc |
| 29 | 0 | 1 half shell, 1 sc |
Do not fasten off.
Pocket Edging and Top Band
Edging Rnd: Ch 1. Work 33 sc evenly down the stepped diagonal edge. Then work:
– Short side: 1 sc in the Row 8 end and 2 sc in each of the next 12 row ends (25 sc)
– Bottom curve: sc in the first st of Row 7, sc in each of the 42 fan dc (skip the sc between fans), sc in the last st of Row 7 (44 sc)
– Tall side: 1 sc in the Row 8 end and 2 sc in each of the 21 row ends (43 sc)
Join. (33 + 25 + 44 + 43 = 145 sc)
Top band:
– Row 1: Ch 1, sc in each of the 33 diagonal sts. Turn. (33)
– Row 2: Ch 1, sc across. (33)
– Row 3: Ch 1, rev sc across. (33)
Fasten off.
Hanging Tab
Use cream.
Ch 7.
Row 1: Sc in 2nd ch from hook and each ch across. (6)
Rows 2–14: Ch 1, sc across. (6)
The tab measures about 1.5 × 3.1 in (3.8 × 7.9 cm). Leave a 12 in (30.5 cm) tail.
Appliqués
Large rose (make 3, dusty rose):
Ch 31.
– Row 1: Sc in 2nd ch from hook and each ch across. (30)
– Row 2: Ch 1, [sc in next st, 3 hdc in next st] 6 times, [sc in next st, 5 dc in next st] 9 times. (15 petals)
Roll the strip from the small-petal end, keeping the base level. Stitch through all layers at the base. The finished rose is about 1.75 in (4.4 cm) across.
Rosebud (make 4, dusty rose):
Ch 13.
– Row 1: Sc in 2nd ch from hook and across. (12)
– Row 2: Ch 1, [sc in next st, 3 hdc in next st] 6 times.
Roll tightly. The bud is about 0.75 in (1.9 cm) across.
Leaf (make 10, sage green):
Ch 8. Sl st in 2nd ch from hook, then sc, hdc, 2 dc, hdc and sc across the chain. Ch 2 for the tip. Working down the other side of the chain, sc, hdc, 2 dc, hdc, sc and sl st.
Each leaf is about 1.5 in (3.8 cm) long.
Border
The border is worked on the rim with the same sc gauge: 16 sts = 4 in (10.2 cm).
Border Rnd 1 (joining round):
1. Pin the pocket over the back. Put the pocket’s short side along Side 2 and its tall side along Side 1. (Use the opposite sides to mirror the design.)
2. With the pocket RS facing, join cream at st 144.
3. Sc through one pocket edging st and one rim st together for each joining st:
– Short side: 25 edging sc, plus 2 sc across the 3 band row ends, along sts 144–170 (27)
– Bottom curve: sts 171–192 and 1–22 (44)
– Tall side: 43 edging sc, plus 2 sc across the band row ends, along sts 23–67 (45)
4. Then sc in each rim st alone, sts 68–143. (76)
5. Join. (27 + 44 + 45 + 76 = 192)
Border Rnd 2: Ch 1, rev sc in each st around. Join. (192)
Count per section in both rounds: bottom curve 44, Side 1 52, top curve 44, Side 2 52.
Why the math works: the pocket edging was planned at 4 sts per inch, the same as the rim. The 44-st bottom curve of the pocket matches the rim’s 44-st curve, both 11 in (27.9 cm). The short side covers 6.75 in (17.1 cm) of rim and the tall side 11.25 in (28.6 cm). Add the 3.5 in (8.9 cm) radius of the curve, and you get the finished heights of 10.25 in (26.0 cm) and 14.75 in (37.5 cm). The join adds no stitches, so the rim stays at 192.
Finishing the tab and flowers:
1. Wrap the tab around the ring and fold it in half. Sew both ends to the back of the top curve, centered on st 96, so the tab rises above the border.
2. Sew the appliqués down the tall side of the pocket, about 0.5 in (1.3 cm) in from the edge. Starting near the top corner, place a bud, 2 leaves, a rose, a bud, 2 leaves, a rose, a bud, 2 leaves, a rose, a bud and the last 4 leaves.
Final Blocking
- Dampen the whole holder and press out the extra water in a towel.
- Fill the pocket with two rolls, or a rolled towel 4 in (10.2 cm) across.
- Pin the back flat to 7 × 20 in (17.8 × 50.8 cm), and ease the rim upright.
- Open each shell with your fingers.
- Lift the rose petals and flatten the leaves.
- Leave it to dry completely before hanging.
Final Quality-Control Checklist
- [ ] Back is 7 × 20 in (17.8 × 50.8 cm) and lies flat
- [ ] Rim is 2.25 in (5.7 cm) tall and stands straight all around
- [ ] Border Rnds 1 and 2 each have 192 sts
- [ ] Pocket heights are 10.25 in (26.0 cm) and 14.75 in (37.5 cm)
- [ ] The diagonal top is smooth, with no gaps at the steps
- [ ] Tab is centered on st 96 and the ring hangs straight
- [ ] All appliqués are secure and the tails are woven in
Troubleshooting
- Back ruffles at the ends: your hdc is too loose. Go down a hook size.
- Back cups at the ends: your increases are too tight. Go up a hook size.
- Rim flares: you worked Rnd 11 in both loops. Redo it in BLO.
- Half-circle ruffles: tighten the chains in Rows 4–6, then block to 7 in (17.8 cm).
- Pocket and rim counts don’t match: recount the edging round. It must be 25 / 44 / 43 / 33.
- Steps on the diagonal look jagged: work the sl sts loosely, and keep the band rows firm.
- Roses are floppy: roll them tighter and add more stitches at the base.
Care
Hand wash in cool water with mild soap. Reshape and dry flat over a rolled towel.
Final Notes
The measurements build on each other:
1. The back reaches 7 × 20 in (17.8 × 50.8 cm) at 192 sts.
2. The rim rises 2.25 in (5.7 cm) without changing that count.
3. The pocket’s half-circle sets its width at 7 in (17.8 cm).
4. The pocket’s 145-st edging was planned at the same 4 sts per inch as the rim.
5. The joining round links the two in 116 matching stitches, so the border holds at 192.
Check each stage before moving on, and the holder will hang straight and full.
Happy crocheting!