

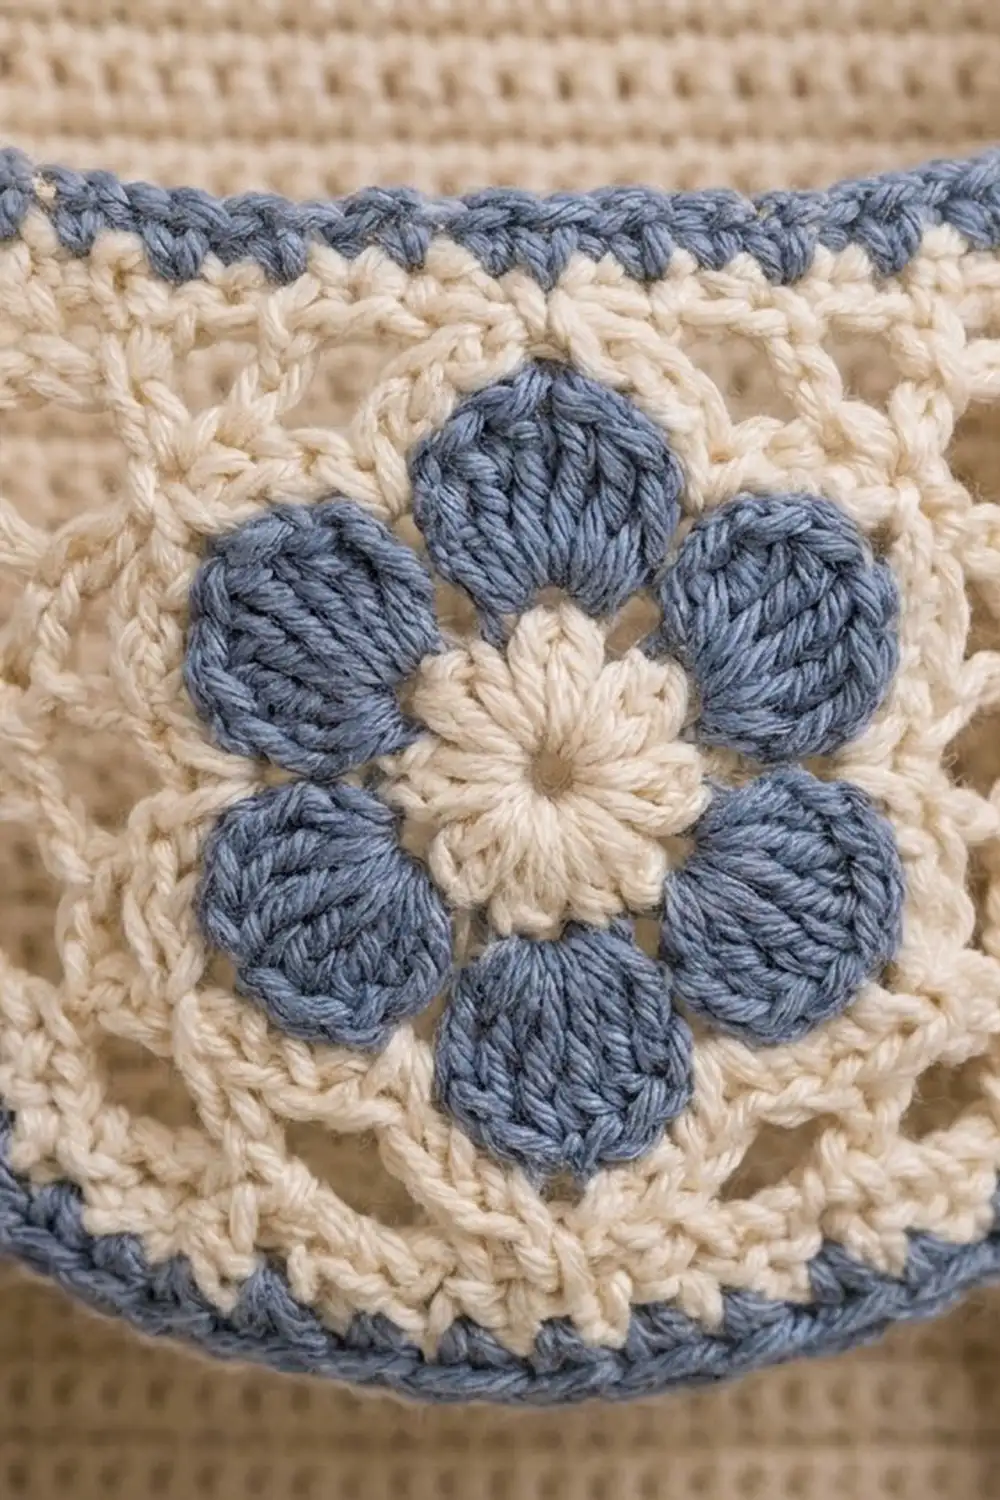
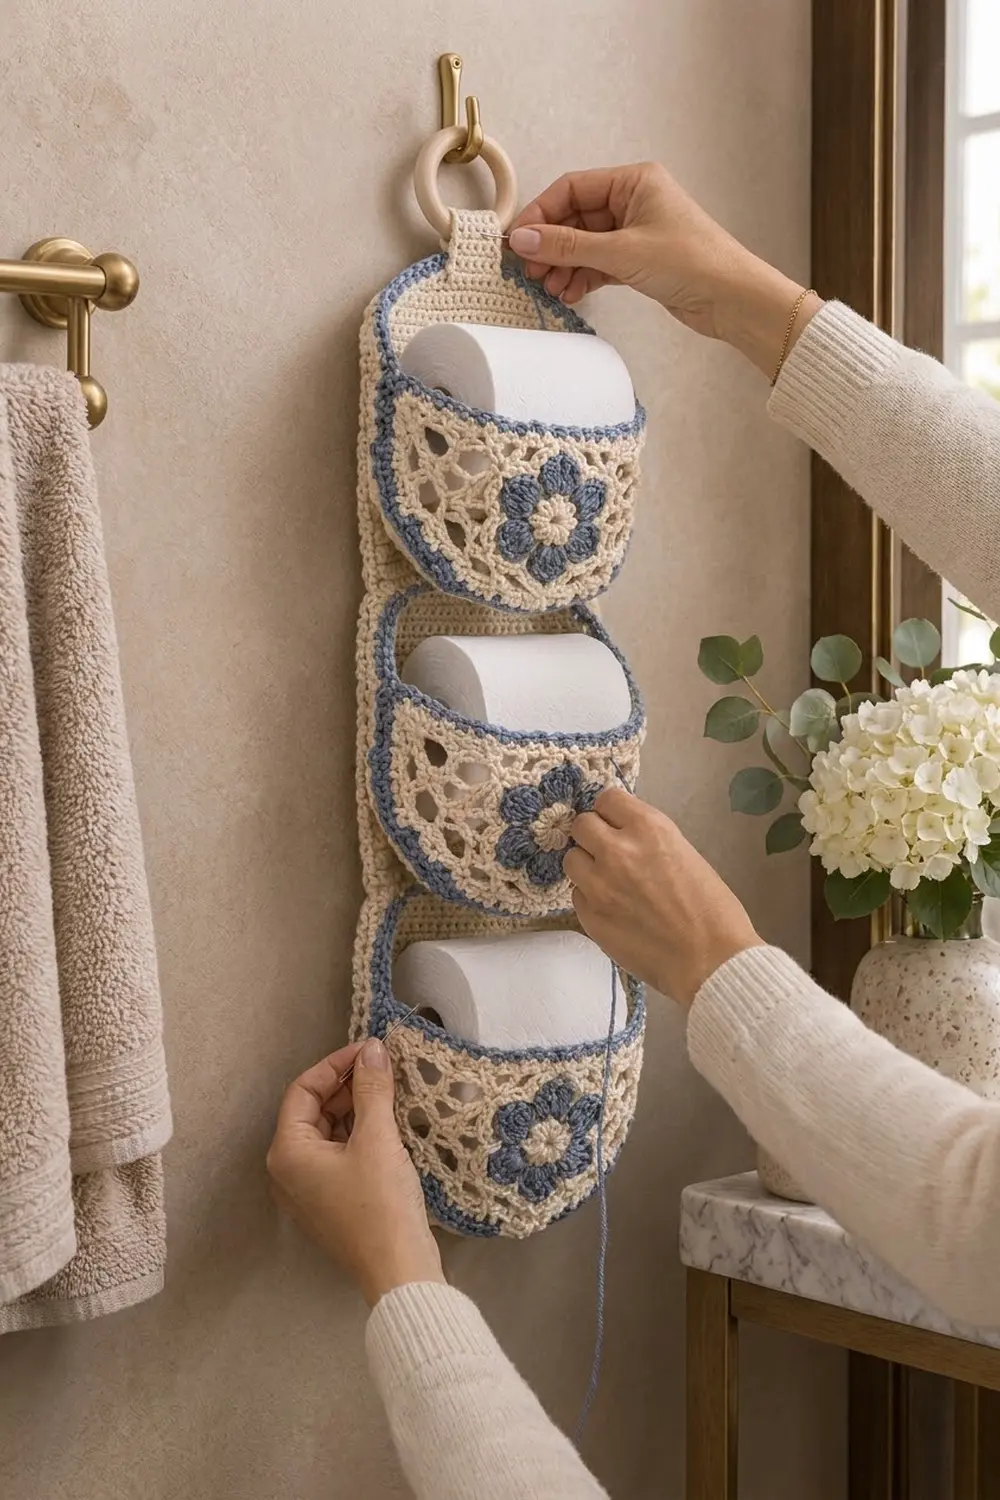
This hanging holder stores three spare toilet rolls in a tidy vertical stack. A solid cream back panel carries three rounded lace pockets. Each pocket has a dusty-blue six-petal flower in the center, a cream honeycomb mesh around it, and a crisp blue edge.
The palette uses only two colors: warm cream and soft denim blue. The style is cottage-meets-spa, lacy and decorative but sturdy enough for daily use. A short cream tab loops over a natural wooden ring at the top, so the holder hangs from a towel hook, a knob or a small peg.
All instructions use US crochet terms. With its border, the back panel measures about 6.3 x 21.8 in (16.0 x 55.4 cm). Including the tab and ring, the holder hangs about 25 in (63.5 cm) long.
Construction is simple. Crochet a flat back panel in single crochet rows and edge it with two border rounds. Then make three circular lace pockets in the round and sew each one to the panel along two-thirds of its edge. The free third of each pocket becomes the opening.
Finished Size and Construction
- Finished size (panel with border): 6.3 x 21.8 in (16.0 x 55.4 cm)
- Hanging length with tab and ring: about 25 in (63.5 cm)
- Skill level: Intermediate
- Terminology: US
- Yarn weight: DK (3) cotton
- Hook: 4 mm (G-6)
- Number of pieces: 5 (1 back panel, 3 pocket fronts, 1 tab), sewn into one holder
- Layout: 3 pockets stacked in 1 column
- Pocket size (flat, before sewing): 7.75 in (19.7 cm) across
- Panel size before border: 5.5 x 21 in (14.0 x 53.3 cm)
- Border depth: 2 rounds, about 0.4 in (1.0 cm) on each side
Materials
Choose a smooth mercerized or combed DK cotton. Cotton holds the pocket shape and copes well with a steamy bathroom. Avoid fuzzy or very stretchy yarns, because the pockets will sag under the weight of the rolls.
- Cream (Color A): 120 g, about 270 m
- Dusty blue (Color B): 50 g, about 112 m
These amounts include about 15% extra for your test pocket, sewing tails and small gauge differences.
Tools:
– 4 mm (G-6) crochet hook
– Wooden ring, 2.5 in (6.4 cm) outer diameter
– Tapestry needle
– 6 locking stitch markers
– Scissors and tape measure
– Blocking mat and rust-proof pins
Abbreviations (US Terms)
- ch – chain
- sl st – slip stitch
- sc – single crochet
- sc2tog – single crochet 2 together
- dc – double crochet
- st(s) – stitch(es)
- sp – space
- rnd – round
Special stitch – Petal: 7 dc in the same stitch.
Special stitch – Shell: (3 dc, ch 2, 3 dc) in the same space.
Gauge and Checkpoints
Gauge: 18 sc x 20 rows = 4 in (10.2 cm) in sc rows, before blocking.
Make one pocket before you start the panel. It tells you more than a swatch would, because lace and solid fabric respond differently to your tension.
Pocket checkpoints (width across, gently flattened):
– After Rnd 3: 3.25 in (8.3 cm)
– After Rnd 5: 5 in (12.7 cm)
– After Rnd 7: 7 in (17.8 cm)
– After Rnd 9: 7.75 in (19.7 cm)
Panel checkpoints:
– Width after Row 1: 5.5 in (14.0 cm)
– Height after Row 50: 10 in (25.4 cm)
– Height after Row 105: 21 in (53.3 cm)
If your pocket is more than 0.25 in (0.6 cm) too big, go down half a hook size. If it is too small, go up half a size. If only the mesh rounds are off, change how tightly you chain instead of changing hooks. Snug chains shrink the mesh quickly.
Back Panel
With Color A, ch 26.
Row 1: Sc in 2nd ch from hook and in each ch across, turn. (25 sc)
Rows 2–100: Ch 1, sc in each st across, turn. (25 sc)
The panel now measures 20 in (50.8 cm) tall.
Top shaping:
Row 101: Ch 1, sc2tog, sc in next 21 sts, sc2tog, turn. (23 sts)
Row 102: Ch 1, sc2tog, sc in next 19 sts, sc2tog, turn. (21 sts)
Row 103: Ch 1, sc2tog, sc in next 17 sts, sc2tog, turn. (19 sts)
Row 104: Ch 1, sc2tog, sc in next 15 sts, sc2tog, turn. (17 sts)
Row 105: Ch 1, sc2tog, sc in next 13 sts, sc2tog. (15 sts)
Don’t fasten off, because the border starts here. The panel measures 5.5 x 21 in (14.0 x 53.3 cm).
Pocket Front (make 3)
Rnd 1 (Color A): Magic ring, ch 1, 12 sc in ring, sl st to first sc to join. Fasten off. (12 sc)
Rnd 2 (Color B): Join in any st, ch 3 (counts as dc), dc in same st, 2 dc in each st around, sl st to top of ch-3 to join. (24 dc)
Rnd 3 (Color B): Ch 1, sc in next st, skip 1 st, Petal in next st, skip 1 st; repeat from * 5 more times, sl st to first sc to join. Fasten off. (6 petals: 6 sc + 42 dc = 48 sts)
The 7-dc petals fan out into a rounded six-petal flower around the cream center.
Rnd 4 (Color A): Join with sc in the center (4th) dc of any petal, ch 5, sc in next sc between petals, ch 5, sc in center dc of next petal, ch 5, sc in next sc, ch 5; repeat from * 4 more times, sl st to first sc to join. (12 sc, 12 ch-5 sps)
Rnd 5 (Color A): Sl st into first ch-5 sp, ch 3 (counts as dc), (2 dc, ch 2, 3 dc) in same sp, Shell in each remaining ch-5 sp around, sl st to top of ch-3 to join. (12 shells: 72 dc, 12 ch-2 sps)
Rnd 6 (Color A): Sl st to first ch-2 sp, ch 1, sc in same sp, ch 5, sc in gap between this shell and the next, ch 5, sc in next ch-2 sp, ch 5, sc in next gap between shells, ch 5; repeat from * around, sl st to first sc to join. (24 sc, 24 ch-5 loops)
This round makes the honeycomb mesh. The loops alternate between the shell centers and the gaps between shells.
Rnd 7 (Color A): Sl st to center of first loop, ch 1, sc in same loop, ch 6, sc in next loop; repeat from * around, ending with ch 6, sl st to first sc to join. Fasten off. (24 sc, 24 ch-6 loops)
Rnd 8 (Color B): Join in any ch-6 loop, ch 1, 5 sc in each ch-6 loop around, sl st to first sc to join. This round converts loops into a solid edge: 24 loops x 5 sc = 120 sc. Don’t work into the sc of Rnd 7.
Rnd 9 (Color B): Ch 1, sc in each st around, sl st to first sc to join. (120 sc)
Fasten off, leaving a 40 in (101.6 cm) tail of Color B for sewing. The two blue rounds form a firm edge that keeps the pocket opening from stretching.
Hanging Tab
With Color A, ch 8.
Row 1: Sc in 2nd ch from hook and in each ch across, turn. (7 sc)
Rows 2–16: Ch 1, sc in each st across, turn. (7 sc)
The tab measures 1.5 x 3.2 in (3.8 x 8.1 cm). Fasten off, leaving a 12 in (30.5 cm) tail.
Make All Pieces
- Color A only: 1 back panel, 1 tab
- Color A + Color B: 3 pocket fronts
Layout, top to bottom:
      [ ring ]
       [tab]
  +--------------+
  |  Pocket 3    |  bottom seam on Row 70
  +--------------+
  |  Pocket 2    |  bottom seam on Row 37
  +--------------+
  |  Pocket 1    |  bottom seam on Row 4
  +--------------+
Joining
Work the panel border (see the Border section below) first, then come back here to attach the pockets and tab.
Marking the panel: Place a marker in the center st of Row 4, Row 37 and Row 70. These rows are 33 rows apart, so the pockets sit 6.6 in (16.8 cm) apart.
Marking each pocket: Divide the 120 sts of Rnd 9 into four groups: 21 sts (left side), 38 sts (bottom), 21 sts (right side) and 40 sts (opening). The sewn edge is 21 + 38 + 21 = 80 sts, and 80 + 40 = 120.
Bottom seam: Place the wrong side of the pocket against the right side of the panel. Whip stitch the 38 bottom pocket sts to the 25 sts of the marked row as follows: (2 pocket sts into next panel st, 1 pocket st into next panel st) 12 times, then 2 pocket sts into the last panel st. That puts 36 + 2 = 38 pocket sts over 24 + 1 = 25 panel sts. The light gathering curves the pocket bottom into a bowl.
Side seams: Start at the border stitch level with the marked row. Whip stitch 21 pocket sts to 21 Rnd 2 border sts up each side, one stitch to one stitch. Each side seam rises about 4.7 in (11.9 cm).
Tension: Pull each whip stitch just tight enough to close the gap. Seams that are too tight pucker the panel, and loose seams let the pocket droop forward.
Size checkpoint: The 40 open sts make an 8.2 in (20.8 cm) arc across the 6.3 in (16.0 cm) panel, so the pocket opens about 2 in (5.1 cm) deep. A standard roll should drop in with a little room to spare.
Tab: Fold the tab around the wooden ring. Center the tab ends on the 15 top sts, leaving 4 sts free on each side. Sew one end to the front of the panel’s top edge and the other end to the back.
Border
Work the border on the back panel only. The pockets already have their own blue edge.
Border gauge: Along the straight sides, work 9 sc for every 10 row ends. This matches the 18 sc per 4 in (10.2 cm) gauge over 20 rows. Along the shaped top rows, work 1 sc per row end.
Rnd 1 (Color A): After Row 105, ch 1 and turn the work so you can go down the left edge.
- Left slope: 5 sc (1 in each row end of Rows 105–101)
- Left side: 90 sc along Rows 100–1, skipping every 10th row end
- Bottom: 3 sc in first foundation ch, sc in next 23 ch, 3 sc in last ch (29 sts, corners included)
- Right side: 90 sc along Rows 1–100
- Right slope: 5 sc
- Top: sc in each of the 15 sts of Row 105
Sl st to first sc to join. Total: 5 + 90 + 29 + 90 + 5 + 15 = 234 sc.
Rnd 2 (Color B): Join in any st, ch 1, sc in each st around, but work 3 sc in the center sc of each bottom 3-sc corner. Sl st to first sc to join and fasten off. Total: 234 sts worked 1-per-stitch + 4 extra = 238 sc.
Count per side: top 15, each slope 5, each side 90, bottom 29 + 4 = 33.
Why the math works: At 4.5 sc per in, 90 sc cover exactly 20 in (50.8 cm), the height of the straight rows, so the sides lie flat. Each bottom corner gains 2 sts per round, which is enough to turn 90 degrees. The decreases have already rounded the top, so it needs no extra stitches. The two sc rounds add 0.4 in (1.0 cm) to each side. The panel ends up 5.5 + 0.8 = 6.3 in (16.0 cm) wide and 21 + 0.8 = 21.8 in (55.4 cm) tall.
Final Blocking
- Weave in all tails before blocking, except the sewing tails.
- Wet-block the pockets first. Soak them, roll them in a towel to press out the water, and pin each one flat to 7.75 in (19.7 cm), opening the mesh loops evenly.
- Pin the panel to 5.5 x 21 in (14.0 x 53.3 cm) if blocking before the border, or 6.3 x 21.8 in (16.0 x 55.4 cm) after.
- Let everything dry completely.
- After joining, put a roll in each pocket. Steam the pockets lightly from 1 in (2.5 cm) away so they settle around the rolls.
- Remove the rolls and let the holder cool and dry while hanging.
Final Quality-Control Checklist
- Each pocket has exactly 120 sts in Rnd 9.
- The six petals are even, and the cream center shows.
- The panel border totals 234 sts in Rnd 1 and 238 sts in Rnd 2.
- The panel sides are straight, without ripples.
- The pockets are centered and spaced 33 rows apart.
- Each pocket opening is 40 sts and sits level.
- The tab is centered, with 4 sts free on each side.
- No knots or tails show on the front.
Troubleshooting
Petals look flat or crowded: Make sure you skip 1 st on each side of every Petal in Rnd 3.
Pocket ruffles: Your mesh chains are too loose. Use ch 4 in Rnd 6 and ch 5 in Rnd 7, but keep 5 sc per loop in Rnd 8 so you still have 120 sts.
Pocket cups: Your chains are too tight. Loosen them, or go up half a hook size for Rnds 6–7 only.
Panel sides wave: The border has too many stitches. Skip one more row end in every 10 rows.
Panel sides pull in: The border has too few stitches. Work 1 sc in every row end for a stretch.
Pocket droops forward: Tighten the side seams, or re-block with a roll inside.
Care
Hand wash, or machine wash cold on a gentle cycle in a mesh laundry bag. Reshape and dry flat. Cotton can shrink a little, so re-block if needed.
Final Notes
Each measurement in this pattern builds on the one before, and you can check every step. A gauge of 18 sc x 20 rows = 4 in (10.2 cm) gives a 5.5 x 21 in (14.0 x 53.3 cm) panel. Two border rounds bring it to 6.3 x 21.8 in (16.0 x 55.4 cm). Each 120-st pocket blocks to 7.75 in (19.7 cm) across, with 80 sts sewn down and 40 left open. If you hit those numbers, the rolls will sit snugly in their lace pockets.
Happy crocheting!