

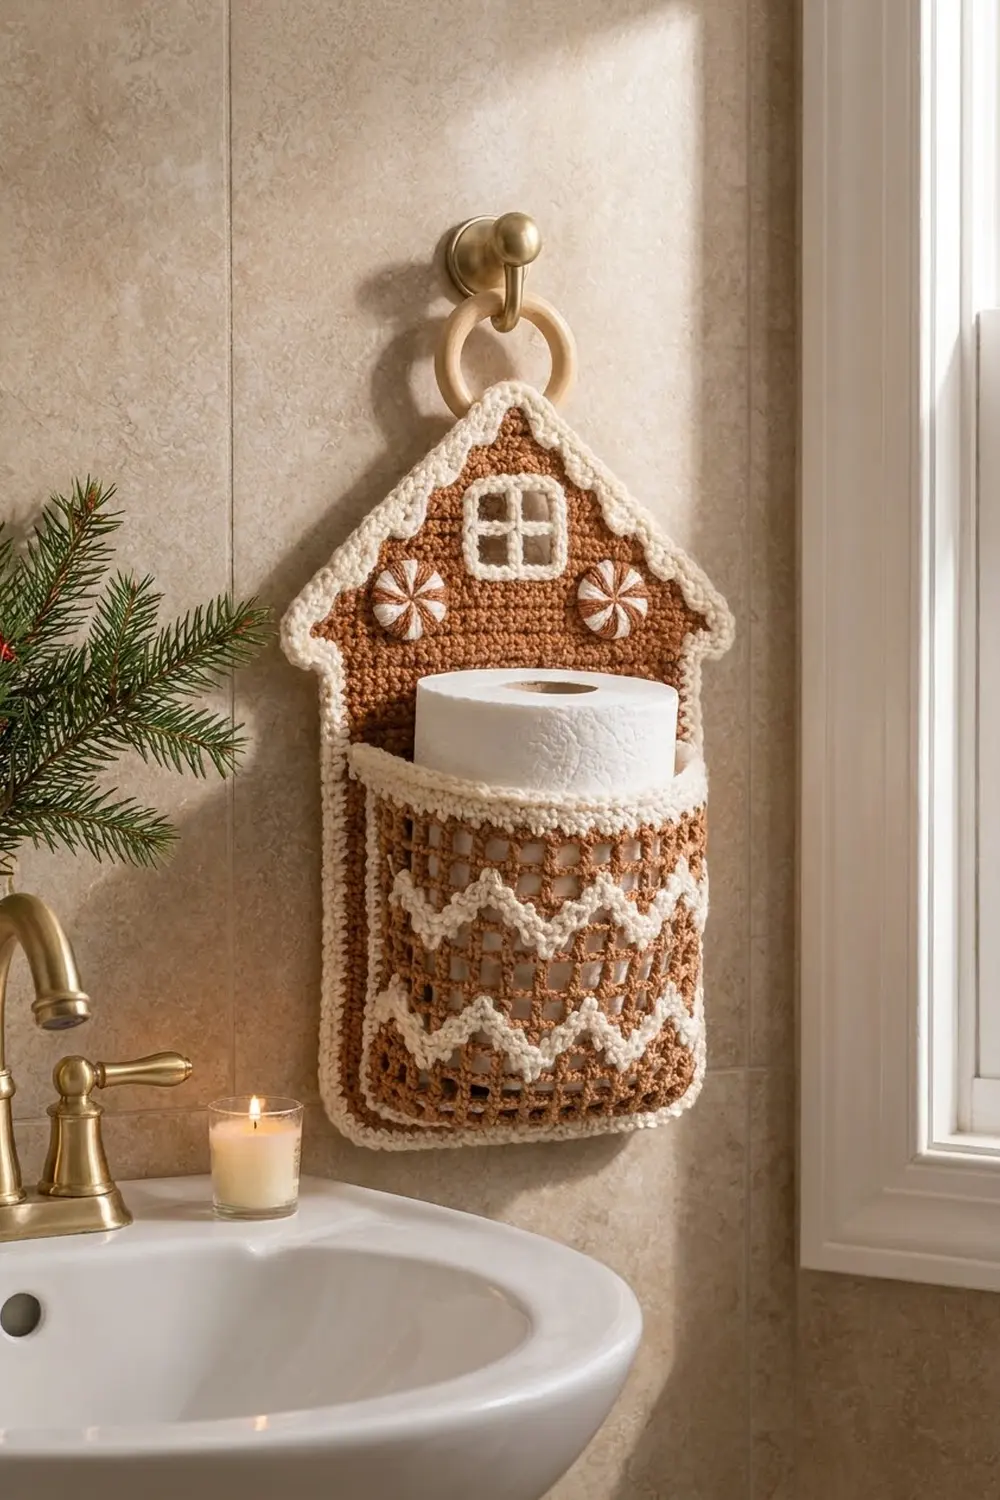
This little gingerbread cottage hangs on the bathroom wall and holds a spare roll in its front pocket. The house is solid caramel-brown single crochet, outlined with a bumpy cream border that looks like piped icing. A four-pane window and two peppermint candies finish the front.
The pocket is open filet mesh in the same brown. Two thick cream zigzags run across it like icing on a gingerbread cookie, and a solid cream band and textured edge finish the top. The roll shows through the mesh, so the holder looks light even though it is sturdy.
The pattern uses US crochet terms. The finished holder is about 10 in (25.4 cm) wide at the eaves, 9 in (22.9 cm) wide at the walls and 13.2 in (33.5 cm) tall, not counting the hanging ring.
Here is the construction. You work the back panel in rows from the bottom up, adding eaves and then decreasing to the peak. You make the pocket in filet mesh and add the zigzags with surface slip stitch. Both pieces get cream borders, the appliqués are sewn on, the pocket is whipstitched in place, and a tab attaches the ring.
Finished Size and Construction
- Finished size: 10 in (25.4 cm) wide at the eaves × 13.2 in (33.5 cm) tall
- Skill level: Intermediate
- Terminology: US
- Yarn weight: Worsted (#4)
- Hook: 5.0 mm (H-8)
- Number of pieces: 7 (back panel, pocket, window, 2 peppermints, tab, plus the purchased ring)
- Layout: The pocket covers the lower walls, the window is centered in the gable, and the peppermints sit at eave level
- Back panel before border: 8 in (20.3 cm) wide at the walls, 9 in (22.9 cm) at the eaves, 12.2 in (31.0 cm) tall
- Pocket before border: 8.25 in (21.0 cm) × 6.4 in (16.3 cm)
- Border depth: back panel 0.5 in (1.3 cm), pocket 0.25 in (0.6 cm)
Materials
Use a smooth worsted-weight cotton or cotton blend. Cotton holds the house shape and shows the mesh clearly. Avoid fuzzy yarns, because they blur the window panes and the zigzags.
- Brown (main color): 80 g, about 145 m
- Cream (icing): 45 g, about 81 m
These quantities include a margin of about 25% for your swatch and tension differences.
Tools:
– 5.0 mm (H-8) crochet hook
– Tapestry needle
– Wooden ring, 2 in (5.1 cm)
– Stitch markers
– Rustproof pins and a blocking mat
– Measuring tape
Abbreviations (US Terms)
- ch – chain
- sl st – slip stitch
- sc – single crochet
- dc – double crochet
- sc2tog – single crochet 2 together
- sp – space
- MR – magic ring
- rep – repeat
- st(s) – stitch(es)
Special stitches:
- Foundation single crochet (fsc): Insert the hook into the base chain of the last stitch and pull up a loop. Yarn over and pull through 1 loop (this is the chain). Yarn over and pull through both loops. Each fsc adds 1 stitch to the end of a row.
- Reverse single crochet (crab st): Work single crochet from left to right (right to left if you crochet left-handed). It makes the rope-like icing edge.
- Surface slip stitch: Keep the yarn behind the mesh. Insert the hook through a mesh space from the front, pull up a loop, then insert into the next space on the path and pull the new loop through the loop on the hook.
Gauge and Checkpoints
- Single crochet: 16 sts and 18 rows = 4 in (10.2 cm)
- Filet mesh: 16 sts (8 squares) and 8 rows = 4 in (10.2 cm)
Before you start the panel, make a 4 in (10.2 cm) sc swatch and a small mesh swatch. Gauge controls whether the pocket lines up with the panel.
Checkpoints:
– After back panel Row 36: 8 in (20.3 cm) wide × 8 in (20.3 cm) tall
– After Row 37: 9 in (22.9 cm) wide at the eaves
– After Row 55: 12.2 in (31.0 cm) tall in total
– After pocket Row 12: 8.25 in (21.0 cm) × 6 in (15.2 cm)
If your pieces come out too big, go down 0.5 mm in hook size. If they are too small, go up 0.5 mm. Don’t add or remove stitches, because the border counts depend on the stitch counts given here.

Back Panel
Use brown and work in rows. The turning ch-1 never counts as a stitch.
Foundation: Ch 33.
Row 1: Sc in the 2nd ch from the hook and in each ch across, turn. (32 sts)
Rows 2–36: Ch 1, sc in each st across, turn. (32 sts)
The walls now measure 8 in (20.3 cm) square.
Row 37 (eave row): Ch 3, sc in the 2nd ch from the hook and the next ch (2 sts), sc in each of the 32 sts, work 2 fsc, turn. (2 + 32 + 2 = 36 sts)
The eaves stick out 0.5 in (1.3 cm) on each side.
Rows 38–54 (roof): Ch 1, sc2tog, sc to the last 2 sts, sc2tog, turn. Each row is 2 sts shorter than the one before.
– Row 38: 34 sts
– Row 42: 26 sts
– Row 46: 18 sts
– Row 50: 10 sts
– Row 54: 2 sts
Row 55: Ch 1, sc2tog. (1 st) Fasten off.
The roof rises 4.2 in (10.7 cm) from Row 37 to the peak, and the panel is 12.2 in (31.0 cm) tall.
Use brown.
Foundation: Ch 36.
Row 1: Dc in the 6th ch from the hook. The 5 skipped chains count as a dc, a ch-1 sp and a skipped base chain. Ch 1, skip 1 ch, dc in the next ch; rep from * across, turn. (17 dc + 16 ch-1 sps = 33 sts, 16 squares)*
Rows 2–12: Ch 4 (counts as dc + ch 1), dc in the next dc, ch 1, dc in the next dc; rep from * across. Work the last dc in the 3rd ch of the turning chain, then turn. (33 sts, 16 squares)*
Change to cream.
Row 13: Ch 1, sc in each dc and each ch-1 sp across, turn. (33 sts)
Row 14: Ch 1, sc in each st across. (33 sts) Fasten off.
The pocket now measures 8.25 in (21.0 cm) × 6.4 in (16.3 cm). It is 0.25 in (0.6 cm) wider than the walls on purpose, which gives the pocket room to bow around the roll.
Cream Zigzags
Number the squares 1–16 from right to left and count rows from the bottom. Hold the cream yarn doubled and work surface slip stitch through the squares. Each step moves one square sideways and one row up or down.
- Band A, pass 1: Start in square 1 of Row 2. Climb to Row 4 at square 3, drop back to Row 2 at square 5, and keep repeating. The low points fall at squares 1, 5, 9 and 13, and the high points at 3, 7, 11 and 15. Finish at square 16 in Row 3. (16 surface sl sts)
- Band A, pass 2: Work the same path one row higher, with low points in Row 3 and high points in Row 5. (16 surface sl sts)
- Band B: Work both passes again, with low points in Rows 7 and 8 and high points in Rows 9 and 10.
Rows 1, 6, 11 and 12 stay open. The two passes sit side by side and make one thick zigzag with 4 high points. Pull each loop up to the height of a mesh square so the pocket doesn’t pucker.
Window
Use cream.
Foundation: Ch 11.
Row 1: Dc in the 8th ch from the hook, ch 2, skip 2 ch, dc in the last ch, turn. (2 spaces)
Row 2: Ch 5 (counts as dc + ch 2), dc in the next dc, ch 2, dc in the 3rd ch of the turning chain. (2 spaces; 7 sts across)
Edging round: Ch 1. Work 3 sc in each of the 4 corners. Along the top and bottom, work 5 sc between the corners. Along each side, work 4 sc (2 per row-end). Join with a sl st. (12 + 10 + 8 = 30 sc)
This makes a four-pane frame about 1.75 in (4.4 cm) wide × 1.5 in (3.8 cm) tall.
Peppermints (make 2)
Rnd 1: In cream, work 6 sc in a MR. (6)
Rnd 2: 2 sc in each st. (12)
Rnd 3: Change to brown. Sc in the next st, 2 sc in the next st; rep from * 5 more times. Join and fasten off. (18)*
Each candy is about 1.5 in (3.8 cm) across. With brown, embroider 6 curved wedges of straight stitches from the center out to Rnd 2, leaving cream stripes between them.
Hanging Tab
Use cream.
Foundation: Ch 4.
Row 1: Sc in the 2nd ch from the hook and in the next 2 ch, turn. (3 sts)
Rows 2–8: Ch 1, sc in each st, turn. (3 sts)
Fasten off. The tab measures 0.75 in (1.9 cm) × 1.8 in (4.6 cm).
Make All Pieces
Brown: the back panel and the pocket mesh (Rows 1–12), plus Rnd 3 and the swirls of each peppermint.
Cream: the pocket band, the zigzags, the window, peppermint Rnds 1–2, the tab and all borders.
Text layout (front view):
            [ ring ]
              /\
             /  \
            /[##]\        window, centered
   (o)     /      \    (o)   peppermints at eave level
  _______ /        \ _______  eaves
 |                          |
 |  ======================  |  pocket top band
 |  # mesh  /\/\/\/\  mesh #|  Band B
 |  # mesh  /\/\/\/\  mesh #|  Band A
 |__________________________|
Borders
Border gauge: 4 sc per 1 in (2.5 cm) along every edge.
Back Panel Border
Use cream. Join at the bottom right corner with the right side facing.
Rnd 1: Work the edges in this order:
– Bottom: 3 sc in the corner st, sc in the next 30, 3 sc in the corner st. (36)
– Each wall: 32 sc over the 36 row-ends of Rows 1–36, skipping every 9th row-end. (32 per side)
– Each eave: 1 sc in each of the 2 underside sts, then 3 sc in the outer row-end of Row 37. (5 per side)
– Each roof slope: Over Rows 38–55, work (sc, sc, 2 sc) across each group of 3 row-ends. (6 groups × 4 = 24 per side)
– Peak: 3 sc in the Row 55 st. (3)
Join. Total: 36 + 64 + 10 + 48 + 3 = 161 sc.
Rnd 2:
– Sc in each st.
– Work 3 sc in the center st of each of the 5 outward corners (2 at the bottom, 2 at the eaves, 1 at the peak). That adds 10.
– Sc2tog at each of the 2 inward corners where a wall meets an eave. That removes 2.
Total: 161 + 10 − 2 = 169 sts.
Rnd 3: Crab st in each st around. (169) Fasten off.
Why the math works: The walls are 8 in (20.3 cm) tall, and 32 sc at 4 per inch cover 8 in. Each roof slope runs about 6 in (15.2 cm) on the diagonal, and 24 sc cover 6 in. The extra stitches at the outward corners keep the points sharp, and the sc2tog at the inward corners keeps the eaves from flaring.
Pocket Border
Use cream. Join at the top right corner.
Rnd 1:
– Top: 3 sc in the corner, sc in the next 31, 3 sc in the corner. (37)
– Each side: 2 sc per dc row-end (24) plus 1 sc per sc row-end (2). (26 per side)
– Bottom: Work along the foundation chain the same way as the top. (37)
Total: 37 + 37 + 26 + 26 = 126 sc.
Rnd 2: Crab st in each st around. (126) Fasten off.
The pocket now measures 8.75 in (22.2 cm) × 6.9 in (17.5 cm).
Joining
- Appliqués: Center the window over Rows 41–48 of the gable. Pin a peppermint on each side over Row 39, about 1.75 in (4.4 cm) in from the wall line. Whipstitch around the edges with matching yarn.
- Pocket: Lay the pocket on the panel with the bottoms aligned. Put the center sc of each bottom pocket corner on top of the center sc of the matching back panel corner, using Rnd 1 of both borders.
- Bottom seam: There are 33 pocket sts and 32 panel sts between the corner centers. Sew them 1 to 1, and stitch 2 pocket sts into the center panel st.
- Sides: Starting at each bottom corner center, sew the next 28 pocket sts (the rest of the corner, the 26 side sts and the first sc of the top corner) to 28 panel sts going up the wall. Leave the top open.
- Tension: Use cream and whipstitch through both loops. Stitches should be snug but should not pull the mesh in. Check that the pocket lies flat sideways and bows outward only slightly.
- Tab: Fold the tab around the ring and sew both ends to the back of the peak.
Size checkpoint: The joined holder should measure 10 in (25.4 cm) across the eaves and 13.2 in (33.5 cm) tall.
Final Blocking
- Wet the holder in cool water and gently press out the excess.
- Roll it in a towel to remove more water.
- Pin it face up. Set the walls to 9 in (22.9 cm), the eaves to 10 in (25.4 cm) and the height to 13.2 in (33.5 cm).
- Pin the roof slopes straight and the peak sharp.
- Put a rolled towel inside the pocket so it dries with a gentle curve.
- Leave it until completely dry.
Final Quality-Control Checklist
- The back panel has 32 sts at the walls, 36 at the eaves and ends in a single peak stitch
- The pocket has 16 squares in every mesh row
- Both zigzag bands have 4 high points and run parallel
- The border has 169 sts on the panel and 126 on the pocket
- The window and peppermints are level and sewn on securely
- The ring tab holds the weight of a roll without stretching
- All yarn ends are woven in on the back
Troubleshooting
- Roof slopes are wavy: Rnd 1 has too many stitches along the slope. Work exactly 24 per slope.
- Walls ruffle: You probably didn’t skip every 9th row-end. Redo Rnd 1.
- Zigzags pucker: Your surface slip stitches are too tight. Pull each loop up to the height of a square.
- Pocket gapes at the top: Add one more sc row in cream before the border.
- Eave corners curl: Make sure you worked the sc2tog at both inward corners in Rnd 2.
Care
Hand wash in cool water, reshape and dry flat. Don’t put it in the dryer, because heat can shrink the cotton and distort the house outline.
Final Notes
The measurements build on each other. A 4 in (10.2 cm) gauge swatch gives 8 in (20.3 cm) walls, Row 37 gives 9 in (22.9 cm) eaves and the roof brings the panel to 12.2 in (31.0 cm). The border adds 0.5 in (1.3 cm) all around, for a finished size of 10 in (25.4 cm) × 13.2 in (33.5 cm). The pocket starts at 8.25 in (21.0 cm) × 6.4 in (16.3 cm) and finishes at 8.75 in (22.2 cm) × 6.9 in (17.5 cm), which leaves just enough ease to hold a roll. Check each measurement as you go and the holder will hang straight.
Happy crocheting!