

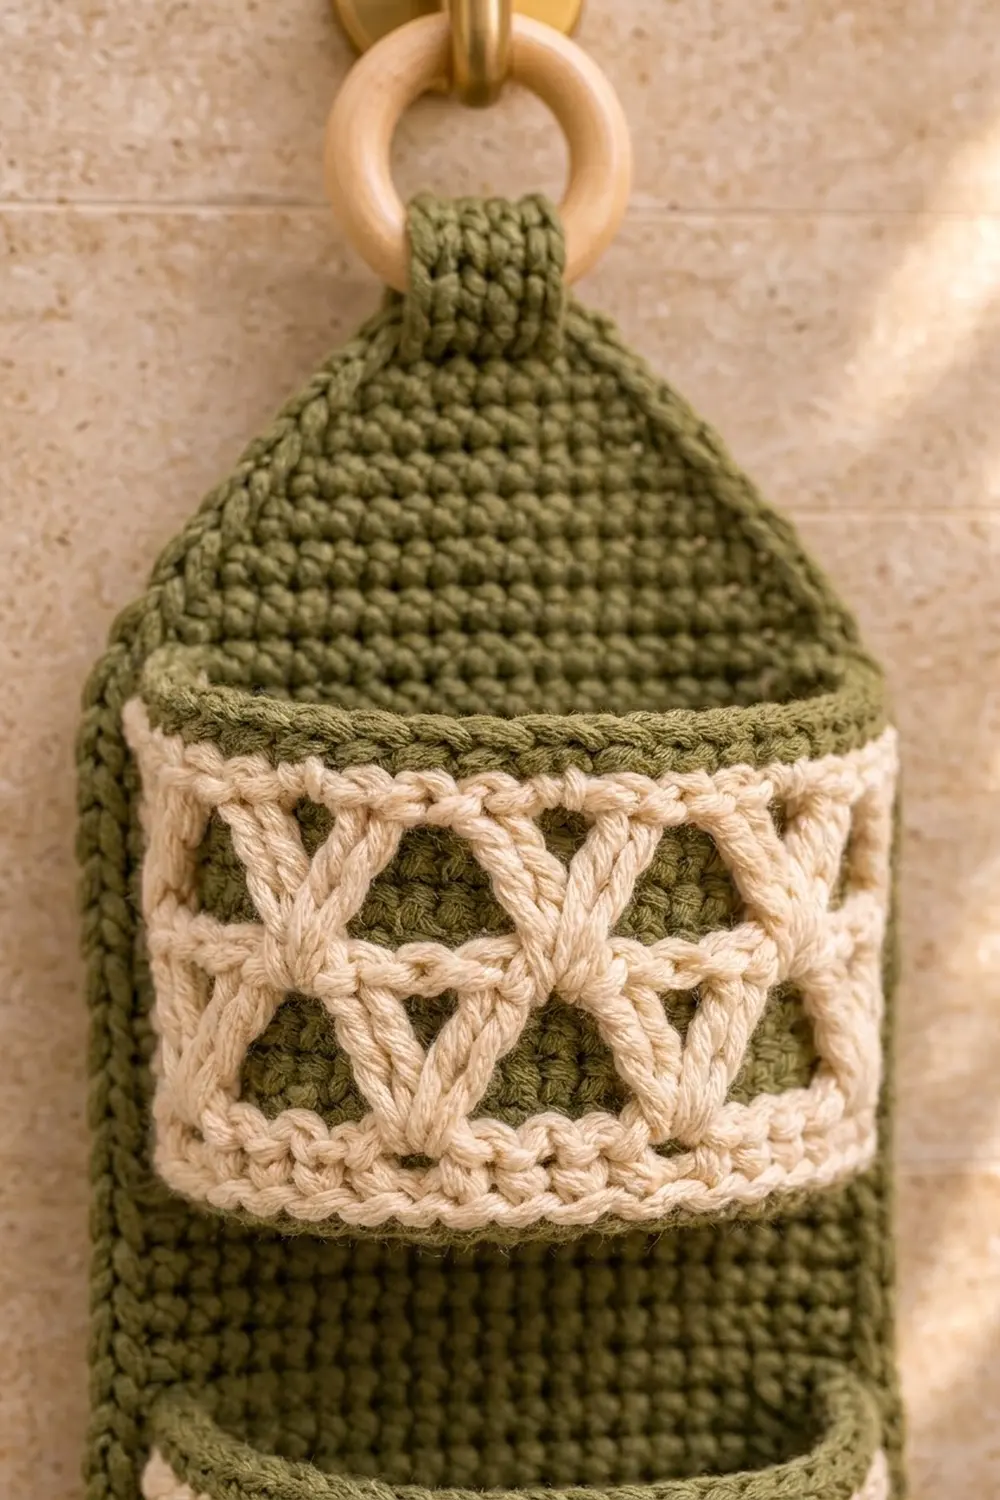
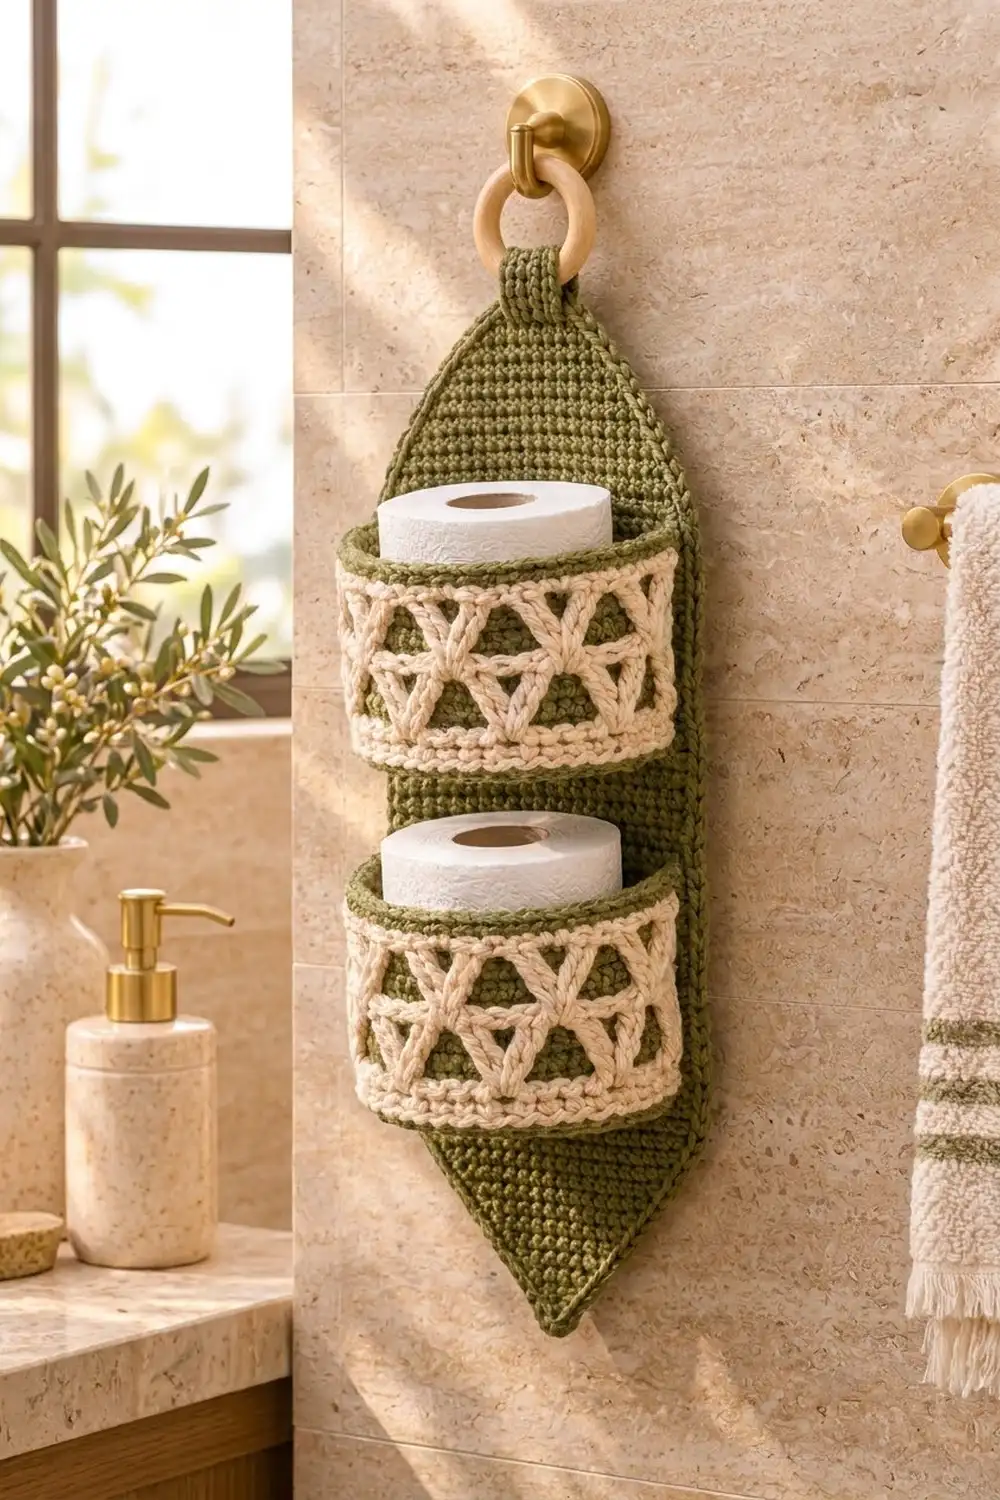
This hanging holder keeps two spare rolls in sight and within reach. A tall olive-green panel with pointed ends hangs from a natural wooden ring. Two cream pockets with an open V-stitch trellis sit on the front, and each one holds a standard roll.
The colors are calm and earthy: olive for the structure and cream for the lattice pockets, with a thin olive rim along each pocket’s top edge. The panel is solid single crochet, so it stays flat against the wall. The trellis keeps the pockets light and lets the rolls show through.
The pattern uses US crochet terms. The finished panel measures about 6.75 in (17.1 cm) wide and 22.5 in (57.2 cm) long. The tab and ring add about 3 in (7.6 cm) above the top point.
You’ll crochet one panel from point to point and edge it with one round of single crochet. Next you’ll make two pocket bands and two D-shaped pocket bases, sew each band to a base to form a cup, and sew the cups to the panel. A short tab attaches the ring to the top.
Finished Size and Construction
- Finished panel: 6.75 in (17.1 cm) wide × 22.5 in (57.2 cm) long
- Skill level: Intermediate
- Terminology: US terms
- Yarn weight: Worsted (#4) cotton
- Hook: 4.5 mm (US 7)
- Number of pieces: 6 (1 panel, 2 pocket bands, 2 pocket bases, 1 tab)
- Layout: pockets stacked vertically on one panel
- Panel before border: 6.25 in (15.9 cm) × 22 in (55.9 cm)
- Border depth: 0.25 in (0.6 cm) on every edge
- Pocket band: 12.25 in (31.1 cm) long × 3.6 in (9.1 cm) tall
- Pocket base: 6.25 in (15.9 cm) wide × 4.4 in (11.2 cm) deep
Materials
Use a smooth worsted-weight cotton or cotton blend at about 190 m per 100 g. Cotton holds its shape in a humid bathroom and gives the trellis crisp, clear stitches. Avoid fuzzy or very stretchy yarn, because the panel has to stay flat under the weight of two rolls.
- Olive green (main color): 120 g, about 228 m — panel, border, tab, and pocket rims
- Cream: 80 g, about 152 m — pocket bands and pocket bases
These amounts include a margin of roughly 20% for your gauge swatch and seaming.
Tools:
– 4.5 mm (US 7) crochet hook
– One wooden ring, 2 in (5.1 cm) across
– Tapestry needle
– Stitch markers (at least 6)
– Scissors
– Tape measure
– Rust-proof pins and a blocking mat
Abbreviations (US Terms)
- ch – chain
- sc – single crochet
- dc – double crochet
- sl st – slip stitch
- st(s) – stitch(es)
- sp – space
- sc2tog – single crochet 2 together
- sc3tog – single crochet 3 together
- dc2tog – double crochet 2 together
- rep – repeat
Special stitches
- V-st (V-stitch): (dc, ch 1, dc) in the same stitch or space.
- Split cluster: a dc2tog worked across two different spaces. Yarn over, insert the hook in the first space, pull up a loop, yarn over and pull through 2 loops. Yarn over, insert the hook in the second space, pull up a loop, yarn over and pull through 2 loops. Yarn over and pull through all 3 loops on the hook.
Gauge and Checkpoints
Main gauge: 16 sc × 18 rows = 4 in (10.2 cm) in rows of sc.
Trellis gauge: 3 V-st repeats (12 sts) = 3 in (7.6 cm).
Make a swatch first. Chain 17, work 16 sc, and continue for 18 rows. Block the swatch and measure the center. Then crochet one pocket band before you start the panel. It’s the quickest piece and shows whether your trellis matches your sc gauge.
Checkpoints:
– Panel after Row 12: 25 sts, 6.25 in (15.9 cm) wide, 2.7 in (6.9 cm) tall
– Panel after Row 87: 19.3 in (49.0 cm) tall
– Panel after Row 99: 22 in (55.9 cm) tall
– Bordered panel: 6.75 in (17.1 cm) × 22.5 in (57.2 cm)
– Pocket band after Row 2: 12.25 in (31.1 cm) wide
– Pocket band after Row 10: 3.6 in (9.1 cm) tall
– Pocket base after Row 10: 2.2 in (5.6 cm) deep; after Row 20: 4.4 in (11.2 cm) deep
Too big? Go down to a 4.0 mm hook. Too small? Go up to a 5.0 mm hook. Match the stitch gauge first. A row gauge that’s slightly off only changes the panel length, but stitch gauge controls how the pocket band fits around its base.
Backing Panel (Olive)
The panel is worked bottom to top in rows. Turn at the end of every row. The ch 1 at the start of a row doesn’t count as a stitch.
Bottom point
Row 1: Ch 2, 3 sc in 2nd ch from hook. (3 sts)
Row 2: Ch 1, 2 sc in first st, sc in next st, 2 sc in last st. (5 sts)
Rows 3–12: Ch 1, 2 sc in first st, sc in each st to last st, 2 sc in last st. Each row adds 2 sts. Row 3 has 7 sts, Row 4 has 9 sts, and so on to Row 12, which has 25 sts. (25 sts)
Checkpoint: 6.25 in (15.9 cm) wide and 2.7 in (6.9 cm) tall.
Straight section
Rows 13–87: Ch 1, sc in each st across. (25 sts per row, 75 rows)
On Row 14, place a marker at each end. On Row 52, place a marker at each end. These rows show where the pocket bases go.
Top point
Rows 88–98: Ch 1, sc2tog, sc in each st to last 2 sts, sc2tog. Each row removes 2 sts. Row 88 has 23 sts, Row 89 has 21 sts, and so on to Row 98, which has 3 sts. (3 sts)
Row 99: Ch 1, sc3tog. (1 st)
Don’t fasten off. Go straight to the border.
Panel Border (Olive)
Border gauge: 4 sc per inch along every edge, the same as your stitch gauge.
On the side edges, sc rows stack at 4.5 rows per inch, while the border needs 4 sc per inch. Working 8 sc over every 9 row ends keeps the edge flat. Each slanted edge is about 4.1 in (10.4 cm) long, so it gets 16 sc, worked over 12 row ends.
The counts below are listed for each edge. Each tip’s 3 sc are counted separately and are not part of any edge count.
Round 1 (RS): Ch 1. Work 3 sc in the Row 99 stitch for the top tip.
- Upper slant (Rows 99–88): *sc in each of the next 2 row ends, 2 sc in the next row end; rep from * 3 more times. (16 sc)
- Long side (Rows 87–13): *sc in each of the next 8 row ends, skip 1 row end; rep from * 7 more times, then sc in each of the last 3 row ends. (75 row ends: 64 + 3 = 67 sc)
- Lower slant (Rows 12–1): Work as for the upper slant. (16 sc)
- Bottom tip: 3 sc in the free loop of the foundation ch.
- Second lower slant, long side, and upper slant: Work these to match the first side. (16 sc, 67 sc, 16 sc)
Sl st to the first sc and fasten off.
Total: 3 + 16 + 67 + 16 + 3 + 16 + 67 + 16 = 204 sc
Why the math works: 67 sc ÷ 4 per inch is about 16.75 in (42.5 cm), which matches the straight section to within one stitch. Each 16-sc slant is 4 in (10.2 cm), which matches the 4.1 in (10.4 cm) diagonal. The 3 sc at each tip turn the sharp point without cupping. The border adds 0.25 in (0.6 cm) on every edge, so the panel finishes at 6.75 in (17.1 cm) × 22.5 in (57.2 cm).
Pocket Band (Make 2)
Work in rows with cream and turn at the end of every row.
Foundation: Ch 50.
Row 1: Sc in 2nd ch from hook and in each ch across. (49 sts)
Row 2: Ch 1, sc in each st across. (49 sts)
Checkpoint: 12.25 in (31.1 cm) wide.
Row 3 (V row): Ch 3 (counts as dc), skip next st, V-st in next st, *skip next 3 sts, V-st in next st; rep from * 10 more times, skip next st, dc in last st. (12 V-sts plus 2 edge dc)
Row 4 (cluster row): Ch 2, dc in first V-st ch-1 sp. Together these count as the first cluster.
– *Ch 3, work a split cluster with the first leg in the same ch-1 sp and the second leg in the next V-st’s ch-1 sp; rep from * 10 more times.
– Ch 3, work a split cluster with the first leg in the same ch-1 sp and the second leg in the top of the turning ch-3.
(13 clusters and 12 ch-3 sps)
Each ch-3 space sits directly above a V-st. The clusters form the upward-pointing triangles between the V columns.
Row 5 (V row): Ch 3 (counts as dc), V-st in each ch-3 sp across, dc in the top of the last cluster. (12 V-sts plus 2 edge dc)
Row 6: Repeat Row 4. (13 clusters and 12 ch-3 sps)
Row 7: Repeat Row 5. (12 V-sts plus 2 edge dc)
Row 8 (conversion row): Ch 1, sc in the first dc.
– *Sc in the first dc of the V-st, sc in the ch-1 sp, sc in the second dc of the V-st, then sc in the gap before the next V-st; rep from * 10 more times.
– Sc in the first dc of the last V-st, sc in its ch-1 sp, sc in its second dc, sc in the last dc.
Count: 26 sc worked into existing dc (2 edge dc + 24 V-st legs) + 23 extra sc (12 in ch-1 sps + 11 in gaps) = 49 sts
Row 9: Ch 1, sc in each st across. (49 sts) Fasten off cream.
Row 10 (rim): Join olive in the first st. Ch 1, sc in each st across. (49 sts) Fasten off.
Checkpoint: 3.6 in (9.1 cm) tall and 12.25 in (31.1 cm) long.
Pocket Base (Make 2)
Work in rows with cream.
Foundation: Ch 26.
Row 1: Sc in 2nd ch from hook and in each ch across. (25 sts)
Rows 2–10: Ch 1, sc in each st across. (25 sts)
Checkpoint: 6.25 in (15.9 cm) × 2.2 in (5.6 cm).
Rows 11–20: Ch 1, sc2tog, sc in each st to last 2 sts, sc2tog. Row 11 has 23 sts, and each later row has 2 fewer, ending with 5 sts on Row 20. (5 sts)
Edging (Row 21): Don’t turn. Ch 1 and work around the curved edge. Work 9 sc down the first straight side (Rows 1–10), 13 sc along the first slant (Rows 11–20), and 5 sc across Row 20. Then work 13 sc along the second slant and 9 sc along the second straight side. Leave the foundation chain unworked. (49 sts)
This edge has 49 sts, the same as the band’s foundation, so the band sews to the base one stitch to one stitch.
Hanging Tab (Olive)
Foundation: Ch 6.
Row 1: Sc in 2nd ch from hook and in each ch across. (5 sts)
Rows 2–27: Ch 1, sc in each st across. (5 sts)
Fasten off and leave a 12 in (30.5 cm) tail. The tab measures 1.25 in (3.2 cm) × 6 in (15.2 cm).
Make All Pieces
- Olive: 1 panel with border, 1 tab, and the Row 10 rim on each pocket band
- Cream: 2 pocket bands (Rows 1–9) and 2 pocket bases
Layout (front view, top to bottom):
        [ring]
         [tab]
          /\        Rows 88–99
         |  |
         |  |       plain olive
         |UU|       upper pocket: base on Row 52
         |  |
         |UU|       lower pocket: base on Row 14
          \/        Rows 1–12
Joining
Use matching yarn and a whipstitch through the back loops only so the seams stay flat.
- Band to base: Line up the band’s foundation edge with the base’s 49-st edging. Sew them together one stitch to one stitch, starting at a corner of the base. The band’s ends should meet the corners of the base’s foundation chain. This forms a cup that’s open at the back.
- Base to panel: Center the base’s foundation chain on the panel row you marked earlier: Row 14 for the lower pocket and Row 52 for the upper pocket. Sew the 25 foundation loops to the 25 sts of that row, one to one.
- Band ends to panel: Sew each end of the band to the first or last st column of the panel, just inside the border. Work up 16 rows from the base row so each side of the band covers its full 3.6 in (9.1 cm) height.
- Tab and ring: Fold the tab over the ring. Put one end on the front of the panel’s top point and the other on the back, so each covers about 2 in (5.1 cm). Sew through all the layers around the tab’s edges.
Tension: Pull each whipstitch just snug. Seams that are too tight pucker the panel, and loose seams let the pockets sag.
Checkpoint: The panel should still lie flat and measure 6.75 in (17.1 cm) × 22.5 in (57.2 cm). The ring should hang about 1 in (2.5 cm) above the tip.
Final Blocking
- Lightly mist the panel, or the whole holder if it’s already assembled, with cool water.
- Pin the panel flat at 6.75 in (17.1 cm) × 22.5 in (57.2 cm), keeping both points sharp and centered.
- Stuff each pocket with a dry roll in a plastic bag, or a rolled towel, so the pockets dry rounded.
- Gently open each triangle in the trellis with your fingers.
- Let everything dry completely before you remove the pins.
Final Quality-Control Checklist
- Panel border has 204 sc, and both tips are sharp
- Long sides measure the same, with no wavy edges
- Each pocket band has 12 V-sts per V row and 49 sts in Rows 8–10
- Olive rim is even along each pocket’s top edge
- Base seams line up stitch for stitch with no gaps
- Both pockets sit level and centered
- Tab is sewn securely through both layers
- All yarn ends are woven in at least 2 in (5.1 cm)
Troubleshooting
- Panel edges ripple: Too many border sc. Recheck that you skipped every 9th row end.
- Border pulls the edges in: Too few border sc, or tight tension. Use a 5.0 mm hook for the border only.
- Band is too short for the base: Your trellis is tighter than your sc. Recheck Row 8 for 49 sts and loosen your V-sts.
- Triangles look uneven: Make sure both legs of each split cluster go into ch-1 spaces, not into the dc.
- Pocket sags forward: Re-sew the band ends a little tighter, or move the base seam up one row.
- Points curl: Steam-block them flat, holding the iron above the fabric without touching it.
Care
Hand-wash in cool water, roll in a towel to remove excess water, and dry flat in shape. Take the wooden ring off before washing if you can.
Final Notes
Each measurement builds on the one before it. A gauge of 16 sc per 4 in (10.2 cm) gives a 25-st panel that’s 6.25 in (15.9 cm) wide. The border’s 8-in-9 rule adds an even 0.25 in (0.6 cm) on every edge, for a finished panel of 6.75 in (17.1 cm) × 22.5 in (57.2 cm). The 49-st pocket band matches the base’s 49-st edging, and each 25-st base matches the panel’s 25-st rows. Check each of those counts as you go, and the pockets will hang straight and level.
Happy crocheting!