

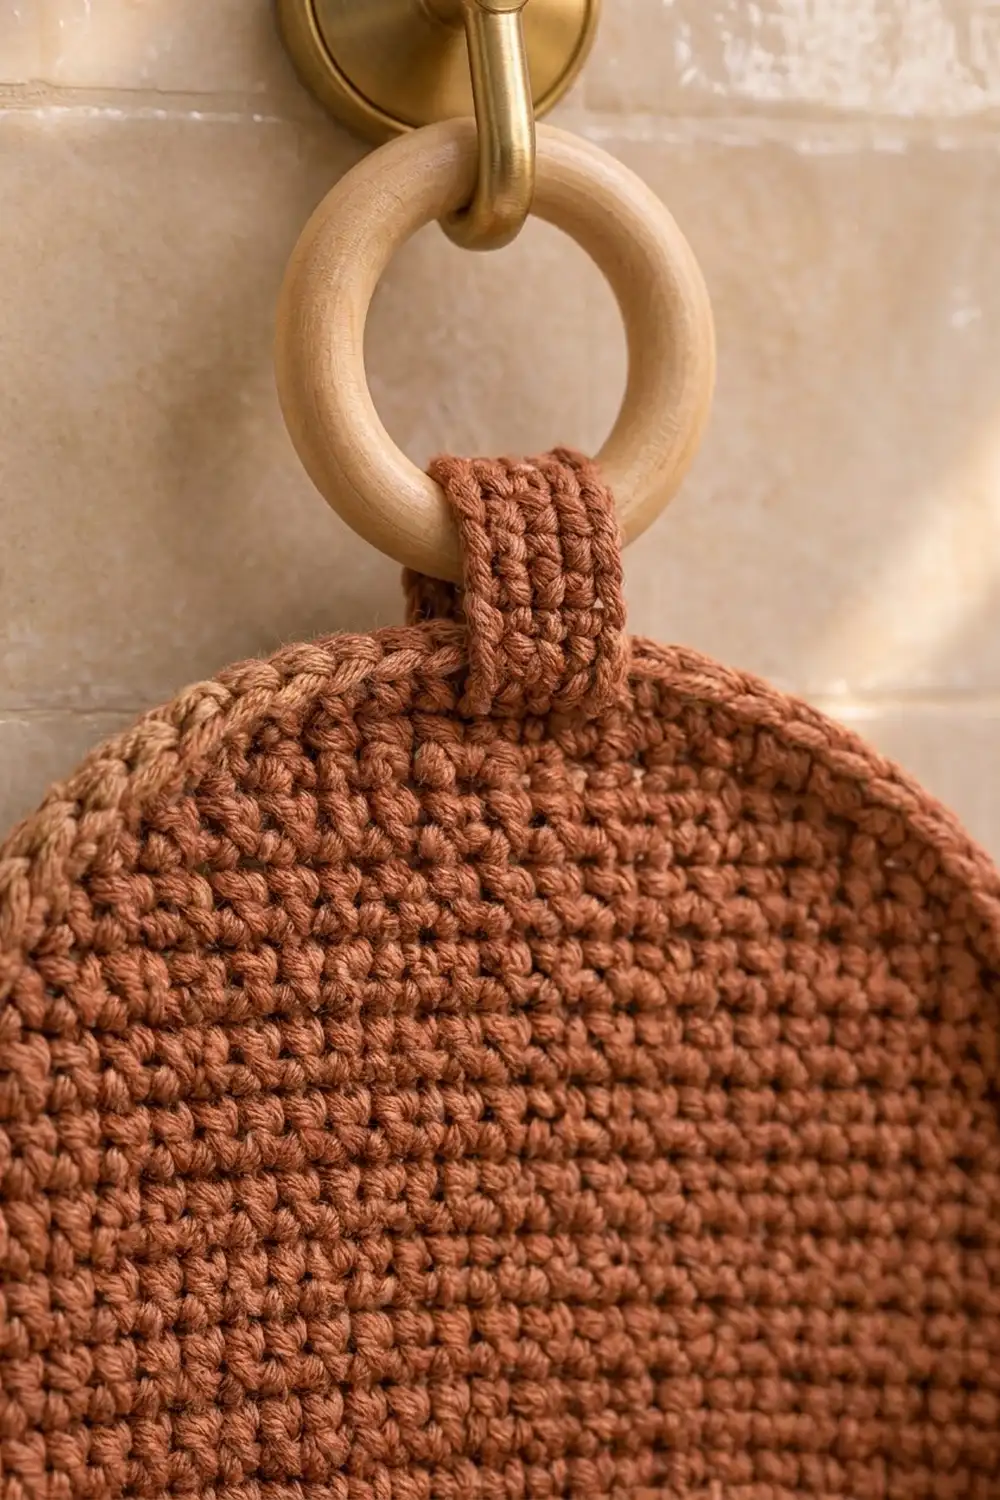
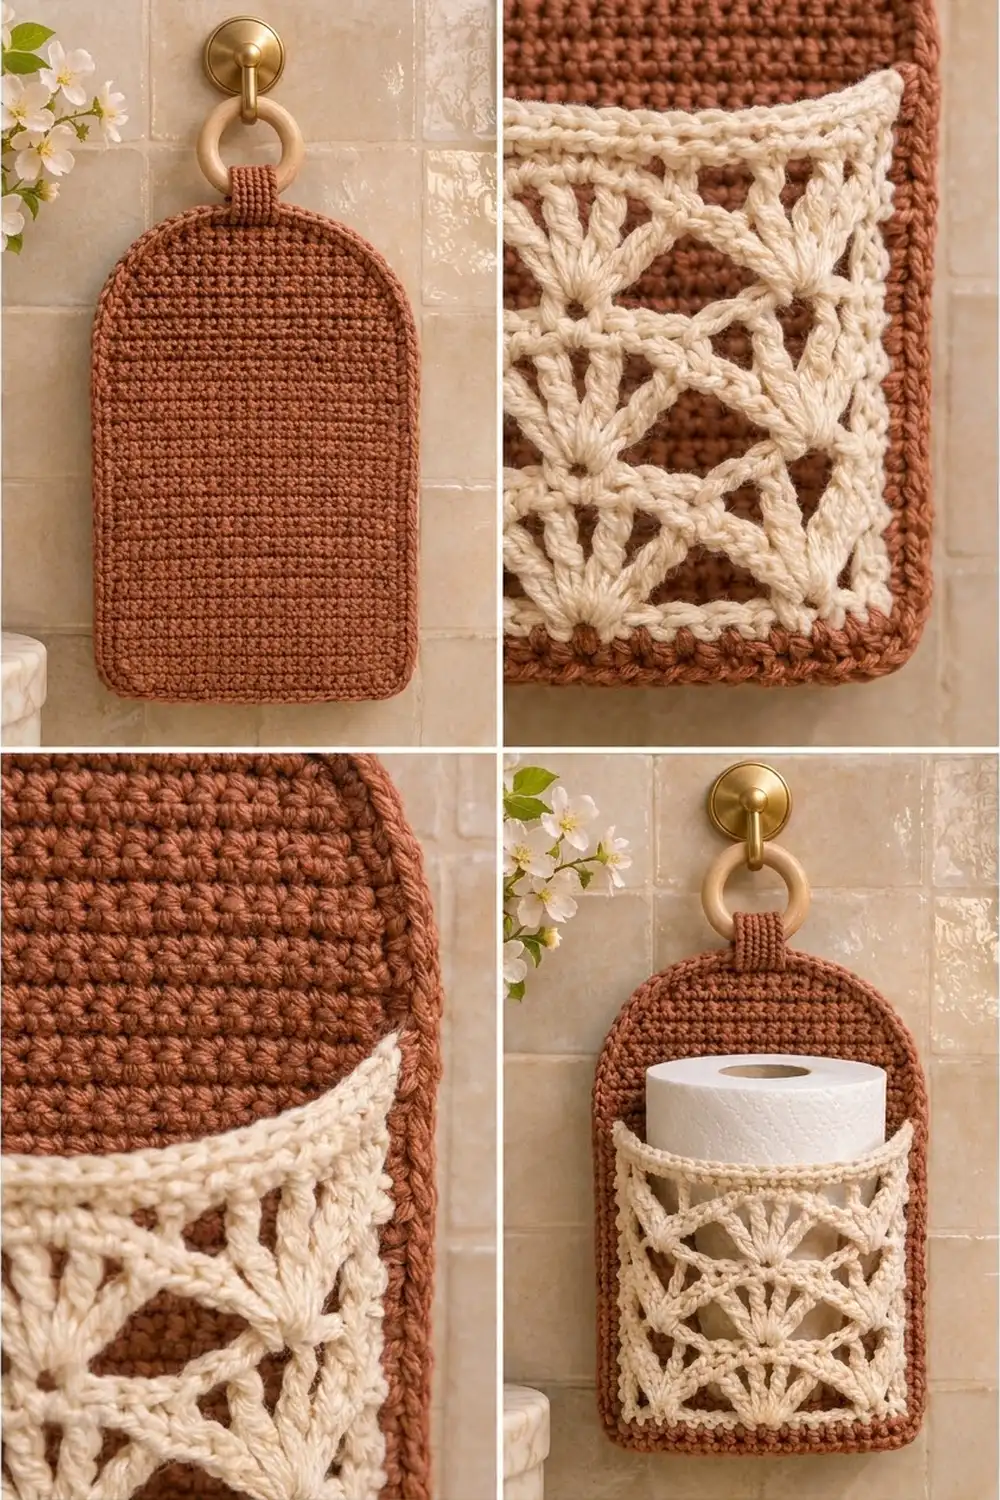
This hanging toilet paper holder has a solid terracotta back panel with a softly arched top. On the front is a cream lace pocket where tall treble fans sit between chain arches, so the lace reads as a diamond lattice. A narrow tab at the top loops around a wooden ring, so the holder can hang from any wall hook.
There are two colors: warm rust/terracotta for the back panel and tab, and natural cream for the lace pocket and its border. The look is calm and boho, and it works well with warm tiles, brass fittings and natural wood. This pattern uses US crochet terms throughout.
The finished holder measures 8.75 in wide x 10.5 in tall (22.2 x 26.7 cm), not counting the tab. It is about 12 in (30.5 cm) tall to the top of the tab loop.
You’ll make two pieces:
– Back panel: worked bottom-up in single crochet rows, shaped into an arch, then edged. A tab is worked from the center top.
– Pocket: a flat lace rectangle with a single crochet border. It is wider than the back, so it bows forward once you sew its sides and bottom onto the panel.
Finished Size and Construction
- Finished size: 8.75 x 10.5 in (22.2 x 26.7 cm), plus tab
- Skill level: Intermediate
- Terminology: US
- Yarn weight: Worsted (CYC 4), cotton
- Hook: 5.0 mm (H-8)
- Number of pieces: 2 crocheted pieces (back panel with tab, and lace pocket) plus 1 wooden ring
- Layout: the pocket is sewn to the lower front of the back panel, with its top edge left open
- Back panel before edging: 8.25 x 10 in (21.0 x 25.4 cm)
- Pocket before border: 12.25 x 7 in (31.1 x 17.8 cm)
- Pocket after border: 12.75 x 7.5 in (32.4 x 19.1 cm)
- Border/edging depth: 0.25 in (0.6 cm), one round on each piece
Materials
Use 100% cotton or a cotton blend in worsted weight. Cotton holds its shape on a wall, keeps the lace crisp and handles bathroom humidity well. Avoid splitty yarn, because the fans need clean treble stitches.
- Rust/terracotta: 60 g (115 m) for the back panel, edging, tab and seams
- Cream: 40 g (75 m) for the lace pocket and border
These quantities include a margin of about 25% for swatching and seaming.
Tools:
– 5.0 mm (H-8) crochet hook
– Wooden ring, 2.5 in (6.4 cm) outer diameter
– Tapestry needle
– Locking stitch markers
– Rust-proof pins
– Blocking mat and spray bottle
– Tape measure
Abbreviations (US Terms)
- ch – chain
- sc – single crochet
- tr – treble crochet
- sc2tog – single crochet 2 together
- sc3tog – single crochet 3 together
- sl st – slip stitch
- sk – skip
- sp – space
- st(s) – stitch(es)
- RS / WS – right side / wrong side
Fan: (tr, ch 1) 6 times, then tr, all in the same stitch. This makes 7 tr and 6 ch-1 sps.
Half fan: 4 tr with ch 1 between each, all in one stitch at the edge of a row. The exact wording is given in Row 4.
Gauge and Checkpoints
Single crochet gauge: 16 sc x 18 rows = 4 x 4 in (10.2 x 10.2 cm).
Lace gauge: one 12-st repeat = 3 in (7.6 cm) wide. Rows 2–5 = 3.25 in (8.3 cm) tall.
Make the pocket first and use it as your test piece. Row 1 is plain single crochet, so you can check your width within minutes.
Checkpoints:
– Pocket Row 1: 12.25 in (31.1 cm) wide
– Pocket after Row 5: 3.5 in (8.9 cm) tall
– Pocket after Row 9: 6.75 in (17.1 cm) tall
– Pocket after Row 10: 7 in (17.8 cm) tall
– Back after Row 36: 8.25 in (21.0 cm) wide and 8 in (20.3 cm) tall
– Back after Row 45: 10 in (25.4 cm) tall
If your piece comes out too big, go down 0.5 mm in hook size. If it’s too small, go up 0.5 mm.
Lace Pocket
Use cream. The lace is worked over a multiple of 12 + 1 sts.
Row 1 (WS): Ch 50, sc in 2nd ch from hook and in each ch across, turn. (49 sc)
Row 2 (RS, fan row): Ch 1, sc in first st, *sk 5 sts, Fan in next st, sk 5 sts, sc in next st; repeat from * 3 more times, turn. (4 fans, 5 sc)
Row 3 (arch row): Ch 9 (counts as tr and ch 5), sc in center (4th) tr of first fan, *ch 5, tr in next sc, ch 5, sc in center tr of next fan; repeat from * 2 more times, ch 5, tr in last sc, turn. (5 tr, 4 sc, 8 ch-5 sps = 49 sts)
Row 4 (fan row): Ch 4 (counts as tr), (ch 1, tr) 3 times in first tr [half fan], *sk ch-5 sp, sc in next sc, sk ch-5 sp, Fan in next tr; repeat from * 2 more times, sk ch-5 sp, sc in next sc, sk ch-5 sp, (tr, ch 1) 3 times in 4th ch of turning ch-9, tr in same ch [half fan], turn. (2 half fans, 3 fans, 4 sc)
Row 5 (arch row): Ch 1, sc in first tr, *ch 5, tr in next sc, ch 5, sc in center tr of next fan; repeat from * 2 more times, ch 5, tr in next sc, ch 5, sc in top of turning ch-4, turn. (5 sc, 4 tr, 8 ch-5 sps = 49 sts)
Checkpoint: the piece should measure 3.5 in (8.9 cm) tall.
Row 6: Ch 1, sc in first sc, *sk ch-5 sp, Fan in next tr, sk ch-5 sp, sc in next sc; repeat from * 3 more times, turn. (4 fans, 5 sc)
Rows 7–9: Work as Rows 3–5.
The fans now sit in staggered tiers, and the ch-5 arches between them form the diamond lattice. Checkpoint: 6.75 in (17.1 cm) tall.
Row 10 (RS, leveling row): Ch 1, sc in first sc, *5 sc in ch-5 sp, sc in tr, 5 sc in ch-5 sp, sc in sc; repeat from * 3 more times. (49 sc) Fasten off.
Row 10 is a conversion row. Its count is 9 sc (1 in each existing sc and tr) + 40 sc (5 in each of the 8 ch-5 sps) = 49 sc. This gives the pocket opening a straight, firm top edge.
Back Panel
Use rust. The panel is worked in rows from the bottom up.
Row 1 (RS): Ch 34, sc in 2nd ch from hook and in each ch across, turn. (33 sc)
Rows 2–36: Ch 1, sc in each st across, turn. (33 sc)
Checkpoint: 8.25 in (21.0 cm) wide and 8 in (20.3 cm) tall.
Arch shaping:
– Row 37: Ch 1, sc2tog, sc in next 29 sts, sc2tog, turn. (31 sc)
– Row 38: Ch 1, sc in each st, turn. (31 sc)
– Row 39: Ch 1, sc2tog, sc in next 27 sts, sc2tog, turn. (29 sc)
– Row 40: Ch 1, sc in each st, turn. (29 sc)
– Row 41: Ch 1, sc2tog, sc in next 25 sts, sc2tog, turn. (27 sc)
– Row 42: Ch 1, sc2tog, sc in next 23 sts, sc2tog, turn. (25 sc)
– Row 43: Ch 1, sc2tog, sc in next 21 sts, sc2tog, turn. (23 sc)
– Row 44: Ch 1, sc3tog, sc in next 17 sts, sc3tog, turn. (19 sc)
– Row 45: Ch 1, sc3tog, sc in next 13 sts, sc3tog. (15 sc) Fasten off.
The decreases start slowly and then speed up, so the top gets rounded shoulders instead of a point. The flat top is 15 sts, which is 3.75 in (9.5 cm). Checkpoint: the panel measures 10 in (25.4 cm) tall.
Work the back edging (see Border) before you make the tab.
Hanging Tab
With RS facing, skip the first 5 of the 15 top edging sc and join rust in the 6th st.
Row 1: Ch 1, sc in same st and in next 4 sts, turn. (5 sc)
Rows 2–18: Ch 1, sc in each st, turn. (5 sc)
The tab is 1.25 in (3.2 cm) wide and 4 in (10.2 cm) long. Fasten off, leaving a 10 in (25.4 cm) tail. Pass the tab over the wooden ring from front to back. Sew the last row flat across the WS of the panel, 0.75 in (1.9 cm) below the top edge.
Make All Pieces
- Rust: 1 back panel with edging and tab
- Cream: 1 lace pocket with border
- Hardware: 1 wooden ring
Layout, seen from the front:
        [ ring ]
        [ tab  ]
 [ rust back, upper 3 in / 7.6 cm   ]
 [ cream lace pocket, lower 7.5 in  ]
 [ sides + bottom sewn, top open    ]
Border
Border gauge: 4 sc = 1 in (2.5 cm) along every edge, the same as the body sc gauge.
Pocket Border (cream)
Rnd 1: With RS facing, join cream in the first st of Row 10.
- Top: Ch 1, sc in same st, sc in next 47 sts, (sc, ch 1, sc) in last st. (49 sc on the top edge)
- First side: Sc in row-end of Row 10, 3 sc around the post of the end tr of each of Rows 9–2 (24 sc), sc in row-end of Row 1, (sc, ch 1, sc) in first foundation loop. (28 sc on this side, counting the 2 corner sc)
- Bottom: Sc in each of next 47 foundation loops, (sc, ch 1, sc) in last loop. (49 sc on the bottom edge)
- Second side: Work as the first side. End with sc in the same st as the first sc of the round, ch 1, and join with sl st to the first sc. (28 sc) Fasten off.
Total: 49 + 28 + 49 + 28 = 154 sc, plus 4 ch-1 corner sps.
Why the math works: 49 sc at 4 sc/in = 12.25 in, which matches Row 10. Each side has 28 sc at 4 sc/in = 7 in, which matches the body height. Each corner sc counts only toward the side it begins or ends, so no corner is counted twice.
Back Edging (rust)
Rnd 1: With RS facing, join rust in the first foundation loop at the bottom right.
- Bottom: Ch 1, sc in same loop, sc in next 31 loops, sc in last loop. (33 sc)
- Corner: Ch 1, sc in same loop. (This corner sc is the first sc of the side.)
- First side: 1 sc in each row-end of Rows 1–36, skipping the row-ends of Rows 9, 18, 27 and 36 (32 sc). Then 1 sc in each row-end of Rows 37–43 (7 sc) and 2 sc in each row-end of Rows 44–45 (4 sc). (1 + 32 + 7 + 4 = 44 sc)
- Top: Sc in each of the 15 sts. (15 sc)
- Second side: Mirror the first side (44 sc). The last of these is a corner sc in the same foundation loop as the first sc of the round. Ch 1, join with sl st to the first sc. Fasten off.
Total: 33 + 44 + 15 + 44 = 136 sc, plus 2 ch-1 corner sps.
Why the math works: Skipping 4 of the 36 straight row-ends leaves 32 sc over 8 in (20.3 cm), which is exactly 4 sc/in. The extra sc on the curve fill in the stepped sc3tog edges. The edged back measures 8.75 x 10.5 in (22.2 x 26.7 cm).
Joining
Cut a 40 in (101.6 cm) length of rust yarn. Place the pocket on the front of the back panel, RS out. Match the pocket’s bottom ch-1 corners to the back’s bottom ch-1 corners and pin.
Sides: Whipstitch the 28 pocket side sc to the first 28 back side sc (the corner sc + 27), 1-to-1, through both loops of both pieces. Repeat on the other side.
Bottom: Sew the first pocket sc to the first back sc (1-to-1). Then repeat 16 times: 3 pocket sts to 2 back sts. That joins 1 + 48 = 49 pocket sts to 1 + 32 = 33 back sts and spreads the extra width evenly.
Leave the top of the pocket open. Because 12.25 in (31.1 cm) of lace spans 8.25 in (21.0 cm) between the side seams, the pocket bows forward about 3.5–4 in (8.9–10.2 cm), which is enough room for a roll.
Tension: Pull each stitch just snug, so the rust fabric doesn’t pucker. The rust yarn blends into the back panel.
Checkpoint: The pocket’s top corners sit 7.5 in (19.1 cm) above the bottom edge, with 3 in (7.6 cm) of solid rust showing above them.
Final Blocking
- Spray the holder with water until it’s damp but not soaked.
- Lay it face up and pin the back panel to 8.75 x 10.5 in (22.2 x 26.7 cm).
- Smooth the arch into an even curve with your fingers.
- Fill the pocket with a rolled towel about 4.5 in (11.4 cm) across.
- Pin each fan so its 7 trebles spread evenly and the arches lie straight.
- Let it dry completely, then remove the pins and the towel.
Final Quality-Control Checklist
- [ ] Back: 33 sc wide, 45 rows, 15 sts across the top
- [ ] Back edging: 136 sc, with 44 sc on each side
- [ ] Pocket: staggered fan tiers and a straight Row 10
- [ ] Pocket border: 49 / 28 / 49 / 28 sc
- [ ] Side seams joined 1-to-1, bottom seam joined 3-to-2
- [ ] Tab centered, ring secure, all ends woven in
- [ ] Holder hangs straight and holds a roll
Troubleshooting
Fans lean or look uneven: Skip exactly 5 sts on each side of every fan in Row 2. In Rows 4 and 6, skip the whole ch-5 sp.
Pocket top ripples: Row 10 has extra sc. Work exactly 5 sc in each ch-5 sp.
Back edges wave: Skip one more row-end per section, or work the edging with a hook one size smaller.
Roll doesn’t fit: Your lace is too narrow. Go up 0.5 mm in hook size for the pocket only.
Tab twists: Sew the last tab row flat and square to the panel.
Care
Hand wash in cool water with mild soap. Press out the water in a towel, then dry flat with a rolled towel in the pocket to keep its shape.
Final Notes
Here is how the measurements build on each other:
– Pocket: 49 sc make 12.25 in (31.1 cm) of lace, and ten rows reach 7 in (17.8 cm). The border brings it to 12.75 x 7.5 in (32.4 x 19.1 cm).
– Back: 33 sc and 45 rows make 8.25 x 10 in (21.0 x 25.4 cm). The edging brings it to 8.75 x 10.5 in (22.2 x 26.7 cm).
– Seams: The 1-to-1 side seams and the 3-to-2 bottom seam turn the extra lace width into a roomy pocket.
Check gauge first and count at every checkpoint.
Happy crocheting!